Setting up a Synology NAS is a one evening job for most people: you find the NAS on your network in a browser, let it install DSM, create a storage pool and a volume, and then spend the rest of the time on the settings that actually protect your data. This guide covers that entire Synology NAS setup process on DSM 7.4, the current release as of September 2026. It’s the same order I run when a brand new unit comes out of the box.
Not everything in this tutorial is mandatory, but it’s a good starting point where you can pick and choose what you’d like to implement. If you’d like to see the whole Synology NAS initial setup process done on real hardware, my full video walkthrough below covers it, recorded on DSM 7.2 where the flow is the same.
Disclosure: Some links below are affiliate links, which means that I earn a percentage of each sale at no cost to you. Thank you for your support.
Synology NAS Getting Started: What You Need First
A Synology NAS ships as an empty enclosure, so the first requirement is drives. Synology’s prerequisites are at least one compatible 3.5″ or 2.5″ drive installed, the NAS powered on, and your computer on the same local network with internet access. The M.2 slots on the models that have them can’t be used to install DSM, since they only serve as SSD cache or a separate volume, so the operating system always lands on the drives in the bays.
- The NAS itself, with at least one compatible drive installed.
- A computer on the same network, using Chrome or Firefox (the two browsers Synology suggests).
Slide the drives into the trays and into the bays, run the network cable from the NAS to your router or switch, connect power and press the power button. Give it a minute to boot before you go looking for it. The drive tray steps for your exact chassis are in your model’s Product Manual, under Documents in Synology’s Download Center.
The unit I set up on camera for my own walkthrough was a DS923+ with two 4 TB drives and two NVMe drives in it. The current version of that model is the Synology DS925+, which is the one I have here for testing. My guide on which Synology NAS to buy covers the rest of the lineup.
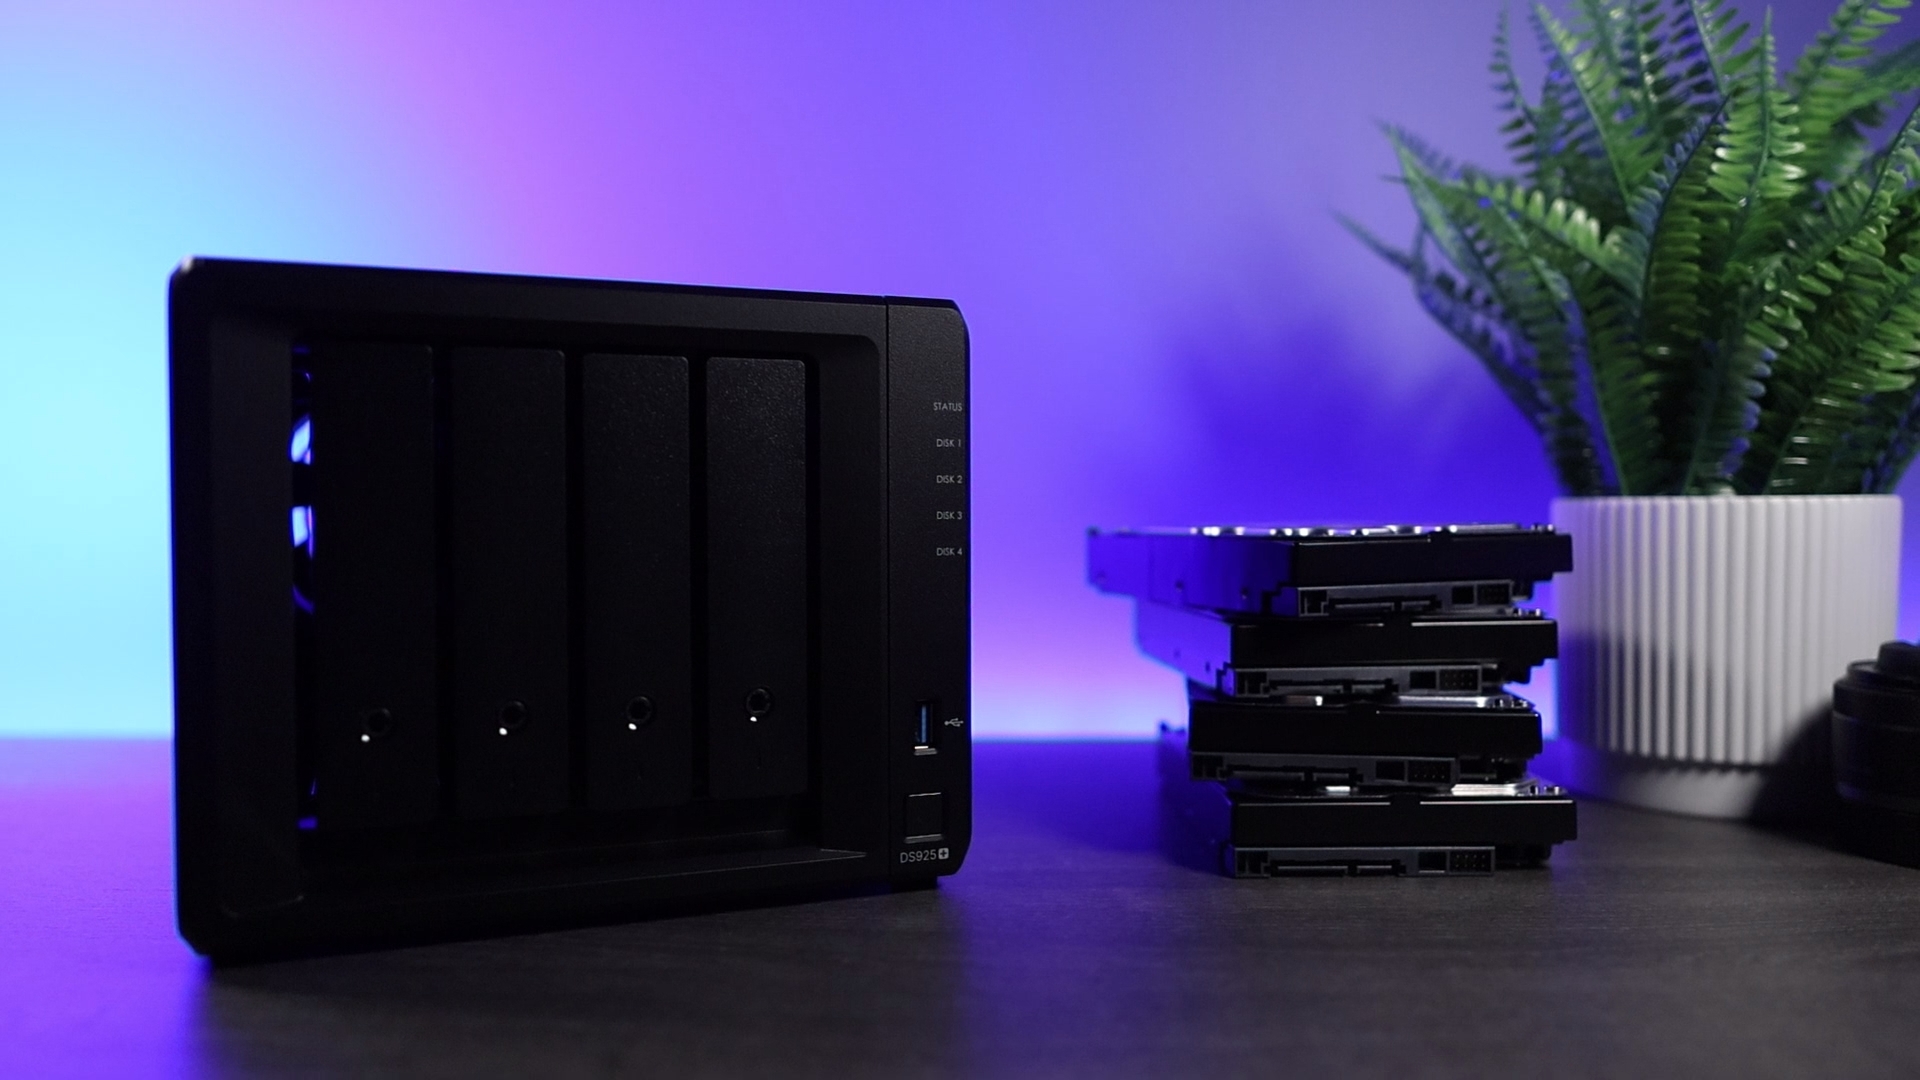
Drive compatibility is the one part of this that genuinely changed for a 2026 buyer. The DS925+ and Synology’s other 2025 DiskStation Plus, Value and J models shipped with hard drive restrictions, meaning you had to use Synology’s own drives, and that rightfully pushed a lot of people away. Since DSM 7.3 you can use whatever hard drives you want, which I covered in August 2026 when I compared Synology and UGREEN. The restrictions aren’t gone entirely though. DSM 7.4’s Storage Efficiency feature requires Synology hard drives, and there were still SSD restrictions in August 2026, so check the drives you’re buying against Synology’s compatibility list first.
Synology DSM: What It Is and Which Version to Run
DSM (DiskStation Manager) is the operating system that runs on every Synology NAS. It’s a full desktop you use inside a browser rather than a settings page with a few checkboxes on it. Control Panel holds the system settings, File Station browses your files, Storage Manager handles the drives, and Package Center installs everything else.
The version you should be running is the DSM 7.4 series. DSM 7.4 was released on June 16, 2026, and the newest build as of this update (September 2026) is 7.4.1. A new NAS downloads and installs whatever the current 7.4 build is while you’re setting it up, and it updates itself afterwards, so there’s no reason to chase a specific build number.
DSM 7.4 added Storage Efficiency (post-process deduplication and compression for hard drive volumes) and a built-in AI advisor called DSM Agent. None of it changes how a new NAS is set up.
Package Center and the Applications Worth Installing
Just about everything a Synology is known for is a package you install after setup, from Package Center. Synology Drive Server was my favorite Synology package when I ran one, Synology Photos handles phone photo backups and long ago replaced Photo Station and Moments, Active Backup for Business backs up Windows and Linux machines, and Container Manager, the package Synology called Docker before DSM 7.2, runs containers. Plex and Emby are there for media, Jellyfin runs as a container in Container Manager, and Home Assistant runs in Virtual Machine Manager.
My advice is to get the NAS configured first and install packages one at a time afterwards. Each one tends to want a firewall rule, a shared folder and a permissions decision, and doing six at once is how people lose track of what they opened.
How to Find Your Synology NAS: Default IP and Port
There is no Synology default IP address to type into a browser. The NAS asks your router for an address over DHCP when it boots, so it’s different on every network. Synology’s Web Assistant exists to find it for you.
1. Open a browser on a computer on the same local network and go to http://find.synology.com. It redirects to finds.synology.com, which is the Web Assistant page, and your DiskStation should appear within a few seconds with a status of Not installed.
2. Select Connect to start the DSM installation and setup process.
If the browser search comes up empty, go to http://synologynas:5000 directly (http://synologynas.local:5000 on a Mac). 5000 is the default DSM HTTP port and 5001 is the default HTTPS port. If the browser route still fails, Synology Assistant is the desktop alternative, and Synology’s 2025 hardware installation guide recommends it for a local setup. Open Synology’s Download Center, pick your model, download Synology Assistant under Desktop Utilities, then install it, select Search, pick your NAS and select Connect. If the NAS is still nowhere to be seen, I have a longer guide on how to find a Synology NAS on your network.
How to Set Up a Synology NAS and Install DSM
With the NAS found, the install itself is mostly waiting. The browser downloads DSM for you now, and the manual file download is the offline fallback rather than the normal path.
1. Accept the End User License Agreement and the privacy statement, then select Install.
2. Choose Automatically download and install the latest DSM version from Synology website, which is what I’d recommend, since it pulls the current build rather than whatever shipped in the box.
3. If the NAS has no internet access, use Manually upload a .pat file from your computer instead. Download it first on your computer from Synology’s Download Center, under the Operating System tab for your exact model, with the current DSM series preselected, then browse to that file here.
4. Tick I understand that all data on these drives will be deleted and select Continue.
5. DSM installs and the NAS reboots. After a few minutes, go back to http://find.synology.com and connect to the DiskStation again.
Once the install finishes, DSM opens a short setup wizard. Synology changes these screens from release to release, so take the order here as the shape of it rather than a script. You create the administrator account and name the device, choose how DSM handles updates, and decide whether to sign in to a Synology Account. Everything it sets can be changed later in Control Panel.
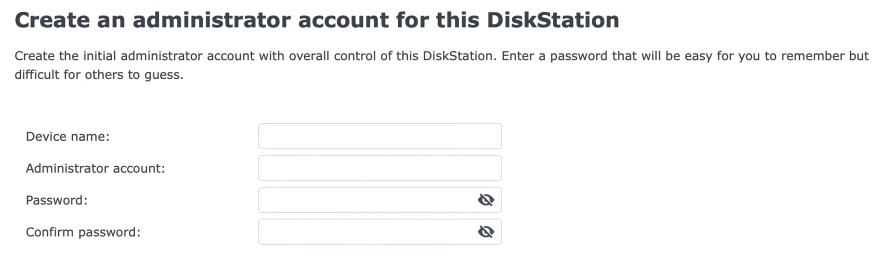
That was the whole flow when I last set one up on DSM 7.2.
There’s no default Synology username or password. DSM has you create the administrator account here, so give the device a server name you’ll recognize and treat that account as a real account rather than a formality, because the built-in admin name is the one every bot on the internet tries first. Use a different username with a long password, and turn on two-factor authentication for it once you’re in.
A Synology Account is optional and you can add it later from Control Panel > Synology Account. It’s what QuickConnect, DDNS, automatic backups of your DSM configuration and Active Insight all hang off. Skipping it now costs you nothing you can’t switch on afterwards, and the same goes for Device Analytics in Control Panel > Info Center > Device Analytics.
Hard Drive, Storage Pool, and Volume Setup
DSM prompts you to create a storage pool and a volume as soon as you log in for the first time. If it doesn’t, open Storage Manager, select Storage and select Create Now (on a NAS that already has a pool it’s Create > Create Storage Pool). A storage pool is the group of drives and the RAID type that protects them, and a volume is the formatted space you put folders on.
1. The wizard opens on a summary screen. Select Start.
2. Give the storage pool a description if you’d like, then pick the RAID type. SHR is what I’d use on a home NAS, since it tolerates one drive failing and lets you mix drive sizes, and RAID 1 is the two drive equivalent on models without SHR. DSM can convert a pool later if you add drives (Basic to RAID 1 or 5, RAID 1 to RAID 5, SHR-1 to SHR-2), but not back down and not between SHR and a standard RAID type, so choose carefully. Select Next.
3. Select the drives (generally all of them) you’d like in this storage pool and select Next.
4. You’ll be prompted that all data on the drives will be erased. Select Continue.
5. Choose Perform drive check or Skip drive check. The check takes hours on large drives, but it’s worth it on a brand new NAS. Select Next.
6. Set how much of the pool this volume gets. Most people use all of it, so select Max, then Next.
7. Choose Btrfs as the file system and select Next. A volume can’t be converted to another file system later, and snapshots, shared folder quotas and data checksums all need Btrfs.
8. The next screen offers volume encryption. Select Next to skip it.
9. Confirm the settings and select Apply, and the storage pool and volume are created.
Data scrubbing needs a Btrfs volume or a parity pool. On a two drive SHR or RAID 1 pool it catches a bad checksum and repairs the file from the other drive, and only the parity check needs SHR with three or more drives, RAID 5, RAID 6 or RAID F1.
Setting Up a Data Scrubbing Schedule
Data scrubbing inspects your volumes and, where the RAID type allows it, repairs the inconsistencies it finds, which in practice means it protects you against bit rot. I generally run it every quarter, with twice a year as the minimum I’d accept on a NAS holding anything I care about.
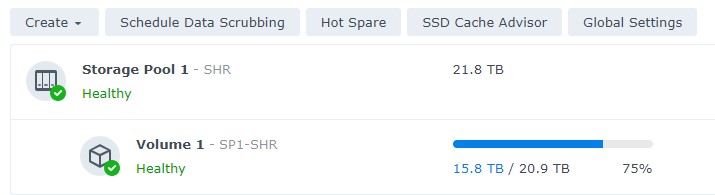
1. Open Storage Manager and go to the Storage page. Select the Schedule Data Scrubbing button.
2. Tick Enable data scrubbing schedule, then select and prioritize the storage pools you want scrubbed.
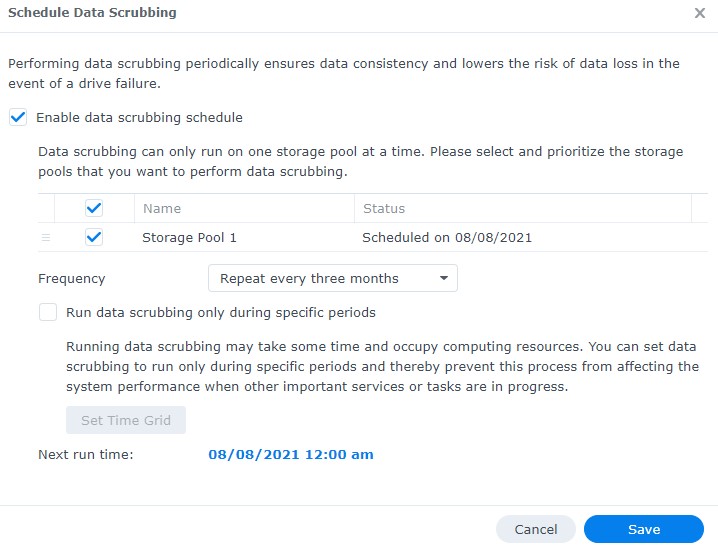
3. Set Frequency, then tick Run data scrubbing only during specific periods to enable Set Time Grid and pick a window, ideally one where nobody is using the NAS.
4. Select Save.
Once it’s saved, Storage Manager’s Overview page lists the task and its next run time under Task Schedule. Scrubbing can’t check or repair a shared folder’s data unless Enable data checksum for advanced data integrity is ticked on it. I have a separate tutorial on data scrubbing if you’d like more detail.
Synology NAS Configuration: The Settings to Change First
With storage created, the Synology NAS configuration work starts, and this is the section I’d read even if you skip everything else. That means a static IP, shared folders, snapshots, the recycle bin, a UPS and notifications, and they decide whether a bad day costs you an afternoon or costs you your files.
Set a Static IP Address
The better way is a DHCP reservation in your router, since the NAS keeps asking and the router keeps handing it the same address. Plenty of ISP supplied routers won’t let you do that, and if yours won’t, set the address in DSM instead.
1. Go to Control Panel > Network > Network Interface and select Edit on the LAN device.
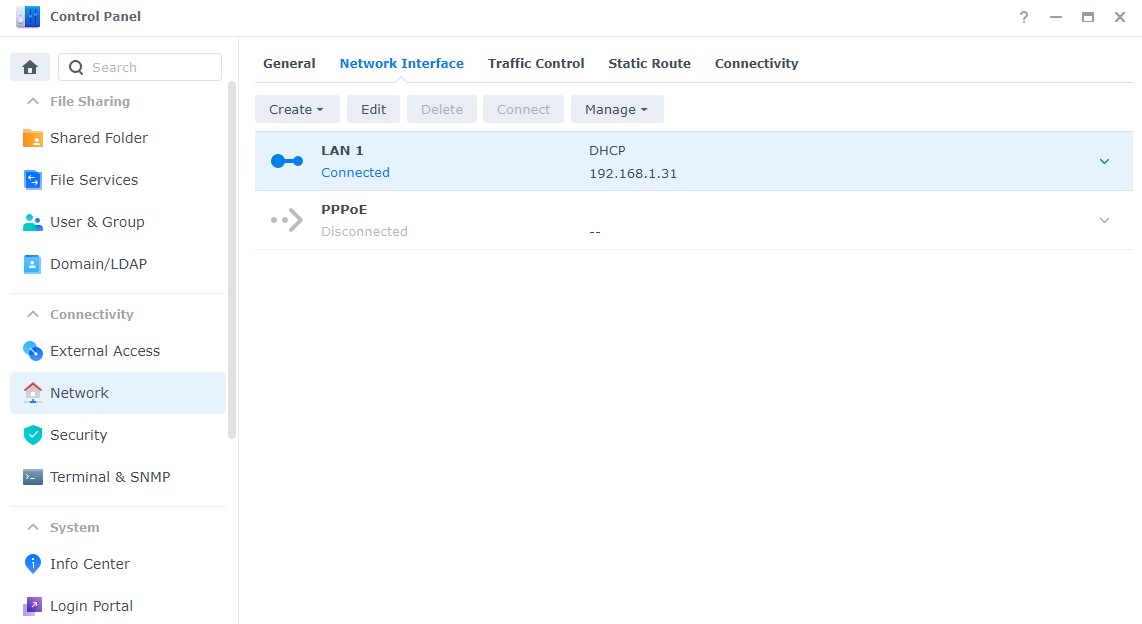
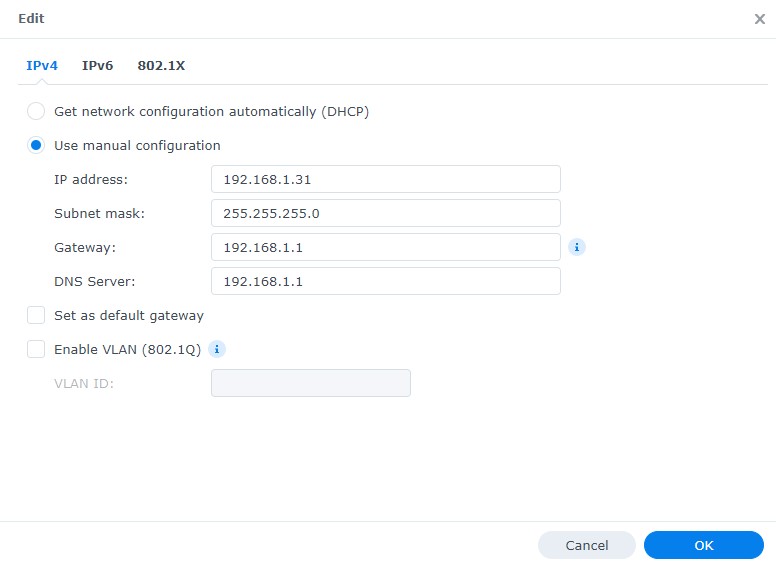
2. On the IPv4 tab, select Use manual configuration and enter an address on your network that’s outside the range your router hands out over DHCP. The subnet mask, gateway and DNS server can all stay as they are. Select OK, and your DSM session will refresh on the new address. If the tab hangs, browse to the new address yourself. If the NAS answers at neither address, the RESET button on the back resets the network and the admin account to their defaults.
A lot of Synology models have more than one ethernet port, so if you’ve plugged in more than one cable, each LAN interface needs its own static IP address.
Shared folders are the backbone of a NAS and they’re what everything else points at. I’d generally create one per category of data (documents, photos, backups, media), because permissions, snapshots and backup tasks are all set per folder.
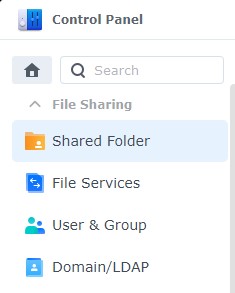
1. Open Control Panel and select Shared Folder.
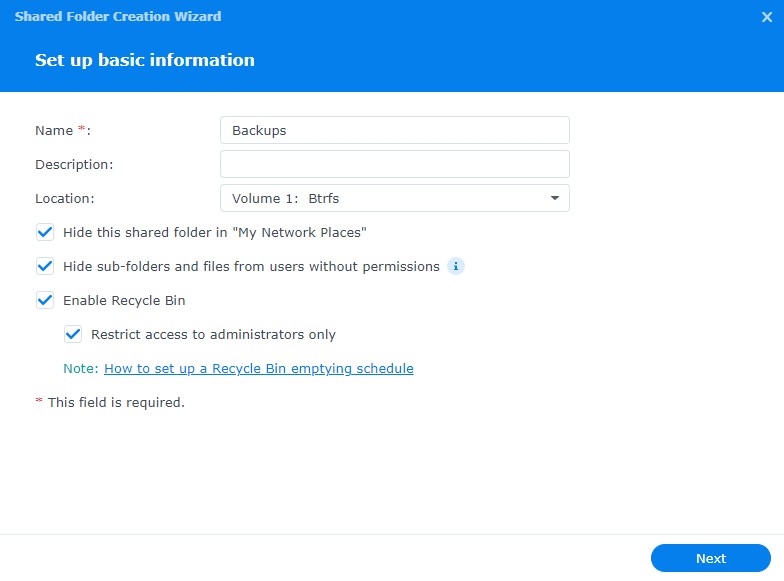
2. Select Create, then Create Shared Folder. Give it a Name and a Description, choose the volume under Location, and decide on the checkboxes below, including Enable Recycle Bin.
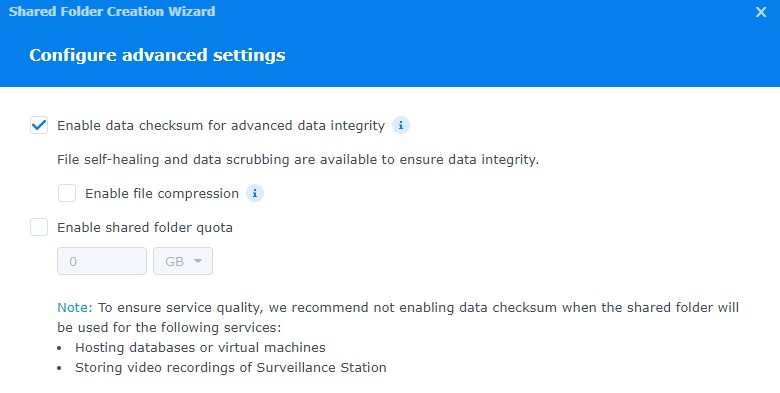
3. The next screen offers Protect this shared folder by encrypting it and Protect this shared folder with WriteOnce. Encryption asks you for a key. If you lose the encryption key your files are gone for good, so store it somewhere safe. WriteOnce locks files against modification or deletion for a retention period you set.
4. Tick Enable data checksum for advanced data integrity, since that’s what data scrubbing depends on and it can only be set here, when the folder is created, and add file compression or a quota if you want them. Select Next.
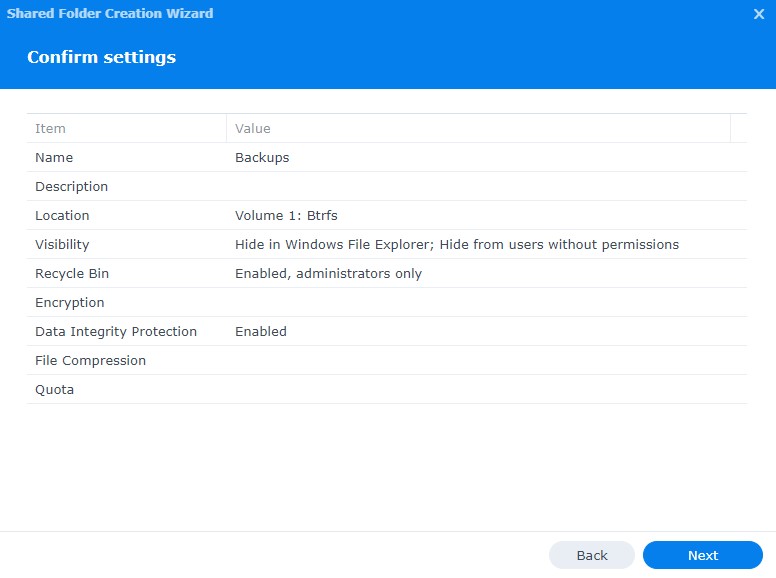
5. Confirm the settings and select Next.
6. You’ll land on the folder’s permissions. Set them to match who should see the folder, and the shared folder is created.
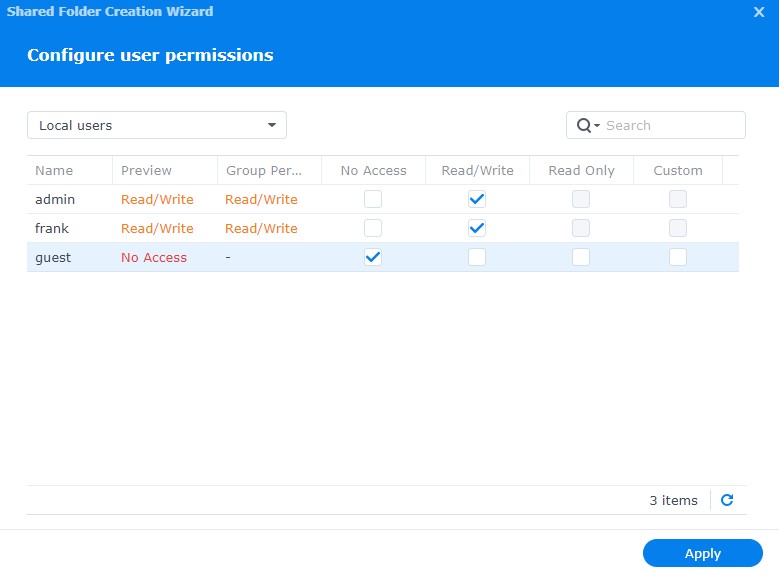
Encrypted folders work by being mounted and unmounted with the key, and while a folder is mounted it behaves like any other shared folder.
Turn On Snapshots
The easiest way to think about snapshots is that they freeze your files in time and let you recover them later, as long as the volume you created is Btrfs. They take up very little space, and they’re the best protection against the thing that actually happens to home users, which is deleting or overwriting a file and noticing three days later.
1. Open Package Center, search for Snapshot, and install Snapshot Replication.
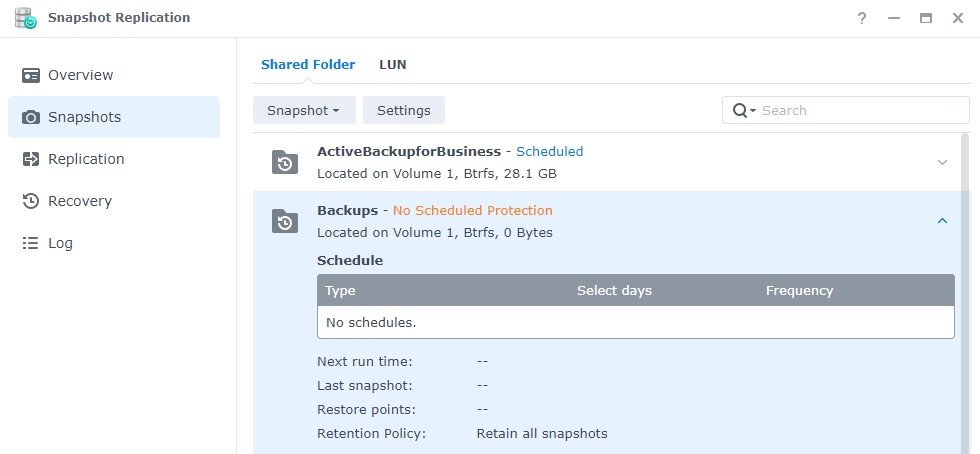
2. Launch Snapshot Replication, select Snapshots, and open the settings on the folder you’d like to protect.
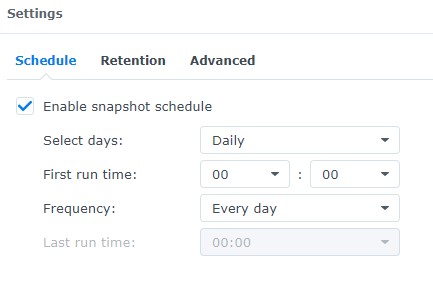
3. Enable the snapshot schedule, then set your Retention (how many snapshots to keep, which will differ per folder depending on how big and how volatile the files are) and under Settings > Advanced, tick Make snapshot visible if you’d like users to browse them, then select OK.
They are not a backup though, because they live on the same drives as the data they protect, which is what the next section is for.
Schedule the Recycle Bin to Empty Itself
The recycle bin holds deleted files until you empty it, and the reason I recommend automating that is most people forget to do it manually.
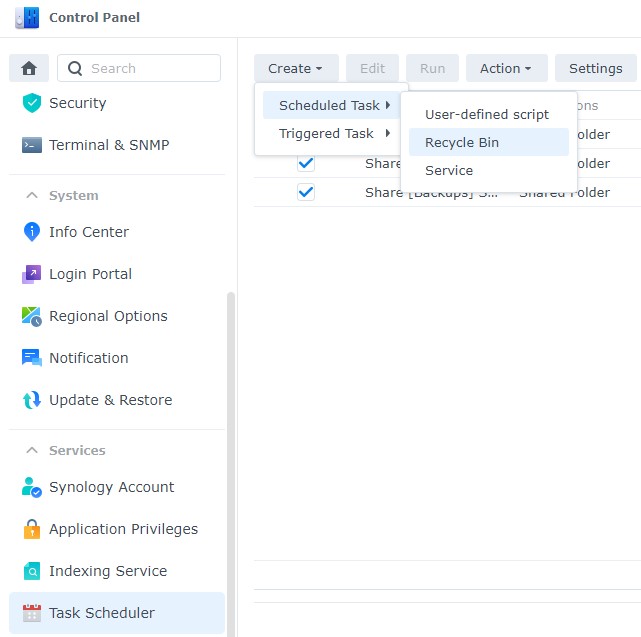
1. Open the Control Panel and select Task Scheduler.
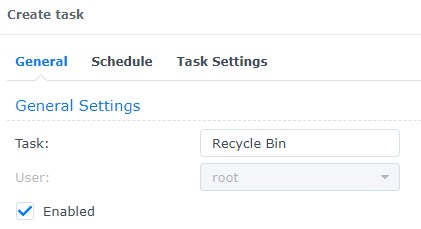
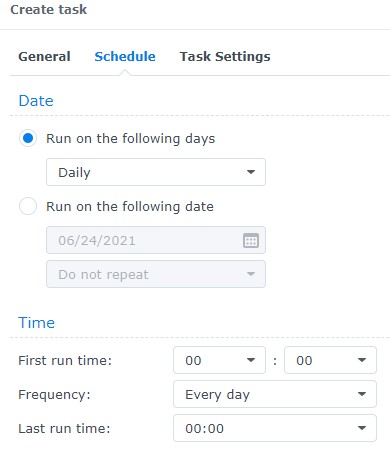
2. Select Create, then Scheduled Task, then Recycle Bin. Name the task, set when it runs, and choose whether every recycle bin is emptied or only specific ones.
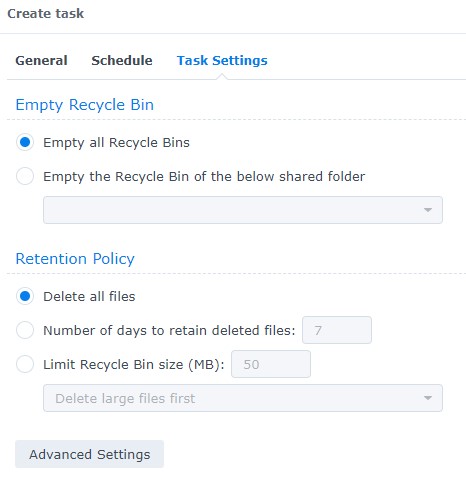
3. Set the retention policy, which is what decides when files are actually deleted. I use 14 days, but that depends on how quickly you’d notice a mistake. Select OK to create the task.
Install Storage Analyzer
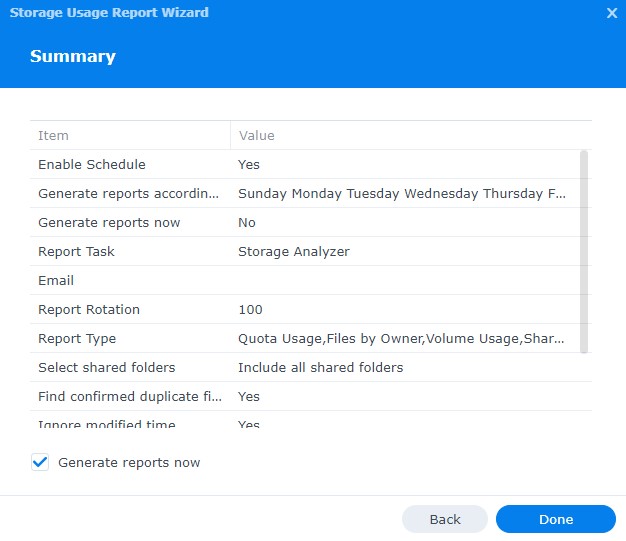
Storage Analyzer shows you which files and folders are taking up space and where the duplicates are.
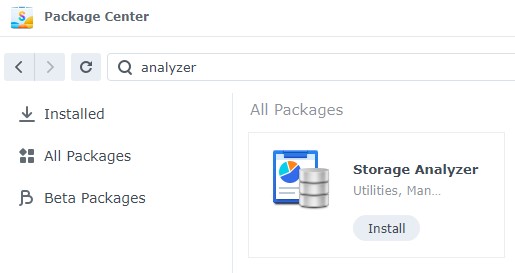
1. Open Package Center, search for Analyzer, and install Storage Analyzer.
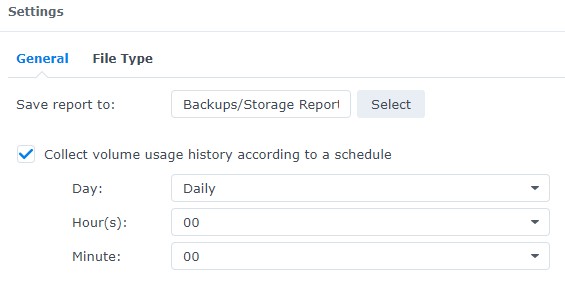
2. Open the package, pick a shared folder for its reports and how often they’re generated, then name the report and decide how many to keep.
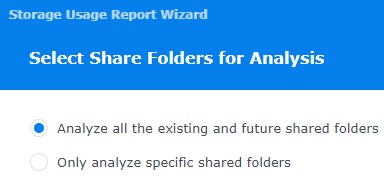
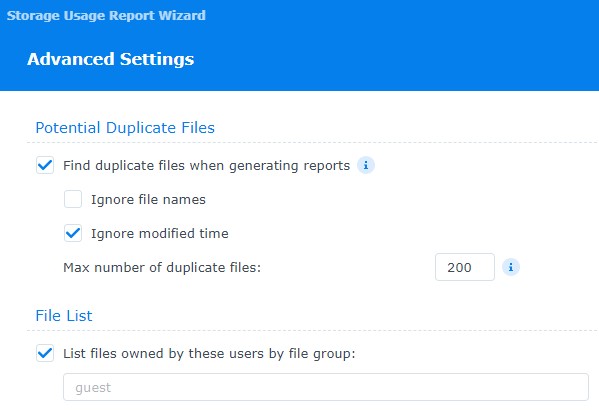
3. Choose whether to analyze all current and future shared folders, set the rules used to find duplicate files, then select Generate reports now and Done.
Add a UPS and Configure It in DSM
If your data is important to you, a UPS is the cheapest security blanket you can buy. It keeps consistent power going to the NAS and, in an outage, tells it to shut down safely instead of losing power mid-write. Here’s my favorite UPS, and if you’d like to spend a little less, here’s another great option that still has USB data transfer so it can shut the NAS down for you. I also have a guide to the best Synology NAS UPS devices.
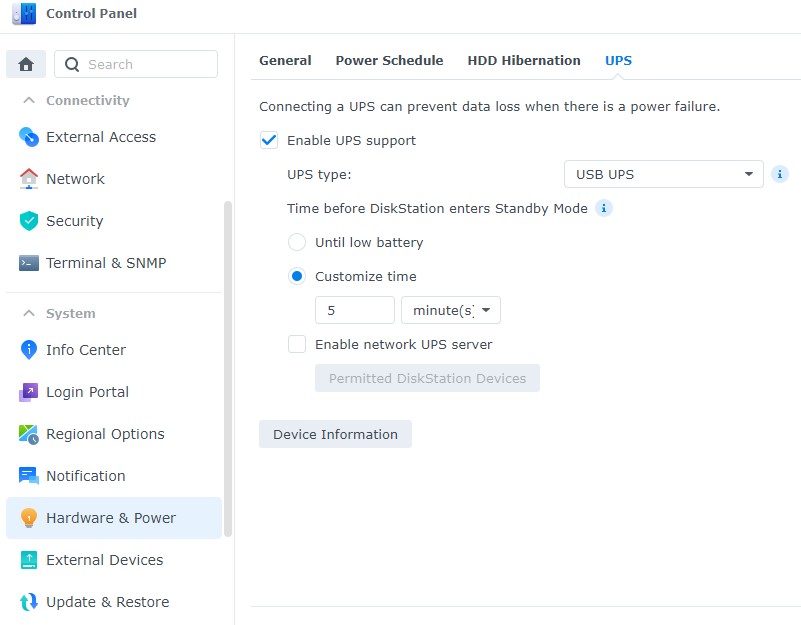
1. Connect the UPS to the NAS over USB, then open Control Panel, select Hardware & Power, and open the UPS tab.
2. Tick Enable UPS support, select the UPS type you own, and set Time before Synology NAS enters Standby Mode, then select Apply.
Set Up Notifications
A failed drive in a RAID array is completely silent from the outside, so set up notifications before you put real data on the NAS.
1. Open Control Panel > Notification > Email.
2. Select Set Up, pick your Service provider and sign in, or enter a custom SMTP server.
3. Add the address that should receive alerts, then select Send Test Email and check that it arrives.
Backing Up Your Synology NAS
RAID is not a backup. A storage pool survives a drive failure, and that is all it does. It will happily replicate a deleted folder, a ransomware run or a lightning strike across every drive in the array. If the data on your NAS is important to you, follow the 3-2-1 rule: three copies of your data, on two storage mediums, with one of them off-site.
Hyper Backup is the package that does this on a Synology, and you install it from Package Center like everything else. It backs up shared folders, packages and system configuration to an external drive, another NAS or a cloud service, on a schedule and with versioning.
Backing Up to an External Drive or a Second NAS
The option most people take is a USB external drive plugged straight into the NAS, which DSM mounts as a USB share and Hyper Backup can write to directly, though a drive in a format DSM doesn’t recognise has to be formatted in Control Panel > External Devices first. The catch is that a drive sitting on top of the NAS is not off-site, since it burns, floods and gets stolen along with the NAS, so treat it as your fast restore copy rather than your only one.
If you have a second Synology, or a friend who will host one, install Hyper Backup Vault from Package Center on the destination NAS first, and it becomes a proper backup target over the network. The same task can point at a Raspberry Pi or another rsync target instead.
Backing Up to Backblaze B2 with Hyper Backup
For the off-site copy, Backblaze B2 is still a working Hyper Backup destination, and it’s what I used back when my data lived on a Synology. You won’t find Backblaze by name in the destination list though, which is where people get stuck.
Do the Backblaze half first: sign up for B2, create a bucket and copy the Endpoint value it shows, then under Application Keys select Add a New Application Key and keep the keyID and applicationKey it returns. The applicationKey is shown once, so copy it now.
1. In Hyper Backup, select +, then Data backup task.
2. Scroll to the Cloud Service group, select S3 Storage, and select Next.
3. Set S3 Server to Custom Server URL, then enter your B2 S3 endpoint in the Server Address field.
4. Set Signature Version to v4, put your B2 keyID in Access Key and your applicationKey in Secret Key, then pick your bucket under Bucket Name and finish the schedule and retention screens.
Backing Up Your Computers to the NAS
The other direction matters just as much. Active Backup for Business handles Windows and Linux machines from one console, does bare metal and file level restores, and installs from Package Center on any x64 model with a Btrfs volume. On the ARM J and Value units it isn’t offered, and Veeam’s free agent or plain rsync cover the same ground.
Accessing Your Synology NAS From Outside Your Network
Once the NAS is set up, this is the thing almost everyone asks about next, and there are three reasonable answers. What you shouldn’t do is forward port 5000 or 5001 from your router to the NAS, because that puts a login page for everything you own on the public internet.
A VPN is the most secure option and the one I’d pick. If your router can run WireGuard or OpenVPN, do it there, and if it can’t, Synology’s VPN Server package runs OpenVPN or L2TP/IPSec from the NAS itself. There’s no WireGuard option on DSM. You connect to your home network first and then reach the NAS as if you were sitting at home. DSM is never exposed at all. You do forward one port on the router for the VPN itself, UDP 1194 for OpenVPN, which is a very different thing from exposing a DSM login page.
QuickConnect is the easiest option by a landslide. It connects you without any port forwarding, falling back to Synology’s relay servers when a direct connection isn’t possible, and the trade-off is that Synology’s infrastructure sits in the middle of your access. I used a VPN instead when my data lived on a Synology, but for most people who just want their phone to reach their photos, QuickConnect is a fair deal. You turn it on at Control Panel > External Access > QuickConnect: tick Enable QuickConnect, sign in to a Synology Account when it prompts you, pick a QuickConnect ID and select Apply. That ID is what you and the mobile apps connect with from then on.
DDNS is the third piece, and you need it if you’re running a VPN server at home on a dynamic external IP address. Synology gives you a free synology.me hostname from Control Panel > External Access > DDNS: select Add, set Service provider to Synology, pick a hostname, and use Test Connection to confirm it resolves to you. It needs the Synology Account the setup wizard offered you.
Synology NAS Setup Best Practices for Security
The security of your NAS matters more than any other setting in this guide, so these are the things I change on every Synology I set up. If you’re not exposing the NAS to the internet, some of them matter less, but I’d still do all of them.
DSM Update Settings
If you do nothing else here, keep DSM updated. You get new features, but more importantly you get the security fixes.
This is the one place where Synology moved the goalposts since I first wrote this guide. On a NAS released in 2025 or later, important DSM and package updates now install themselves, and the “notify me and let me decide” choice isn’t offered in the interface at all. Getting it back means an SSH session as root. On a 2024 or earlier model you still get all three options under Control Panel > Update & Restore > DSM Update > Update Settings: Automatically install important updates, Automatically install the latest updates, or Notify me and let me decide whether to install the new update.
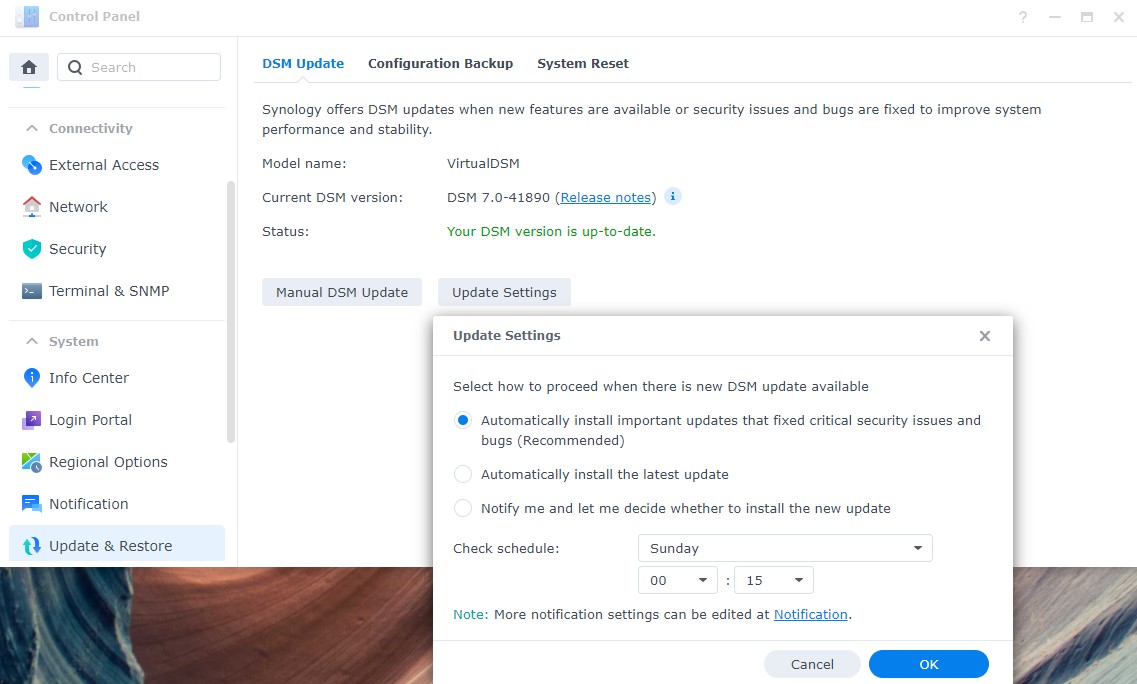
Synology’s own recommendation is important DSM and package updates only, and that’s what I’d leave on either way. Set the install window for the middle of the night so a reboot never lands while you’re using it.
Change the Default DSM Ports
Every scanner on the internet knows DSM sits on 5000 for HTTP and 5001 for HTTPS. I change them on any NAS that will be reachable from outside, and if you’re staying internal only, it’s optional rather than important.
1. Open Control Panel, select Login Portal, then the DSM tab. Under Web Services, enter your new ports in the DSM Port (HTTP) and DSM Port (HTTPS) fields, tick Automatically redirect HTTP connections to HTTPS for DSM desktop if you’d like everything to go over HTTPS, then select Save.
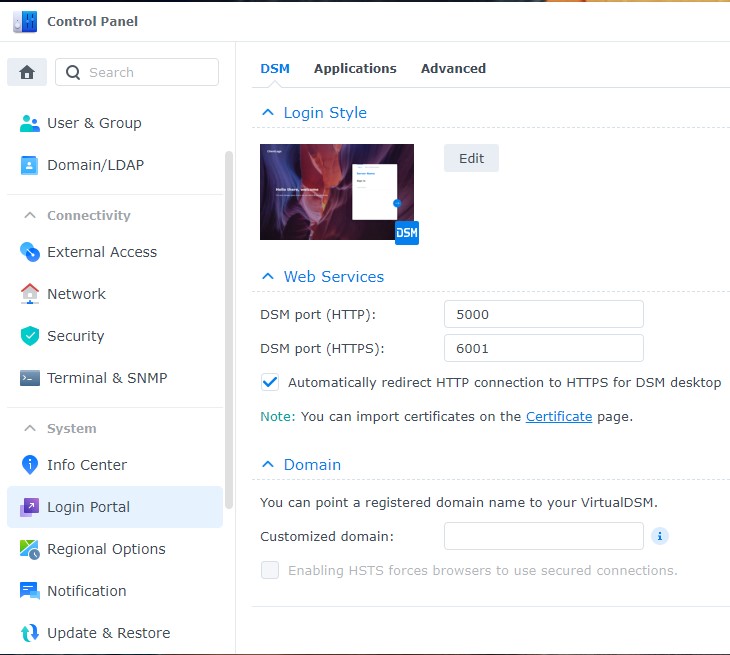
DSM restarts its web server when you save, so the tab you’re on will drop for a moment and you reconnect on the new port. Pick ports that aren’t already in use, and write them down.
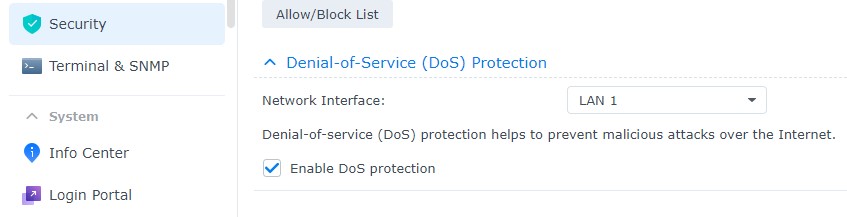
Enable DoS Protection
A denial-of-service attack tries to make a machine or network unreachable by burying it in traffic, and DSM has a single checkbox for it.
Open Control Panel > Security > Protection > Denial of Service (DoS) Protection, tick Enable DoS protection and select Apply.
Configure Auto Block
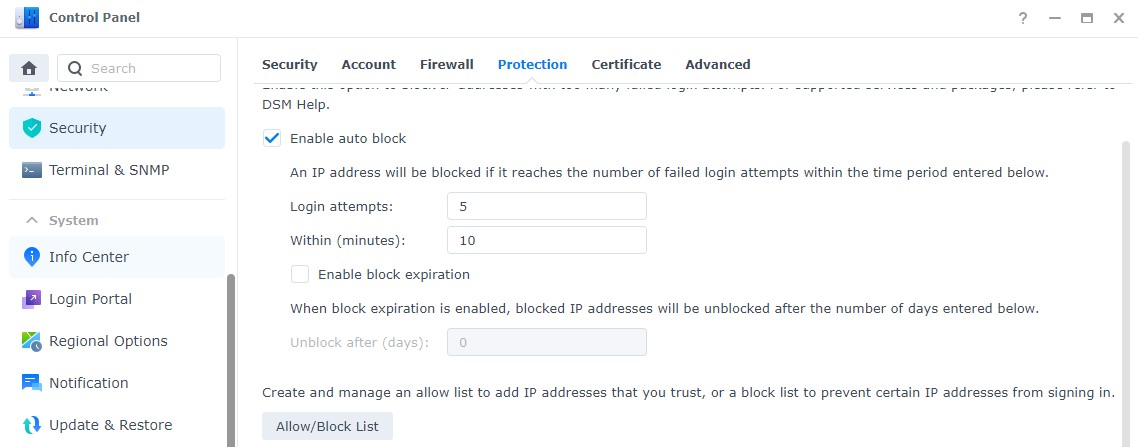
Auto block blocks public IP addresses that fail to log in ten times within five minutes. Local addresses are never blocked, and the first few failures from any address are ignored so SMB clients don’t lock themselves out.
1. Open the Control Panel, select Security, then the Protection tab.
2. Confirm Enable auto block is ticked, adjust the login attempts and time window if you’d like, then select Apply. To whitelist an address, select Allow/Block List and add it to the Allow List.
Set Up the Synology Firewall
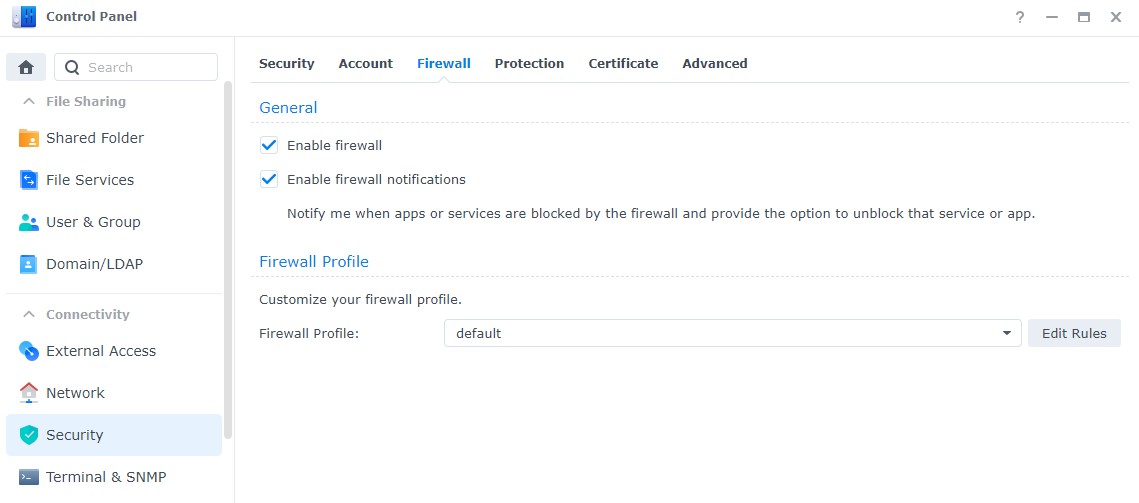
I use Synology’s firewall because I want nobody reaching anything on the NAS unless I’ve specifically allowed it. With that said, if you’re a brand new user and you’re not exposing the NAS externally, I wouldn’t rush into it, since a firewall you half configured is mostly a way to lock yourself out of your own storage.
The rules themselves depend on what you run. Somebody using SSH needs an allow rule for it and somebody who doesn’t should be blocking it, and every new package generally needs its own rule.
1. Open Control Panel and select Security. Open the Firewall tab, tick Enable firewall and select Apply, then under Firewall Profile select Edit Rules.
2. Leave the drop-down at the top right on All Interfaces unless you have a reason to split rules per interface, select Create, choose Select from a list of built-in applications, tick the Management UI boxes so you don’t lose access to DSM itself, and select OK. If you changed the DSM ports earlier, check that the Management UI entry covers the ports you set, and add a Custom rule (Destination Port, TCP) for them if it doesn’t. Keep a logged-in DSM tab open until you’ve confirmed you can still reach DSM from a second browser after applying the rules.
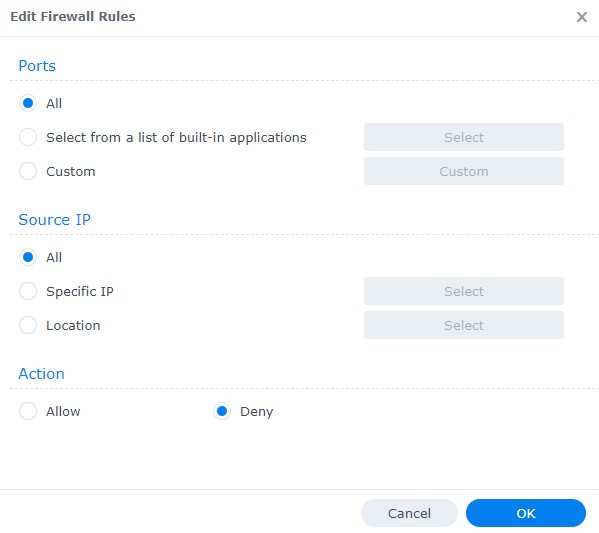
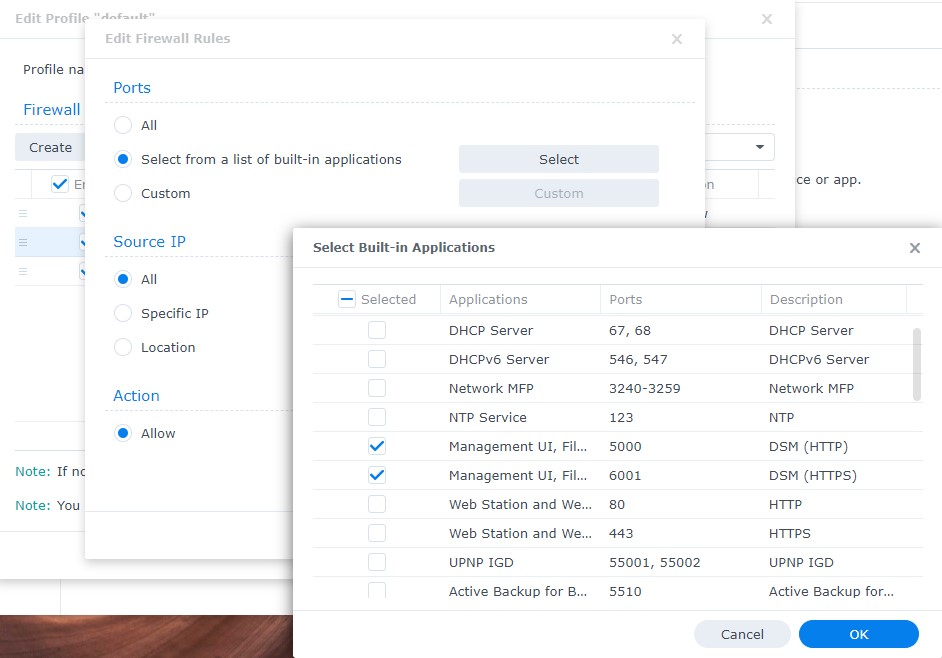
3. Work down the rest of the applications you actually use and create a rule for each one, rather than one combined rule, so you can manage them individually later.
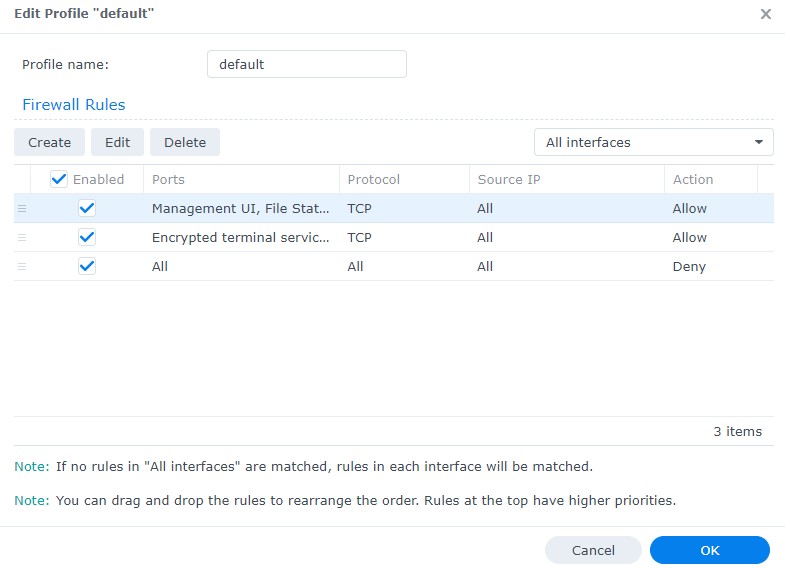
4. With your allow rules in place, set the drop-down at the bottom of the rule list to Deny access so anything you haven’t permitted is refused, select OK, then Apply on the Firewall tab. That catch-all is per interface, so only set it where you built the allow rules.
Turn On Two-Factor Authentication
I know, it’s annoying, but it works, and I’d recommend you set up two-factor authentication on your administrator account at minimum. If your password leaks, 2FA is the layer that stops the leak from becoming an incident.
1. Select the person icon in the top right of DSM, select Personal, then open the Security tab and start 2-Factor Authentication (2FA).
2. Choose the verification code (OTP) method and select Next. DSM will suggest Synology’s Secure SignIn app, but any TOTP application you already use is fine.
3. Scan the QR code, enter the code it generates, and select Next.
4. Set up an email address as your fallback so a lost phone doesn’t lock you out permanently, then select Done.
On the admin side, Control Panel > Security > Account has an Enforce 2-factor authentication for the following users option. One caveat before you enforce it: a Hyper Backup or Shared Folder Sync task that uses rsync with SSH transfer encryption stops working once 2FA is on, so leave that account out of the enforcement or point the task somewhere that doesn’t need it.
Snapshots on your important folders, one backup that lives somewhere other than the NAS, and 2FA on your admin account are the three that matter most.
All of this is the floor rather than the ceiling. Cybersecurity is always evolving, the settings that are enough today might not be next year, and nothing here is a guarantee, so treat it as something you revisit every few months rather than a box you tick once.