If you have a Synology NAS device, you may want to access your files and services remotely when you’re not at home. This can be useful for backups, streaming, file sharing, and other purposes.
However, remotely accessing a Synology NAS can be challenging, as there are different methods and factors to consider, which can make the overall topic of Synology NAS remote access confusing.
Synology NAS Remote Access: 5 Options Compared
There are five common methods to remotely access a Synology NAS. Each method has pros and cons, so we’ll look at each method below and provide some best practices and tips for each.
- Dynamic DNS (DDNS)
- Reverse Proxy
- Synology QuickConnect
- Zero-Config VPNs (Tailscale)
- Self-hosted VPNs (WireGuard, OpenVPN)
Dynamic DNS (DDNS)
DDNS is a service that allows you to access your NAS using a domain name instead of an IP address. This is useful because your external IP address may change frequently, especially if you have a dynamic IP from your internet service provider (which most people do).
With DDNS, you can register a domain name (ex. mynas.synology.me) and link it to your external IP address. Whenever your IP address changes, the DDNS service will automatically update the domain name to point to the new IP address.
The pros and cons of DDNS are:
- Pros:
- Faster transmission speeds
- Customizable ports.
- Cons:
- Requires port forwarding
- Lacks strong security, and generally should not be used.
DDNS Best Practices
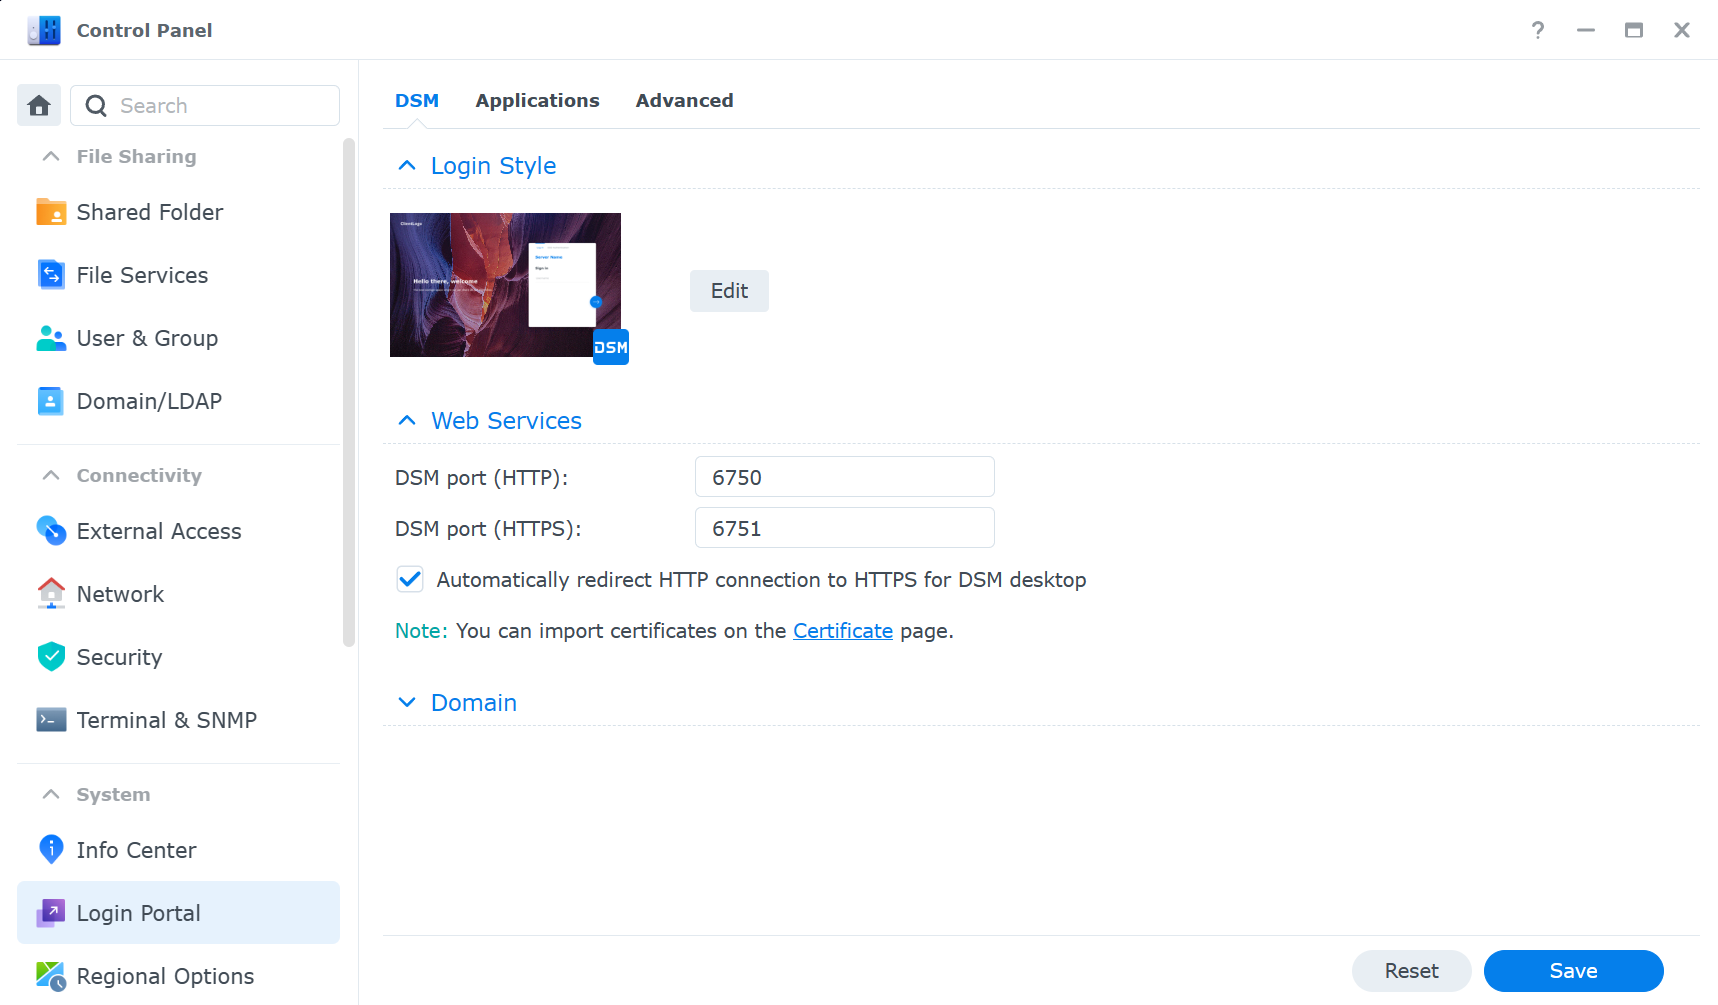
- Change the default ports for your services to avoid common attacks. For example, instead of using port 5001 for the web interface, use a random port number like 6751. You can change the ports in Control Panel > Login Portal > DSM Port (HTTPS).
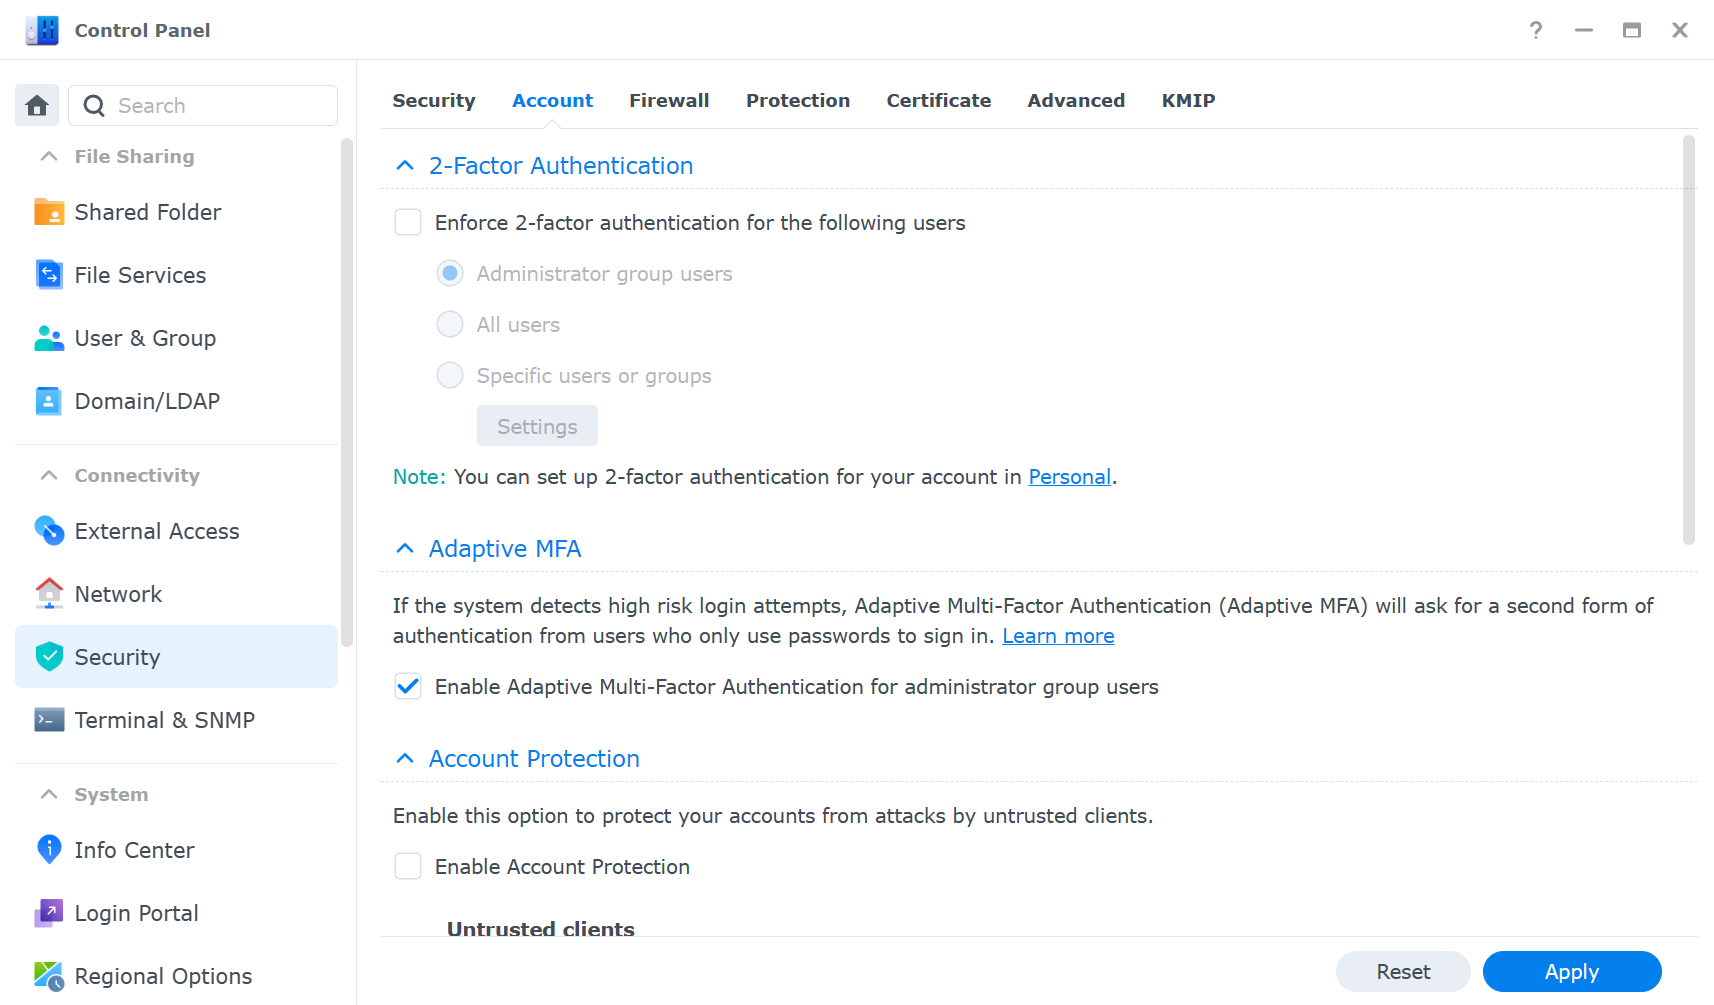
- Enable two-factor authentication for your NAS login and other services. This adds an extra layer of security by requiring a verification code from your phone or another device. You can enable two-factor authentication for all users in Control Panel > Security > Account.
- Consider exposing only the services that you need remotely.
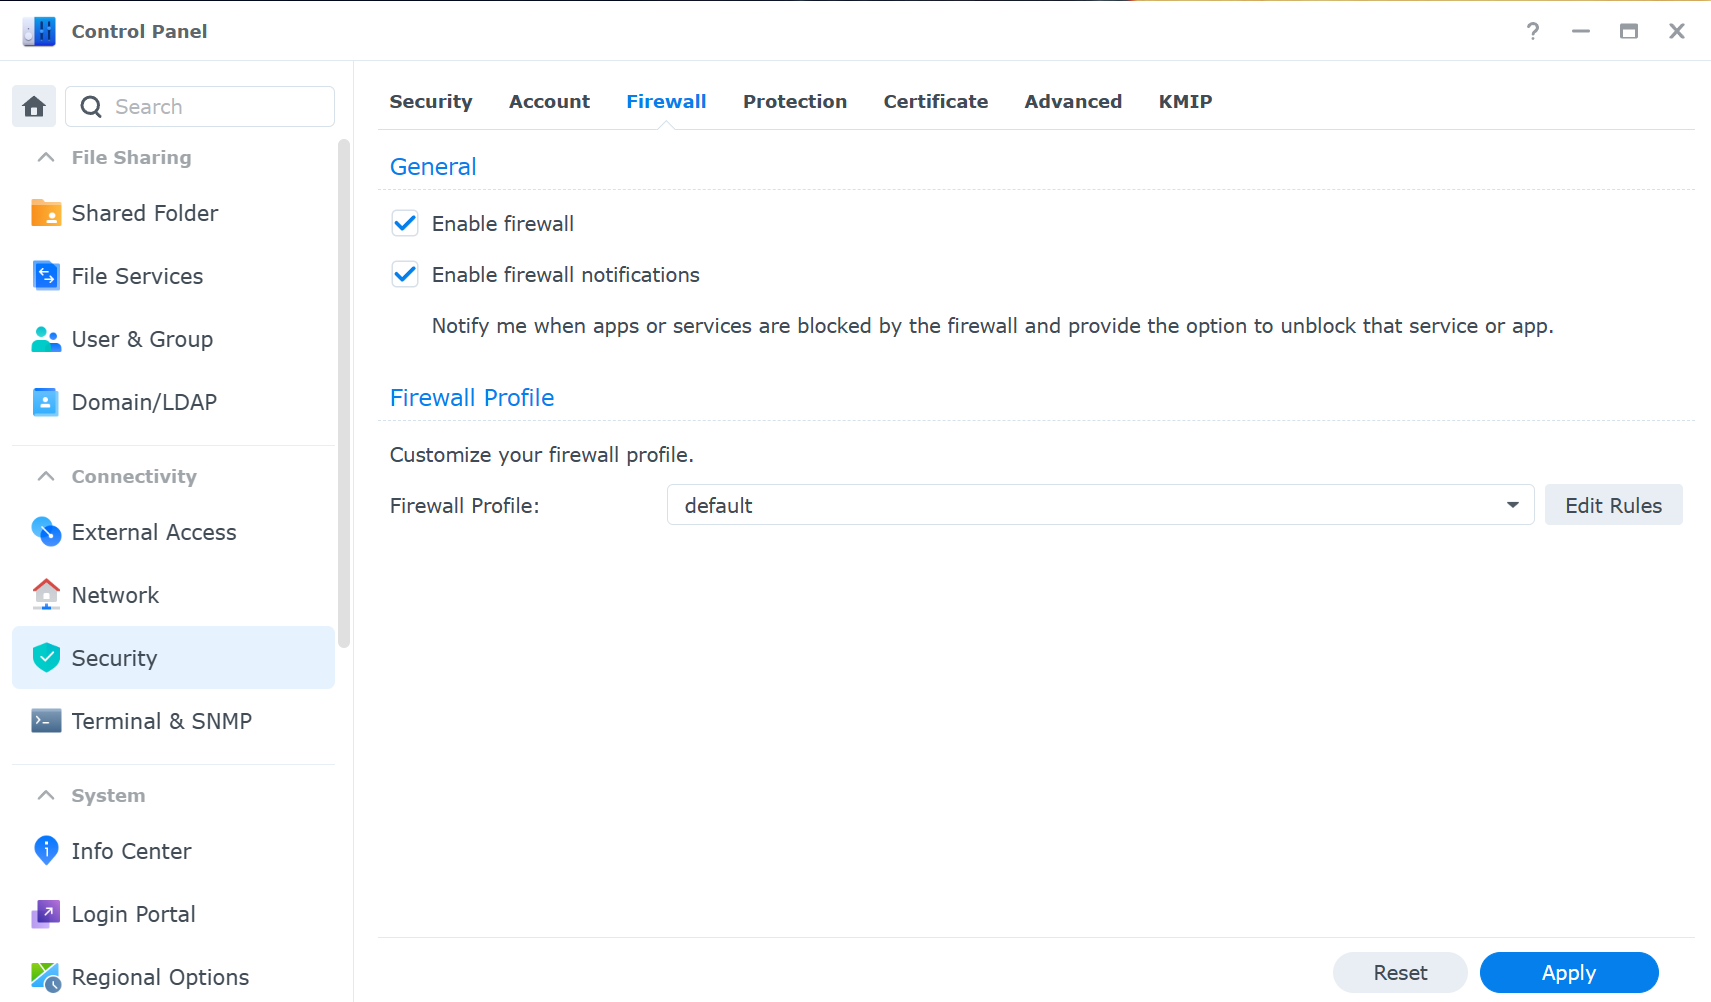
- Use Synology’s firewall to limit access to specific IP addresses or regions. This prevents unauthorized access from unknown sources. You can configure the firewall rules in Control Panel > Security > Firewall.
Configuring DDNS on a Synology NAS
- Sign up for a DDNS service. Synology provides a free DDNS service for its users, but you can also use other providers such as No-IP, DuckDNS, etc.
- Configure your router to forward the ports that you want to access remotely to your NAS. For example, if you want to access the web interface of your NAS, you need to forward port 5001 for HTTPS to your NAS’s local IP address (though as mentioned above, you should change this port).
- Enable DDNS on your NAS. Go to Control Panel > External Access > DDNS and add a new DDNS service. Choose your provider, enter your domain name, username, and password, and click Apply. You can also enable notifications to receive email alerts when your IP address changes.
- Test your DDNS configuration. Open a web browser and enter your domain name followed by the port number (e.g., mynas.synology.me:5001). You should see the login page of your NAS. If not, check your router settings and firewall rules.
Reverse Proxy Server
A reverse proxy server acts as an intermediary between your NAS and the internet. It receives client requests and forwards them to your NAS, and vice versa. A reverse proxy can provide several benefits:
- Added security: You can use a reverse proxy to encrypt the traffic between your NAS and the internet using SSL/TLS certificates.
- You can also use a reverse proxy to hide the IP address and port number of your NAS, making it less vulnerable to attacks.
- Subdomain access: You can use a reverse proxy to access your services using subdomains instead of ports. For example, instead of using mynas.synology.me:5001, you can use dsm.mynas.synology.me (or if you own your own domain, nas.yourdomain.com). This makes it easier to remember and type the URLs and also allows you to use different SSL certificates for different services.
- Cloudflare integration: You can use a reverse proxy to integrate your NAS with Cloudflare, a service that provides various features such as DNS, CDN, firewall, and analytics. Cloudflare can help you improve the performance, security, and reliability of your NAS, though you must own your own domain for this.
The pros and cons of a reverse proxy are:
- Pros:
- Speed and performance similar to DDNS
- Added security through subdomain access
- Potential for Cloudflare integration
- Access control profiles
- Cons:
- Exposes NAS to the outside world
Reverse Proxy Best Practices
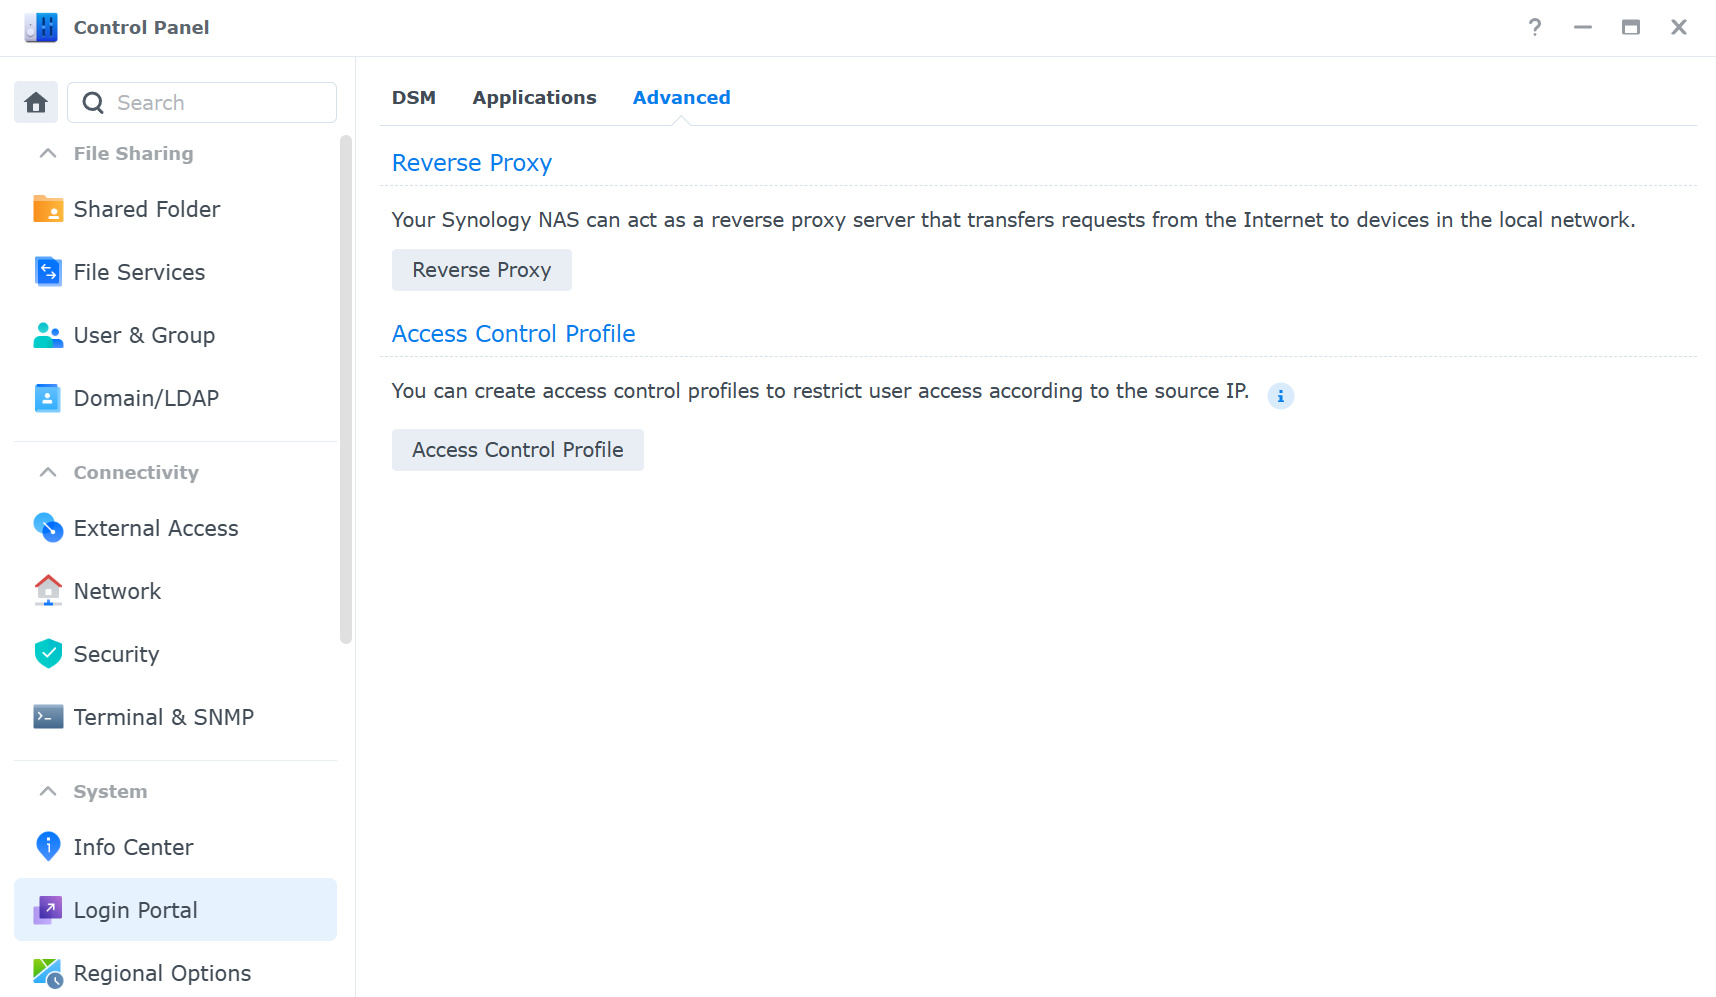
- Limit access to your NAS using access control profiles. You can use access lists to allow or deny access to your NAS based on IP addresses. You can configure access lists in Control Panel > Login Portal > Advanced > Access Control Profile.
- Use unique subdomains for your services. This makes it easier to identify and manage your services and also allows you to use different SSL certificates for different services. You can obtain free SSL certificates from Let’s Encrypt in Control Panel > Security > Certificate.

Configuring a Reverse Proxy Rule for Remote Access
- Register a domain name and point it to your external IP address using the domain registrar. You can use any DNS service you prefer, such as Google Domains, Namecheap, or Cloudflare.
- Configure your router to forward port 80 (HTTP) and port 443 (HTTPS) to your NAS. These are the standard ports for web traffic, and you only need to forward these two ports for all your services.
- Enable the reverse proxy server on your NAS. Go to Control Panel > Login Portal > Advanced > Reverse Proxy and add a new rule for each service you want to access remotely. For example, if you want to access the web interface of your NAS, you need to create a rule like this:
- Description: DSM
- Source: HTTPS, mynas.mydomain.com, 443
- Destination: HTTPS, localhost, 5001
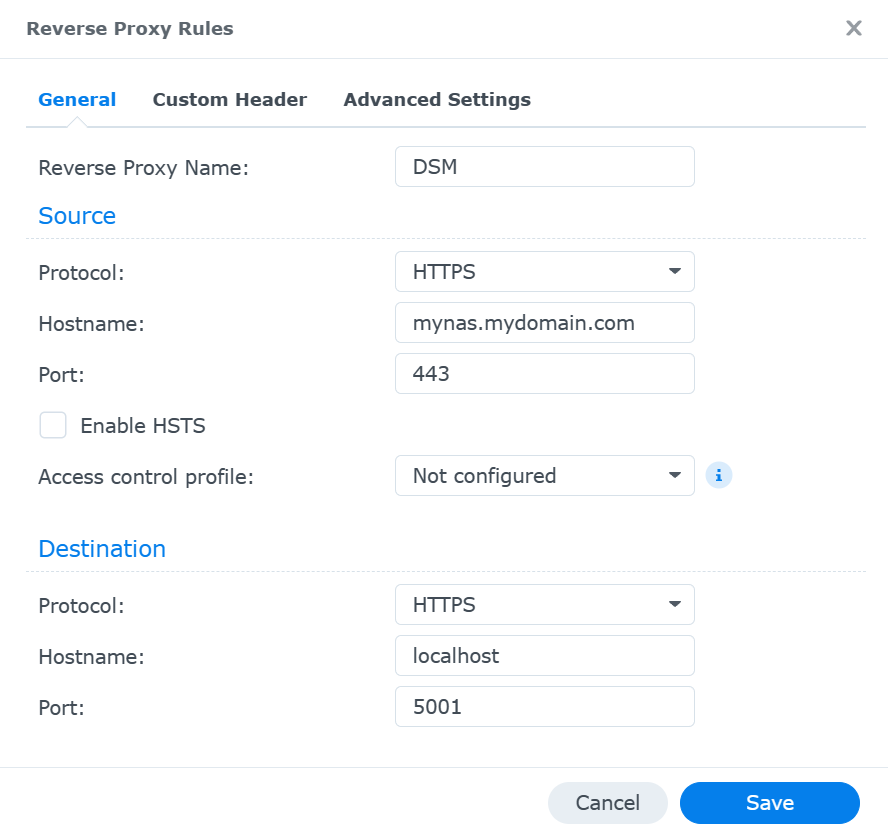
This means that when you access mynas.mydomain.com, the reverse proxy will forward your request to localhost:5001, which is the web interface of your NAS (DSM).
- Test your reverse proxy. Open a web browser and enter your subdomain. You should see the login page of your NAS. If not, check your router settings and reverse proxy rules.
Synology QuickConnect
Synology QuickConnect is a service that allows you to access your NAS without port forwarding or DDNS. It works by creating a relay tunnel between your NAS and Synology’s servers, which act as an intermediary for your requests.
QuickConnect is extremely easy to set up, as you only need to do the steps below, but I’d suggest you review Synology’s whitepaper before using it.
The pros and cons of QuickConnect are:
- Pros:
- Extremely easy to set up
- User-selectable services to expose
- Cons:
- Potential for slower performance
- Limited control over access scope.
Synology QuickConnect Best Practices
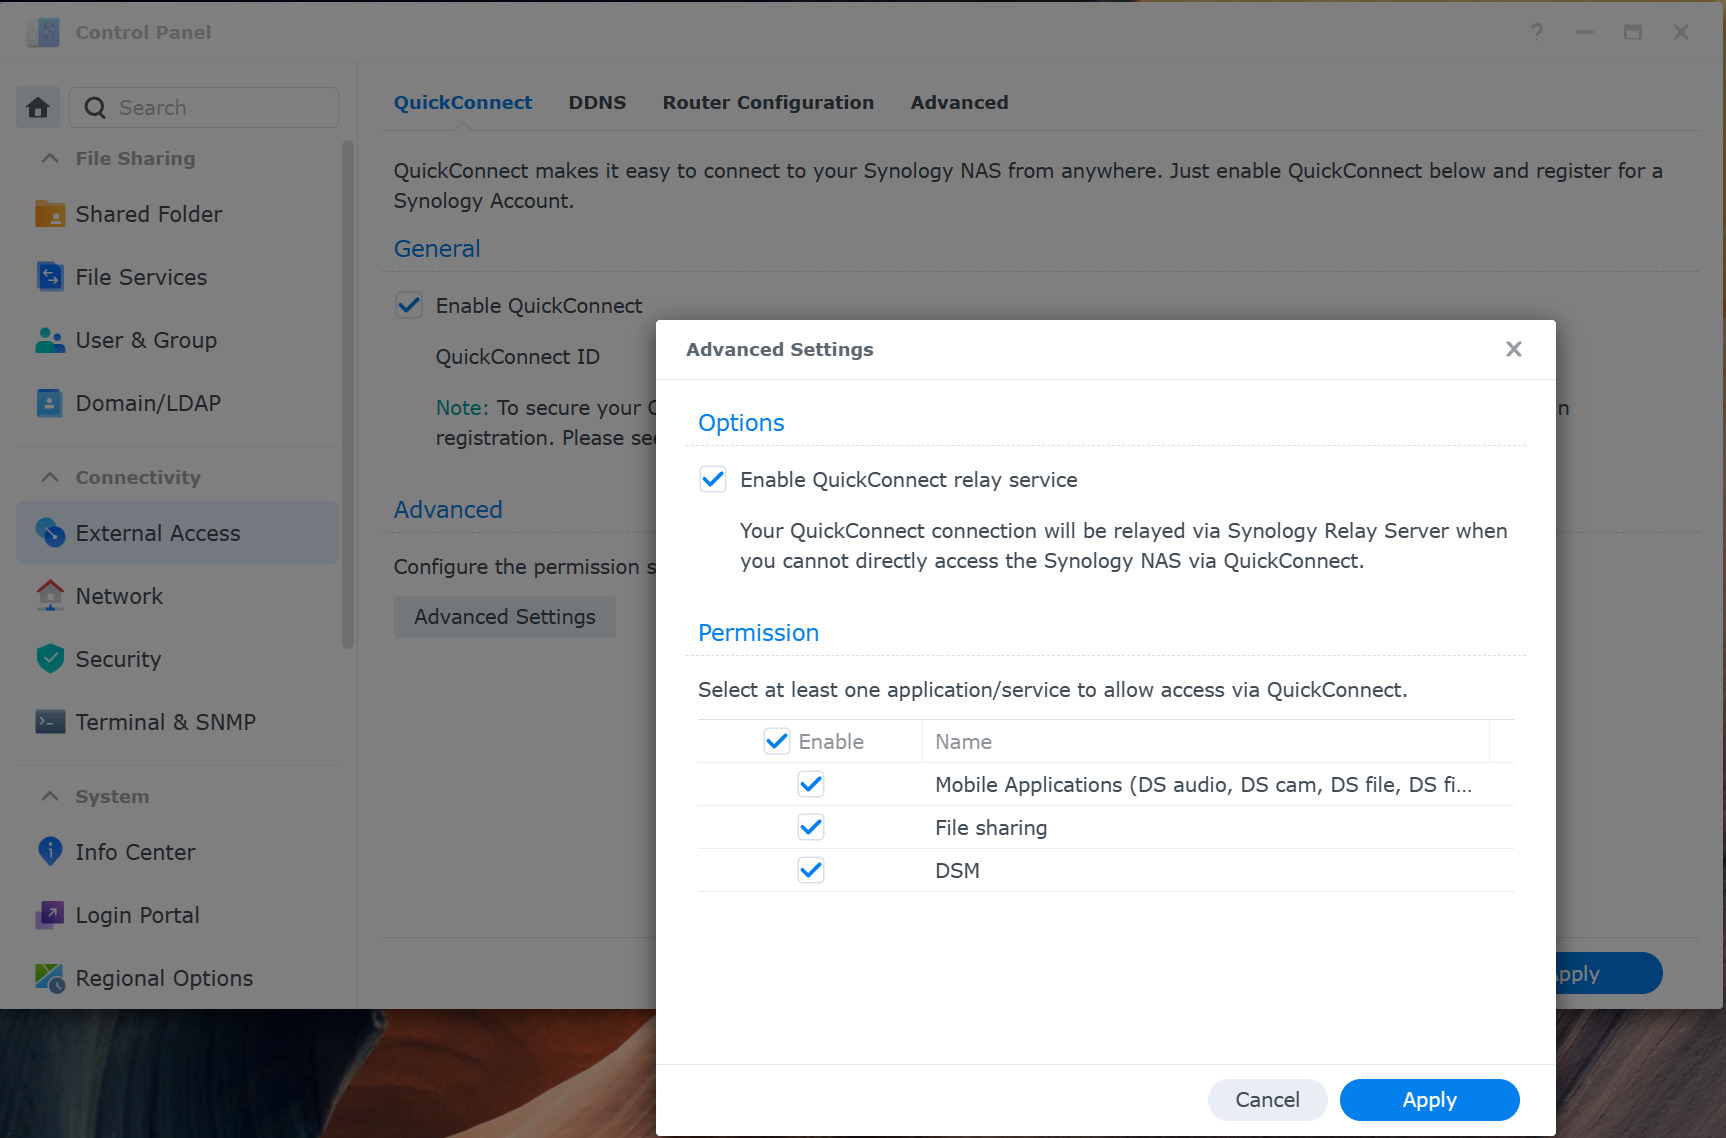
- Limit access to specific services you intend to use. This reduces the bandwidth consumption and the risk of unauthorized access. You can enable or disable services in Control Panel > External Access > QuickConnect > Advanced.
Configuring Synology QuickConnect
Full Synology QuickConnect Tutorial
- Create a Synology account and register your NAS. Go to Control Panel > External Access > QuickConnect and click Enable QuickConnect. Enter a QuickConnect ID for your NAS, then click Apply.
- Enable QuickConnect for the services you want to access remotely.
- Test QuickConnect. Open a web browser and enter your QuickConnect URL (ex., mynas.quickconnect.to). You should see the login page of your NAS.
Zero-Config VPNs (Tailscale)
A VPN (virtual private network) is a service that creates a secure and encrypted connection between your device and a remote server. A VPN can help you access your NAS remotely by creating a virtual network that connects your device and your NAS as if they were on the same local network.
This removes the need for port forwarding or DDNS, as you can use the local IP address of your NAS to access your services. There are many VPN services available, but some of them require complex configuration and management.
A zero-config VPN is a type of VPN that simplifies the setup and usage of VPNs by automating the configuration and authentication processes. One example of a zero-config VPN is Tailscale, which is a service that uses WireGuard as the underlying VPN protocol and allows you to create a secure mesh network between your devices.
The pros and cons of Tailscale are:
- Pros:
- No port forwarding required
- Secure
- Better performance than QuickConnect.
- Cons:
- Requires users to connect to the VPN first
- Slower than reverse proxy/DDNS
- Limitations on free tier users in some cases
Tailscale Considerations
- Tailscale is ideal for secure Synology NAS remote access but requires a user connection to the VPN for access. This means that you need to have the Tailscale app running on your device and log in to your Tailscale account before you can access your NAS. This may not be convenient for some users who want to access their NAS without any additional steps.
- Great for personal use but may not be suitable for business use. The free tier of Tailscale allows up to 100 devices, three users, and unlimited bandwidth. However, if you want to use Tailscale for business purposes, you may need to upgrade to a paid plan.
Configuring Tailscale on a Synology NAS
- Sign up for a Tailscale account and download the Tailscale app on your personal device and your NAS. You can use the free tier for personal use, which allows up to 100 devices.
- Install the Tailscale app on your device and your NAS. You can find the installation instructions for different platforms on the Tailscale website.
- Log in to the Tailscale app on your device and your NAS using your Tailscale account. You will see a list of your devices and their IP addresses on the Tailscale network. You can also name your devices for easier identification.
- Test your Tailscale connection. Open a web browser and enter the Tailscale IP address of your NAS followed by the port number of the service you want to access (IP_ADDRESS:5000). You should see the login page of your NAS (assuming you’re connected to the Tailscale VPN).
Self-hosted VPNs (WireGuard, OpenVPN)
A self-hosted VPN is a VPN that you set up and manage yourself on your own server. This gives you full control over the configuration, security, and performance of your VPN. A self-hosted VPN can also help you access your NAS remotely by creating a virtual network that connects your device and your NAS as if they were on the same local network.
There are many VPN protocols and software available, but two of the most popular and widely used ones are WireGuard and OpenVPN. WireGuard is a newer and simpler VPN protocol that offers faster speeds, lower latency, and easier setup than OpenVPN. OpenVPN is an older and more established VPN protocol that offers more features, compatibility, and customization than WireGuard.
The pros and cons of self-hosted VPNs are:
- Pros:
- Full control
- Secure
- Higher performance compared to other methods
- Cons:
- Complex setup
- Requires port forwarding
- Users must connect to the VPN before accessing services
Self-hosted VPN Considerations
- Self-hosted VPNs are great for secure remote access, but setting up and maintaining a self-hosted VPN can be challenging, especially for beginners. You need to have some knowledge of networking, VPN protocols, and security. You also need to keep your VPN server and client software updated and secure.
- Self-hosted VPNs are ideal for advanced users who want more features and customization. Overall, they give you more options and flexibility than other methods. You can choose the VPN protocol, software, encryption, authentication, and other settings that fit your needs.
Configuring a Self-hosted VPN
Synology NAS OpenVPN Setup Tutorial
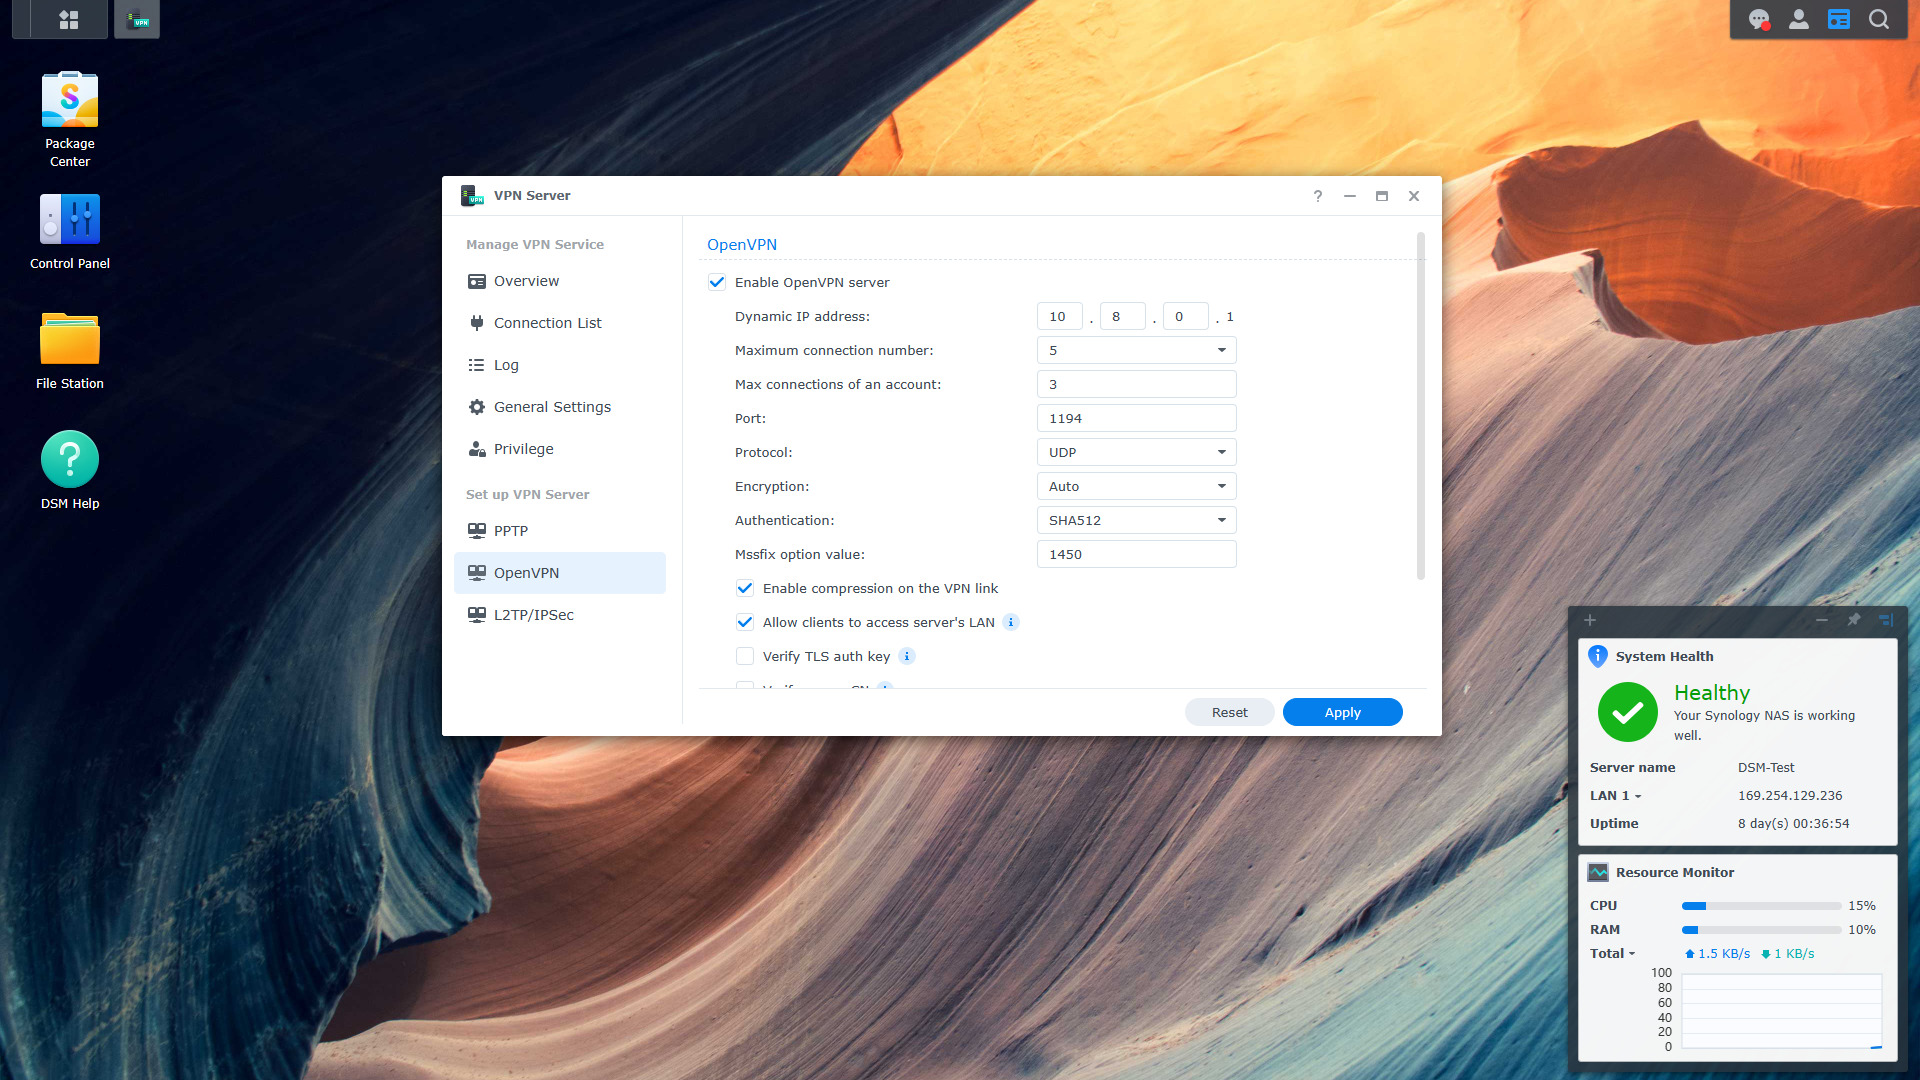
- Choose a VPN protocol and software. You can use either WireGuard or OpenVPN, or both, depending on your preference and needs. There are various devices that run WireGuard, with one of the most popular options being a Raspberry Pi. If you’d like to use OpenVPN, you can configure it using your Synology NAS!
- Install and configure the VPN server, then complete the port forwarding steps.
- Install and configure the VPN client on your device. You can use either the official VPN client software from WireGuard or OpenVPN or a third-party VPN client app that supports these protocols.
- Test your VPN connection. Connect to the VPN server using the VPN client on your device. You should see a VPN icon on your device’s status bar, indicating that you are connected to the VPN. Keep in mind that this must be done on an external network (where the VPN server is not hosted).
- Access your NAS using the local IP address. You can use the same IP address and port number that you use to access your NAS on your local network (192.168.1.X:5000). You should see the login page of your NAS.
Conclusion & Final Thoughts: Synology NAS Remote Access
After looking at five different options for Synology NAS remote access, there isn’t necessarily a right or wrong way of doing it. Check out each option, the pros and cons of each, as well as your overall requirements to determine which option makes the most sense for you.
It’s also important to remember that you may want to use a combination of methods above for different scenarios. For example, accessing a media server might be easier with a VPN or port forwarding, but sharing a file with a friend or family member might be easiest with QuickConnect. You can enable/disable these services or simply use them when needed.