I’ve been running Synology NAS devices for over seven years, across the DS1019+, DS1821+, and DS923+, and Synology QuickConnect is the first thing I turn on after the initial setup. It gives the NAS one permanent address you can reach from anywhere, and it does it without a static IP, a DDNS hostname, or a single port forwarding rule on your router.
Most people land here for one of three reasons: you’re setting it up for the first time, you’re trying to log in and the address isn’t working, or you’ve forgotten what your QuickConnect ID was. All three are covered below. If you’re weighing this against the other ways in, my Synology NAS remote access comparison puts all five options side by side.
What QuickConnect Actually Does
QuickConnect gives your NAS an ID, and that ID is what you connect to instead of an IP address, so when something asks for it, Synology’s servers work out where your NAS currently is and route you there.
How that routing works explains why people disagree so much about the speed, and per Synology’s QuickConnect white paper, the connection is attempted in three stages, in order:
- LAN/WAN detection. Your client asks Synology for the NAS’s registered addresses and tries to connect directly. On your own network, this is what happens, and it’s as fast as typing the IP in.
- Hole punching. If a direct connection isn’t possible, the NAS and your client each open a temporary port on their own side of NAT, and Synology’s server introduces them to each other. The traffic then flows directly between the two. Performance is close to what you’d get with DDNS and port forwarding.
- Relay. If hole punching fails, everything goes through a Synology relay server. This is the slow one. Synology’s own wording is that it “can cause a significant delay in data delivery” and that the relay has limited bandwidth that degrades as usage increases.
So when someone says QuickConnect is slow and someone else says it’s fine, they’re both right, they’re just on different stages. Restrictive NAT, CGNAT from your ISP, or a locked-down corporate network pushes you onto the relay, where file browsing still feels fine while a large transfer crawls, and direct or hole-punched connections generally don’t have that problem.
How to Set Up Synology QuickConnect
Setup takes about a minute, though you will need a Synology Account, and DSM will prompt you to sign in or create one during the process if you haven’t already.
1. Open Control Panel, select External Access, then the QuickConnect tab.
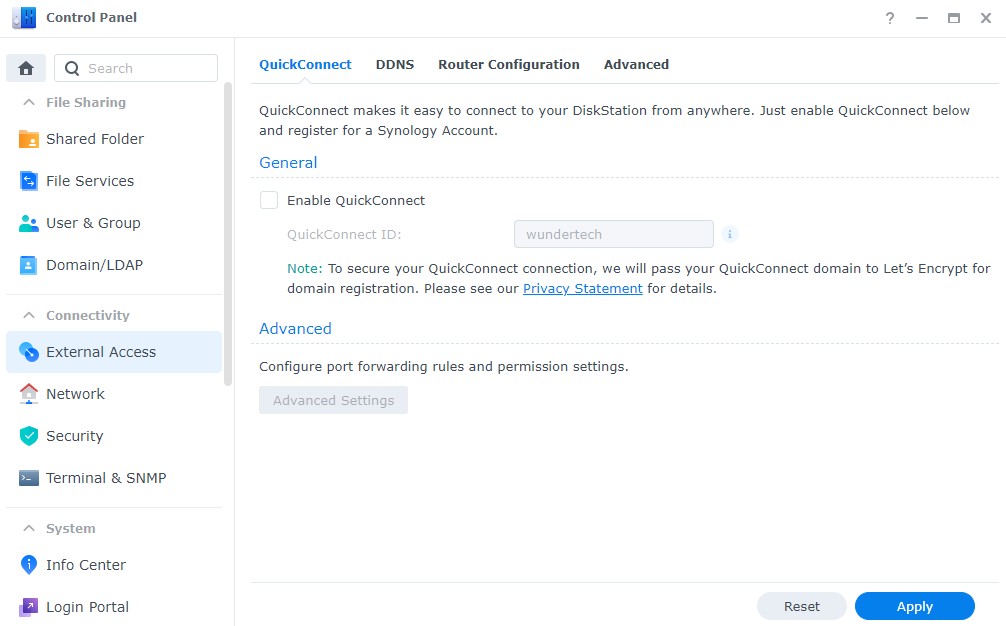
2. Check Enable QuickConnect, enter the QuickConnect ID you want, then select Apply.
The ID has to be unique across every Synology NAS in the world, so the obvious ones are long gone. Pick something you’ll actually remember, because this is the address you’ll be typing, and I’d avoid using your own name or anything that identifies you, since the ID is effectively public the moment you share a link with it.
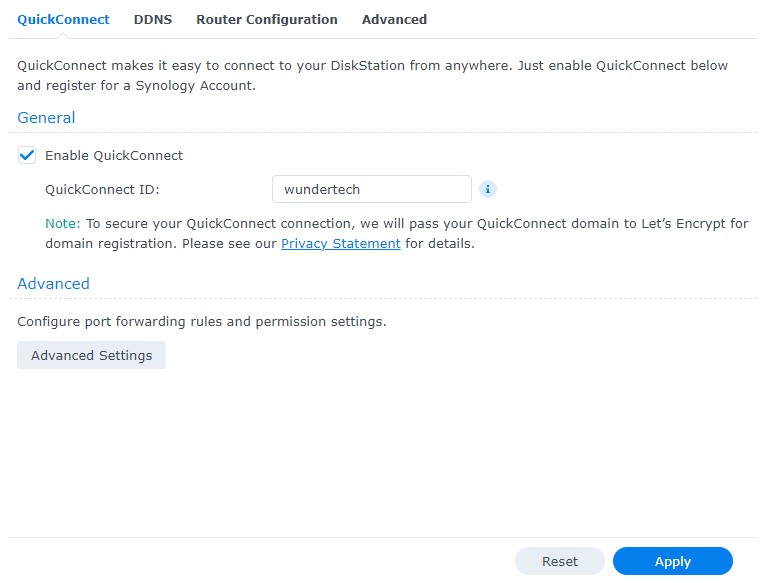
3. QuickConnect is now on, and DSM shows your address underneath the ID field, which is how you know it’s working.
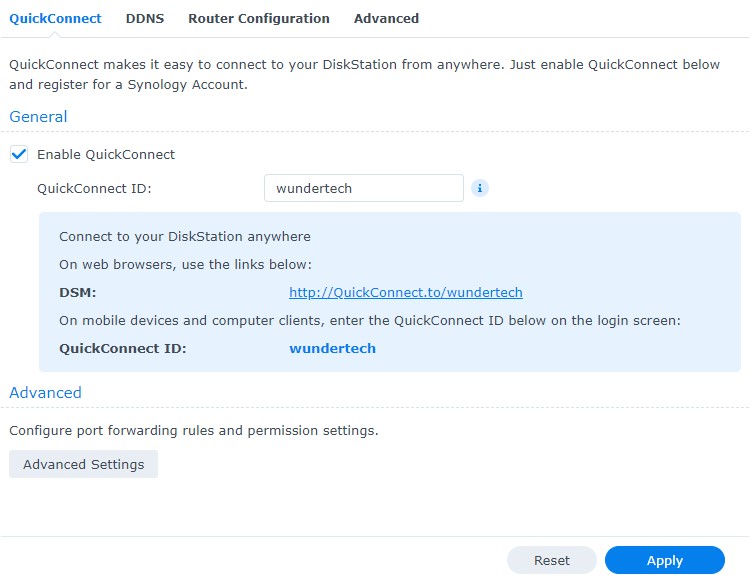
Before you close the window, go into Advanced Settings. The defaults there are not what I’d leave in place.
Turn Off Automatic Port Forwarding in Advanced Settings
Select Advanced Settings and the first option you’ll see offers to automatically create port forwarding rules on your router.
Leave that unchecked. It’s generally the single most important setting on this page. If you enable it, DSM asks your router to open your NAS’s management port to the internet, and at that point your DSM login screen is directly reachable by anyone who scans for it. That’s the exact exposure QuickConnect exists to avoid. QuickConnect gets you the same remote access through Synology’s relay and hole punching instead, without an open port on your router.
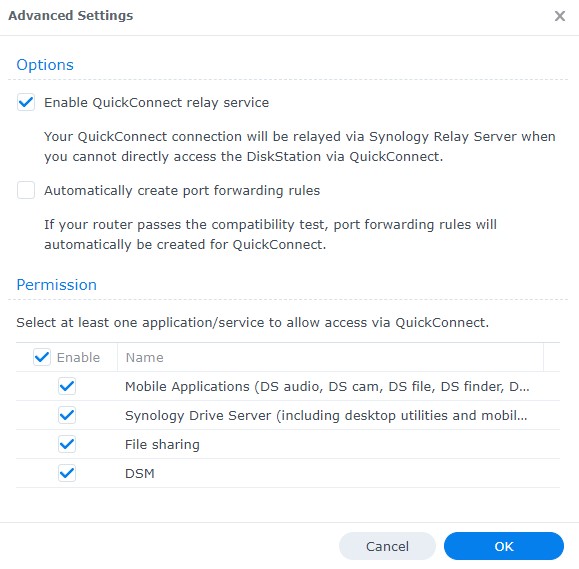
Below that is the list of applications reachable over QuickConnect, and I’d go at it from a least-permissive angle, turning on only what you actually need to reach from outside and disabling the rest. If the only thing you use remotely is Synology Photos on your phone, that should be the only thing enabled.
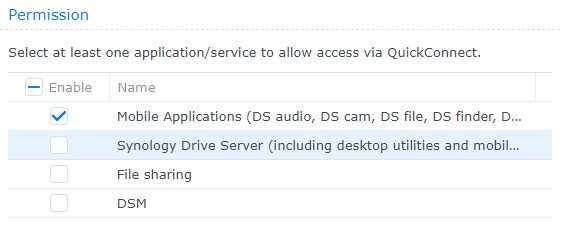
Whatever you save here is the whole surface, as anything you left disabled will not answer over QuickConnect at all, which is really the point.
How to Log In to QuickConnect
There are two ways in, and the second one is the one most people are missing.
1. Go to quickconnect.to, type your QuickConnect ID into the box, and select Connect.
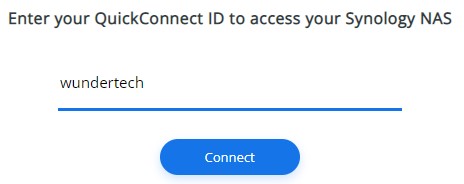
2. You’ll land on your own DSM login screen, where you sign in with your DSM username and password.
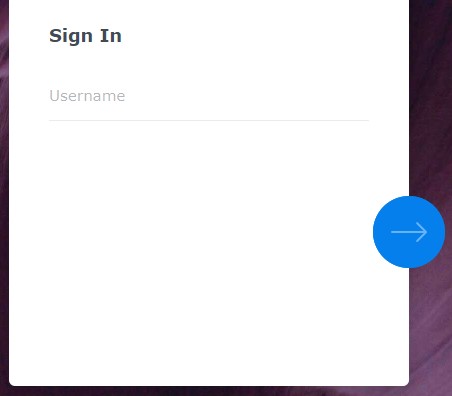
There is no separate QuickConnect password
This is where the confusion usually is, because quickconnect.to is a redirector rather than an account system, so you never type credentials into quickconnect.to itself. It works out where your NAS is and hands you to it, and the login you fill in belongs to DSM. Your Synology Account is only used to register the ID in the first place, not to sign in with.
So if you’re searching for a QuickConnect login and can’t find one, that’s why, and the username and password you want are the ones you created on the NAS.
Skip the portal with a direct address
You don’t have to go through the box on the homepage. Your NAS has a permanent address you can bookmark:
quickconnect.to/YourIDtakes you straight to DSM.quickconnect.to/YourID/aliastakes you straight to a specific application, if that application has an alias set in Control Panel > Login Portal > Applications. For example,quickconnect.to/YourID/filefor File Station.
That’s what I use, since it’s one bookmark and it survives your public IP changing.
How to Find Your QuickConnect ID
If you set this up a while ago and can’t remember what you picked, there are three places to look:
- In DSM. Control Panel > External Access > QuickConnect. The ID sits in the field, and the full address is printed below it. This is the definitive answer, but it needs you to already be on the NAS.
- In a Synology mobile app you’re already signed into. Open the app’s connection or account settings and the saved address is there. Handy when you’re locked out on a laptop but your phone still works.
- In your Synology Account. Sign in to account.synology.com and check the devices registered to it. The NAS is listed with its QuickConnect ID.
You can change the ID whenever you want from that same Control Panel page, but just know that changing it breaks every bookmark and every share link you’ve handed out, and the old ID goes back in the pool for someone else to claim.
If none of the above works because you can’t reach the NAS at all, the problem is generally local rather than QuickConnect, and my guide on finding a Synology NAS on the network covers getting back in.
Using Your QuickConnect ID in Synology’s Apps
The browser portal is only half of it, as every Synology mobile app and desktop client accepts the QuickConnect ID in the same field where you’d normally put an IP address or hostname.
This is the part I actually rely on day to day, where Synology Drive on a laptop, set up with the QuickConnect ID rather than a local IP, keeps syncing whether the laptop is at home or on someone else’s Wi-Fi, and it sorts out which route to take on its own.
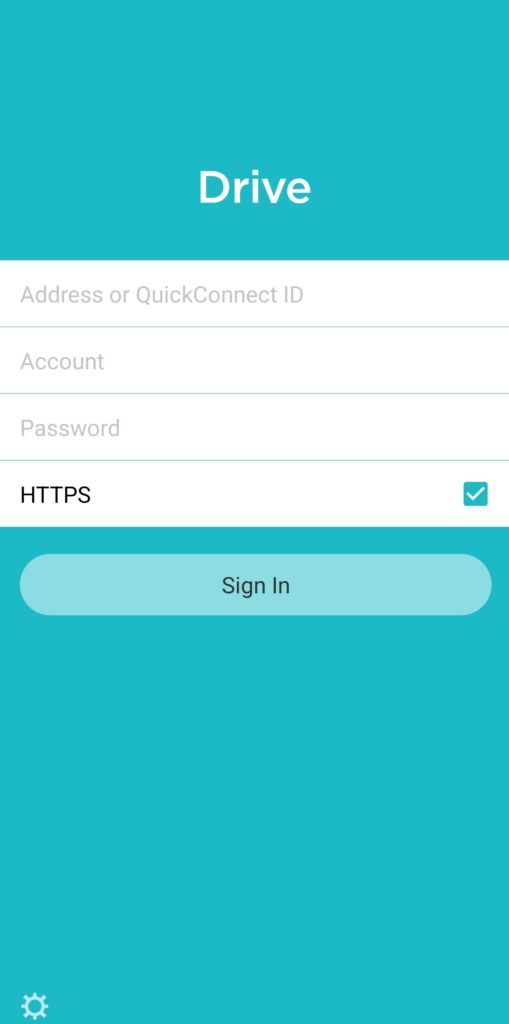
The same field appears in DS file, Synology Photos, DS video, and the rest, and if an app won’t connect, check that it’s enabled in the QuickConnect application list from earlier, because that’s usually the reason. A full rundown of what’s worth installing is in my best apps for Synology NAS guide.
Sharing Files with QuickConnect
QuickConnect also backs Synology’s file sharing links, which is how you send someone a file without giving them an account on your NAS.
1. In File Station, right-click a file or folder and select Share.
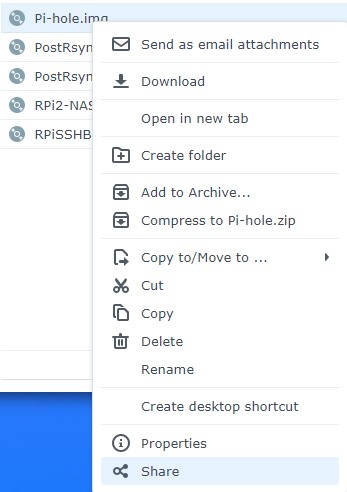
2. DSM generates a link, and if it starts with gofile.me, that link is running over QuickConnect. Set an expiry date and a password under Advanced Options before you send it, then Save.
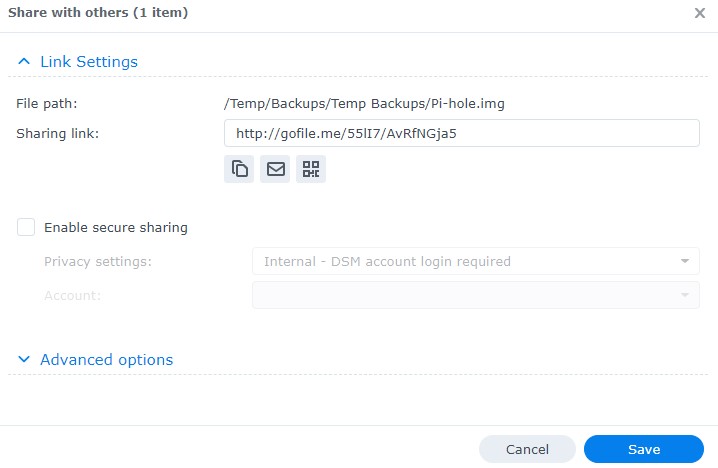
Synology Drive does the same thing from its own interface, and either way the file-sharing service has to be enabled in your QuickConnect permissions or the link won’t resolve for whoever you sent it to. There’s more detail on the options in my guide to externally sharing files from a Synology NAS.
An expiry date is worth setting as a habit, because a share link with no expiry is a permanent public URL to your data, and it’s easy to forget one exists.
What QuickConnect Can’t Reach
This is the most common disappointment with QuickConnect, so I want to be blunt about it. QuickConnect only works with Synology’s own applications. It cannot reach anything third-party running on your NAS.
That means no Plex, no Jellyfin, nothing you have running in Container Manager, and no custom web app on a port you picked. People turn QuickConnect on specifically to watch Plex from a hotel and then find nothing works, and there’s no setting that changes it. QuickConnect routes to services it knows about, and your Docker containers aren’t on that list.
If that’s what you’re here for, you want a VPN or a reverse proxy instead, and the next section covers both.
Is QuickConnect Safe to Leave On?
Mostly yes, with two things you should understand rather than take on faith.
It makes your DSM login reachable from the internet. Not through an open port on your router, which is a genuine improvement over port forwarding, but reachable all the same. Synology has publicly investigated botnet-driven brute-force campaigns against NAS devices, and a reachable login page is a login page someone will eventually try. Two-factor authentication, a strong password, no account called “admin”, and Auto Block turned on take care of the realistic threat. My Synology security guide covers all of it.
Browser sessions through the portal aren’t always end to end. Synology’s own white paper is clear about this. When your browser can be redirected to your NAS over LAN or WAN, the session is encrypted end to end. When it can’t, traffic goes through Synology’s Portal Server, and that server decrypts and modifies specific HTTP headers before passing the data on. Synology states the collected information is used only to deliver the service. It’s a reasonable design and there’s no evidence of anything else happening, but the encryption terminates on their infrastructure in that path, and you should know that before you route sensitive work through it. Connections from the mobile and desktop apps go over the virtual tunnel and don’t have this characteristic.
Security guidance changes constantly, and nothing here is a guarantee. Treat this as a snapshot of how things stand now, keep DSM updated, and check Synology’s own security advisories periodically.
When I’d Use Something Else Instead
QuickConnect is the right call when you want Synology’s apps working from anywhere with no networking effort. It stops being the right call the moment you need anything beyond that.
| Option | Setup effort | Reaches non-Synology apps | Speed |
|---|---|---|---|
| QuickConnect | Minutes | No | Fast direct, slow on relay |
| Tailscale | Under 10 minutes | Yes | Fast, direct where possible |
| OpenVPN | Moderate | Yes | Limited by your upload speed |
| DDNS + port forwarding | Moderate | Yes | Fastest, largest exposure |
| Reverse proxy | Highest | Yes | Fast, needs a domain |
Tailscale is what I’d point most people to as the next step up. It installs on the NAS as a package, takes about the same effort as QuickConnect, and puts your whole local network within reach rather than just Synology’s applications. If you want something more traditional, OpenVPN runs natively on the NAS too.
For publishing a specific service on your own domain, a reverse proxy paired with DDNS is the more capable setup, at the cost of real configuration work and a larger attack surface to maintain.
These aren’t mutually exclusive, and I run QuickConnect for the Synology apps with a VPN for everything else, which overall covers essentially every situation without leaving a port open.
Where to Go From Here
Turn QuickConnect on, leave automatic port forwarding off, cut the application list down to what you actually use remotely, and bookmark quickconnect.to/YourID. That’s really all there is to it, and it puts you in a better position than most NAS owners are in.
From there, the two things worth doing next are locking down the NAS properly now that it’s reachable from outside, and finishing the rest of the initial setup guide if you’re still early on. If you’re shopping rather than configuring, my Synology NAS buying guide covers the current lineup, and I’ve also written up the best Synology alternatives if the drive lock changes have you looking elsewhere.