Today we’re going to take a look at how to share files on a Synology NAS with anyone in the world!
The actual sharing of a file is very simple. However, figuring out the way that you want to expose your NAS is the challenging part. The majority of the explanation for all available options is done in the video above. I highly suggest watching that portion of the video before sharing a link using the instructions below. However, I will do my best to summarize the three options below.
Synology QuickConnect
By enabling Synology QuickConnect and granting the “File sharing” permission in the Advanced tab, you can share files from your NAS without opening any ports on your router. You will know that you’re using Synology’s QuickConnect when you try and share a link and the URL contains “gofile”.
While this might sound like a great option, please keep in mind that you have almost no control and cannot limit access. In the second and third options below, you can limit access to a much greater extent. For this reason, QuickConnect is not something that I traditionally recommend. While it might be the “easiest”, it’s the least secure in my opinion.
Port Forwarding
By using a DDNS hostname (Synology offers a free synology.me address) and port forwarding the HTTPS DSM port, you can share files with external users.
While this might sound scary, you can limit access using Synology’s firewall. This can be done by either allowing access to a DHCP range or a single IP address. This greatly reduces risk since you are drastically limiting who can access the link and in certain cases, ensuring that the one individual you are sharing it with is the only person who can access it.
If you aren’t sure how to use Synology’s firewall, please check out my video that explains it in greater detail.
Reverse Proxy Server
A reverse proxy server allows you to open an individual port on your router (generally port 443 for HTTPS traffic) and serve multiple services through that port by using different domain names. For example, domain1.mydomain.com and domain2.mydomain.com can both be routed to different services on your network without forwarding additional ports.
Since you’re using a reverse proxy server for this, you cannot limit access using Synology’s firewall. The reason is because all traffic will appear to DSM like it’s coming from your reverse proxy server (an internal server), so you will have to use Access Control Profiles to limit access instead. Ultimately, it will function the same as option two, but you will have to limit access differently.
1. Login to DSM and open File Station.
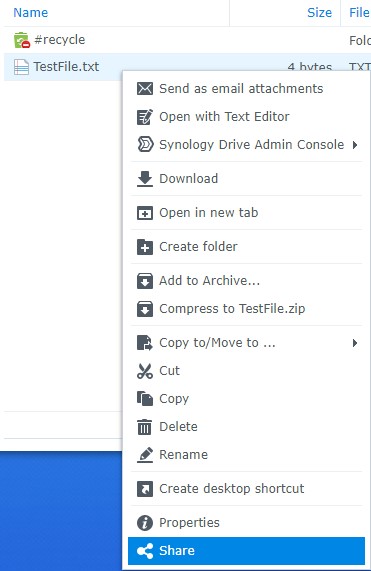
2. Navigate to the folder that is holding your file or folder, right-click it and select Share.
3. A Shared Links section will appear that will have the DDNS hostname or gofile (QuickConnect) link. If you’re using a reverse proxy, you will have to change this URL to match your domain name (remove DDNS hostname+port and add your domain name).
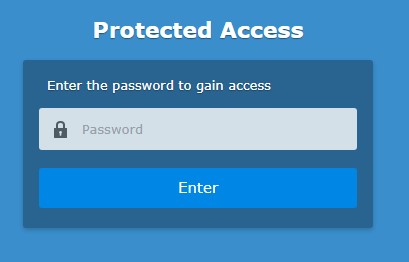
4. Enable Secure Sharing and set a password or DSM user account that will be needed to access this file or folder.
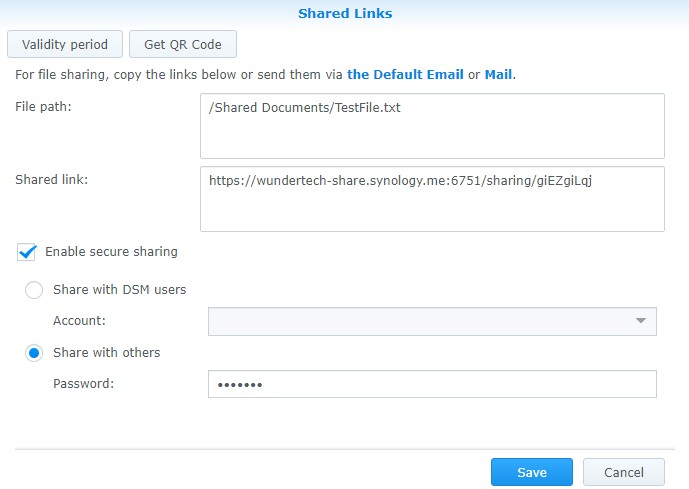
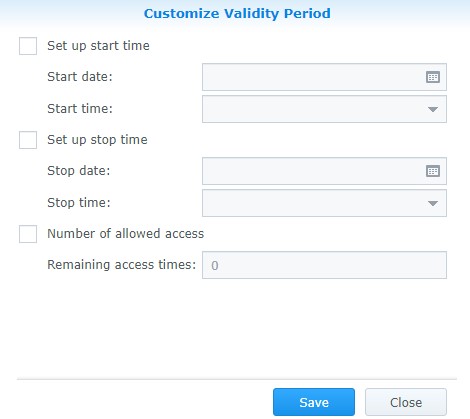
5. Select Validity period and change the start time, stop time, or total number of times a user can access this data.
6. Select Save and your link will be copied to your clipboard.
Depending on the type of security you selected (user account or password), when the user navigates to the address, they will be prompted to enter the information.
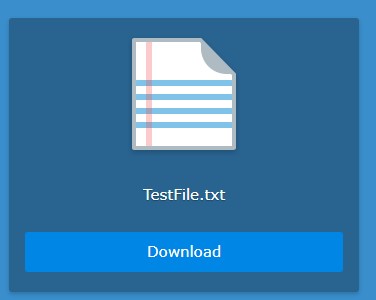
When they log in, they will be allowed to download the file. If the data that was shared is a folder, they will have the ability to see and download everything inside of the folder.
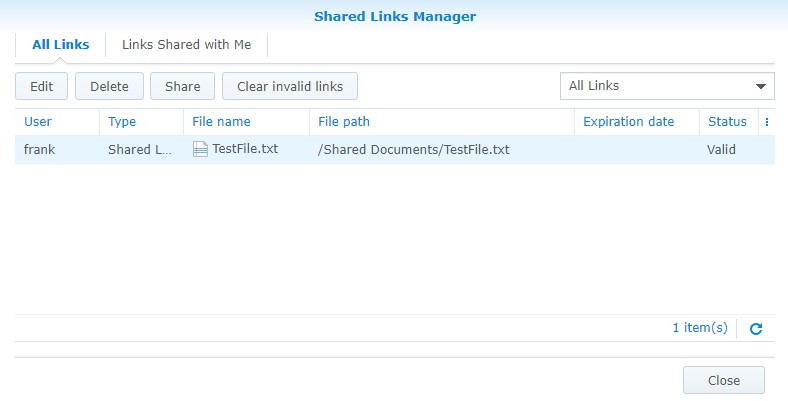
If you’re sharing multiple files and folders, you need to be able to track them somehow. In File Station, select Tools, then Shared Links Manager. You will then be able to manage all of your links!
The steps you need to take on how to share files on a Synology NAS is very easy, but how you go about sharing those links is what you’ll have to figure out. I am hoping that the video clarified slightly what the best option for you is, but if you have any questions, feel free to leave them in the comments!