In this tutorial, we are going to look at how to set up Pi-hole on a Synology NAS. Before we get started, I want to be clear that this process changed drastically after DSM 7.2 was released in May of 2023. Now, Container Manager is used as opposed to Docker and the UI is entirely different.
It is incredibly important to note that having redundant DNS servers is very important. Losing DNS resolution has similar consequences to losing internet from your ISP – you might think the internet is down, but you really just lost DNS resolution.
I highly suggest that you purchase a cheap Raspberry Pi and configure Pi-hole on it so that you have two Pi-hole DNS servers. This will ensure that when your NAS is rebooted, your clients do not lose DNS resolution services.
How to Set Up Pi-hole on a Synology NAS
Before we configure the container itself, we need to create a few folders which we’ll mount the container volumes.
Configuring the Volume Mappings
1. Install Container Manager from Synology’s Package Center. This will automatically create a docker shared folder on your NAS. This is what we’ll use to configure Pi-hole.
2. There are two folders that we will map our Docker image to that we need to create. Inside of the docker folder, we are going to create a folder named pihole.
Inside that folder, we are going to create two subfolders. Create one folder named pihole and another folder named dnsmasq.d. From a navigational perspective, the paths will look like this:
docker > pihole > pihole
docker > pihole > dnsmasq.d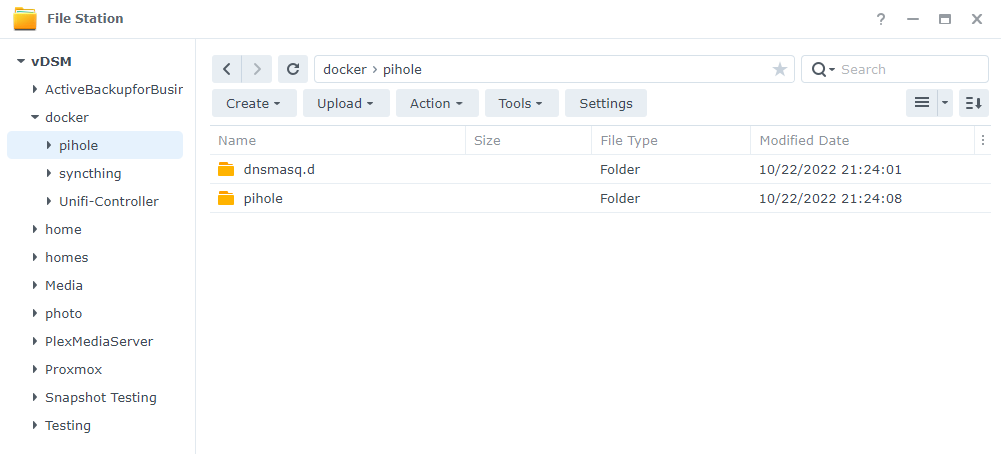
Configuring the Macvlan Network Interface
As mentioned above, we’re configuring a macvlan network interface so that our Pi-hole container will have an entirely separate IP address and ports. To be clear, this means our Pi-hole instance will have a completely separate set of ports.
There are port conflicts if you use the host network interface, and this will bypass all of them. You’ll also access Pi-hole on a separate IP address than your NAS has.
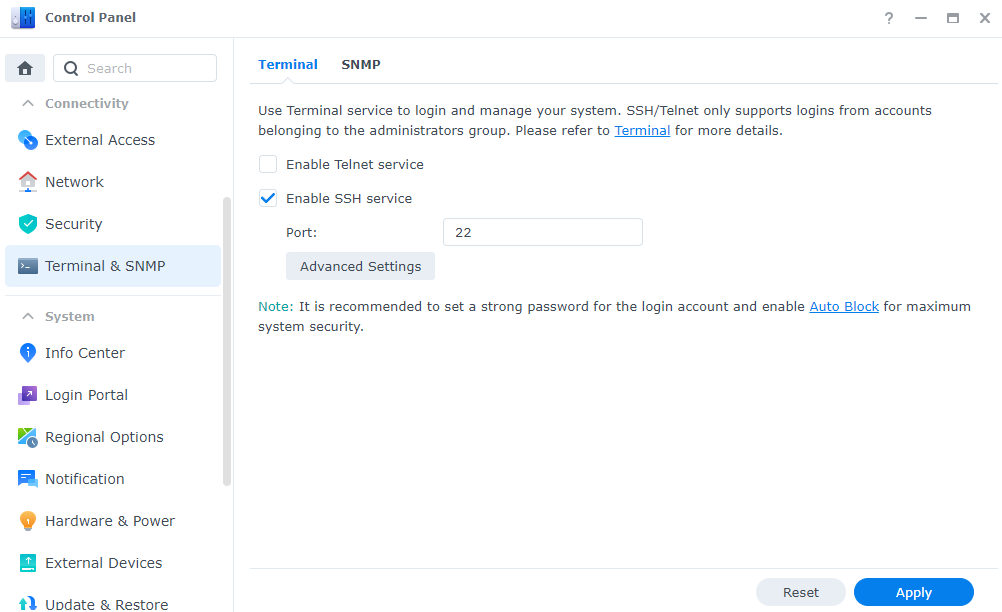
1. Ensure you can SSH into your Synology NAS. Open Control Panel, select Terminal & SNMP, and Enable SSH service. If you are using Synology’s Firewall, ensure that you allow port 22 traffic.
2. SSH into your Synology NAS using your favorite SSH tool. The first thing that we need to do is create a docker macvlan network interface. First, we need to determine what network interfaces currently exist (on your Synology NAS) and note down the adapter name.
To do this, run the command below and note down the network interface name that has your Synology NAS’s IP address (in this example, mine is eth0).
ifconfig

3. Next, you need to run the command below while substituting the correct subnet (most are 192.168.1.0/24 by default). You also need to pick an IP address that you’d like to use that’s not currently in use. I will be using 192.168.1.198.
NOTE: ph_network will be the name of the network (you can substitute this as you’d like). The values in red might have to be altered
sudo docker network create -d macvlan -o parent=eth0 --subnet=192.168.1.0/24 --gateway=192.168.1.1 --ip-range=192.168.1.198/32 ph_network
Our network is now created. We can then exit our SSH session and disable it in DSM (if you won’t be using it). If you are disabling it and you created a firewall rule for it, you should inactivate the firewall rule as well.
Creating the Docker Compose File for Pi-Hole
Thanks to DSM 7.2 and the addition of Docker Compose, the steps below will be significantly easier than they were in prior versions.
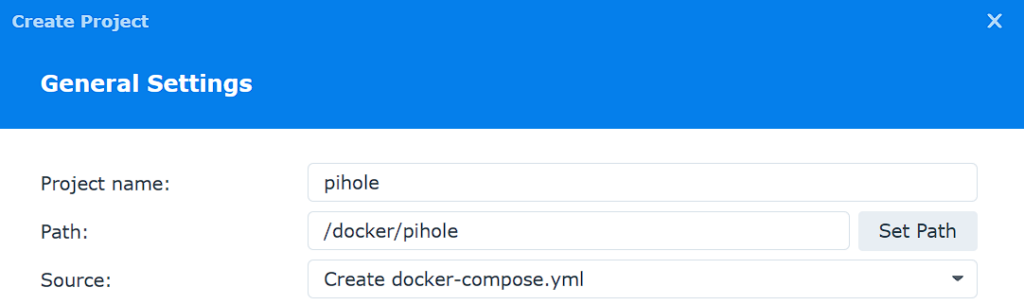
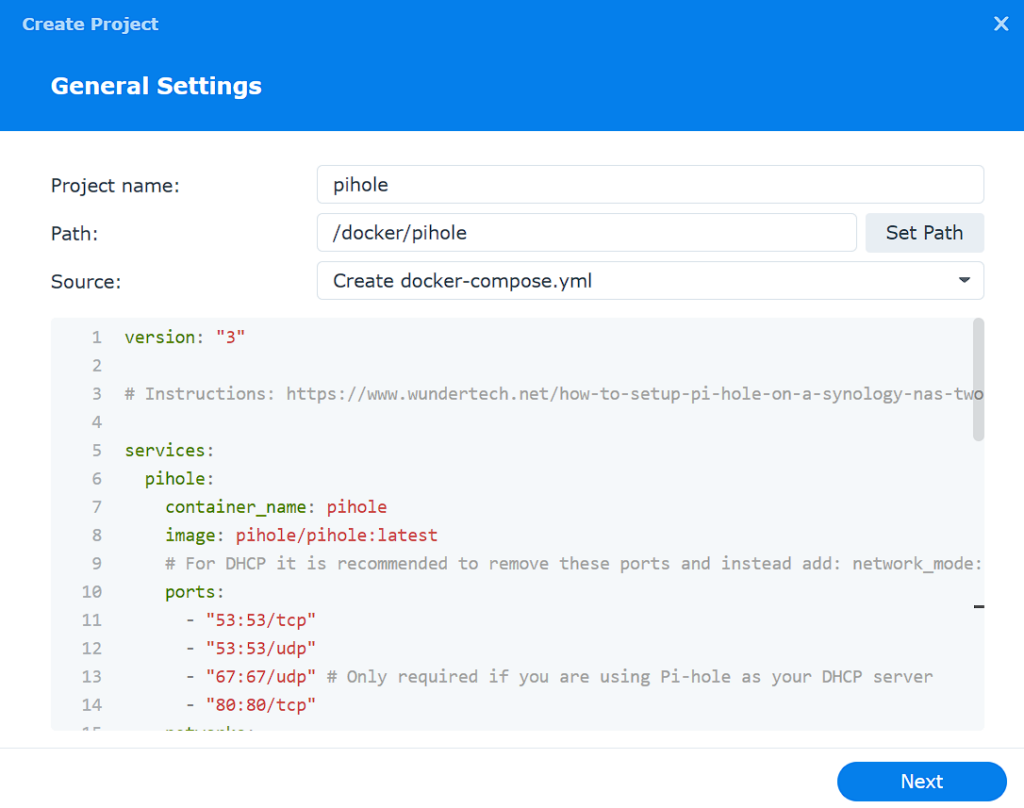
1. Open Container Manager, select Project, then Create.
2. Enter pihole as the Project Name, then select the pihole folder and select Create docker-compose.yml.
3. There are a few changes you might have to make to the docker-compose file before creating it. I have highlighted in red what might need to be updated, but in general, you’ll potentially change the volume number, timezone, and most importantly, password.
- WEBPASSWORD: password that you’d like to access the admin portal with.
- TZ: Current timezone.
version: "3"
# Instructions: https://www.wundertech.net/how-to-setup-pi-hole-on-a-synology-nas-two-methods/
services:
  pihole:
    container_name: pihole
    image: pihole/pihole:latest
    ports:
      - "53:53/tcp"
      - "53:53/udp"
      - "67:67/udp" # Only required if you are using Pi-hole as your DHCP server
      - "80:80/tcp"
    networks:
     - ph_network
     - ph_bridge
    environment:
      TZ: 'America/Chicago'
      WEBPASSWORD: 'password'
      DNSMASQ_LISTENING: local
    # Volumes store your data between container upgrades
    volumes:
      - '/volume1/docker/pihole/pihole:/etc/pihole'
      - '/volume1/docker/pihole/dnsmasq.d:/etc/dnsmasq.d'
    cap_add:
      - NET_ADMIN # Required if you are using Pi-hole as your DHCP server, else not needed
    restart: unless-stopped
networks:
    ph_bridge:
      driver: bridge
      ipam:
        config:
          - subnet: 192.168.10.0/24
            gateway: 192.168.10.1
            ip_range: 192.168.10.2/32
    ph_network:
      name: ph_network
      external: true
4. Add the Docker Compose file above with your changes to the editor, and select Next.
5. Select Next until you can view the summary, then select Done to create the container.
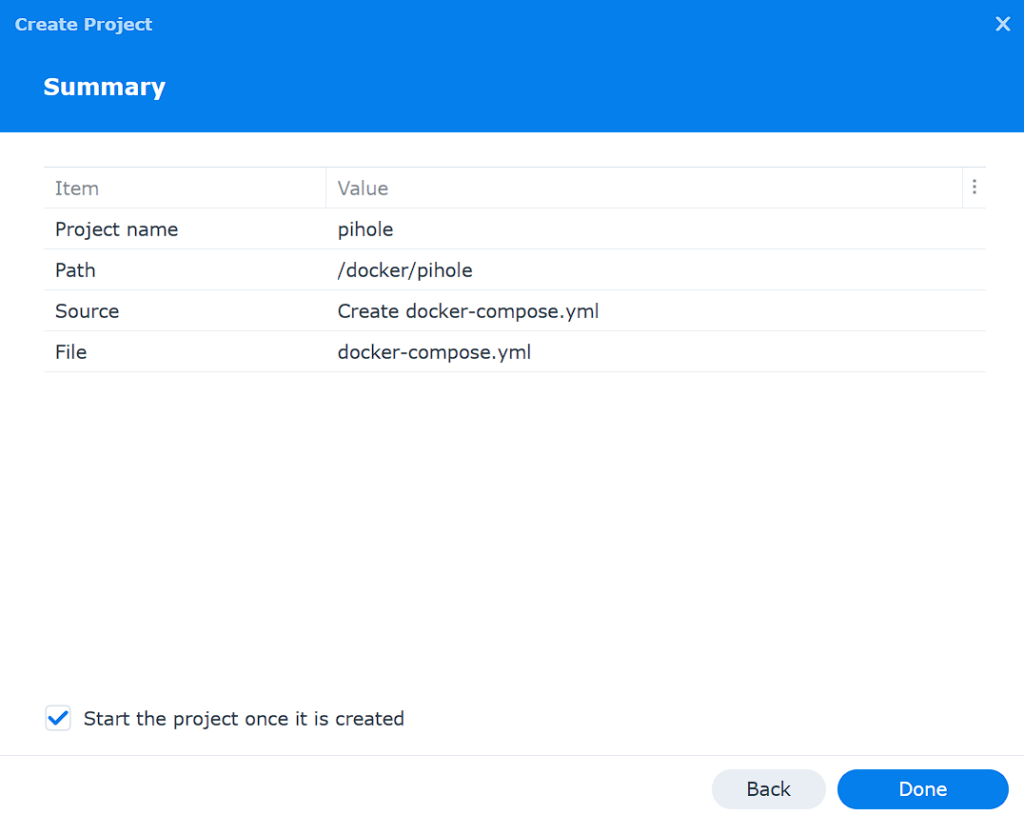
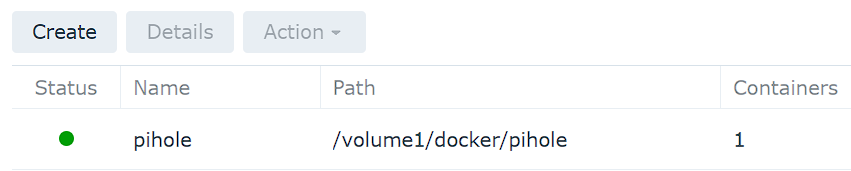
6. The container is now created and Pi-hole is running!
Configuring the Pi-hole Application
Pi-hole is now installed and can be accessed by following the IP address of your macvlan network interface and signing in with the password specified above!
http://[ph_network_IP_ADDRESS]/admin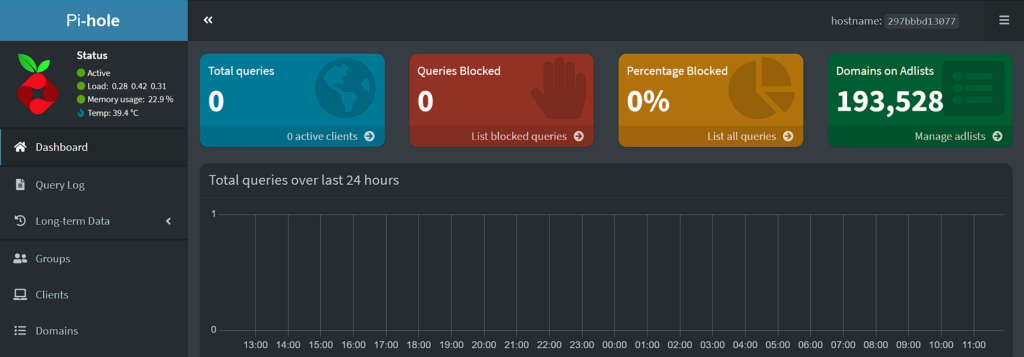
From here, you can configure Local DNS Records, and add or change various blocklists! Pi-hole is now functional, but there are still DNS changes that must be made.
Updating DNS for Pi-hole
Now that the Pi-hole setup is complete, we need to determine a way to point our clients to our DNS server. There are two main ways to do this:
- Point your router’s DNS server to your Pi-hole server IP address. This will ensure that any device connected will use Pi-hole as its DNS server.
- Point each client to your DNS server. This is beneficial if you only want certain clients to use Pi-hole as a DNS server.
I point my router’s DNS servers to my Pi-hole server as I want to ensure every device connects to it. This is different for every router, so you might have to look up where exactly it is on your device.
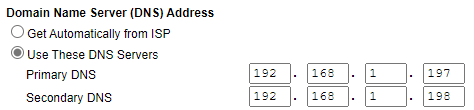
Now, all devices on my local network will automatically use these DNS servers and Pi-hole adblocking will work for all devices!
Using Bridge Network Interface for NAS to Pi-hole Communication
If you are interested in connecting directly from the NAS to the Container for DNS, you MUST use the Bridge network interface created in the Docker Compose file.
networks:
    ph_bridge:
      driver: bridge
      ipam:
        config:
          - subnet: 192.168.10.0/24
            gateway: 192.168.10.1
            ip_range: 192.168.10.2/32
    ph_network:
      name: ph_network
      external: true
The IP address in this tutorial is 192.168.10.2. If you use this IP address from the NAS directly (and only the NAS), you will be able to use Pi-hole as the DNS server.
Troubleshooting Steps
In prior versions of DSM and the Pi-hole container, I had DNS issues with the container itself. In situations like this, I found that manually specifying the DNS servers was necessary. Follow the steps below if you’re having issues with the container starting.
1. SSH into your Synology NAS and run these commands, but substitute your volume.
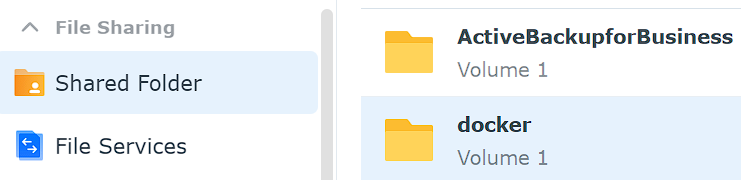
cd /[VOLUME_#]/docker/pihole
sudo vi resolv.conf

If you aren’t sure what volume you’re using, open the Control Panel, select Shared Folder, then look at what’s listed for docker folder and use that number:
2. In the file that is created, enter the two lines below and save the file. If you aren’t sure how to use the vi editor, you can learn how to use it here.
In summary, from the editor, press i (for insert mode), add the nameservers listed below, then press the ESC key (to exit editing), then type :wq, then enter to write the changes and exit.
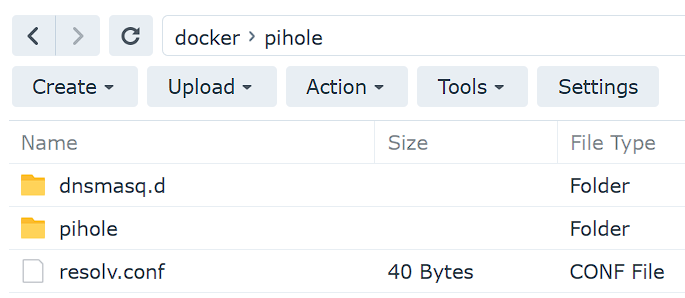
NOTE: If you have trouble with this, just create a local file named resolv.conf with the two lines below and upload it to your pihole folder in DSM.
nameserver 127.0.0.1
nameserver 8.8.8.8

After the file is created, you should see it (resolv.conf) in the pihole folder in DSM.
3. Recreate the container using the Docker Compose file below which will utilize this file. I have highlighted in red what might be updated, but in general, you’ll potentially change the volume number, timezone, and most importantly, password.
- WEBPASSWORD: password that you’d like to access the admin portal with.
- TZ: Current timezone.
version: "3"
# Instructions: https://www.wundertech.net/how-to-setup-pi-hole-on-a-synology-nas-two-methods/
services:
  pihole:
    container_name: pihole
    image: pihole/pihole:latest
    ports:
      - "53:53/tcp"
      - "53:53/udp"
      - "67:67/udp" # Only required if you are using Pi-hole as your DHCP server
      - "80:80/tcp"
    networks:
     - ph_network
     - ph_bridge
    environment:
      TZ: 'America/Chicago'
      WEBPASSWORD: 'password'
      DNSMASQ_LISTENING: local
    # Volumes store your data between container upgrades
    volumes:
      - '/volume1/docker/pihole/pihole:/etc/pihole'
      - '/volume1/docker/pihole/dnsmasq.d:/etc/dnsmasq.d'
      - '/volume1/docker/pihole/resolv.conf:/etc/resolv.conf'
    cap_add:
      - NET_ADMIN # Required if you are using Pi-hole as your DHCP server, else not needed
    restart: unless-stopped
networks:
    ph_bridge:
      driver: bridge
      ipam:
        config:
          - subnet: 192.168.10.0/24
            gateway: 192.168.10.1
            ip_range: 192.168.10.2/32
    ph_network:
      name: ph_network
      external: true
Conclusion & Final Thoughts
The process of setting up Pi-hole on a Synology NAS isn’t too bad and Pi-hole is awesome! I’ve been using it for a while and while I run into the occasional issue where it blocks something I need, finding it and whitelisting it is a fairly easy process.
Once again, I will point out the importance of redundant Pi-hole servers. There are so many benefits to having a second DNS server, and with Raspberry Pi Zero kits being as cheap as $25, it’s worth it for redundancy purposes.


Thank you for this really good guideline to enabling the Pi-Hole setup on a synology with the macvlan interface.
I was wondering why I still got so much ads and figured out that this was due to IPv6 within my network.
Maybe you want to give a hint about that and even better show how to configure it appropriate for the macvlan interface as well.
Within my AVM Fitz!Box I have now configured DHCP DNS hosts for lookup and currently happy with it.
Again, thanks a lot and best regards
Thanks so much! I will keep this in mind for a future tutorial!!
Awesome write up and very clear instructions! Thank you for taking the time to walk us through. I was using the basic setup prior with DCHP running though pihole to see all clients since my night hawk router gateway was the only client showing. I was hoping the macvlan would solve that issue so I could revert back to my router handing out IPs, but still only seeing only 192.168.1.1 for all requests. Do you have any advice, or would you just trust pihole for DHCP? I also loved your video on setting up a backup pi in the event the synology were to go down. This inspired me to grab a zero and get it going. Again, awesome stuff and great work! Thank you
Thanks so much! You are on the right track that using Pi-hole as DHCP or manually connecting each client to it is the best way to get it to show each IP address. Both options are solutions, but it depends how you’d like to handle it. If you want all devices to run through Pi-hole automatically, either leaving it as-is or letting Pi-hole handle DHCP would be your best option. If you only have a few devices and don’t mind setting their DNS servers manually, that will also solve the problem.
Let me know if I can help in any other way!
Hey! Thanks for the tutorial.
I just wanted to suggest maybe recommending nano instead of vi to edit these config files. If nano is installed on these NAS, it’s a whole lot easier to handle than vi(m). Sure a vim expert can be much faster with it, but for many people here they will only take a long time to get this one edit done and likely not touch vi again any time soon.
Regards, Sam
Thanks for the feedback! I completely agree that nano is significantly easier to work with than vi, but I don’t think nano comes installed on a Synology NAS, so it requires a few additional install steps. I could certainly be wrong though, so I will try and point out that there are other text editors that can be used in future videos!
So I created the bridge, and set IP of PiHole to 192.168.1.250, however I’m unable to connect to the pihole admin page. I’ve turned the firewall on/off and restarted PiHole in between with no difference. The pihole is running currently and no errors are shown in the log files. Here’s my setup:
IFCONFIG Shows:
docker0 Link encap:Ethernet HWaddr 02:42:50:4F:21:40
inet addr:172.17.0.1 Bcast:172.17.255.255 Mask:255.255.0.0
UP BROADCAST MULTICAST MTU:1500 Metric:1
RX packets:0 errors:0 dropped:0 overruns:0 frame:0
TX packets:0 errors:0 dropped:0 overruns:0 carrier:0
collisions:0 txqueuelen:0
RX bytes:0 (0.0 B) TX bytes:0 (0.0 B)
eth0 Link encap:Ethernet HWaddr 00:11:32:DE:06:B9
UP BROADCAST RUNNING MULTICAST MTU:1500 Metric:1
RX packets:1071939 errors:0 dropped:0 overruns:0 frame:0
TX packets:385611 errors:0 dropped:0 overruns:0 carrier:0
collisions:0 txqueuelen:1000
RX bytes:244545447 (233.2 MiB) TX bytes:687479782 (655.6 MiB)
Interrupt:93 base 0xe000
eth1 Link encap:Ethernet HWaddr 00:11:32:DE:06:BA
UP BROADCAST RUNNING MULTICAST MTU:1500 Metric:1
RX packets:1731146 errors:0 dropped:0 overruns:0 frame:0
TX packets:1987058 errors:0 dropped:0 overruns:0 carrier:0
collisions:0 txqueuelen:1000
RX bytes:260351233 (248.2 MiB) TX bytes:6816001538 (6.3 GiB)
Interrupt:92 base 0xa000
lo Link encap:Local Loopback
inet addr:127.0.0.1 Mask:255.0.0.0
inet6 addr: ::1/128 Scope:Host
UP LOOPBACK RUNNING MTU:65536 Metric:1
RX packets:7401217 errors:0 dropped:0 overruns:0 frame:0
TX packets:7401217 errors:0 dropped:0 overruns:0 carrier:0
collisions:0 txqueuelen:1
RX bytes:1024702701 (977.2 MiB) TX bytes:1024702701 (977.2 MiB)
ovs_eth0 Link encap:Ethernet HWaddr 00:11:32:DE:06:B9
inet addr:192.168.1.140 Bcast:192.168.1.255 Mask:255.255.255.0
inet6 addr: fe80::211:32ff:fede:6b9/64 Scope:Link
UP BROADCAST RUNNING MULTICAST MTU:1500 Metric:1
RX packets:1067396 errors:0 dropped:0 overruns:0 frame:0
TX packets:271009 errors:0 dropped:0 overruns:0 carrier:0
collisions:0 txqueuelen:1
RX bytes:229338647 (218.7 MiB) TX bytes:687480398 (655.6 MiB)
ovs_eth1 Link encap:Ethernet HWaddr 00:11:32:DE:06:BA
inet addr:192.168.1.141 Bcast:192.168.1.255 Mask:255.255.255.0
inet6 addr: fe80::211:32ff:fede:6ba/64 Scope:Link
UP BROADCAST RUNNING MULTICAST MTU:1500 Metric:1
RX packets:1730965 errors:0 dropped:0 overruns:0 frame:0
TX packets:907134 errors:0 dropped:0 overruns:0 carrier:0
collisions:0 txqueuelen:1
RX bytes:236106863 (225.1 MiB) TX bytes:6816002154 (6.3 GiB)
SSH command I ran:
sudo docker network create -d macvlan -o parent=ovs_eth0 –subnet=192.168.1.0/24 –gateway=192.168.1.1 –ip-range=192.168.1.250/27 PiHole_Network
PiHole_Bridge
Driver: bridge
Subnet 192.168.10.0/24
IP Range: 192.168.10.2/32
Gateway: 192.168.10.1
IPv6: Disabled
Container: PiHole-Vlan
PiHole_Network
Driver: macvlan
Subnet 192.168.10.0/24
IP Range: 192.168.1.250/27
Gateway: 192.168.1.1
IPv6: Disabled
Container: PiHole-Vlan
192.168.1.250/admin shows, the site can’t be reached, took too long to respond
Any reason why you used /27 in the macvlan creation command? That could be it, since /32 is what will give you that individual IP. Can you run an IP scan on your local network to see if it was assigned a different IP?
I can’t figure out what’s wrong with my setup. I tried option 1, and the container booted fine, but I was unable to reach the admin page in my browser. So then I tried option 2, and when I try to boot the container I get a “Docker API has failed” error.
For option one, do you have Synology’s firewall enabled? If you do, did you create an “allow” rule for it?
thank you for this tutorial. New to docker on synology, how to we go about updating pihole?
WunderTech
2 months ago
Generally, the easiest way that I find to do it is to download the latest Pi-Hole image, stop the Pi-Hole container and then right-click it and duplicate settings. It will then create a new container with the same settings (and new image) where you can start it up and test to make sure everything is still working as expected. If it is, feel free to delete the old container.
People have suggested that you can do it by “clearing” the existing container, but that does NOT work for me. I lose all my settings that way.
Found it in your comments on the YouTube Video https://www.youtube.com/watch?v=4Z9Mtpc7Tak&t=1s
Yes! Those will work as well, the tutorial I just linked to is a little more detailed.
Just created a tutorial for that! This should help: https://www.wundertech.net/how-to-update-docker-containers-on-a-synology-nas/
Thanks for checking out the tutorial!
Thank you for the detailed instructions! I am new to this level of networking. I do have a quick question. When I am creating the macvlan, do I use my gateway IP addess or the one you provided?
The issue that I am running into is that i cannot access the webportal after completing the macvlan setup.
Does the macvlan network interface create successfully?
You will use your gateway IP address. Everything should match your local subnet, so if you’re using 192.168.2.X, use 192.168.2 everywhere that I have 192.168.1.
Let me know if you have any other questions!
I’m having trouble resolving DNS queries intended for the synology active directory. i have successfully installed pihole using macvlan method (because i needed different ip for pihole as 2 DNS servers (active directory and pihole) cannot reside on same IP) On pihole v5.1.2 conditional forwarding is configured as follows:
local network in CIDR notation: 10.1.1.0/16
ip address of DHCP: 10.1.1.20
local domain name: domain.local
For some strange reason, clients are unable to contact the active directory hosted on the NAS itself at 10.1.1.20
Someone on reddit suggested creating 01-custom.conf file inside /etc/dnsmasq.d/ to create a conditional forwarding as follows, which still didn’t work:
server=/domain.local/10.1.1.20
server=/1.1.10.in-addr.arpa/10.1.1.20
Any help will be highly appreciable!
Your issue might be that your container won’t be able to communicate with the host (NAS) by its IP address if you’re using a macvlan network interface. By default, the container will ONLY be able to communicate with the host using the bridge network (192.168.10.2 in this tutorial). The same is true for the Synology NAS – it will only be able to communicate with the container using the bridge network.
Let me know if that works, and if it doesn’t, we can continue troubleshooting!
Is anyone else having trouble using macvlan over bond0?
Hello,
I am running into a problem when forwarding my router to the Pi-Hole. When I forward the primary DNS of the router to the ip address (macvlan) I run into an error “dns resolution is currently unavailable” when I try to update gravity, or if I need to restart the pi-hole it gets stuck in a loop with the same error on the log. If I turn off dns forwarding on the router to the pi-hole, it works. Any clue?
That’s strange. If you point an individual client to it (rather than your router), does DNS resolution work?
Also, did you create the resolv.conf file and add the correct DNS servers there? That is generally the containers DNS server.
Let me know and we can continue troubleshooting!