In this tutorial, we are going to look at how to set up Pi-hole on a Synology NAS. Before we get started, I want to be clear that this process changed drastically after DSM 7.2 was released in May of 2023. Now, Container Manager is used as opposed to Docker and the UI is entirely different.
Before we look at how to set up Pi-hole on a Synology NAS, it is incredibly important to note that having redundant DNS servers is very important. Losing DNS resolution has similar consequences to losing internet from your ISP – you might think the internet is down, but you really just lost DNS resolution.
I highly suggest that you purchase a cheap Raspberry Pi and configure Pi-hole on it so that you have two Pi-hole DNS servers. This will ensure that when your NAS is rebooted, your clients do not lose DNS resolution services.
How to Set Up Pi-hole on a Synology NAS
Before we look at how to set up Pi-hole on a Synology NAS by configuring the Pi-hole container itself, we need to create a few folders which we’ll mount the container volumes.
Configuring the Volume Mappings
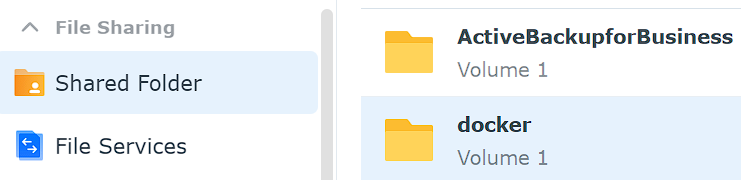
1. Install Container Manager from Synology’s Package Center. This will automatically create a docker shared folder on your NAS. This is what we’ll use to configure Pi-hole on a Synology NAS.
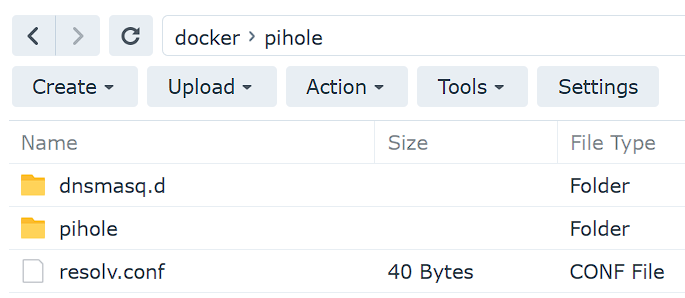
2. There are two folders that we will map our Docker image to that we need to create. Inside of the docker folder, we are going to create a folder named pihole.
Inside that folder, we are going to create two subfolders. Create one folder named pihole and another folder named dnsmasq.d. From a navigational perspective, the paths will look like this:
docker > pihole > pihole
docker > pihole > dnsmasq.d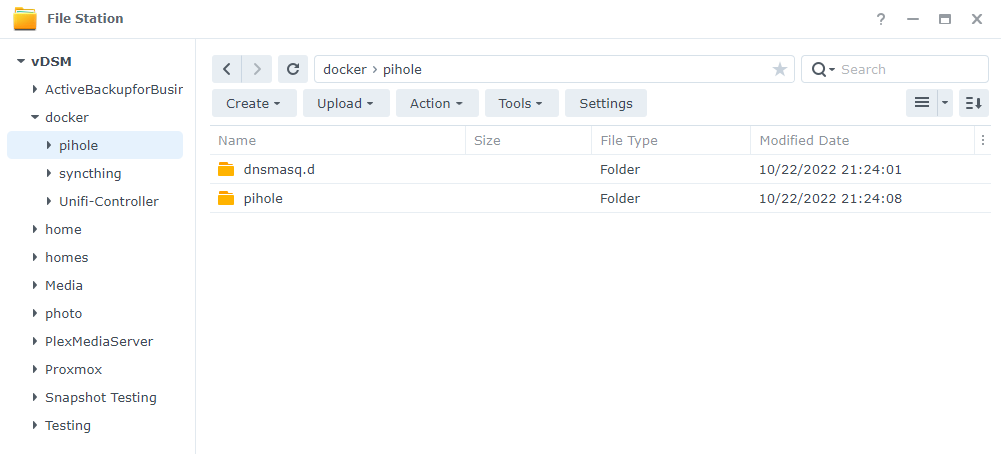
Configuring the Macvlan Network Interface
As mentioned above, we’re configuring a macvlan network interface so that our Pi-hole container will have an entirely separate IP address and ports. To be clear, this means our Pi-hole on a Synology NAS instance will have a completely separate set of ports.
There are port conflicts if you use the host network interface, and this will bypass all of them. You’ll also access Pi-hole on a separate IP address than your NAS has.
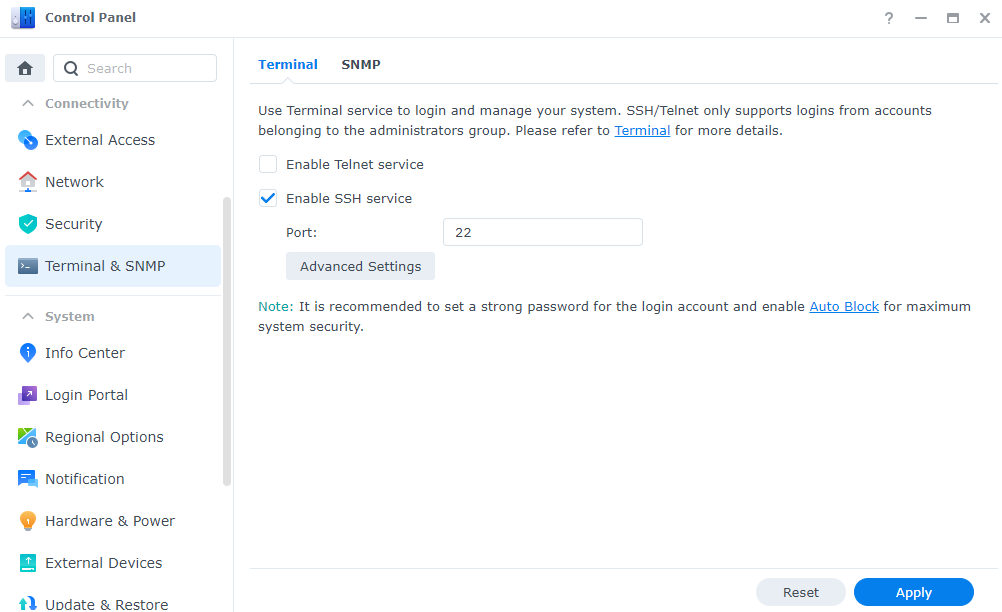
1. Ensure you can SSH into your Synology NAS. Open Control Panel, select Terminal & SNMP, and Enable SSH service. If you are using Synology’s Firewall, ensure that you allow port 22 traffic.
2. SSH into your Synology NAS using your favorite SSH tool. The first thing that we need to do is create a docker macvlan network interface. First, we need to determine what network interfaces currently exist (on your Synology NAS) and note down the adapter name.
To do this, run the command below and note down the network interface name that has your Synology NAS’s IP address (in this example, mine is eth0).
ifconfig

3. Next, you need to run the command below while substituting the correct subnet (most are 192.168.1.0/24 by default). You also need to pick an IP address that you’d like to use that’s not currently in use. I will be using 192.168.1.198.
NOTE: ph_network will be the name of the network (you can substitute this as you’d like). The values in red might have to be altered
sudo docker network create -d macvlan -o parent=eth0 --subnet=192.168.1.0/24 --gateway=192.168.1.1 --ip-range=192.168.1.198/32 ph_network
Our network is now created. We can then exit our SSH session and disable it in DSM (if you won’t be using it). If you are disabling it and you created a firewall rule for it, you should inactivate the firewall rule as well.
Creating the Docker Compose File for Pi-Hole
Thanks to DSM 7.2 and the addition of Docker Compose, the steps below will be significantly easier when looking at how to set up Pi-hole on a Synology NAS than they were in prior versions.
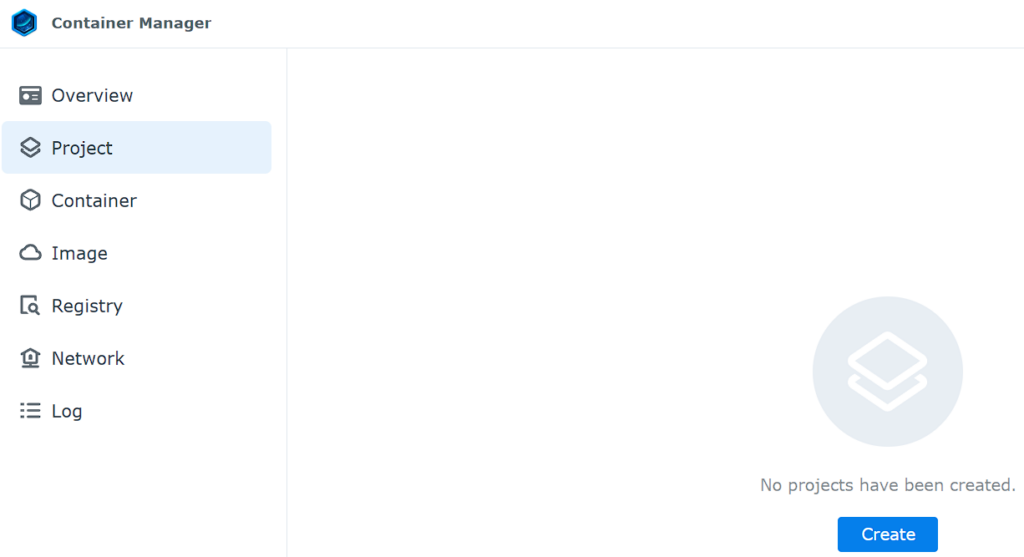
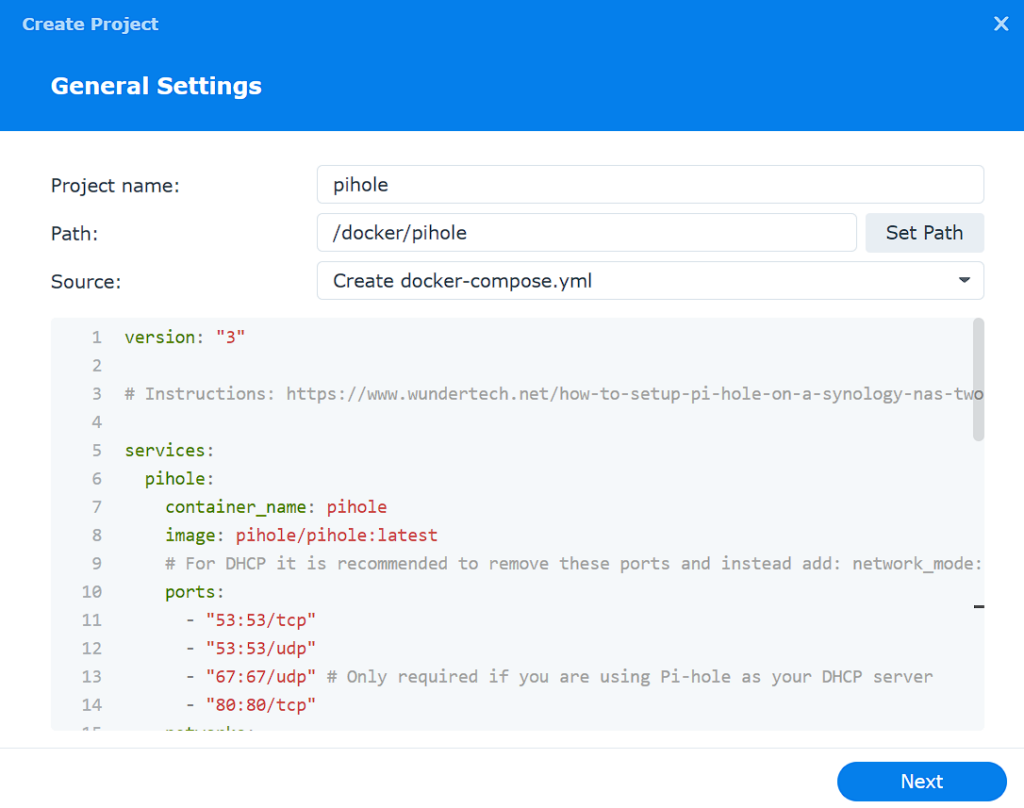
1. Open Container Manager, select Project, then Create.
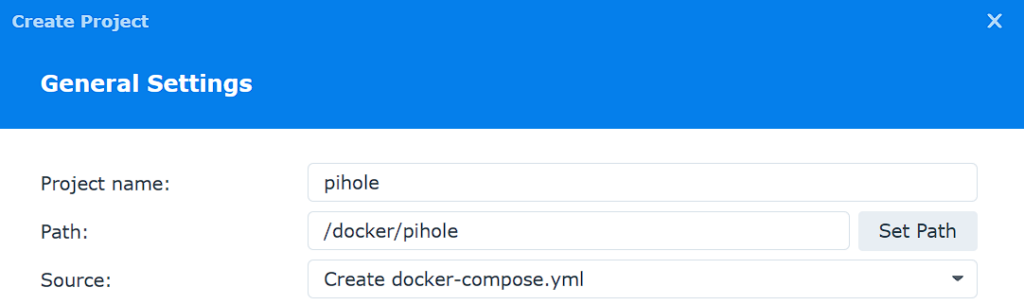
2. Enter pihole as the Project Name, then select the pihole folder and select Create docker-compose.yml.
3. There are a few changes you might have to make to the docker-compose file before creating it. I have highlighted in red what might need to be updated, but in general, you’ll potentially change the volume number, timezone, and most importantly, password.
- WEBPASSWORD: password that you’d like to access the admin portal with.
- TZ: Current timezone.
version: "3"
# Instructions: https://www.wundertech.net/how-to-setup-pi-hole-on-a-synology-nas-two-methods/
services:
  pihole:
    container_name: pihole
    image: pihole/pihole:latest
    ports:
      - "53:53/tcp"
      - "53:53/udp"
      - "67:67/udp" # Only required if you are using Pi-hole as your DHCP server
      - "80:80/tcp"
    networks:
     - ph_network
     - ph_bridge
    environment:
      TZ: 'America/Chicago'
      WEBPASSWORD: 'password'
      DNSMASQ_LISTENING: local
    # Volumes store your data between container upgrades
    volumes:
      - '/volume1/docker/pihole/pihole:/etc/pihole'
      - '/volume1/docker/pihole/dnsmasq.d:/etc/dnsmasq.d'
    cap_add:
      - NET_ADMIN # Required if you are using Pi-hole as your DHCP server, else not needed
    restart: unless-stopped
networks:
    ph_bridge:
      driver: bridge
      ipam:
        config:
          - subnet: 192.168.10.0/24
            gateway: 192.168.10.1
            ip_range: 192.168.10.2/32
    ph_network:
      name: ph_network
      external: true
4. Add the Docker Compose file above with your changes to the editor, and select Next.
5. Select Next until you can view the summary, then select Done to create the container.
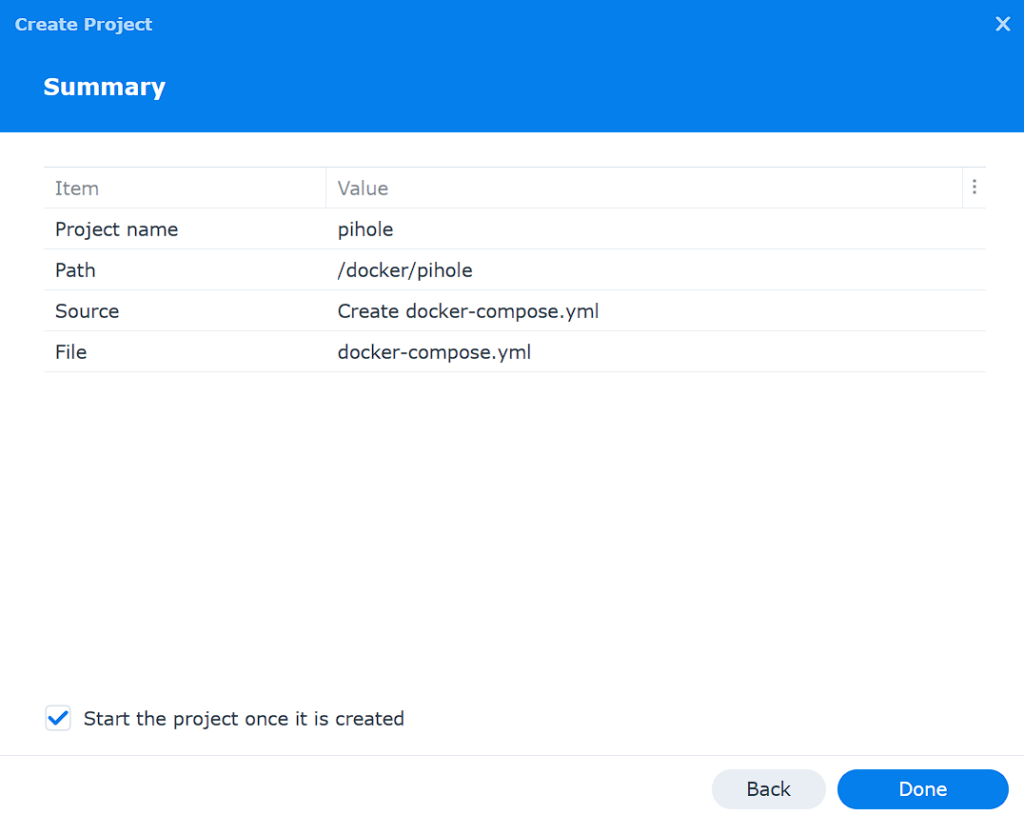
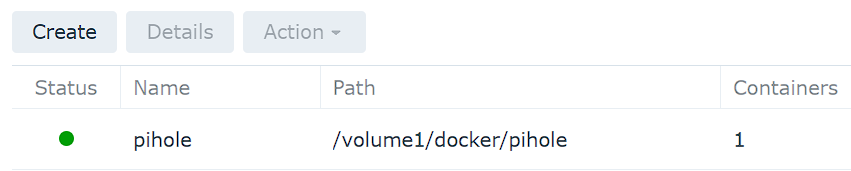
6. The container is now created and Pi-hole is running!
Configuring the Pi-hole Application
Pi-hole on a Synology NAS is now installed and can be accessed by following the IP address of your macvlan network interface and signing in with the password specified above!
http://[ph_network_IP_ADDRESS]/admin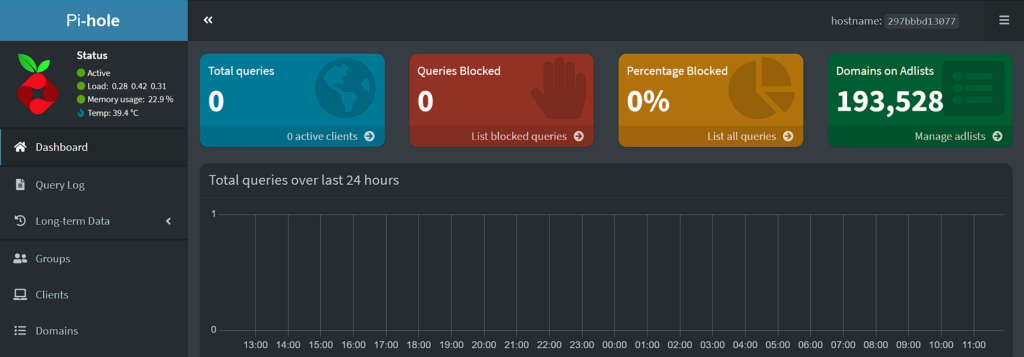
From here, you can configure Local DNS Records, and add or change various blocklists! Pi-hole is now functional, but there are still DNS changes that must be made.
Updating DNS to Use Pi-hole
Now that we looked at how to set up Pi-hole on a Synology NAS and that section is complete, we need to determine a way to point our clients to our DNS server. There are two main ways to do this:
- Point your router’s DNS server to your Pi-hole server IP address. This will ensure that any device connected will use Pi-hole as its DNS server.
- Point each client to your DNS server. This is beneficial if you only want certain clients to use Pi-hole as a DNS server.
I point my router’s DNS servers to my Pi-hole server as I want to ensure every device connects to it. This is different for every router, so you might have to look up where exactly it is on your device.
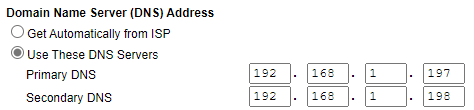
Now, all devices on my local network will automatically use these DNS servers and Pi-hole adblocking will work for all devices!
Using Bridge Network Interface for NAS to Pi-hole Communication
If you are interested in connecting directly from the NAS to the Container for DNS, you MUST use the Bridge network interface created in the Docker Compose file.
networks:
    ph_bridge:
      driver: bridge
      ipam:
        config:
          - subnet: 192.168.10.0/24
            gateway: 192.168.10.1
            ip_range: 192.168.10.2/32
    ph_network:
      name: ph_network
      external: true
The IP address in this tutorial is 192.168.10.2. If you use this IP address from the NAS directly (and only the NAS), you will be able to use Pi-hole as the DNS server.
Troubleshooting Steps
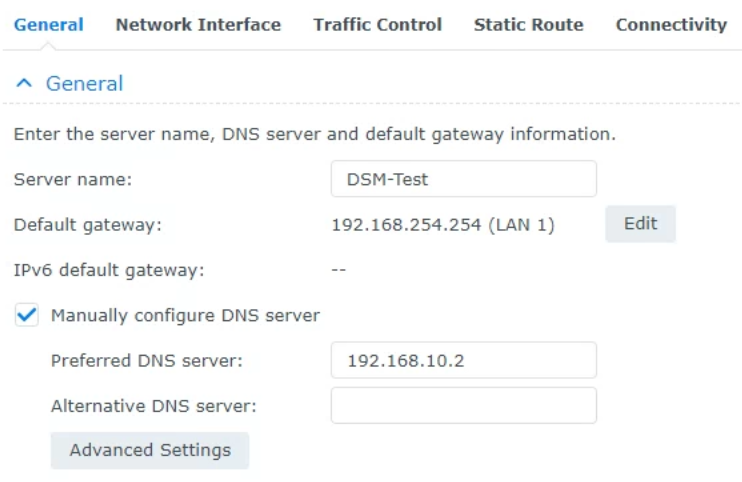
In prior versions of DSM and the Pi-hole container, I had DNS issues with the container itself. In situations like this, I found that manually specifying the DNS servers was necessary. Follow the steps below if you’re having issues with the container starting.
1. SSH into your Synology NAS and run these commands, but substitute your volume.
cd /[VOLUME_#]/docker/pihole
sudo vi resolv.conf

If you aren’t sure what volume you’re using, open the Control Panel, select Shared Folder, then look at what’s listed for docker folder and use that number:
2. In the file that is created, enter the two lines below and save the file. If you aren’t sure how to use the vi editor, you can learn how to use it here.
In summary, from the editor, press i (for insert mode), add the nameservers listed below, then press the ESC key (to exit editing), then type :wq, then enter to write the changes and exit.
NOTE: If you have trouble with this, just create a local file named resolv.conf with the two lines below and upload it to your pihole folder in DSM.
nameserver 127.0.0.1
nameserver 8.8.8.8

After the file is created, you should see it (resolv.conf) in the pihole folder in DSM.
3. Recreate the container using the Docker Compose file below which will utilize this file. I have highlighted in red what might be updated, but in general, you’ll potentially change the volume number, timezone, and most importantly, password.
- WEBPASSWORD: password that you’d like to access the admin portal with.
- TZ: Current timezone.
version: "3"
# Instructions: https://www.wundertech.net/how-to-setup-pi-hole-on-a-synology-nas-two-methods/
services:
  pihole:
    container_name: pihole
    image: pihole/pihole:latest
    ports:
      - "53:53/tcp"
      - "53:53/udp"
      - "67:67/udp" # Only required if you are using Pi-hole as your DHCP server
      - "80:80/tcp"
    networks:
     - ph_network
     - ph_bridge
    environment:
      TZ: 'America/Chicago'
      WEBPASSWORD: 'password'
      DNSMASQ_LISTENING: local
    # Volumes store your data between container upgrades
    volumes:
      - '/volume1/docker/pihole/pihole:/etc/pihole'
      - '/volume1/docker/pihole/dnsmasq.d:/etc/dnsmasq.d'
      - '/volume1/docker/pihole/resolv.conf:/etc/resolv.conf'
    cap_add:
      - NET_ADMIN # Required if you are using Pi-hole as your DHCP server, else not needed
    restart: unless-stopped
networks:
    ph_bridge:
      driver: bridge
      ipam:
        config:
          - subnet: 192.168.10.0/24
            gateway: 192.168.10.1
            ip_range: 192.168.10.2/32
    ph_network:
      name: ph_network
      external: true
Conclusion & Final Thoughts
This tutorial explained how to set up Pi-hole on a Synology NAS. The process on how to set up Pi-hole on a Synology NAS isn’t too bad and Pi-hole is awesome! I’ve been using it for a while and while I run into the occasional issue where it blocks something I need, finding it and whitelisting it is a fairly easy process.
Once again, I will point out the importance of redundant Pi-hole servers. There are so many benefits to having a second DNS server, and with Raspberry Pi Zero kits being as cheap as $25, it’s worth it for redundancy purposes.
Thanks for checking out the tutorial on how to set up Pi-hole on a Synology NAS. If you have any questions on how to set up Pi-hole on a Synology NAS, please leave them in the comments!


Thank you very much for these easy, concise instructions! After trying to figure this out on several other sites and blogs, your tutorial helped me get it up and running in 15 minutes!!!
I’m glad that it helped. Thanks so much for the kind words!
When I click on Docker > Launch, to configure pihole, it says that proceeding will give pihole root access privileges in DSM. How do I avoid giving it root access?
Uncheck “Execute container using high privilege” and you should be good!
Let me know if you need anything else!
Hi there, this is a great guide on getting the nas setup. When i setup my first syno nas with pihole, it works great. the router and PC work fine when connecting to this ip address. I tried the same steps on a secondary syno nas. The steps worked and I was able to launch the web page no problem. The issue I am having is, when i setup the computer or router to this secondary nas IP, it does not pull up any results. The DNS does not resolve and there is no connections detected to the second syno nas IP. So I am not sure what extra step i need. I tried different ports and same issue. Any tips on making my backup syno nas work? Help!!!
Thanks for reading! When you say that it doesn’t resolve anything, do you mean that the DNS server isn’t being used? Certain devices only use the secondary DNS server if the primary is unavailable so that could be it. Would you be able to remove the primary DNS server (for testing) to see if the secondary works?
If I’m misunderstanding the problem, please let me know and we can continue troubleshooting!
When trying to create the network I’m getting the following error: “Error response from daemon: failed to allocate gateway (192.168.1.1): Address already in use”
Indeed, my gateway is at this address. But shouldn’t this be normal?
Also, my Synology NAS Ethernet adapter name is ovs_eth3. There is also an eth3, but the IP of my NAS is at the former.
Did you use the ovs_eth3 adapter in the macvlan creation command? You are correct that that’s the one you should use. Also, what NAS model do you have?
Let me know and we can continue troubleshooting!
I have the same error, but that seems to be because I already created a macvlan for the Nginx Proxy Manager. So I cant create another macvlan that uses eth0 as parent. @WunderTech, wouldn’t a trunked bridge mavlan be better to use for this? Haven’t tried it out yet myself. Will try it myself in the comming days. But if you have any thoughs on this I’d love to hear it.
The short answer is that yes, using a macvlan network interface when you would like to have multiple containers utilize it is not ideal. As far as a trunked bridge, I’m not sure how Synology will handle it, but I’ll look into it!
Had some time tonight to continue the search and macvlan is fine to use with multiple containers. But if you want to set a specific ip to the container you best use the console to do that with `docket network connect –ip “your-ip” your-network your-container` e.g. `docker network connect –ip 192.168.1.225 macvlan_network nginx-proxy`
I did this tonight and this seems to be quite easy and straight forward to do. I now have my proxy manager en pihole using the ip I gave them. If people want to use this you have to skip adding the macvlan_network via the gui. Instead you finish the setup as described but uncheck the start right away checkbox. Before you start the container you type in the above command in the terminal/ssh and that will add the container to the macvlan_network on the ip you specified. After that you press start and Bob’s your uncle. 🙂
@WunderTech, if this sounds good to add and need clarification let me know. I tend to explain stuff a bit to simple sometimes. 🙂
I appreciate the response! Great input, I will try and test this out this weekend. Thanks again!
I appriciate the instructions, easy to follow. When I do this though I get to the Pihole login page and it tells me the password is incorrect. (Several attempts of deleting the docker and reinstalling give the same results.)
TIA
Bill
Thanks for checking out the tutorial! Are you using the same value that you’re adding to the WEBPASSWORD environment variable? Whatever you put as the value for “WEBPASSWORD” is the password that you should be using. Do you receive any errors when you try and login?
Let me know and we can continue troubleshooting!
Just checking in, I see a version 5.1.2 just wondering if the new version has addressed the problems you were having with 5.1.1.
Would like to update to most current version if it does not have issues.
The issue that caused 5.1.1 to break appears to be fixed in 5.1.2. I haven’t really had much time to fully test it (literally just installed it to check for you), so if you’d like to create a new container but keep your old container stopped in case you run into any issues, it’s probably a good idea.
However, I can now update the page to reflect that 5.1.2 appears to have fixed the issue.
Let me know if you need anything else!
Okay, I will give it a try.
Thank you for the quick response!
So, I have setup the new version of pi-hole on my synology (5.1.2) with the macvlan, but the docker container would not start up right and would shutdown after about 1-3 min. It did not work during that time and was only using about 3-5 Mb ram. Turned off the Syno firewall and it started right up. Went back and added allowance for port 53 to firewall and it is still running right now. Is that normal? I thought with the macvlan it would not be effected by the firewall on the synology. Also had to setup on the pi-hole to point to my router in settings since unlike you I am not running my dhcp on the pi-hole docker install but on my edgerouter 4.
Port 53 should only need to be opened if you’re NOT using the macvlan network interface. Can you check the logs on the Docker container to see if there were any specific errors? I wouldn’t expect a firewall rule to shutdown the container, so I’m hoping there’s something in the log.
Let me know if I can help at all!
Not, sure what the issue is. But I looked over the logs and I get to “Starting pihole-FTL (no-daemon) as root”, several times with no further logs, and no error messages, but I was getting a notification that the container stopped unexpectedly after a couple mins. Then I would stop the container in Docker and try again. Also after starting but before the notification I could not access pihole web page and I could not access the internet (could see other IP’s on the local network) docker showed no CPU usage and 3-5MB of RAM, now with it running it is using 0.03-0.5% CPU and 44-45MB ram used).
Once I turned off the fire wall and started the container it worked fine. So I shut down the container again and then turned on the firewall, then the container again would not start correctly. Next I turned on the syno firewall again and let port 53 through, this time when starting the container it worked again. So I left it like that and after seeing your email and looking at the logs just now I took out the rule allowing port 53, without stopping the pihole container. After a min or so I could not resolve web pages with my browser, on my PC again. So I turned port 53 back on and web browsing works again on my PC. I have set my PC’s DNS only to the Macvlan IP address I set (192.168.1.210) so I would know for sure if it stopped working. Not sure what I setup wrong, but sure seems odd.
The Macvlan and the bridge look correct. I am seeing all my different devices IP addresses in the pihole website. The 192.168.1.210 shows as a client in my unifi network, but not of course in my edgerouter HDCP or static lists as it was not set there. There is a question, should I set the fake Mac that the macvlan created when it setup in my Static IP list with the address it is using and is that likely to change anything?
One more thing that I am noticing is that in Pi-hole settings in the system tab my pi-hole Ethernet interface is eth0, I entered Bond0 for my network interface name when I setup my macvlan. Which is what I found using ifconfig. Is that normal? I am using a nas with 4 1gig ports bonded into a 4gig port on my managed switch.
You’re definitely running into some strange issues and my only guess would be that it’s related to the Bond0 network interface you used. With that said, it’s purely a guess because the macvlan network interface should have it’s own port configuration, but I’m assuming the bond network could be causing some issues in regards to the firewall.
My only true advice would be to keep port 53 open on your NAS since you know what it is. If this was an external service, you’d have a lot more to worry about, but since it’s only being used for DNS purposes, I wouldn’t worry too much. If you want, you can limit traffic on that port to your local subnet only.
I know that’s not the best answer, but you did everything right, so it has to be related to that bond network since that’s the only difference between your setup and mine.
If I can help in any other way, please let me know!
Thank you, that is pretty much the conclusion I have come to. I did go through yesterday and redo the whole pi-hole setup, making sure I had bon0 in the macvlan setup (took me a min or two to figure out how to get rid of the original network, rm not delete or remove just docker network rm ph_network…). Deleted the container, the pihole bridge and all first (I did backup the pihole data first, have not put that back in yet). Reinstalled everything from scratch, and the same thing. I am tempted to see what happens if I pick one of the bonded Ethernet connections except if that connection should go down I would lose access to the pihole dns. Thinking about a new project for this with a raspberry pi…
Setting up a real home network (not just a wireless router from Bestbuy) and a NAS has been my most recent pandemic project, and has been pretty fun. Now to remember to take the usb backup drive off my NAS to the office the next time I go in and lock it in my desk.
I will set the firewall to only allow the macvlan network and see how that goes. Thank you for your replies and your cool videos and tutorials!
Hi Frank, would you consider making a tutorial on how to setup two pi-holes to run simultaneously on two distinct Synology servers?..and how to sync settings between them so they act as mirrors of each other…
thanks for sharing your knowledge!
Martin
Hi Martin,
Absolutely! I will try and test this out when I get some time and see if I can come up with something!
Thanks,
Frank
Would looove this feature too. I found this Docker’s container but don’t reallt know how to go through with those relatively vague and non-Synology related steps.. https://github.com/ShiromMakkad/docker-pihole-sync
This looks awesome! I will keep this in mind for future tutorials as it’s something that even I could use!
Hello,
I am running into a problem when forwarding my router to the Pi-Hole. When I forward the primary DNS of the router to the ip address (macvlan) I run into an error “dns resolution is currently unavailable” when I try to update gravity, or if I need to restart the pi-hole it gets stuck in a loop with the same error on the log. If I turn off dns forwarding on the router to the pi-hole, it works. Any clue?
That’s strange. If you point an individual client to it (rather than your router), does DNS resolution work?
Also, did you create the resolv.conf file and add the correct DNS servers there? That is generally the containers DNS server.
Let me know and we can continue troubleshooting!
Is anyone else having trouble using macvlan over bond0?
I’m having trouble resolving DNS queries intended for the synology active directory. i have successfully installed pihole using macvlan method (because i needed different ip for pihole as 2 DNS servers (active directory and pihole) cannot reside on same IP) On pihole v5.1.2 conditional forwarding is configured as follows:
local network in CIDR notation: 10.1.1.0/16
ip address of DHCP: 10.1.1.20
local domain name: domain.local
For some strange reason, clients are unable to contact the active directory hosted on the NAS itself at 10.1.1.20
Someone on reddit suggested creating 01-custom.conf file inside /etc/dnsmasq.d/ to create a conditional forwarding as follows, which still didn’t work:
server=/domain.local/10.1.1.20
server=/1.1.10.in-addr.arpa/10.1.1.20
Any help will be highly appreciable!
Your issue might be that your container won’t be able to communicate with the host (NAS) by its IP address if you’re using a macvlan network interface. By default, the container will ONLY be able to communicate with the host using the bridge network (192.168.10.2 in this tutorial). The same is true for the Synology NAS – it will only be able to communicate with the container using the bridge network.
Let me know if that works, and if it doesn’t, we can continue troubleshooting!
Thank you for the detailed instructions! I am new to this level of networking. I do have a quick question. When I am creating the macvlan, do I use my gateway IP addess or the one you provided?
The issue that I am running into is that i cannot access the webportal after completing the macvlan setup.
Does the macvlan network interface create successfully?
You will use your gateway IP address. Everything should match your local subnet, so if you’re using 192.168.2.X, use 192.168.2 everywhere that I have 192.168.1.
Let me know if you have any other questions!
thank you for this tutorial. New to docker on synology, how to we go about updating pihole?
WunderTech
2 months ago
Generally, the easiest way that I find to do it is to download the latest Pi-Hole image, stop the Pi-Hole container and then right-click it and duplicate settings. It will then create a new container with the same settings (and new image) where you can start it up and test to make sure everything is still working as expected. If it is, feel free to delete the old container.
People have suggested that you can do it by “clearing” the existing container, but that does NOT work for me. I lose all my settings that way.
Found it in your comments on the YouTube Video https://www.youtube.com/watch?v=4Z9Mtpc7Tak&t=1s
Yes! Those will work as well, the tutorial I just linked to is a little more detailed.
Just created a tutorial for that! This should help: https://www.wundertech.net/how-to-update-docker-containers-on-a-synology-nas/
Thanks for checking out the tutorial!
I can’t figure out what’s wrong with my setup. I tried option 1, and the container booted fine, but I was unable to reach the admin page in my browser. So then I tried option 2, and when I try to boot the container I get a “Docker API has failed” error.
For option one, do you have Synology’s firewall enabled? If you do, did you create an “allow” rule for it?
So I created the bridge, and set IP of PiHole to 192.168.1.250, however I’m unable to connect to the pihole admin page. I’ve turned the firewall on/off and restarted PiHole in between with no difference. The pihole is running currently and no errors are shown in the log files. Here’s my setup:
IFCONFIG Shows:
docker0 Link encap:Ethernet HWaddr 02:42:50:4F:21:40
inet addr:172.17.0.1 Bcast:172.17.255.255 Mask:255.255.0.0
UP BROADCAST MULTICAST MTU:1500 Metric:1
RX packets:0 errors:0 dropped:0 overruns:0 frame:0
TX packets:0 errors:0 dropped:0 overruns:0 carrier:0
collisions:0 txqueuelen:0
RX bytes:0 (0.0 B) TX bytes:0 (0.0 B)
eth0 Link encap:Ethernet HWaddr 00:11:32:DE:06:B9
UP BROADCAST RUNNING MULTICAST MTU:1500 Metric:1
RX packets:1071939 errors:0 dropped:0 overruns:0 frame:0
TX packets:385611 errors:0 dropped:0 overruns:0 carrier:0
collisions:0 txqueuelen:1000
RX bytes:244545447 (233.2 MiB) TX bytes:687479782 (655.6 MiB)
Interrupt:93 base 0xe000
eth1 Link encap:Ethernet HWaddr 00:11:32:DE:06:BA
UP BROADCAST RUNNING MULTICAST MTU:1500 Metric:1
RX packets:1731146 errors:0 dropped:0 overruns:0 frame:0
TX packets:1987058 errors:0 dropped:0 overruns:0 carrier:0
collisions:0 txqueuelen:1000
RX bytes:260351233 (248.2 MiB) TX bytes:6816001538 (6.3 GiB)
Interrupt:92 base 0xa000
lo Link encap:Local Loopback
inet addr:127.0.0.1 Mask:255.0.0.0
inet6 addr: ::1/128 Scope:Host
UP LOOPBACK RUNNING MTU:65536 Metric:1
RX packets:7401217 errors:0 dropped:0 overruns:0 frame:0
TX packets:7401217 errors:0 dropped:0 overruns:0 carrier:0
collisions:0 txqueuelen:1
RX bytes:1024702701 (977.2 MiB) TX bytes:1024702701 (977.2 MiB)
ovs_eth0 Link encap:Ethernet HWaddr 00:11:32:DE:06:B9
inet addr:192.168.1.140 Bcast:192.168.1.255 Mask:255.255.255.0
inet6 addr: fe80::211:32ff:fede:6b9/64 Scope:Link
UP BROADCAST RUNNING MULTICAST MTU:1500 Metric:1
RX packets:1067396 errors:0 dropped:0 overruns:0 frame:0
TX packets:271009 errors:0 dropped:0 overruns:0 carrier:0
collisions:0 txqueuelen:1
RX bytes:229338647 (218.7 MiB) TX bytes:687480398 (655.6 MiB)
ovs_eth1 Link encap:Ethernet HWaddr 00:11:32:DE:06:BA
inet addr:192.168.1.141 Bcast:192.168.1.255 Mask:255.255.255.0
inet6 addr: fe80::211:32ff:fede:6ba/64 Scope:Link
UP BROADCAST RUNNING MULTICAST MTU:1500 Metric:1
RX packets:1730965 errors:0 dropped:0 overruns:0 frame:0
TX packets:907134 errors:0 dropped:0 overruns:0 carrier:0
collisions:0 txqueuelen:1
RX bytes:236106863 (225.1 MiB) TX bytes:6816002154 (6.3 GiB)
SSH command I ran:
sudo docker network create -d macvlan -o parent=ovs_eth0 –subnet=192.168.1.0/24 –gateway=192.168.1.1 –ip-range=192.168.1.250/27 PiHole_Network
PiHole_Bridge
Driver: bridge
Subnet 192.168.10.0/24
IP Range: 192.168.10.2/32
Gateway: 192.168.10.1
IPv6: Disabled
Container: PiHole-Vlan
PiHole_Network
Driver: macvlan
Subnet 192.168.10.0/24
IP Range: 192.168.1.250/27
Gateway: 192.168.1.1
IPv6: Disabled
Container: PiHole-Vlan
192.168.1.250/admin shows, the site can’t be reached, took too long to respond
Any reason why you used /27 in the macvlan creation command? That could be it, since /32 is what will give you that individual IP. Can you run an IP scan on your local network to see if it was assigned a different IP?
Hey! Thanks for the tutorial.
I just wanted to suggest maybe recommending nano instead of vi to edit these config files. If nano is installed on these NAS, it’s a whole lot easier to handle than vi(m). Sure a vim expert can be much faster with it, but for many people here they will only take a long time to get this one edit done and likely not touch vi again any time soon.
Regards, Sam
Thanks for the feedback! I completely agree that nano is significantly easier to work with than vi, but I don’t think nano comes installed on a Synology NAS, so it requires a few additional install steps. I could certainly be wrong though, so I will try and point out that there are other text editors that can be used in future videos!
Awesome write up and very clear instructions! Thank you for taking the time to walk us through. I was using the basic setup prior with DCHP running though pihole to see all clients since my night hawk router gateway was the only client showing. I was hoping the macvlan would solve that issue so I could revert back to my router handing out IPs, but still only seeing only 192.168.1.1 for all requests. Do you have any advice, or would you just trust pihole for DHCP? I also loved your video on setting up a backup pi in the event the synology were to go down. This inspired me to grab a zero and get it going. Again, awesome stuff and great work! Thank you
Thanks so much! You are on the right track that using Pi-hole as DHCP or manually connecting each client to it is the best way to get it to show each IP address. Both options are solutions, but it depends how you’d like to handle it. If you want all devices to run through Pi-hole automatically, either leaving it as-is or letting Pi-hole handle DHCP would be your best option. If you only have a few devices and don’t mind setting their DNS servers manually, that will also solve the problem.
Let me know if I can help in any other way!
Thank you for this really good guideline to enabling the Pi-Hole setup on a synology with the macvlan interface.
I was wondering why I still got so much ads and figured out that this was due to IPv6 within my network.
Maybe you want to give a hint about that and even better show how to configure it appropriate for the macvlan interface as well.
Within my AVM Fitz!Box I have now configured DHCP DNS hosts for lookup and currently happy with it.
Again, thanks a lot and best regards
Thanks so much! I will keep this in mind for a future tutorial!!
Thank you for this great guide, especialy for macvlan method. Everything works great in this scenario, but I have a setup which is a bit different. I use LAN1 with address in 10.69.109.0/24 and LAN2 in 192.168.69.0/24 subnet. When using computers which are on that 10.69.109.0/24 subnet I can use pihole DNS (which is on 192.168.69.12 and Synology DS718+ is on 192.168.69.11) just fine. However, if I use computer from any other subnet, ie. 10.69.110.0/24, it can’t reach it. I can ping and open DSM on 192.168.69.11. It was the same problem when I used simple method and pihole was on same 192.168.69.11 address. Then I could even open pihole web interface but could not use DNS. Synology FW is off.
When you are on the 192.168.69 subnet, can you piing the 10.69.109 subnet (and vice-versa) regularly? If not, you might have to set up a static route so that the different subnets can communicate.
Thank you for the guide used the 2nd method because method one was a crash/restart party :-).
I did however need to add a static route on the synology to be able to ping the ip and browse to the admin page. Which looked something like this (to be honoust no clue what it says exactly, google … ;op but it worked after that.
ip link add foobar link bond0 type macvlan mode bridge
ip addr add 192.168.1.2/32 dev foobar
ip link set foobar up
ip route add 192.168.1.4/32 dev foobar
bond0 is my network interface (bonded instead of eth0 for me)
192.168.1.2 is my nas IP
192.168.1.4 is the IP i assigned to my pi-hole
These entries are not permanent and gone after a reboot.
So i created an rc.sh in /etc and put it into a scheduled task (task scheduler – triggered task)
with run command: bash /etc/rc.shon dsm.
However it seems to fire of a bit to quickly after reboot so i added a pause in the rc.sh for about 30 seconds.
After that it worked fine.
rc.sh contents:
sleep 30
ip link add foobar link bond0 type macvlan mode bridge
ip addr add 192.168.1.2/32 dev foobar
ip link set foobar up
route add 192.168.1.4/32 dev foobar
I read you could create a rc.local and put the entries there but for the live of me i couldn’t get it to work.
I have no clue if this is just an issue to me specific but figured to put it here, perhaps it will help someone.
Also use at your own risk 🙂 no expert.
I haven’t seen anyone need to do that, but either way, thanks so much for sharing in case someone else has the same problem!
Tad bit of a novice here, but followed your instructions and got this working perfectly.
Since then i’ve moved my synology to a new house which has a different setup, separate modem and using my own router which has a different subnet. I updated my synology ip to be on the same subnet as i did the router and all is well with dsm but the pihole docker doesn’t seem to work. I cannot connect to the pihole page so i deleted the pihole container and then the two new PH networks i created.
After doing this i cannot download any docker images, so not able to start from scratch with pihole. I’m thinking its because of the vlan’s but i have no idea how to remove these, which i created with your command.
Thought id ask before i completely remove docker/or reset my nas and start from scratch.
I suspect that it’s DNS related. You definitely did the right thing in deleting the PH networks because those networks were using the old routers gateway and I am assuming it changed. As for the container not downloading, did you set a static IP address anywhere on your NAS? If you did, can you confirm that the gateway and DNS servers are both pointing to the right location?
Similar issues to a few others here – with a twist though! Use method 2 using the macvlan. NAS main eth addr is 192.168.67.1.210, set up the pihole outside visible addr to be .220. DNS requests go through to the container via .220 fine but the http page is only accessible via .210 ?!?!? got me scratching my head as to why the .80 port isn’t translated over
That is definitely a little weird. One thing to confirm – you removed the default “bridge” network in the Docker container, right? The ph_bridge network should stay, but the “bridge” network should be removed.
Yes, deleted the default bridge. I just blew it away and rebuilt it as per the above instructions, and same thing – DNS port 53 can be accessed on .220, if I try to map port 80 to port 80 in the port settings tab it complains about port 80 being used already (I am running a webserver on .210:80) to keep it happy I’ve mapped 89:80 for the pi-hole admin page.
I’m honestly not entirely sure why it works using Portainer and not Synology’s GUI. Ultimately, they’re the same (just a skin for Docker), so it shouldn’t have a different effect. As for port 89, that shouldn’t be a problem either if you’re not using the macvlan network interface for anything else. I wish I had better feedback, but I feel like it’s not fully using the macvlan network interface like it should be.
Further to my previous reply…. I followed this guide (https://servicemax.com.au/tips/pi-hole-in-docker-on-synology-the-best-way/ ) using portainer to do the network part of the config and the way it configures it up passes port 80 through to .220. I don’t know what the differences are in the configuration settings/methodology, but it now works. Curious to hear your thoughts. Thanks!
Hi Frank, thanks very much for the tutorial. I used method #2 and it kind of works, my pihole runs on it’s own IP (192.168.178.210) and my home devices start using it, but I have some questions. Why can’t you use synology’s existing docker bridge (172.17.0…) network for the bridge network? Why do you have to create a new one (your example: 192.168.10…)? Next, in fact no matter which bridge network I use, “your’s” or the 172…. one, when I am on my Synology NAS or any other container (e.g. grafana) I cannot reach my pihole at 192.168.178.210. I can reach it at the IP address of the bridge I am using (the 172.17. oder 192.168.10. one – doesn’t matter) – but not at 192.168.178.210. Ray posted a solution on May 6th in this page and I also found a (German) video which does the same thing (https://youtu.be/21CTUWn4JSI?t=419) – but what’s happening here? Could you perhaps explain it? By the way – I am using portainer to assign or un-assign the networks to the pihole container – could that be a problem?
When you say that you can’t access it on the IP address you specify, from which device are you trying to access it from? It makes sense that anything on the NAS will have to use the bridge, but the outside devices should be forced to use the regular IP address.
As for the docker bridge, it might function the exact same way, but I find it easier this way since we specify a static IP address (using /32), so the IP address for the bridge will ALWAYS be what we specify. If the docker bridges IP address won’t change, you might be able to use it for the same functionality!
Hey. Came here from your video. When trying to set up the macvlan i get the response of “Errror response from daemon: operation no supported”. Any ideas where i am going wrong. Cheers
What device are you trying to set this up on? I know some Synology models have issues with the macvlan network interfaces.
Hi!
Just wanted to add that when installing Virtual Machine Manager, vSwitch gets turned on and for some reason Dockers macvlan network causes a conflict. This results in DSM disappearing from network. The fix is to create the macvlan network with parent “ovs_eth0” instead of “eth0” as such:
docker network create -d macvlan –subnet=192.168.1.0/24 –gateway=192.168.1.1 –ip-range=192.168.1.0/29 -o parent=ovs_eth0 my-macvlan
(DSM 6.2.4)
Awesome input, thank you so much for sharing!
Hi Frank, never heard of Pi_Hole before but after seeing this How-To it now leaves me wondering if and why I need it.
Can you please explain in layman’s terms what the benefit of it is please for my Synology that runs Plex for family members as well as security camera recording?
How does it benefit me browsing the net on my iMac & iPhones if at all?
Thank you and keep up the great work 🙂
Thanks! In it’s simplest form, Pi-hole is used to block ads on your local network. When you navigate to a website that has ads (even this one), those ads will automatically be blocked and you won’t see any of them. It’s done by blocking certain DNS requests, which is why Pi-hole is a DNS server. In summary, if you would like to block ads, it’s a great option, but it’s more complex than something like a browser ad-blocker.
Hello,
Thank you for your guide, I tried following it but had the following two errors when configuring Pi-Hole after step 4. I get these when trying to 1) add a blocklist: [✗] DNS resolution is currently unavailable
[✗] DNS resolution is not available
and 2) update the blocklists:
Error, something went wrong!
While executing: attempt to write a readonly database
Some google searches imply changing the root access to Pi-Hole, would you have any advice? One thing I did differently, was open a notepad file to create the resolv.conf file, and moved that to the pi-hole folder in the Synology. I also installed version 5.3.1, and used option 2, installed through macvlan. Thanks in advance.
The conf file has the correct extension, right? meaning it’s resolv.conf and not resolv.conf.txt? That error is almost certainly resolv.conf related (caused me a ton of heartache when I first set mine up). You shouldn’t have to provide admin access, so I’m not sure I would take that route. If you can, double check that everything is right in the resolv.conf file.
Yes, the file is saved as resolv.conf. I’ll try the vi editor method you mentioned if the resolv.conf file is the culprit. FYI it seems the link to the vi editor on your page is broken, and new the link may be https://staff.washington.edu/rells/R110/.
Thanks for replying, I’ll update if successful.
unfortunately the vi editor method didn’t solve the issue either. I’ll see if I can see if I can solve the problem and add the solution here for any others. to summarize, not only can I not add blocklists or update gravity, but any devices added to the DNS server of the pi-hole will then not be able to access websites.
yes, the file has the correct extension. I also tried using the vi editor method which didn’t solve the issue either. Also, any device that has the DNS linked to the pi-hole cannot access any websites unfortunately
by doing a command:
sudo chmod g+w etc-pihole
fixed the 1st issue of being able to add blocklists.
however i’m still stuck on DNS resolutation currently unavailable. google searches suggest the same solution you did, which was have the nameserver 127.0.0.1 on the resolv.conf file, however that’s not working for me just yet unfortunately. I’ll try again, and update if I find a solution
Sorry for not getting to your other messages in time. This is a frustrating one because I dealt with it for a long time at first (which is actually why I created this tutorial, as the resolv.conf situation was a little confusing). When you created that file, did you map it immediately or did you go in at a later time (after the container was created) and try and map it then?
No problem, thank you for your help. I apologize as there is a heavy knowledge gap with me.
I may have done both. So I tried reinstalling Pi-Hole following your steps with resolv.conf mapping it immediately with the latest version and it still gave the same 2 errors of not being able to write, and DNS being unavailable.
some changes I noted from your version:
-your eth0 inet addr: points to 192.168.1.220
-mine is 192.168.0.—
so I set my pihole to an unused 192.168.0.— address.
I kept the same ph_bridge and settings you set though
I tried installing version 5.1 per your guide, and I’m unable to access Pi-hole’s GUI, and in the log it reported: DNS resolution is currently unavailable
So when you installed v5.1, did you receive the exact same DNS resolution error or is this a different error? As for not being able to get to the web admin page, is it giving you any type of error or can it simply not find the page?
Different error in the sense that it shows up in the log of the docker container and stops there rather than show up as an error in pihole’s GUI. After, I am unable to access pihole at all through the ip address.
That’s actually a good sign because that’s where I was receiving my errors (and was able to fix). Have you tried to install Pi-Hole v5.1 without the resolv.conf file?
Just reinstalled without resolv.conf, and received these errors in the docker container log:
WARNING Misconfigured DNS in /etc/resolv.conf: Two DNS servers are recommended, 127.0.0.1 and any backup server
WARNING Misconfigured DNS in /etc/resolv.conf: Primary DNS should be 127.0.0.1 (found 127.0.0.11
I then added resolv.conf with the settings you set, and received this error in the docker container log:
[✗] DNS resolution is currently unavailable
I looked at your adguard guide, perhaps I’ll try that to see if anything changes. One question, should any ports be allowed through for pihole? you mention so in the adguard guide. Thanks again.
I feel bad because I know my input has been unhelpful, but I just don’t know what it could be if it the resolv.conf issue doesn’t fix it. I had this issue for a few days when I first tried to implement Pi-hole on my NAS, but the resolv.conf file (at initial creation) fixed it and fixes it moving forward for every container I try and create.
One side question – are you using Synology’s firewall? If you are, can you allow traffic on port 53 (DNS port)?
I was using Synology’s firewall and port 53 was allowed but still received those errors. But luckily, I was finally able to get it to work by following https://github.com/piwi3910/techtalk/tree/master/Docker_series/07
One google search did mention having to set the time zone, but not sure if that was enough to hamper the entire thing. I’m not sure what particular setting in this code worked, but it ended up working. Thanks for your help throughout this process, I’m following your guides one by one and will move on to the next one now.
Glad that you were able to get it working!
Hi. Great guide, thank you 🙂
I have a question on the last part of the guide, regarding opening the ports in the firewall; method 1, Step 12/13.
I’m not sure if Source-IP should be left “All”, or what that should be. And I assume the rules should be “Allow”.
It would be great if you could show a screenshot with the overview of the two rules, just to confirm that I did it correctly.
Since you aren’t opening the port on your router, you can leave it as all. I am super busy so I’m not sure when I will get time for a screenshot, but please feel free to email me at [email protected] with the screenshot of how yours is set up and I’m happy to confirm it’s correct.
Perhaps stupid question, about changing the DNS IP in my router.
Could my primary DNS be my Pi-Hole, and the secondary by for example Googles DNS server?
So in case my NAS or Pi-Hole fails, then all devices in the house will use the secondary DNS instead, and we can still surf the web.
Would that work?
Absolutely! Just know that if any DNS requests go to Google, you will not have ad-blocking.
Hi,
Thanks for the amazing tutorials. Discovered your channel 2 weeks back and enjoying going back in time to discover what I’ve missed.
I’ve setup 2 PiHole like you mentioned, one on my Synology, another on one of my server (VM on Ubuntu ). And set them both at router level.
Is that enough to ensure load balancing and optimal performance? Would you have a tutorial/guide I might have missed that explain how to do that ? For now it seems like all my clients are hitting the first DNS while the second one seems pretty bored with nothing to do 🙂
Thanks for the help and thanks again for the great work !
Everything you did is perfect! If the main Pi-hole instance is overloaded, requests will automatically be sent to the second Pi-hole instance. You also will have the benefit of redundancy now. Great job!
Apologies for the 2 posts. I didn’t know if my first message went through or not.
Thanks for the advice. Despite setting my Synology as my first dns the second one (the NUC11) seems to be doing all the work. Do you know what are the mechanics behind that ? That’s definitely out of scope for this tutorial though 🙂
I don’t believe that it matters which one you set (though I could be wrong) as the device will simply go to whichever one it deems available. I think that the terms “primary” and “secondary” are used relatively loosely as I experienced similar behavior.
Hi,
I’ve absolutely enjoyed your tutorials so far. I’ve discovered your channel 2 weeks ago and been going back in time to look at all the videos one by one, and found some very useful tips in them. Thanks for the time spent in helping us.
I’ve setup 2 pihole on my local machines : one in a VM inside a small Intel NUC that I have, and one in my Synology NAS in order to have redundancy setup, following this guide. In another video you mention how critical and important it is to have two pihole setup, and you also mention that you naturally got “load balancing” out of this setup.
Both mine are working (nslookup from my lan to any ip resolves correctly), and both are set on my router (Google wifi) to ensure everyone gets it lan-wide. However, after a day or two, I observe that the load balancing didn’t come to me naturally. One gets more than 95% of the requests, the second one almost none.
Did you have to go through something specific to load balance ?
Thanks again for the help.
Just replied to your other comment – sorry, I have to approve the comments due to tons of spam. If you have any other questions, please let me know!
How can I add a private upstream DNS server like unbound? (On Synology)
I haven’t set it up myself so I can’t validate exactly how it will work, but I believe you’ll have to spin up a new container.
Hi, great tutorial!
Short question/situation:
I have synology router (192.168.1.1) as DHCP and DNS the same (asks cloudflare 1.1.1.1).
Domain on the router is home48
– when I ping from windows1 windows2 it reply with windows2.home48
I have now set up pihole in docker (method1) and manually set 192.168.1.2 (Synology NAS) as DNS just for windows1.
All is great, adds are blocked but:
when I ping windows2 = could not find host windows2
Basically, no more LAN devices hostname resolution.
Any clues ?
Thank you!
Yes, that’s how it’s supposed to work (strangely). On your router, there’s a local DNS section where it knows the device name and it’s used as a DNS lookup. If you’d like this to work in Pi-hole, go under “local DNS records” and create a record for the specific local IP address. It should then work as you’re expecting it to.
So even no Synology DNS server package is installed on the router, the router knows the hostnames. Maybe a way to make Pihole forward local “.home48” requests to the Synology Router? Adding a hostname/reservation on the router and than having to add the same record on the pihole is not the nicest thing 🙂
Also, since I see a lot of questions about it:
Synology router (and other routers I believe) has built-in Cloudflare DoH support.
Maybe a tutorial “add-on” on how to also make DNS queries private too using Pihole?
Thanks!
I will look into if it can be synced any way, but generally, it’s a pretty easy one-time setup for the local DNS servers. As for Cloudflare DoH, check out Unbound (I have a tutorial for it, though not on a Synology NAS – I will add it to my list). This is most likely what you’re looking for!
Hi, about DoH, I found a simple way to do it (don’t want to mess with macVlan or editing to much stuff not because it is hard, but because Synology updates might break stuff … like it happened with USB support in DSM7 and etc.)
Basically, you install a simple cloudflared container (https://hub.docker.com/r/visibilityspots/cloudflared), and in PiHole use that container on port #5054 as the only upstream DNS.
After, 1.1.1.1/help should see connection as DoH.
But still, your videos are much more nice than written stuff so you could include it like a 2min ‘add-on’.
PS: and maybe add the setup part for DHCP on pihole too.
Great input, thank you! Will definitely take a look into this!
Error response from daemon: failed to create the macvlan port: device or (i assume it says busy but it cuts off)
Error 1
I followed your guide to the letter and managed to do the script thing to install the macvlan etc but i get the error message above. Any hints on where i should start looking to resolve this?
Are you using the correct network interface name? Also, you don’t have any other macvlan network interfaces, right?
Can you also make a version / tutorial with Pi-hole + unbound on Synology with container manager?
I’ll add it to my list!
This tutorial is great!
Container is up and running. But I did run into an issue. I am getting this error “FTL failed to start due to failed to create listening socket for port 53: Permission denied”
Any idea?
Thanks! Did you configure the macvlan network interface properly and using the exact same name (ph_network)?
Trying to set this up DSM 7.2-64570 Update 1, but can’t get into admin interface. macvlan appears to have been created properly as verified by “docker network ls”. NAS ip in the local network ends with .100, for ph_network is specified .101.
When completed pihole project creation, a promt from Web Station appeared offering to specify how to provide access to pihole container. I specified “Name-based” with “nas” host name and ports 8080 and 8443.
pihole container appears to be running, but I can’t open admin interface via specified IP address. Can’t ping it either. When tried that port chosen in Web Station it opens the typical empty page with “Your website is not set up yet” text.
Any tips on what is wrong?
Have you tried creating the container without using Web Station? I didn’t use any of those settings, so I’m thinking that it could be causing port conflicts.
Tried recreating without Web Station. Was created successfully, but when try to open admin interface it times out.
Can you check the Docker container (when it’s running) to ensure that it’s using the ports specified and isn’t being mapped to different ports?