If you went looking for TrueNAS Scale and ended up on something called TrueNAS Community Edition, nothing went wrong, it’s the same operating system with a new name. iX Systems rebranded Scale to Community Edition in the 25.04 update, and the software underneath it didn’t change at all. That means if you’re running Scale today, you are already running what’s now called Community Edition, and updating works exactly the way it always did.
That rename also settled the old TrueNAS Core vs Scale debate, because Core is the original FreeBSD build and while it still exists, new development is going into Community Edition. Community Edition is the Linux-based version, it’s the one getting new features, and overall it’s what I’d install on any new build. I’ve used TrueNAS for years now (from Core, to Scale, to Community Edition), and honestly, the setup process I use hasn’t changed all that much across any of them.
This article covers where to download it, then the settings that actually matter once you’re inside the web interface: the pool layout, datasets, and the data protection tasks that a lot of people skip. I’d slow down on the pool layout specifically, as it’s by far the hardest thing on this page to change after the fact.
Where to Download TrueNAS Community Edition
TrueNAS Community Edition is a free download directly from iX Systems, so head to the TrueNAS download page and select Community Edition. The other product listed there is TrueNAS Enterprise, which is the supported appliance version that’s sold alongside hardware, and it isn’t what you want for a home or lab build.
What you’ll download is an ISO file, which you can write to a USB stick using something like Rufus or balenaEtcher, then boot the target machine from that stick and run the installer.
There’s one decision at install time that people generally get wrong, so I want to call it out before you start. TrueNAS installs onto its own boot device, and that device needs to be separate from the drives that will hold your data. A small SATA SSD or an M.2 drive is ideal here. Don’t install it onto a disk that you are planning to put into your storage pool, as the installer will claim the entire disk and you won’t get that capacity back.
On hardware, RAM generally matters more than CPU for most builds, where 8GB is the practical floor and 16GB or more is better once you start running apps on it. If you’re still putting the machine together, my DIY NAS build guide covers the parts and my NAS hard drive guide covers the drives. If you would rather run this virtualized instead of on bare metal, I have a separate guide on installing TrueNAS on Proxmox.
When the install finishes, the machine will reboot and print an IP address on the console, so put that address into a browser and you’ll get the web interface, which is where everything below happens.
Choosing a ZFS Pool Layout
This is the most important part of the entire setup, and in my opinion, it’s also the part that gets misunderstood the most. The pool type you pick (stripe, mirror, RAIDz1, RAIDz2, RAIDz3) will ultimately determine your experience with TrueNAS from that point forward. It impacts performance, how long a rebuild takes, and how you are able to add capacity later on.
People generally compare these layouts to traditional RAID levels like RAID 1, 5, and 6. Really though, the only thing they share in common is the number of drives you can lose without losing data, and past that, they behave pretty differently.
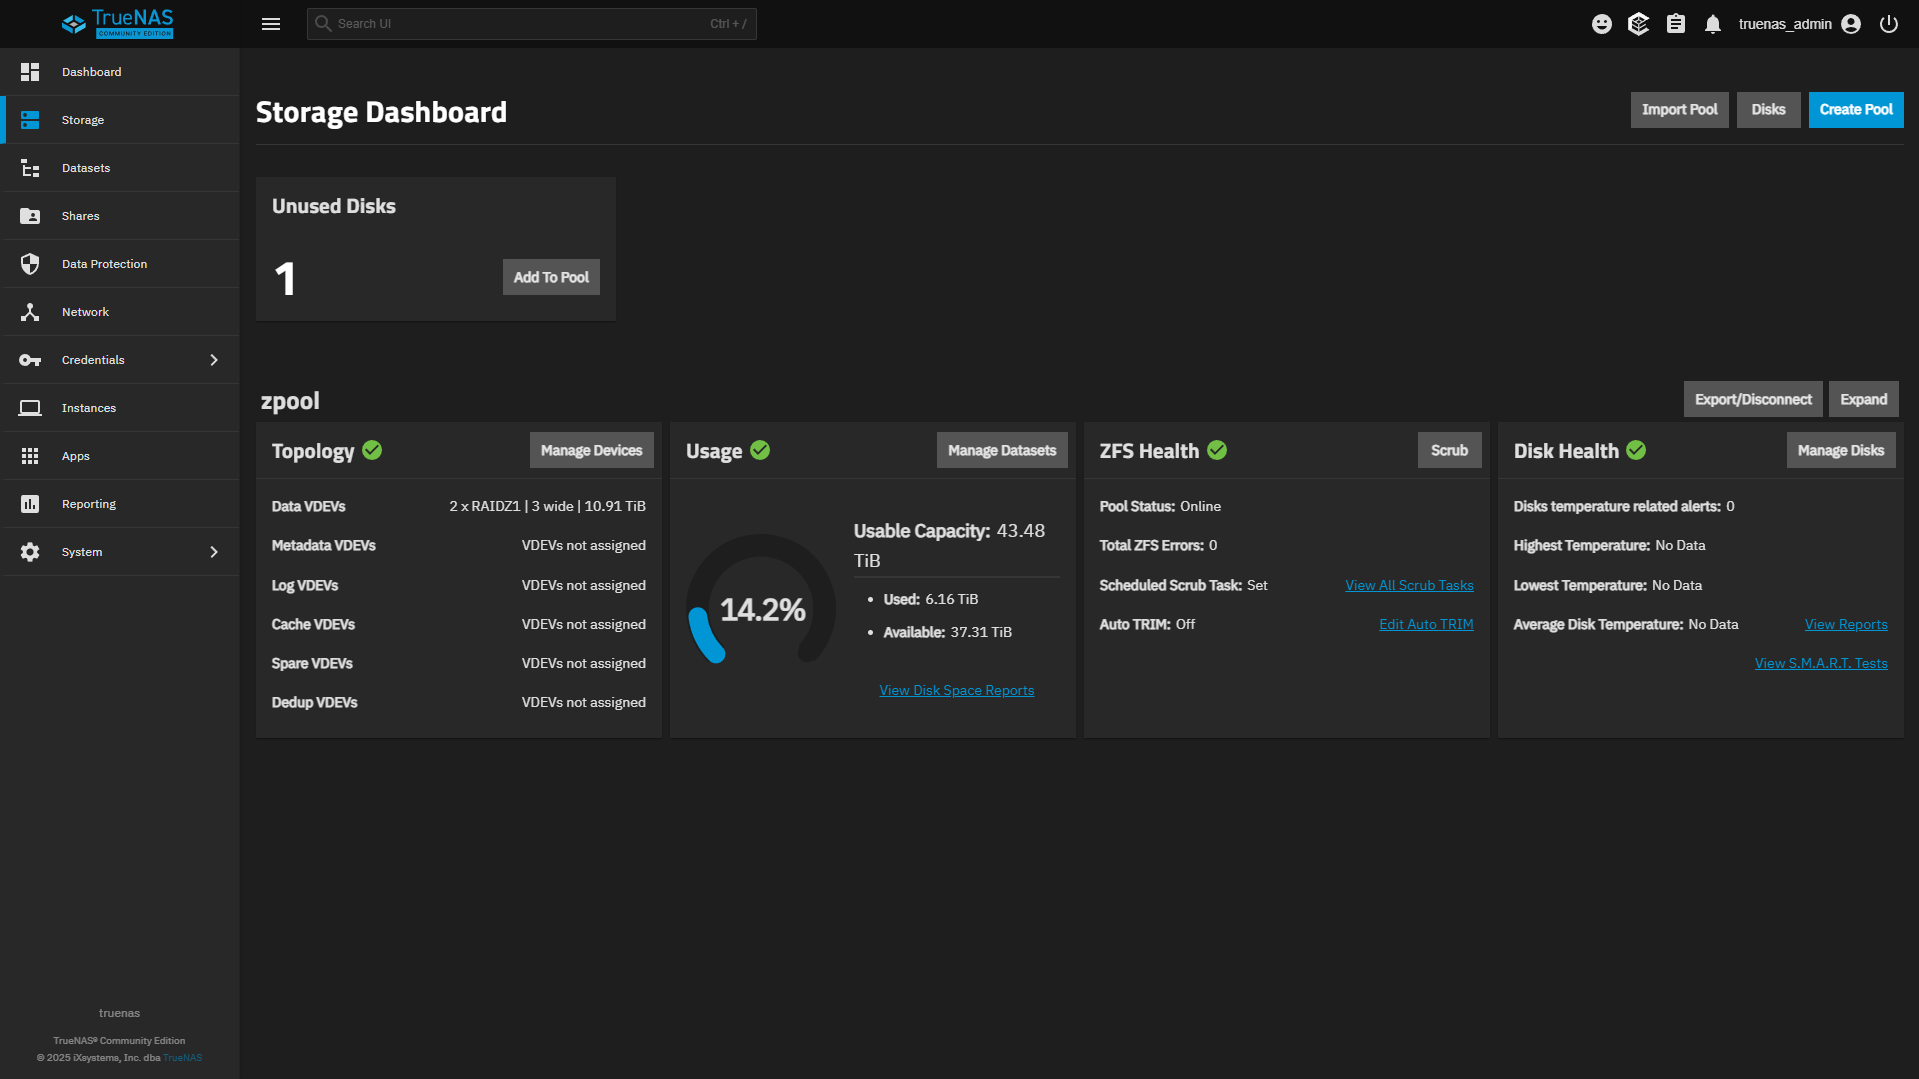
Here’s where the confusion generally starts. With ZFS you don’t create a pool directly, you create a vdev, and the vdev is the thing that has the specific layout, then those vdevs get striped together into a pool. That extra layer is what trips people up, so it’s worth understanding what each option is going to cost you before you commit to a shape.
How Pool Layout Affects Performance
With traditional RAID, you have one array and you continue adding disks to that array. A lot of people assume that is the right approach with ZFS as well, but that’s not necessarily the case. Due to the way parity calculations work with ZFS, a single wide vdev can end up much slower than a traditional RAID array with the same number of disks. The chart below estimates the performance you can expect based on the layout you choose.
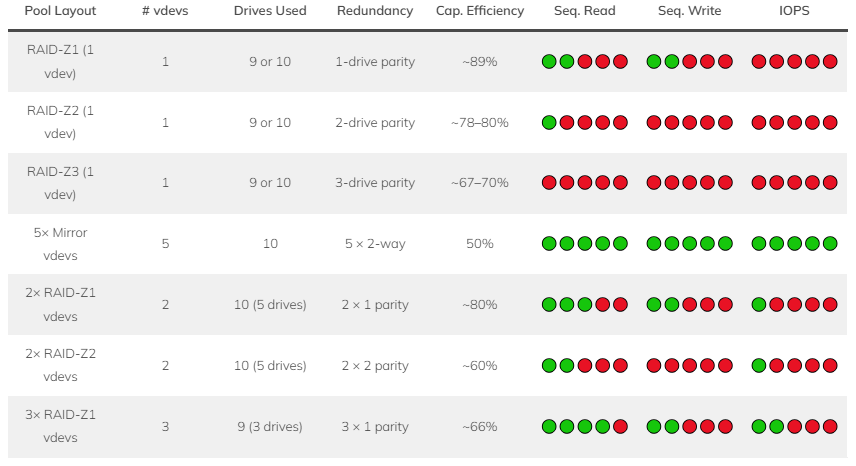
The pattern in that chart is really the thing to take away. Generally, the lower the capacity efficiency (meaning the less usable space you get out of the drives you actually own), the faster the pool is going to run. That is because you’re striping more vdevs together. Overall, you’re trading storage space for speed, and there isn’t a layout that gives you both.
How Pool Layout Affects Resilver Time
Resilvering is what occurs when a drive fails and the pool has to rebuild onto a replacement. RAIDz1, RAIDz2, and RAIDz3 all use parity calculations during that rebuild while mirrors don’t, and that difference shows up as real time spent sitting in a degraded state.
Using 10TB drives, one failed disk, and a pool that’s roughly 50% full, these are the estimated times it would take to resilver a drive based on the layout you’re using.
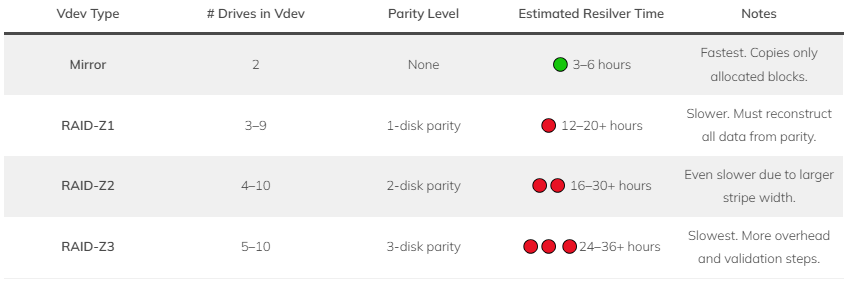
As you can see, mirrors are the fastest to rebuild, which raises the obvious question of whether that immediately makes mirrors the best layout you can use, and well, it depends. They’ll technically give you the best performance and the shortest resilver window, but you’ll only get 50% of your available storage space. On a four-drive build that is a real cost, and it is exactly what makes this decision tougher than it looks at first.
Adding Drives Later
Another important thing to take into consideration is expanding the pool later on, as it’s tied directly to the layout you pick. RAIDz vdevs have been expandable since version 24.10, so you can add a single drive to an existing vdev. But if your pool uses multiple vdevs and you want to grow it by adding another one, you will need to add a full vdev at a time. In the example above, a mirror would mean two drives, while a RAIDz1 vdev might mean three or more, all at once.
That’s a budget question as much as a technical one, so if you know that you’ll be expanding a drive or two at a time, pick a layout that supports doing it that way. I have a full guide on adding a disk to an existing pool in TrueNAS if you want the exact process.
Creating a ZFS Pool
Now that we understand the performance and resilvering you can expect based on the type of vdev(s) you’d like to create, actually creating the pool only takes a minute or two.
1. Select Storage > Create Pool.

2. Give the ZFS pool a name, then enable or disable Encryption depending on whether you want to use it, and if you do enable it, save the key somewhere safe and off the NAS itself.
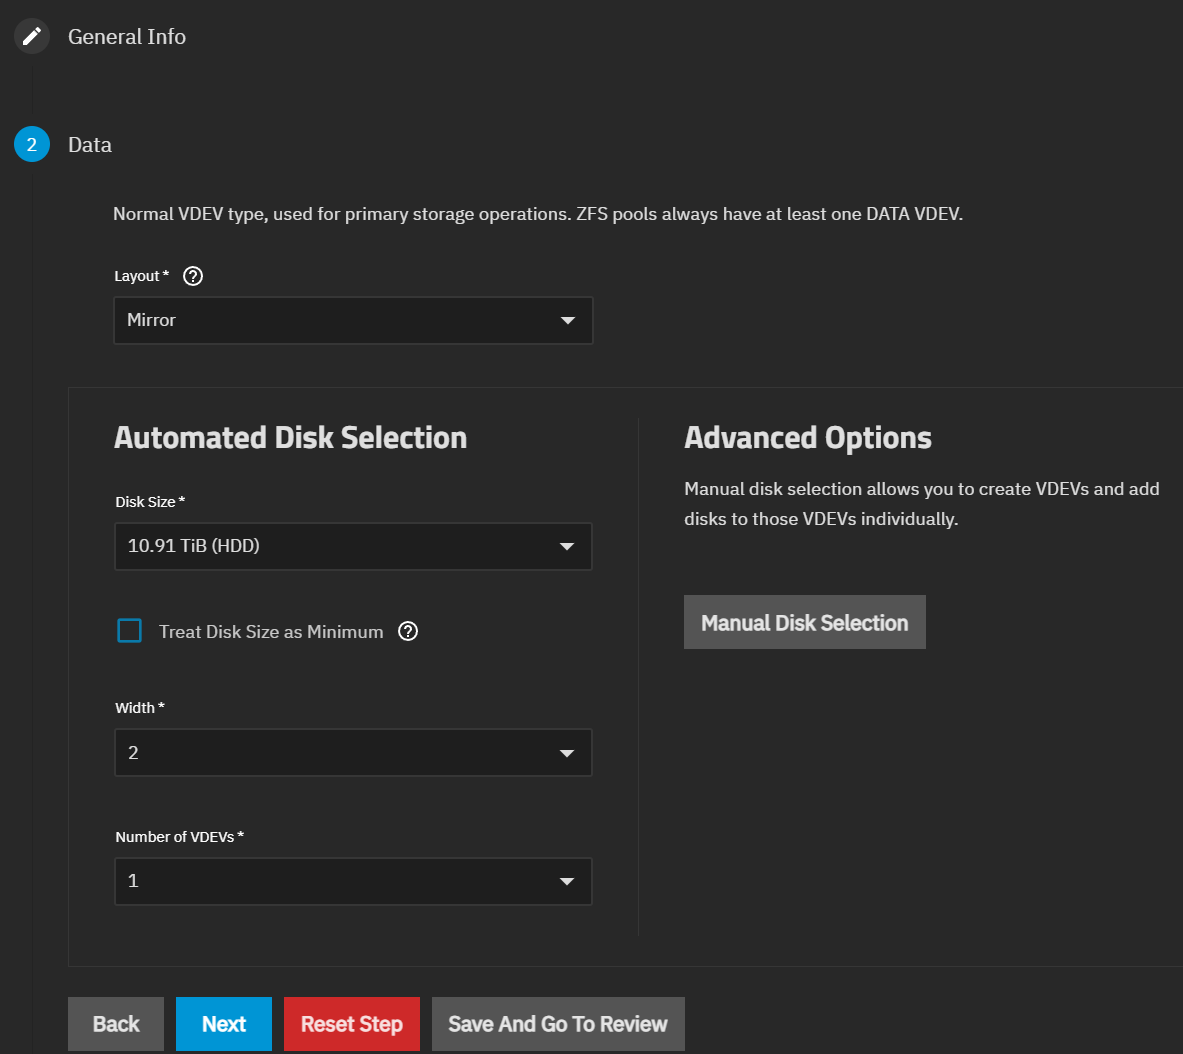
3. In the Layout section, select the layout you decided on above, then set the disk size, the width, and the number of vdevs if you’d like multiple. For beginners, all of the other settings can stay as default. They can improve the read and write performance of the pool, but they are advanced features that you really shouldn’t be starting with. Just add more RAM for now.
Creating a Dataset
Datasets are where your data is actually stored. They’re part of your pool, and they can either sit at the highest level (right under the pool dataset) or be nested underneath a separate dataset.
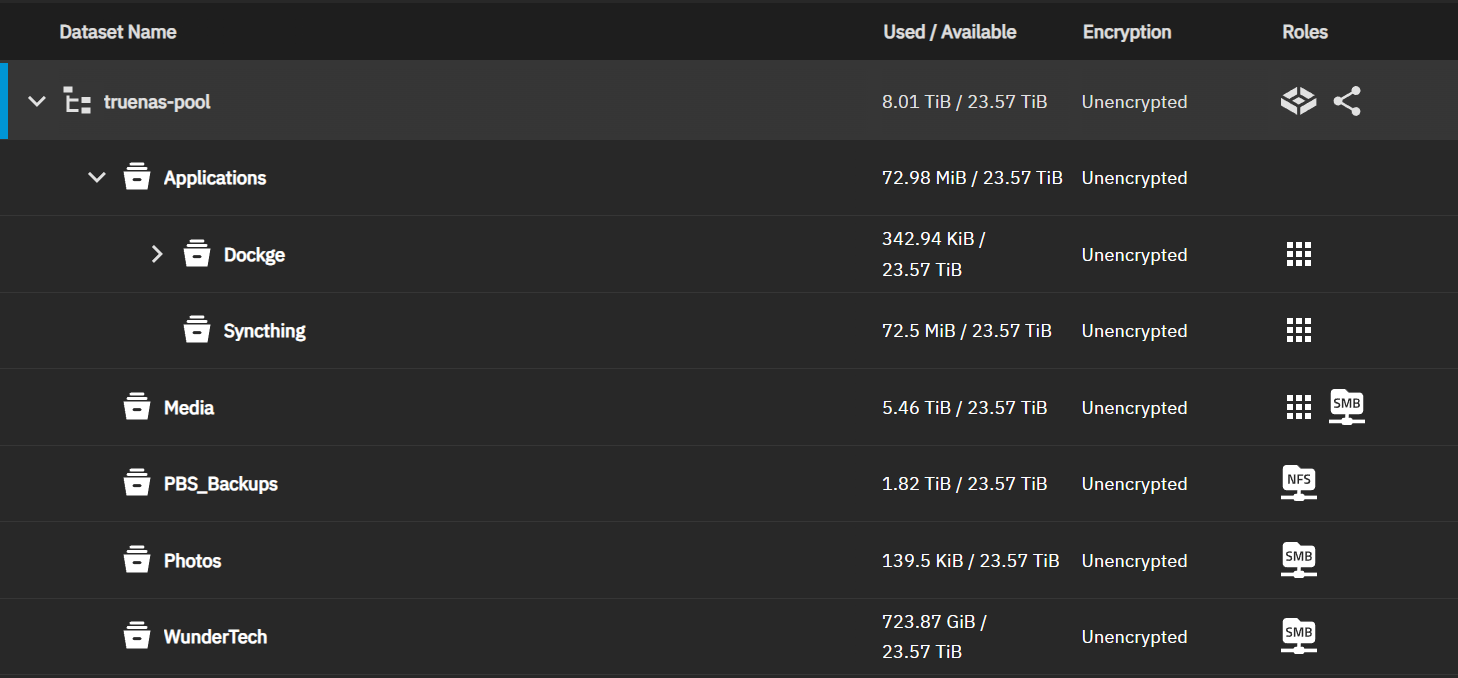
The main reason you’d nest them is to have similar datatypes consolidated under one category, like a media dataset with TV shows and movies underneath it. Each one can still have a different backup schedule, snapshot schedule, or set of permissions.
There isn’t necessarily a right or wrong way to handle this, so the best way to approach it is to determine your backup, snapshot, and permission settings up front. Anywhere those settings are different, you are going to want a separate dataset. Whether it ends up nested or not is really the smaller question.
1. Select Datasets > Add Dataset.
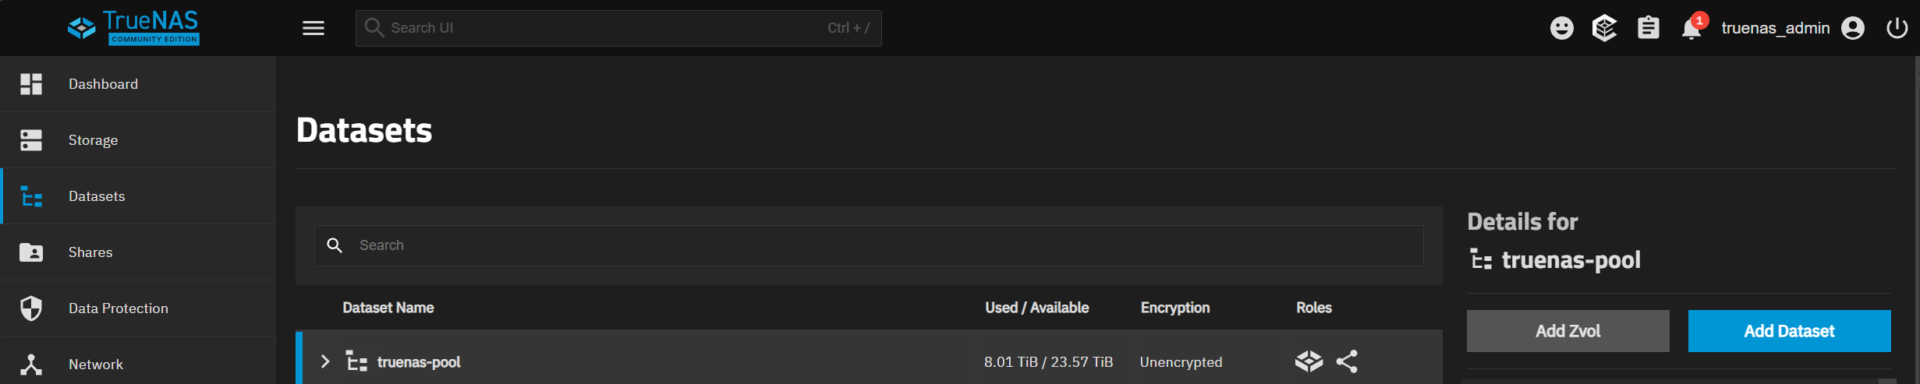
2. Give your dataset a name, then in the Dataset Preset, select the type of dataset you’ll be using. This one is very important for permissions, and while it can be changed at a later time, this is by far the easiest moment to get it right.
- Generic: default UNIX permissions.
- SMB: used for SMB shares (ACLs).
- Apps: designed for use with apps (Docker containers).
- Multiprotocol: designed for NFS and SMB.
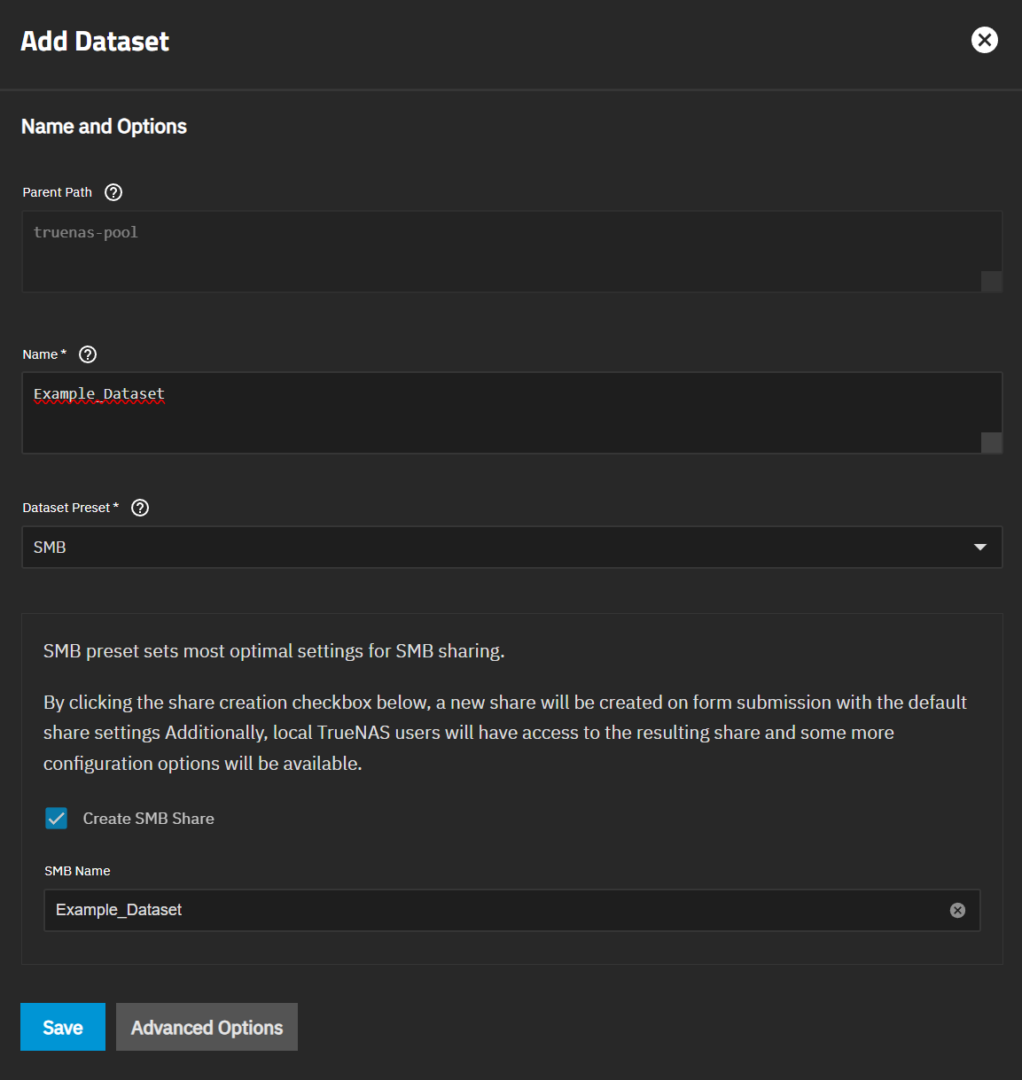
Depending on the option you select, there might be a few additional settings to fill out (like the SMB share name), but after you save, this dataset can be used. If you’re planning on running containers on this system, Apps is the preset you want, and my guide on using Docker on TrueNAS picks up from there.
Data Protection: Scrubs, SMART Tests, and Snapshots
Now that our pool and datasets are created, we can continue by configuring data protection. This is the part that a lot of people skip, and overall, it’s the part that determines whether ZFS actually saves you when something goes wrong.
Scrub Tasks
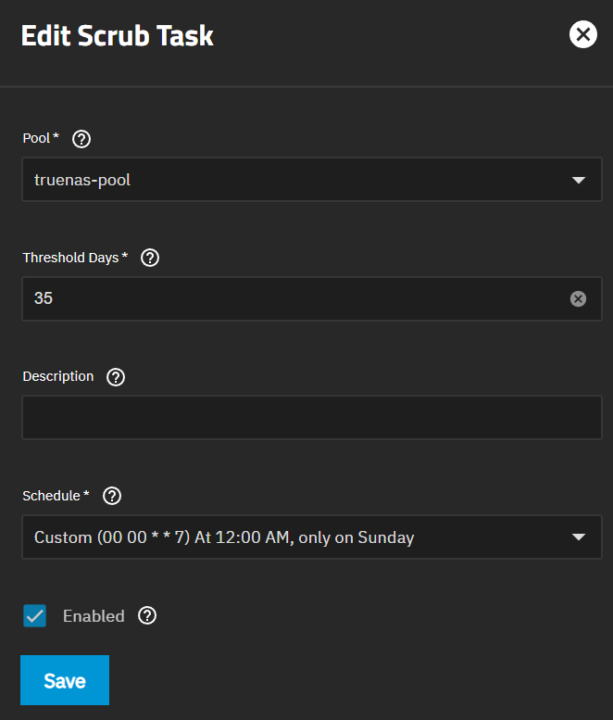
A scrub task is a maintenance step that checks the integrity of your data, as it scans through your pool and detects and corrects any silent corruption that might occur. This is configured by default, and while you can modify the times it runs if you’d like, I tend to keep the default settings, which in my opinion make the most sense for most systems.
By default the scrub task runs every week on Sundays, but since the threshold is set to 35 days, it won’t actually run until that threshold is met. In practice, it ends up being about every five weeks. You can modify the schedule or the threshold if you’d like it running more often.
Periodic S.M.A.R.T Tests
S.M.A.R.T tests are designed to check the disks themselves rather than the data sitting on them. You can run short tests or long tests, and if a drive starts showing any issues, you’ll be notified before it fails outright.
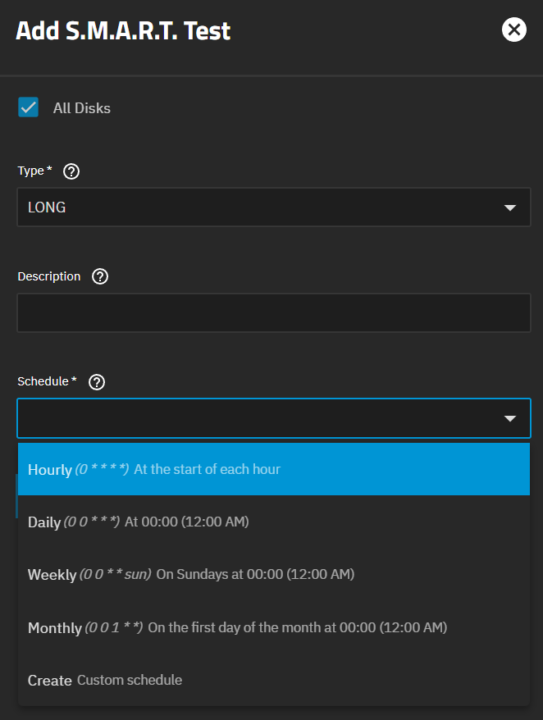
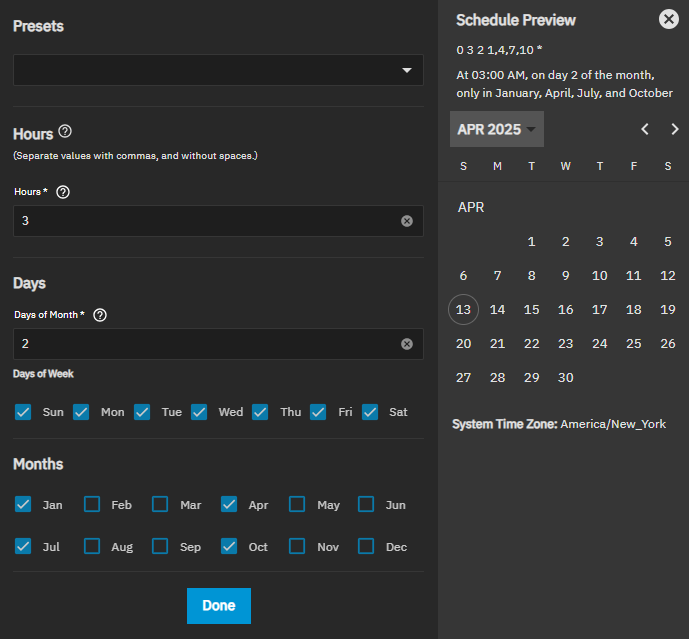
I like to schedule quarterly long tests and weekly short tests, though plenty of people prefer running the long test monthly instead, which is totally fine. Either way, the drives are getting checked on a regular cadence, which is really the whole point of setting them up.
Snapshot Tasks
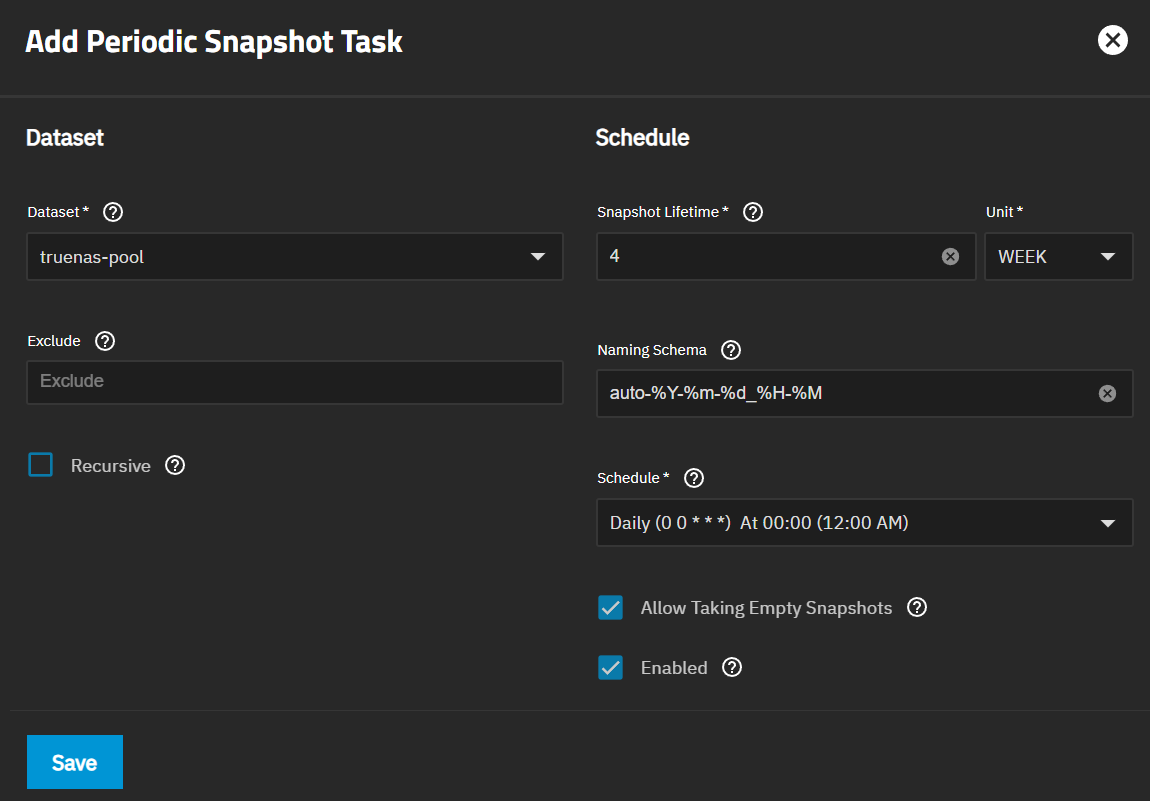
Snapshots are incredibly important to run and are one of the biggest benefits of ZFS overall, so they’re the thing I’d set up before anything else on this list. A snapshot freezes your data at a point in time, and restoring from one is close to instant.
TrueNAS makes this very easy, as a snapshot task can be configured across an entire pool. With that said, as we discussed earlier, each dataset can have a different snapshot schedule if you’d like, and this is exactly where nested datasets come in handy. Media that rarely changes doesn’t need the same snapshot frequency as documents you’re editing every day.
You can customize any of the settings you’d like below, but in general, I’d suggest daily snapshots with a two-week lifetime at minimum.
Backups
The final thing I’d suggest is configuring a real backup, as snapshots don’t count as one on their own. A snapshot lives on the same pool as your data, so while it protects you from accidental deletion and ransomware, it isn’t going to protect you from losing the machine itself.
Where you send it is going to depend on where you want to back your data up, but TrueCloud Backup with Storj, rsync to another box, or even a Cloud Sync task will all work. The only disclaimer with a Cloud Sync task is that it’s a sync, not a backup. If something deletes or encrypts a file locally, the sync will obediently push that change to the destination. That is why the destination needs some sort of snapshot or version feature to protect against things like ransomware attacks.
TrueNAS is an awesome NAS operating system, but a lot of people are confused by it. Overall, I think that comes down to some of the nuances (like ACLs) which make it different than other NAS operating systems. Once you get used to those, it really can’t be beat, and in my opinion, it’s the best DIY NAS operating system you can use. If you’re still weighing it against the alternatives, I compared them directly in Unraid vs TrueNAS, and once your pool is built, installing Plex on TrueNAS is a good first thing to put on it.