
Tailscale installs on TrueNAS as a normal app from the built-in Apps catalog, so there’s no TrueCharts catalog to add and nothing to run on the command line. The TrueNAS Tailscale app lives in the community train of iXsystems’ own catalog, and once it’s running, you can reach the NAS (and, with a subnet route, your entire local network) from anywhere without forwarding a single port.
If you set up Tailscale on TrueNAS Scale (renamed TrueNAS Community Edition in 25.04) through TrueCharts, that catalog is gone. TrueCharts deprecated its Scale apps in May 2024 and had disabled new installs entirely by that August, and 24.10 (October 2024) then moved apps from Kubernetes to Docker, so there is no Add Catalog button anymore. As of this update (September 2026), the recommended release is 25.10 “Goldeye”, which is the release the steps below are written for.
I first set up Tailscale in 2022, on a Synology NAS and then on pfSense, and again on a Synology NAS in 2024, each time with subnet routes and an exit node. I’ve used TrueNAS for years as well, on my DIY NAS and a UGREEN DXP8800 Plus. The settings below come from the app’s current catalog version (1.4.14, August 2026) and Tailscale’s own TrueNAS guide.
What the TrueNAS Tailscale App Gives You
On TrueNAS, the app runs the official Tailscale container image (client v1.102.3 as of August 2026). With the default settings, the NAS itself becomes a node on your tailnet, because the app binds to the host network and mounts the TUN device from the host. The login state is kept in a dataset TrueNAS creates automatically, and it survives reboots.
Tailscale is built on top of the WireGuard VPN protocol and is designed as a point-to-point VPN, which basically means that your devices connect directly to each other. It’s also a zero-configuration VPN (you don’t port forward anything). For some users behind a CGNAT connection, that makes it one of the few ways to get VPN access to the NAS.
Support is handled by the TrueNAS community rather than iXsystems (that’s what the community train means), but the catalog is the one built into TrueNAS, and it’s the path Tailscale’s documentation points to. With that said, Tailscale is not the perfect tool for everyone. Every device you connect from needs the client, and it relies on Tailscale’s coordination servers to add devices and exchange keys. There are potentially fees if you drop out of the free tier, and some users have privacy concerns with a third party managing access into their network.
Install Tailscale on TrueNAS from the Apps Catalog
The way to install Tailscale on TrueNAS now is the app (Apps, then Discover Apps), and once TrueNAS has a pool, the only thing you need before you open it is an auth key. If you haven’t set up TrueNAS Community Edition with a pool yet, do that first, since apps need a pool to live on.
Generate a Tailscale Auth Key
1. Log in to Tailscale (create a free account if you don’t have one), then open the Keys page of the admin console by selecting Settings, then Keys. If the account is new, Tailscale first asks you to add a device. Add the laptop or phone you’ll connect from (you need it later anyway), and the second device it asks for, then select Take me home.
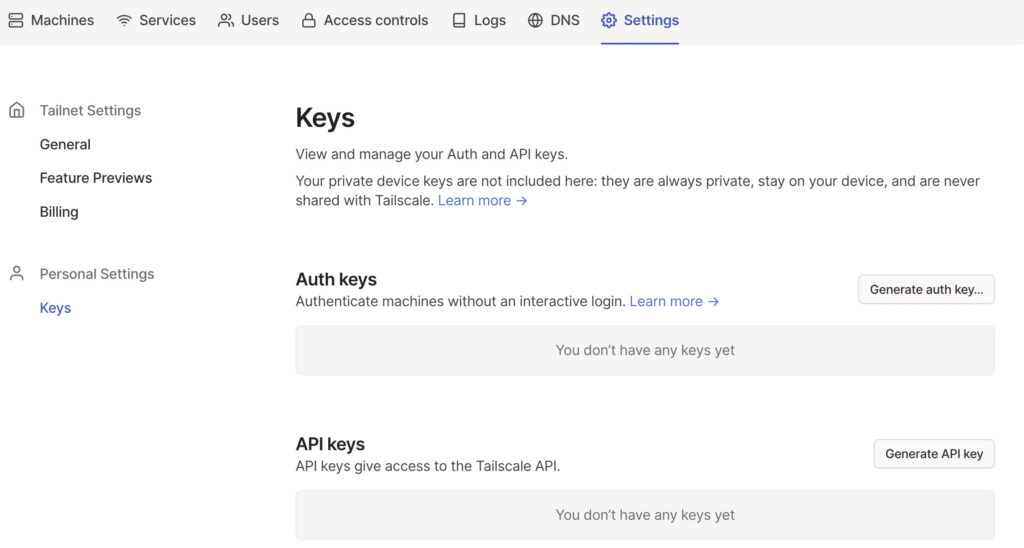
2. Select Generate auth key, give it a description like the name of your NAS, and leave Reusable off unless the same key will authorize several servers. Leave Ephemeral off as well, since an ephemeral machine is removed from your tailnet after a short time offline, and it gets a new IP address if it’s added again. The Expiration (up to 90 days) only limits how long the key can add machines, not how long the NAS stays connected.
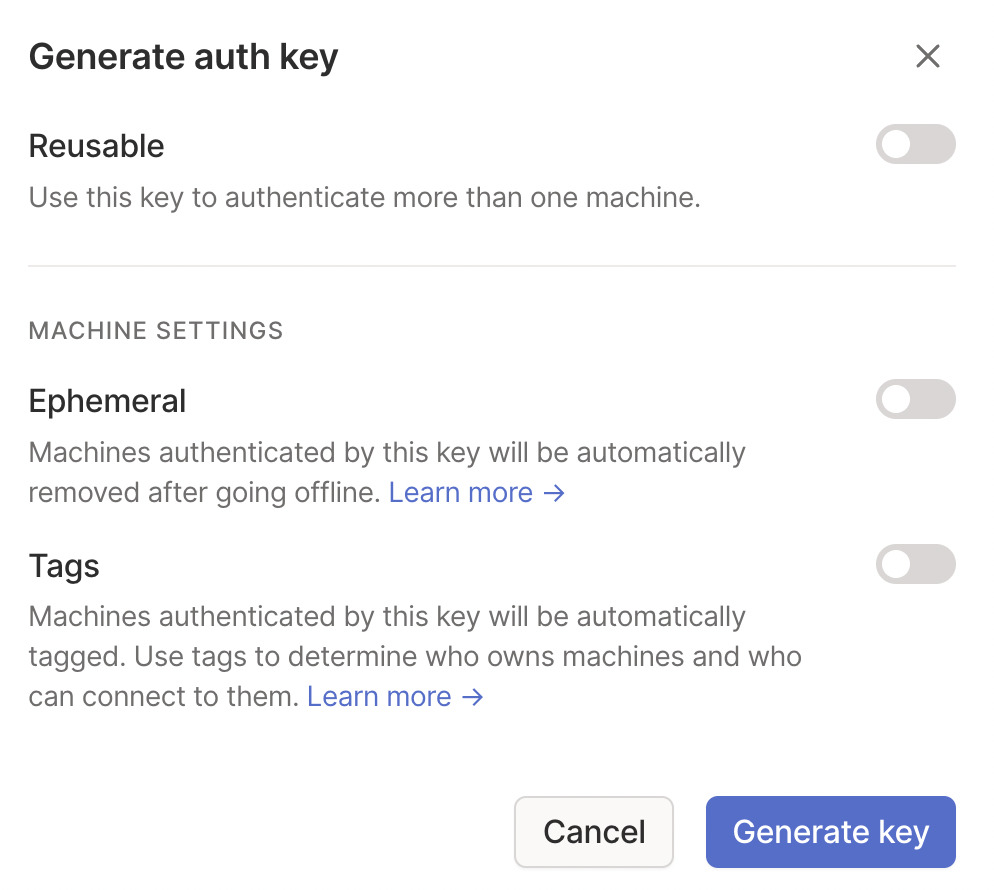
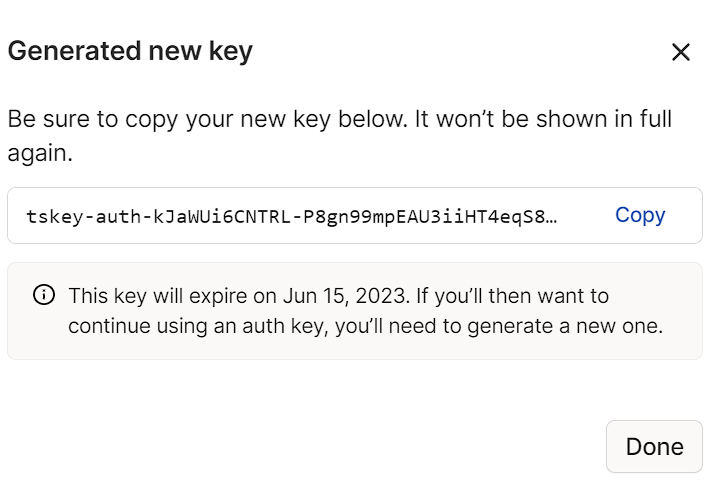
3. Select Generate key and Copy the key, which isn’t shown in full again.
Install the App on TrueNAS
1. In the TrueNAS web UI, select Apps. If you haven’t picked a pool for apps yet, select Configuration, then Choose Pool, pick one, and select Choose.
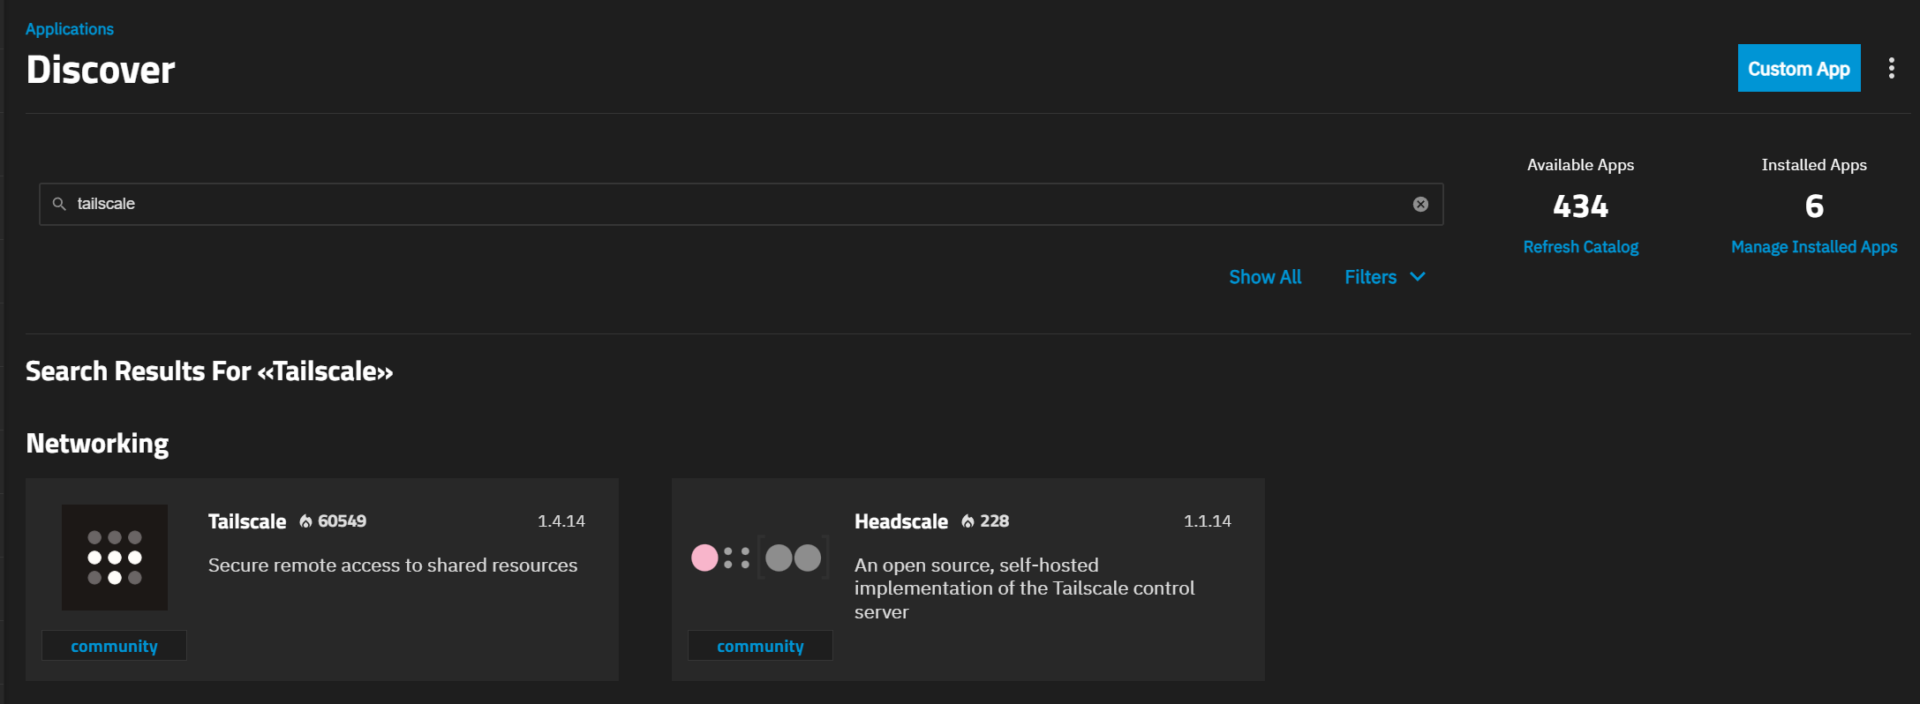
2. Tailscale is in the community train, which Community Edition shows in Discover by default. If it doesn’t appear when you search in the next step, select Configuration, then Settings, tick community, and save.
3. Select Discover Apps, search for Tailscale, open its card, and select Install (the first time, select Agree on the third-party apps Warning).
You could also run Tailscale as a custom app with your own Compose file (Install via YAML, in the menu next to Custom App). The catalog app exposes nearly every Docker flag you’d put in Compose though, and for most people, it’s the simpler option.
TrueNAS Tailscale Setup: App Settings
Below Application name, the form has five groups, and for plain remote access, you’ll only change two fields (Hostname and Auth Key). Decide on the exit node before you select Install, because adding it later takes extra steps.
1. Under Tailscale Configuration, set the Hostname (lowercase letters, numbers, and hyphens only). This is the machine name in the Tailscale admin console, and it defaults to truenas-scale.
2. Paste the key into Auth Key and leave Auth Once enabled, which makes the app log in only if it isn’t already logged in (a restart won’t burn through your key).
3. Leave Userspace off, which is the app’s default.
Tailscale’s own TrueNAS guide ticks Userspace for a basic install, but unticks it and turns on Host Network in its ZFS replication section, where the NAS itself has to talk over the tunnel. That’s the setup you want here.
4. Accept DNS, Accept Routes, and Reset can stay off. Accept DNS only changes the DNS the Tailscale container itself uses (not the DNS TrueNAS uses), and Accept Routes makes the NAS accept subnets other nodes advertise. Leave Accept Routes off if another device, like pfSense running Tailscale, already advertises the subnet the NAS is on, or the NAS can stop answering on its local IP address.
5. If you want the NAS as an exit node, tick Advertise Exit Node now, before you select Install. Subnet routes go under Advertise Routes, and the exit node section below covers both, starting with the IP forwarding they need.
Please note, while Auth Once is on, the Advertise Exit Node, Accept Routes, Reset and Extra Arguments (flags the form doesn’t expose) settings only apply the first time the app logs in. Hostname, Accept DNS and Advertise Routes are re-applied every time it starts.
6. Under Network Configuration, leave Host Network enabled. The form calls it “needed in most cases in order to communicate with the host”, and the web UI and your shares are on the host.
7. Storage Configuration, Labels Configuration and Resources Configuration can stay as default (an ixVolume dataset for state, no labels, 2 CPUs, 4096 MB of memory), then select Install.
The app shows Deploying on the Installed screen and then flips to Running. As soon as it does, the NAS appears under Machines in the admin console with the hostname you gave it. Open the three dots next to it and select Disable Key Expiry, or the NAS drops off the tailnet after 180 days.
TrueNAS Tailscale Exit Node and Subnet Routes
Out of the box, Tailscale only gets you to the devices that have Tailscale installed, and a subnet route changes that. The NAS advertises your local subnet (which makes it what Tailscale calls a subnet router), and you can access it on its local IP address rather than the address inside of Tailscale, which is tremendously helpful. You’ll be able to reach every other device on that subnet as well, and a network drive mapped by IP address keeps working after you leave the house. A subnet route basically transforms Tailscale into a more traditional VPN!
An exit node goes further and routes all of a device’s traffic through your home network, which means your external IP address becomes your home IP address. Think of it as a full tunnel VPN, where the default (no exit node) is a split tunnel that only sends tailnet and local subnet traffic through Tailscale. An exit node is helpful if you’re on public Wi-Fi and want to secure your connection, and most people should set up both if possible, since you pick between them on each device when you connect.
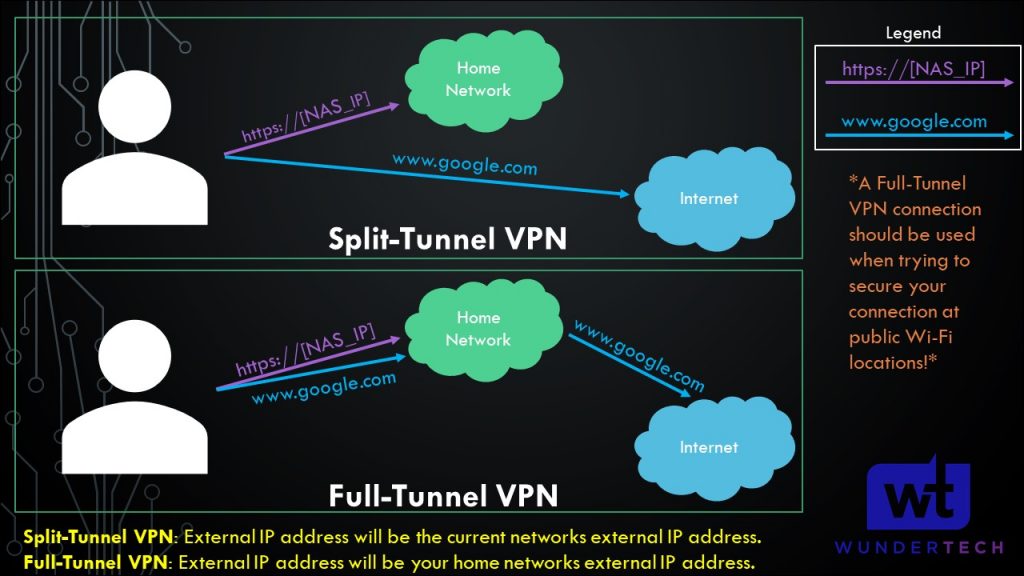
There are five steps, three on TrueNAS and two in the Tailscale admin console (Tailscale’s own exit node and subnet router docs cover the general case).
1. Start with IP forwarding on the host, which both settings need. Select System, then Advanced Settings, find the Sysctl widget, and select Add. In Add Sysctl, set Type to SYSCTL, then create one entry for each line below (Variable on the left, Value on the right), leave Enabled ticked, and select Save. Each applies as soon as you save.
net.ipv4.ip_forward = 1
net.ipv6.conf.all.forwarding = 1
2. Select Add next to Advertise Routes and enter each local subnet as a Route in CIDR notation, either in the install form or later through Edit and Update, since routes are re-applied every time the app starts. If you open the NAS at 192.168.1.50, for example, the subnet is 192.168.1.0/24 on most home networks. The Interfaces widget (System, then Network) shows the NAS as 192.168.1.50/24, which isn’t a valid route, so change the last number to 0 before you paste it, or the app won’t finish deploying.
192.168.1.0/243. Tick Advertise Exit Node in the install form (step 5 of the settings above). If the app is already installed, select Edit, untick Auth Once (paste a fresh auth key if the first one was one-off or has expired), tick Advertise Exit Node, and select Update. Once the NAS shows the Exit Node badge, edit it again and tick Auth Once back on. With it off, the app logs in with that key every time it starts.
4. Back in the Tailscale admin console, select Machines, and the NAS shows a Subnets and/or Exit Node badge for what it advertises. Open the three dots next to it and select Edit route settings (if the menu doesn’t list it, open the machine and select Edit in its Subnets section).
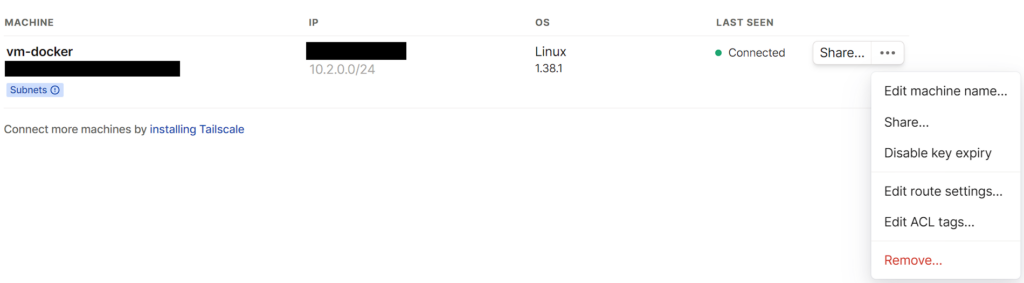
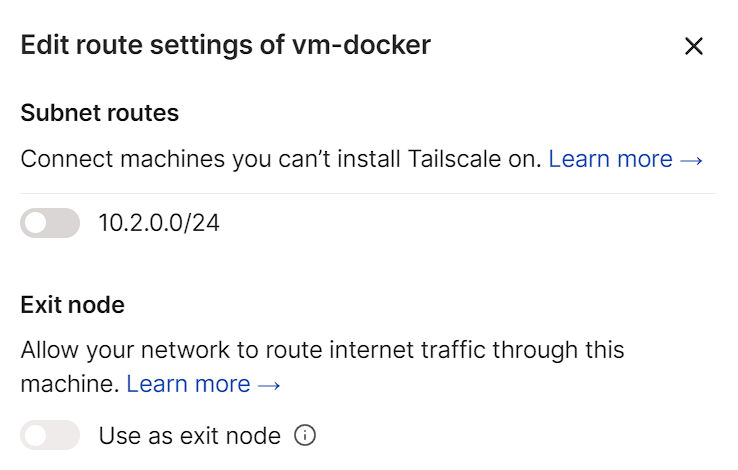
5. Tick the subnet you advertised and/or Use as exit node, then Save. Approving only the subnet gives you a split tunnel, and both gives you the option of a full tunnel.
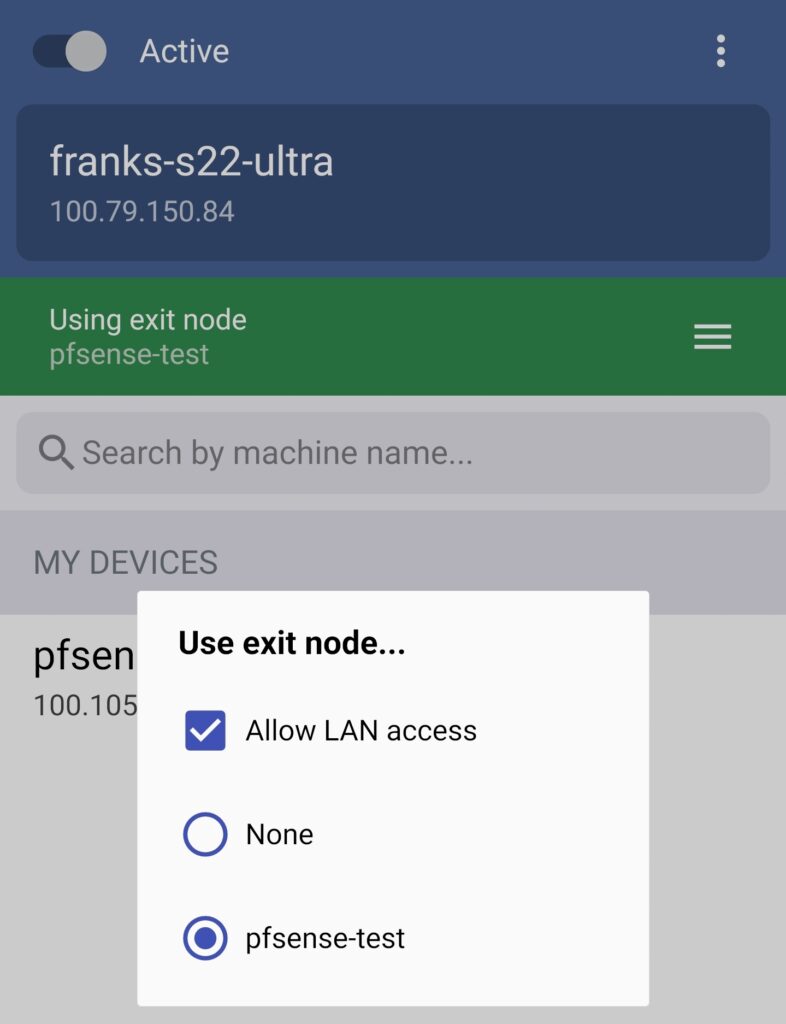
On the laptop or phone you’ll connect from, pick the NAS as the exit node for a full tunnel, or leave it at None for a split tunnel. When you use the exit node, turn on Allow LAN access in the same menu (Allow Local Network Access on Mac and Windows). It’s off by default, and it keeps the network you’re on reachable.
With the app running, open the NAS from any device signed in to the same Tailscale account at the IP address Tailscale assigned it (it’s listed on the Machines page). The web UI, your SMB shares, and any apps on the NAS are reachable at that address. With MagicDNS (on by default for tailnets created since October 2022), the Hostname you gave the app works in its place (plus the port, for an app).
If you approved a subnet route, which is how I set it up on pfSense and on my Synology NAS, the local IP address and your mapped shares keep working too, as long as they’re mapped by IP address. A drive mapped by the NAS’s local network name (like truenas.local) only resolves on your home network.
Android, iOS, macOS and Windows pick up an approved subnet route automatically, but a Linux laptop ignores it until you run the command below once.
sudo tailscale set --accept-routesOne setting to check on the TrueNAS side: under System, then General Settings, select Settings on the GUI widget. Web Interface IPv4 Address should be 0.0.0.0 (the default) for the web UI to listen on the Tailscale address too. The app’s form has no Serve option, and HTTPS over the tailnet (Tailscale Serve) is a separate setup this guide does not cover.
Stuck Deploying, Key Expired, or Tailscale Not Connecting
The app shows Deploying, Running, Stopping, Stopped or Crashed on the Installed screen. If it never leaves Deploying or lands on Crashed, open the app and select the View Logs icon on the Workloads widget. A one-off key that was already used (or one past its expiration) won’t log the app in. Generate a fresh one, select Edit, paste it into Auth Key, and select Update.
A log line saying a route “has non-address bits set” means it was pasted as the NAS’s own address (192.168.1.50/24). Change it to the subnet (192.168.1.0/24) under Edit, then select Update. If your tailnet has device approval turned on, the logs say “machine authorization required”. Select Approve in the NAS’s menu on the Machines page, and it finishes logging in.
If it shows Running but the Tailscale IP doesn’t open the NAS, check that your device is on the same tailnet, Host Network is on, and Web Interface IPv4 Address is 0.0.0.0. If only the local IP fails, check the route approval under Edit route settings (advertising alone does nothing), the Sysctl entries, and --accept-routes on a Linux laptop. If you’ve edited your tailnet’s access rules, check that they still allow the NAS.
If you ticked Advertise Exit Node on a running app and no Exit Node badge appeared, that’s Auth Once, and step 3 of the exit node section shows the fix.
There are two expiries, and they’re easy to mix up. The auth key expiring only stops it from adding new machines, and the NAS stays connected until its node key expires, which is 180 days by default. If you skipped Disable Key Expiry after the install and the NAS has already dropped off, open its menu on the Machines page and select Temporarily extend key. Then select Disable Key Expiry within the 30 minutes it gives you.
Updates work like any other app. When a newer catalog version is out, the Update option in the three-dot menu on the app’s Application Info widget becomes selectable. It opens a window with the new version, and Update there starts it. Because the login is kept in the state dataset, an update doesn’t normally need a new auth key. If it loops between Stopped and Deploying after an update, one reported fix was deleting it with Remove iXVolumes ticked and reinstalling with a fresh key (then removing the old machine from the Machines page).
Tailscale on TrueNAS Core
None of this applies to TrueNAS Core. The TrueNAS Core Tailscale path is a jail, not an app, since Core is FreeBSD with no apps catalog, and Tailscale says Core is not officially supported. iXsystems says jails on Core 13.3 are untested and unsupported, and that the vulnerabilities in iocage (the jail manager behind them) are unlikely to be fixed. Core is no longer under active development, so my advice hasn’t changed since I compared TrueNAS Core vs TrueNAS Scale. Back everything up, then migrate to Community Edition sooner rather than later and install Tailscale as an app.
Final Thoughts on TrueNAS Tailscale
Overall, Tailscale couldn’t possibly be easier to set up, and in my opinion, it’s the easiest and fastest way of setting up VPN access on almost any device. To be clear, this isn’t a traditional VPN the way that OpenVPN or WireGuard is, and the Tailscale vs WireGuard comparison covers where each fits. It is the quickest way to access your local network, though, and it doesn’t require any port forwarding.
Security changes constantly and none of this is guaranteed, so revisit these settings after a major update.