Hyper Backup is the package Synology gives you for getting data off your NAS and somewhere else, and it’s the one I’d set up before almost anything else on a new device. Most people use a NAS as network storage, a backup destination, a media server, or a photo library, and over time it quietly ends up holding some of the most important data you own. Redundancy helps, but RAID protects you from a dead drive, not from a dead NAS, a fire, or a mistake you make yourself.
Before anything else, there are three names worth separating, because they get mixed up constantly and they do different jobs. Hyper Backup is the package that runs on the NAS you’re backing up. Hyper Backup Vault is the package that runs on the destination, and you only need it if that destination is another Synology. Hyper Backup Explorer is a desktop application for Windows, macOS, and Linux that opens a backup archive on a regular computer, without a NAS involved at all.
I’ve been running Hyper Backup to Backblaze B2 since B2 was first supported, and it’s been reliable enough that I’ve stopped thinking about it. This covers where to get all three pieces, how to configure a task properly, how to restore from one (which is the step most people skip), and how to open an archive when the NAS itself isn’t available.
Where to Get Hyper Backup, Vault, and Explorer
Hyper Backup itself is free and it is not a separate download, as it lives in Package Center on the NAS. Open Package Center, search for Hyper Backup, and install it. It runs on any Synology model still receiving DSM updates, so there is no real requirement to check beyond having a supported device and somewhere to send the data.
If your destination is a second Synology NAS, that second device needs Hyper Backup Vault installed, also from Package Center, and it’s what receives and stores the archive. You do not need it for Backblaze B2, an external USB drive, an rsync target, or any of the other destinations.
Hyper Backup Explorer is the one that trips people up, because it is a desktop application rather than a DSM package, and it comes from Synology’s Download Center instead of Package Center. Pick your model, then look under Desktop Utilities. I’d install it now rather than later, since the moment you actually need it is generally the moment your NAS is unavailable.
Setting Up a Hyper Backup Task
The whole purpose of this application is to give you an easy way to back data up from the NAS to a separate location. There are a few different destination options, but the key thing to understand is that an archive gets created. Either your Synology NAS or a separate computer running Hyper Backup Explorer can read and restore data from it.
The steps below outline the general process, though you will have to tailor the setup to your own situation.
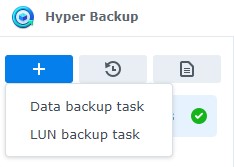
1. Launch Hyper Backup and select the + symbol, then Data backup task.
2. You’ll be brought to the destination list, which is where the archive is going to live. My personal favorite is Backblaze B2, which I’ve been using with Hyper Backup since it was supported. You can also select a local storage location (an external USB drive), a remote NAS device, a file server, or another cloud service. I’d generally advise against the single-version options, though there are a few valid uses for them.
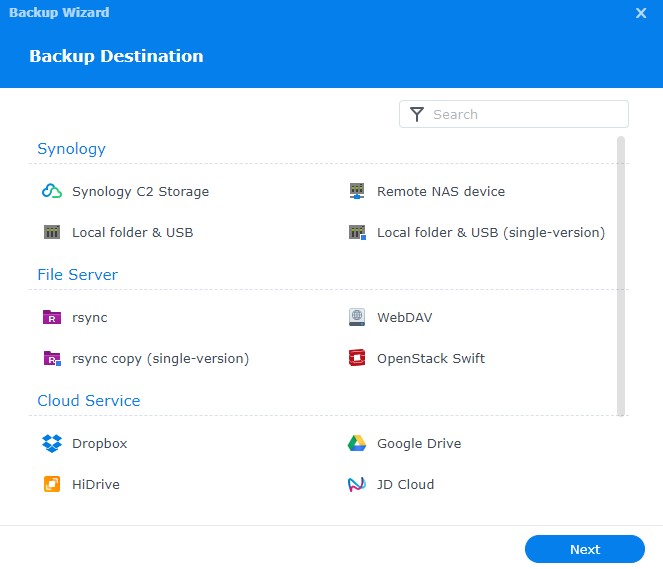
3. Depending on the option you selected, you’ll have to fill out different information, and I cannot really show every example here, but this is where you enter whatever the destination server needs.
4. At the Data Backup section, select your data. If you want to back up the entire NAS you’re free to do so. But disaster recovery plans generally cover data that’s irreplaceable, so it is perfectly acceptable to only select the most important data you have.
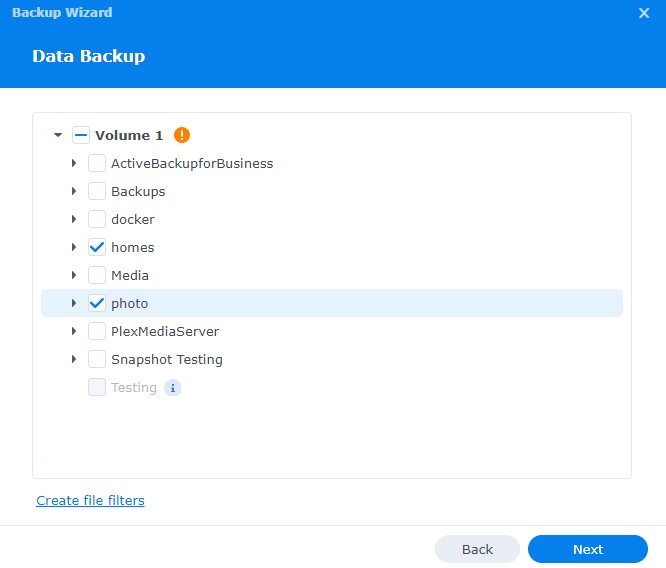
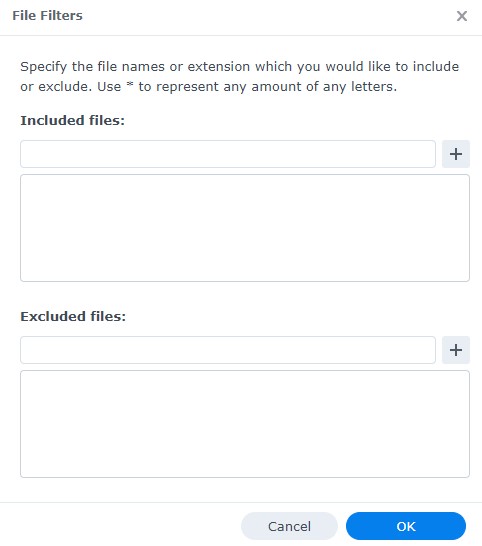
5. If you’d like to create file filters to include or exclude certain file types, select Create file filters at the bottom, then include or exclude file names or extensions.
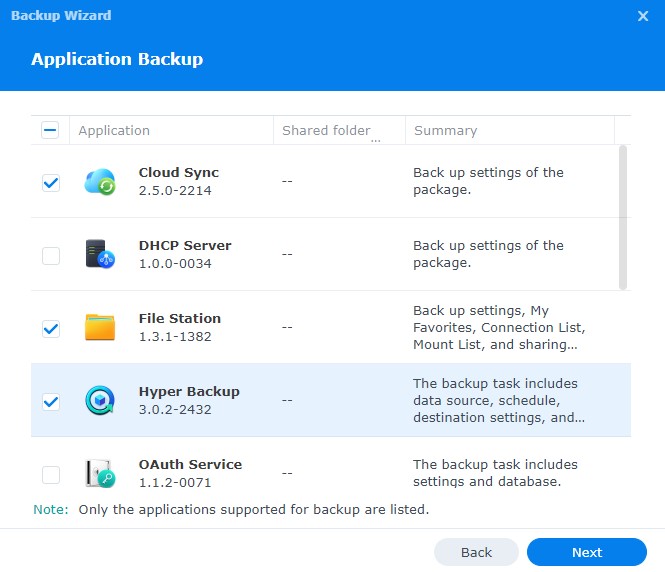
6. At this step you can back up the applications on your NAS. Not all applications are supported, but for the ones that are, the settings and configuration can be backed up and restored onto another Synology NAS, or even the same one.
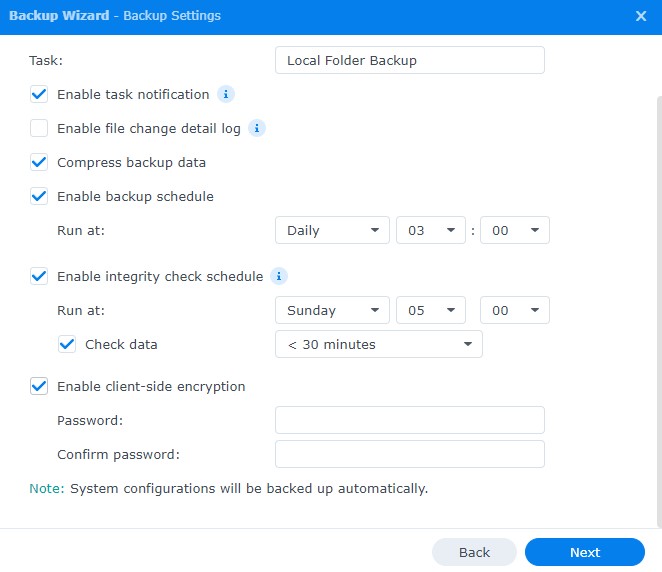
7. Here you’ll schedule the task and pick a date and time for it to run. Beyond the backup schedule itself, give the task a name, turn on Enable integrity check schedule, and decide whether you want client-side encryption.
Client-Side Encryption
Client-side encryption means that if someone gets hold of the Hyper Backup archive, they will not be able to open it without the password or the encryption key. That’s a great option if you’re backing up to an external USB drive or to a friend or family member’s house, since you’re making sure they can’t read what’s in that archive. It is extremely valuable for cloud storage as well.
Save the key somewhere that isn’t the NAS. An encrypted archive you can’t decrypt is the same as no backup at all.
Backup Rotation and Retention
Backup rotation settings are going to be specific to everyone, as they ultimately decide how many versions of the archive you keep. If you’re someone who wants multiple versions spanning different timeframes (days, months, years), you’ll want to use Smart Recycle or Customized Retention.
The downside is that you’ll generally use more storage, since older versions are maintained for longer durations. If you just want to save a set number of versions, using From the earliest versions and setting a maximum is a good option.
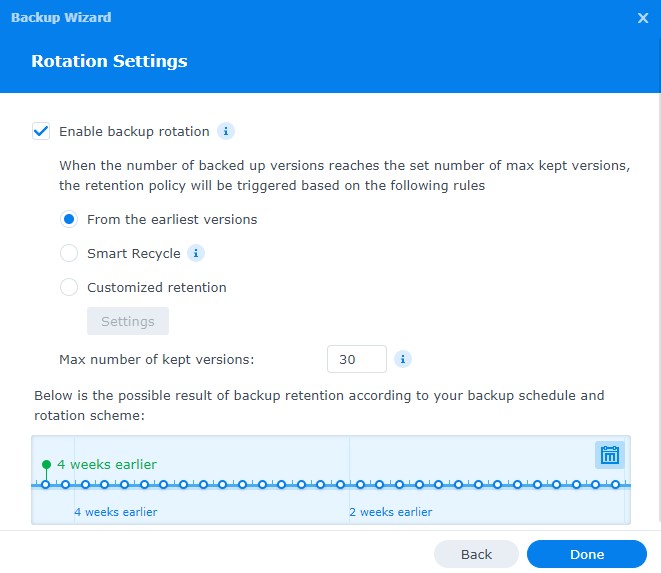
8. At this point the task is fully configured and will back up to the destination you specified. With that said, you do not have a true backup until you have validated that you can restore from it, so once the first backup finishes, move on to the restore section below and actually test it.
Backing Up to an External USB Drive
Backing up to a USB drive is one of the most common setups, and it’s handled as a destination rather than as a separate feature. Plug the drive into the USB port on the NAS and let DSM mount it, where it generally shows up as usbshare1. At step 2 above, choose Local folder & USB as the destination and point the task at that share.
Two things matter before you rely on it. A USB drive attached to the NAS is in the same room, on the same power, and exposed to the same theft or fire as the NAS itself. I’d treat it as your local copy and not your only one. This is also the case where client-side encryption earns its keep, because a drive that walks off is readable by whoever has it otherwise.
Restoring Data from a Hyper Backup Archive
There are two different ways to restore, where the first is accessing files and folders individually and the second is restoring a folder in bulk. We’ll look at both. Restoring a folder entirely overwrites the existing folder, and if it does not exist, it gets created.
Restoring an Individual File or Folder
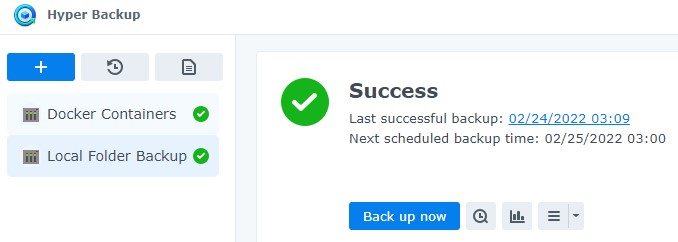
1. Select the backup task, then select Backup Explorer, which is the icon next to Back up now. This is the browser built into DSM, and it isn’t the same thing as the Hyper Backup Explorer desktop app covered further down.
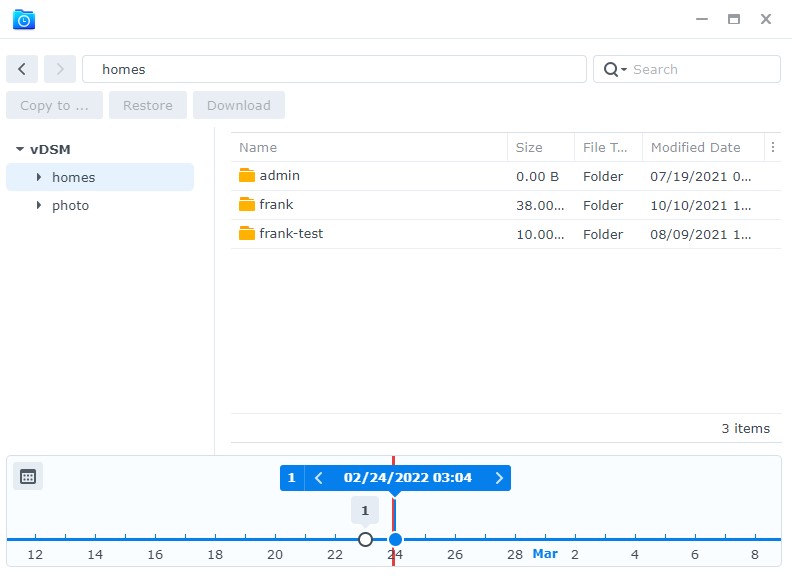
2. At the bottom you’ll see a timeline slider, which is based on the rotation settings you configured above, and for every version that exists you’ll be able to view that file and download or restore it.
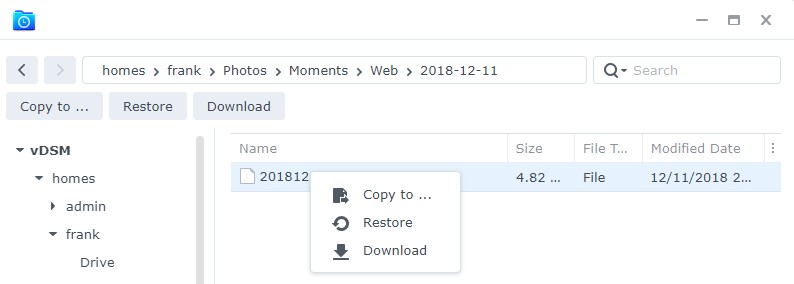
3. To download, copy, or restore a file, find it using the folders on the left and then right-click the item. Downloading pulls it onto whatever device you’re currently using, copying puts it into a folder on the NAS, and restoring overwrites the original file or folder on the NAS.
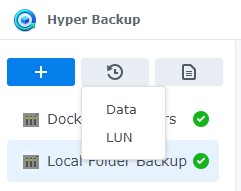
1. Select the Restore button and then select Data.
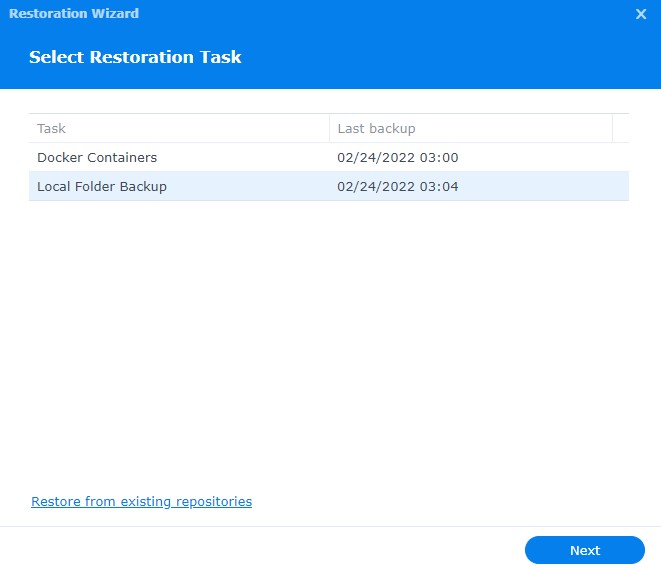
2. Select the restoration task and select Next.
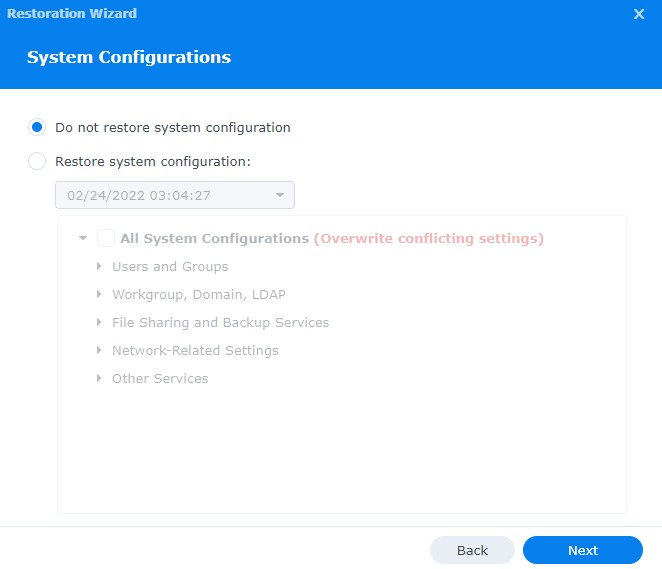
3. Since the system configuration is backed up automatically, you can choose to restore it here if you need it.
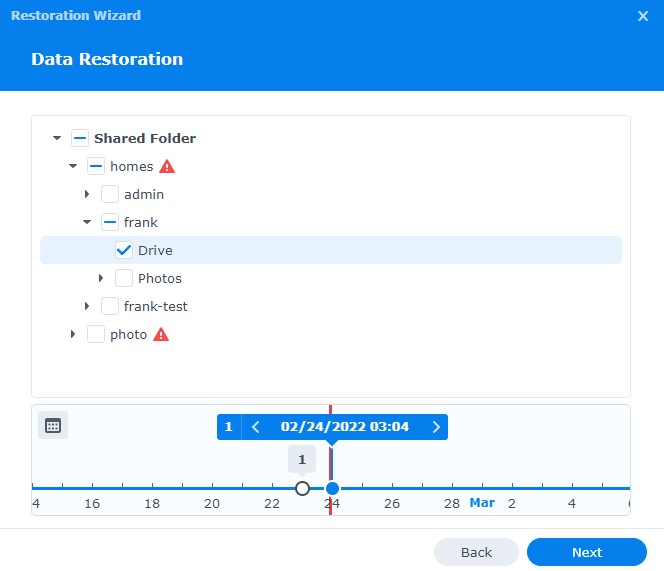
4. Here you can restore entire folders by selecting them along with the version you’d like from the timeline at the bottom. The red exclamation point is telling you that if the folder already exists, it’s going to be overwritten with the data in this backup. Only folders can be restored this way, so if you want an individual file, use the Backup Explorer method above.
5. In this step you can restore the settings for any applications you previously backed up, which overwrites the data that currently exists in those applications, so only do it if you’re certain that’s what you want.
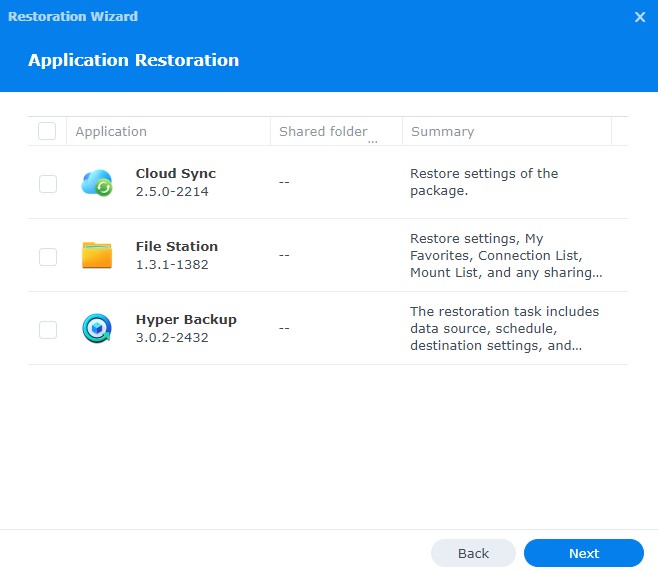
6. Select Done and the data gets restored, and when it finishes you’ll get a message confirming it completed successfully.
Hyper Backup Explorer: Opening an Archive Without Your NAS
Everything above assumes you can log into DSM, which is fine for a deleted file, but it is exactly the assumption that fails in the scenario you built the backup for. If the NAS is dead, stolen, or sitting in a box waiting for an RMA, DSM is not there to restore from.
That’s what Hyper Backup Explorer is for. It’s a desktop application for Windows, macOS, and Linux that opens a Hyper Backup archive (the .hbk file) directly from whatever drive it’s sitting on, with no NAS involved. You browse the archive, pick the version you want off the same kind of timeline you’d see in DSM, and pull files out onto your computer.
Grab it from Synology’s Download Center under Desktop Utilities, then point it at the archive. If you’re backing up to an external USB drive, plug that drive into your computer and open the .hbk file on it. If you used client-side encryption, this is where you’ll need the password or key file, which is the reason to store it somewhere separate from the NAS.
There is one limitation. Explorer reads archives that live on a drive you can physically attach or reach over the network. Archives sitting in a cloud destination like Backblaze B2 generally need to come back through a Synology NAS running Hyper Backup. If cloud is your only copy, keep a spare device in mind as part of the recovery plan.
Renaming a Backup Job
1. Open Hyper Backup and Edit the task you’d like to rename.
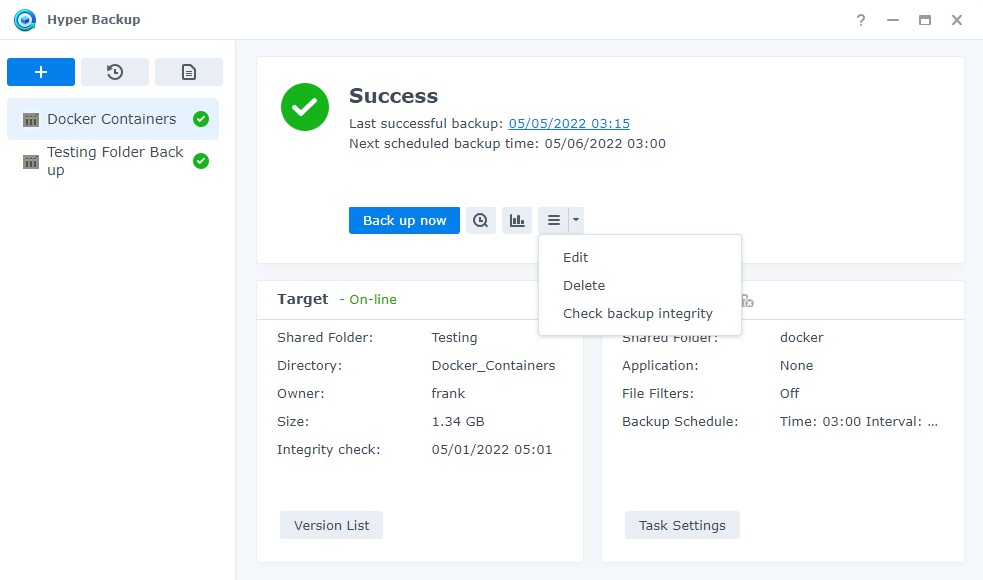
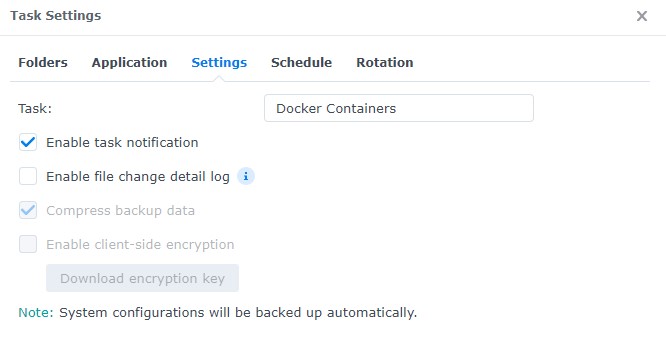
2. Select Settings, change the task name, and then save.
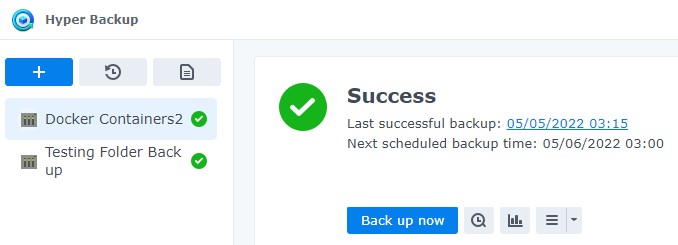
3. Whatever you changed the name to is now reflected in the task list.
Specific Backup Destinations
The setup above is the same regardless of where you’re sending the data, but each destination has its own configuration on the other end, and I’ve covered the three I get asked about most.
Backing up a Synology NAS to Backblaze B2 is the one I run myself, and it’s the cheapest off-site option I’ve found that doesn’t involve owning a second location.
Backing up a Synology NAS to a remote Synology NAS is the option that needs Hyper Backup Vault on the receiving device, and it’s a good fit if you’ve got a second NAS at a family member’s house.
Backing up a Synology NAS to a Raspberry Pi is the cheapest way to build your own off-site target, using rsync rather than Vault.
One thing Hyper Backup isn’t built for is backing up your computers to the NAS, as it only moves data in the other direction. If that’s what you’re after, Active Backup for Business is the package that handles PCs, servers, and virtual machines.
Overall, Hyper Backup is easy to use and it works well, and the part I’d push you on is the restore test rather than the setup. Configure the task, let it run once, then go pull a file back out of it, because a backup you’ve never restored from is really just an assumption. Install Hyper Backup Explorer while you’re at it, since the day you need it is generally the day the NAS isn’t there to help.