In this article, we’re going to take a look at how to configure SSD Cache on a Synology NAS, and when you should, and shouldn’t use it. The overall performance can greatly be enhanced by implementing SSD cache on a Synology NAS, but it’s important to understand how it works before implementing it.
Some links below are Amazon affiliate links which means that I earn a percentage of each sale at no cost to you. Thank you for your support.
Understanding SSD Cache on a Synology NAS
SSD caching is ultimately the process of using a smaller, faster SSD drive (preferably NVMe) to cache or store frequently accessed data from larger primary storage, such as HDDs. In general, it works by temporarily storing frequently accessed data from primary storage devices (HDDs), so when the data is requested, it is available on a faster storage medium.
This works because SATA or NVMe SSDs provide faster read and write speeds compared to traditional HDDs. The SSD drives caching the data will then expedite the process between reading and writing the data, assuming it’s part of the SSD cache as all data is not stored on the SSD cache – only the frequently accessed data.
Advantages of SSD Cache on a Synology NAS
There are certain advantages to SSD cache on a Synology NAS, and we’ll look at a few of them below.
- Performance Enhancement: With the SSD cache holding frequently used data, the Synology NAS can deliver quicker access to such data. This improvement becomes noticeable during activities such as file searches, media streaming, or database operations.
- Reduced Latency: SSDs provide lower data access times, which means that applications and services that require immediate data access, like databases or virtual machines, will experience reduced latency.
- Operational Efficiency: The reduced reliance on the primary HDDs for repeated read/write tasks minimizes the wear and tear on the HDDs. This can extend the longevity of the HDDs.
- Balanced Cost and Performance: Rather than transitioning the entire NAS storage system to the more expensive SSDs, you can use HDD storage complemented with SSD caching to increase performance. This approach optimizes performance without a significant rise in costs.
- Improved User Experience: Faster data access times and reduced latency lead to a smoother and more responsive user experience, whether it’s streaming media, accessing large datasets, or running applications.
Disadvantages of SSD Cache on a Synology NAS
While there are certainly benefits of SSD cache, there are some downsides as well.
- Cost: While SSDs have decreased in price over the years, they are still generally more expensive than traditional HDDs, especially when considering higher-quality SSDs that are ideal for caching purposes.
- Limited Lifespan: SSDs have a finite number of write cycles, meaning they can wear out over time. Heavy write operations on the cache can lead to a shorter SSD lifespan, especially if the SSD used is not enterprise-grade. Keep in mind that you’ll have to select between read or read-write SSD caching, so a read-only SSD cache won’t have the same recommended drive requirements as read-write.
- Data Loss Potential: If a read-write cache (as opposed to read-only) is configured and there’s a failure, there’s a potential risk of data loss or corruption. As of Synology DSM 7, you cannot set up a read-write cache without using RAID 1. This is done for fault tolerance protection.
- Diminishing Returns: Depending on the workload, some users might not observe a significant performance improvement, especially if their primary operations do not benefit substantially from caching (e.g., large sequential data transfers).
- Hardware Compatibility: Not all Synology NAS models support SSD caching. Users need to ensure their model supports the SSDs they intend to use.
SSD Cache vs. Storage Pool/Volume Creation
While you can configure SSD caching, in newer Synology devices, you can also use the M.2 NVMe slots for a storage pool/volume. Before configuring an SSD cache, you must determine if creating an SSD volume makes more sense than SSD cache.
To help determine when you should use a storage pool/volume or SSD cache, I’ll highlight some of their benefits below.
When Should You Use an NVMe Storage Pool & Volume?
High-Performance Needs: If your tasks demand the fastest possible read and write speeds consistently, such as intensive database operations or video editing, an NVMe storage pool would be beneficial.
Frequent Random Access: NVMe SSDs excel at random data access. If your workload involves lots of random data access, such as with virtual machines or transaction-heavy databases, NVMe storage can provide substantial benefits.
When Should You Use SSD Cache on a Synology NAS?
Mixed Workloads: If you have a combination of frequently accessed data and large volumes of cold or infrequently accessed data, an SSD cache can speed up hot data (frequently accessed) while using more affordable storage for the rest.
Cost-Effective Performance Boost: Instead of migrating all data to NVMe storage pools, using them as a cache can provide an overall performance benefit to all data as opposed to what is stored on the NVMe pool.
Requirements: Your requirements simply may not need an NVMe storage pool or it would be wasted if the data isn’t used frequently. An SSD cache may be a better option and one that will be used more frequently.
Picking Read or Read-Write SSD Cache on a Synology NAS
Before you actually configure the SSD cache, you’ll have to make the decision on using a read or read-write SSD cache. For the most part, the key difference is pretty obvious – read cache will only be used for read operations while read-write cache will be used for read and write operations. However, there are some important things to take into consideration:
Performance Impacts for SSD Cache on a Synology NAS
- Read Cache: Primarily benefits workloads with high read operations, like multimedia streaming or file reading. It won’t impact write speeds.
- Read/Write Cache: Helps with both read and write-intensive tasks, making it ideal for environments where data is both frequently read and written, like virtual machines or databases.
Reliability
- Read Cache: A read-only cache provides no real risk. If the cache drive fails, the system can revert to accessing data directly from slower HDDs without data loss.
- Read/Write Cache: A read-write cache comes with a risk of data loss. If the cache fails before data is written back to primary storage, it can result in data loss. For this reason, you cannot create a read-write cache in Synology DSM 7 or later without using at minimum RAID 1.
If you are only using one SSD cache drive, you will be limited to a read-only cache since DSM 7 and above require two SSDs at minimum for a read-write cache!
Cost and Storage Considerations
Since a read-write SSD cache requires at least two drives, the cheaper option is to purchase an individual SSD drive and use it as a read-only cache. Another thing to consider is that since read-write SSD caching comes with risks of data loss, you generally want to purchase higher-quality SSD drives as opposed to cheaper consumer devices.
Ultimately, a read-write SSD cache can simply be more expensive than a read-only cache no matter which way you look at it.
Read or Read-Write Recommendation: SSD Cache on a Synology NAS
Read Cache: Best for scenarios with mostly read operations and where budget constraints exist.
Read/Write Cache: Ideal for mixed workloads, where both increased read and write speeds are needed and the user can invest in at minimum, two high-quality SSD drives.
How to Configure SSD Cache on a Synology NAS
Now that we looked at what Synology NAS SSD cache is and why you might or might not want to use it, let’s look at exactly how it’s configured on a Synology NAS.
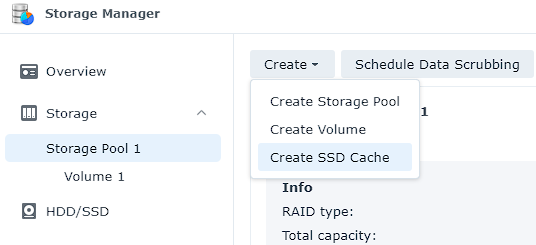
1. Log into Synology DSM and open the Storage Manager. Select the Storage Pool where you’d like to add the SSD cache.
2. Select Create, and then Create SSD Cache.
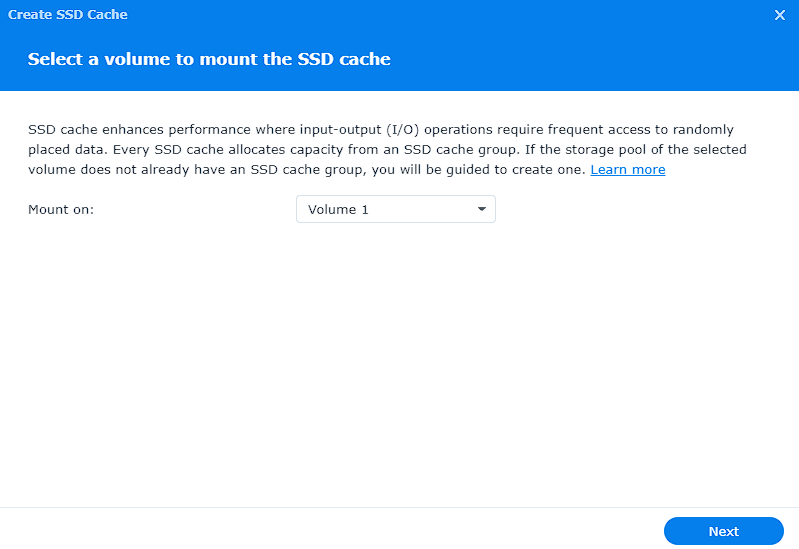
3. Select the volume where you’d like to create the SSD cache and select Next.
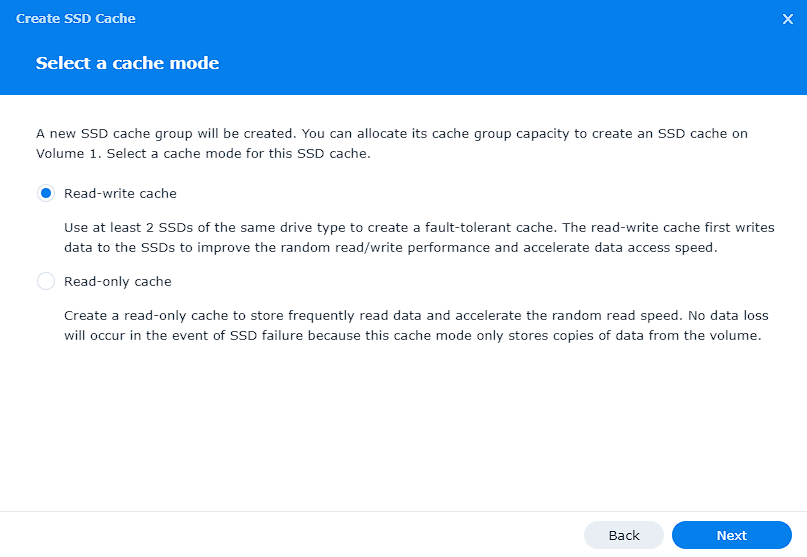
4. Select Read or Read-Write Cache. There isn’t necessarily a right or wrong answer here, but you’ll have to assess your requirements and pick the option that will fulfill them best. Remember that a read-write cache requires at least two SSDs.
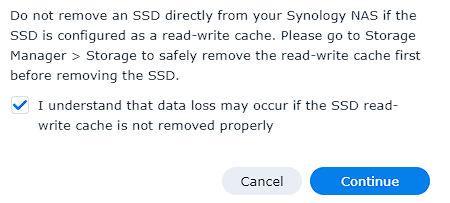
5. If you selected read-write cache, you’ll have to agree and proceed. If you selected read-only, you’ll be brought to the next section automatically.
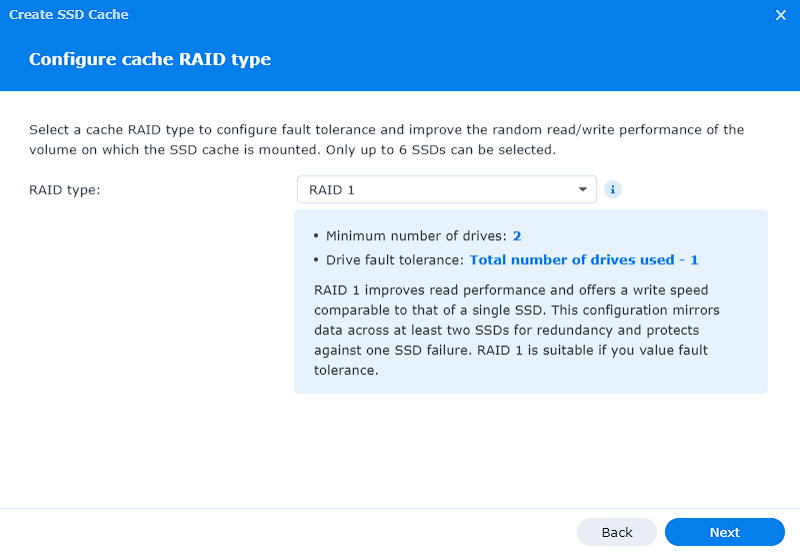
6. Select the RAID Type. If you’re using a read-only cache, you’ll be able to pick between Basic (one SSD) and RAID 0/1/10. For the most part, it doesn’t make sense to use RAID 1 and a read-only cache, so if you have two drives and plan on using a read-only cache, it makes sense to use RAID 0.
For a read-write cache, you’ll have to select RAID 1/5/6/10, but most people will most likely be using RAID 1.
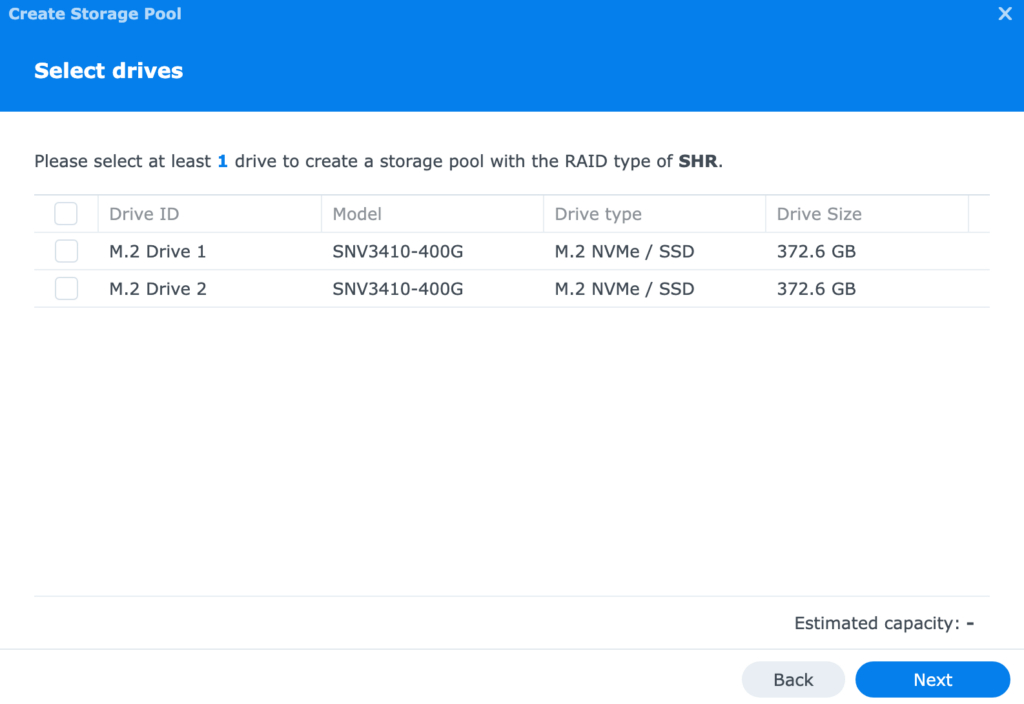
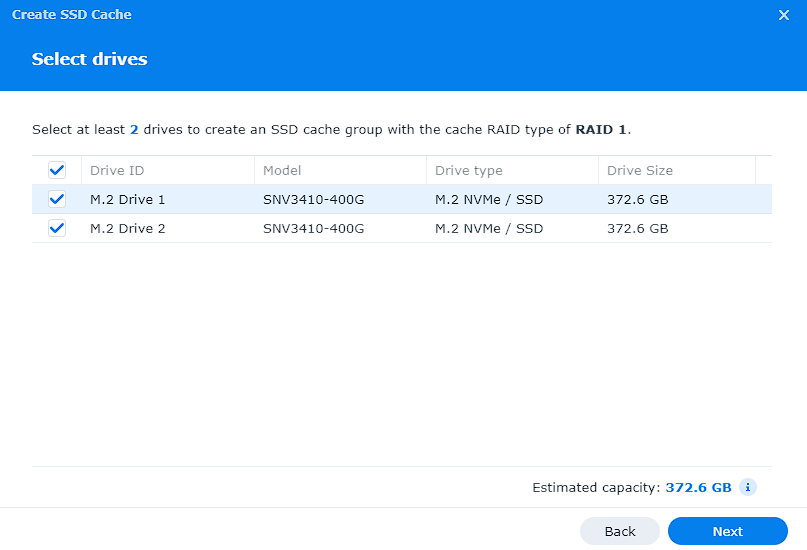
7. Select the SSD drives that you’d like to use for the cache, and select Next.
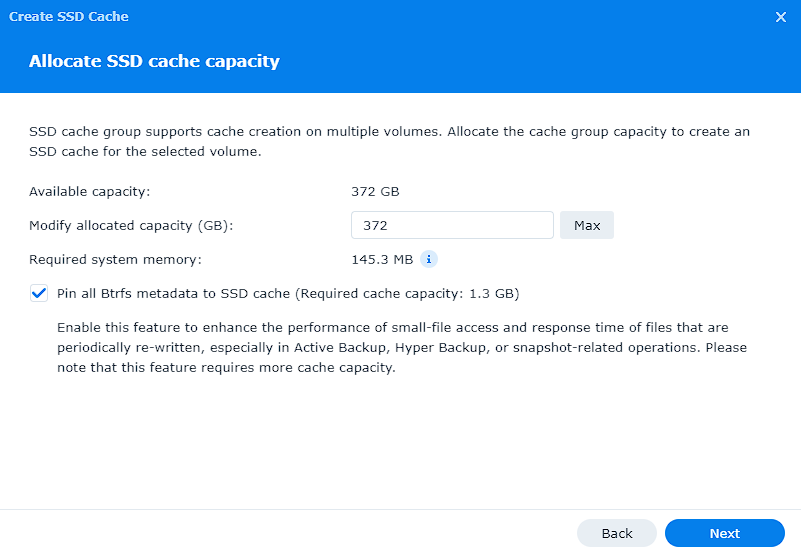
8. Ensure that you allocate all of the space to the SSD cache and then determine if you’d like to pin all Btrfs metadata to SSD cache (only available for read-write cache).
This article from Synology will help determine if you’d like to pin the metadata, but in general, you might want to consider using it if you are or plan on using Active Backup for Business, Hyper Backup, or Snapshots (which you should absolutely be using).
This can help speed up the performance of mass deletions which all three of these applications will be doing frequently.
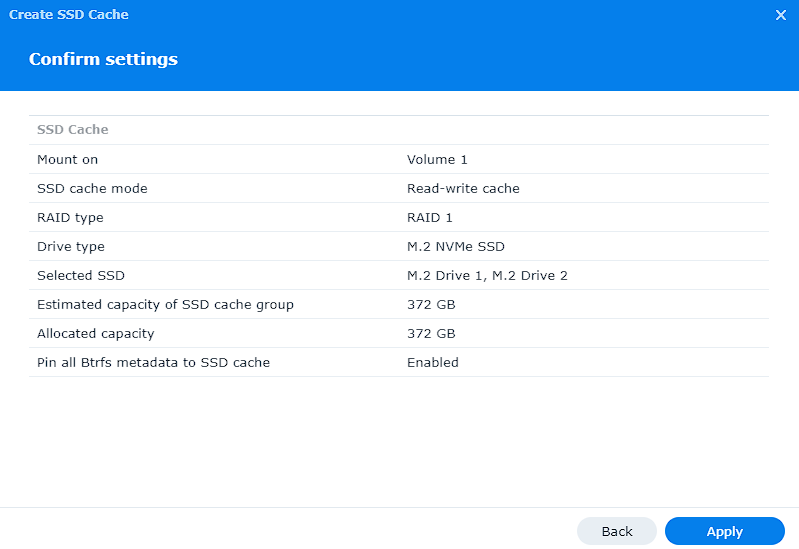
9. Confirm the settings and select Apply to configure the SSD cache! You’ll have to select OK to confirm that all data on the drives will be deleted.
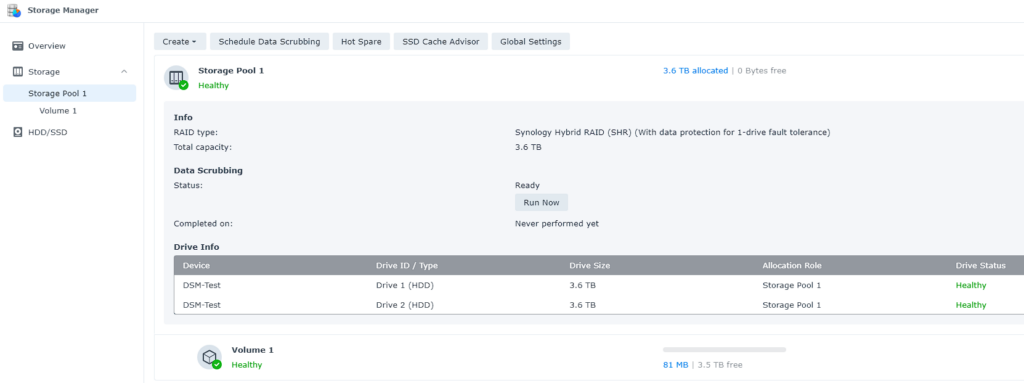
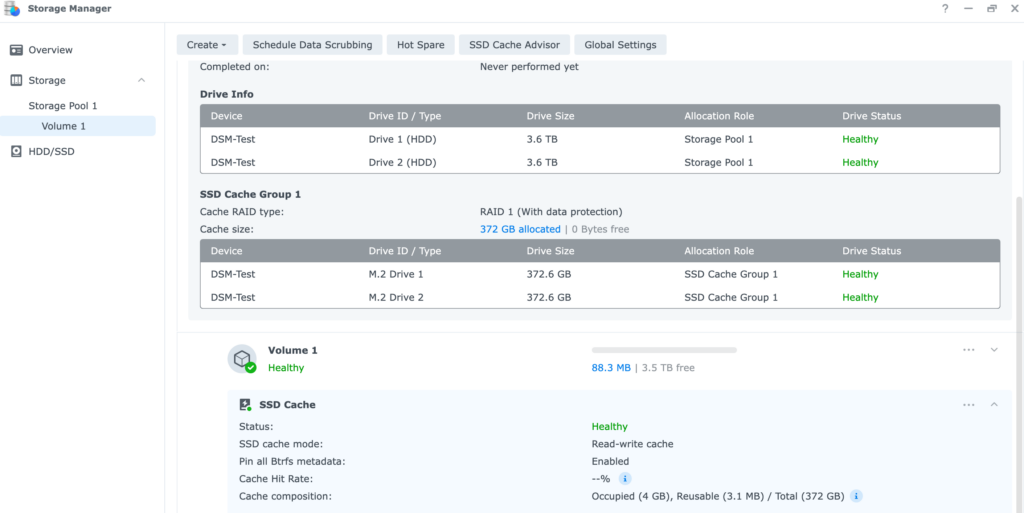
10. The SSD cache is now created and can be seen from the Storage Pool section of the Storage Manager.

Removing SSD Cache on a Synology NAS
There are times when you might want to remove the SSD cache that was previously configured on a Synology NAS. The steps below will give the exact process of how to remove the SSD cache.
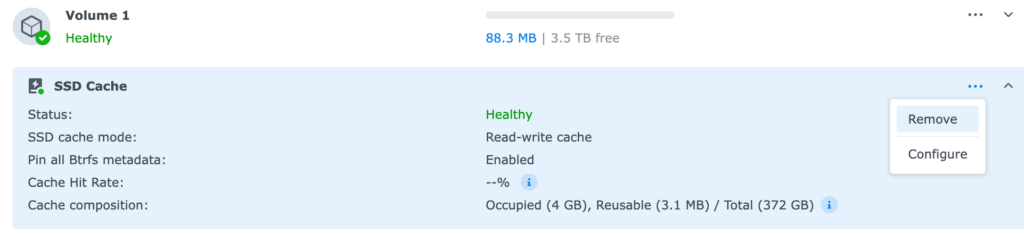
1. Open the Storage Manager and select the Volume that the SSD cache is configured on and expand the SSD cache section.
2. Select the three ellipses on the SSD cache and select Remove.
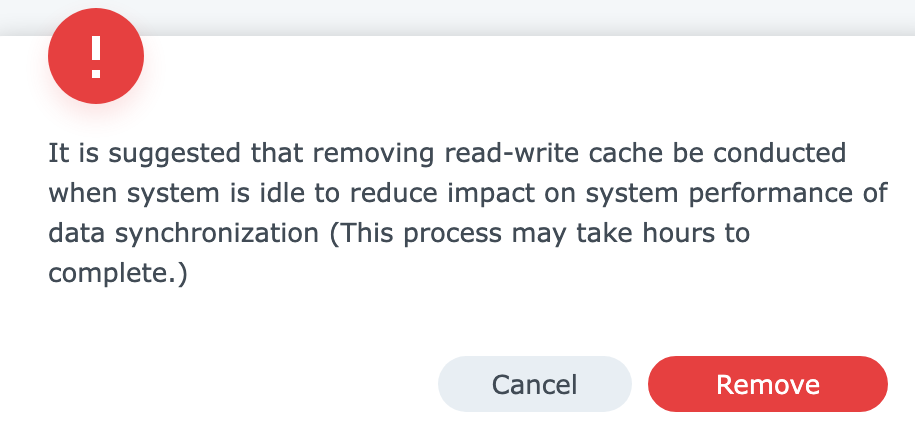
3. If you’re doing anything intensive on the NAS, you might want to wait, but when you’re ready, select OK to remove the SSD cache. You’ll then have to enter your password and confirm the removal.
4. The SSD cache is now removed! You can then use the SSDs as a volume, or recreate the SSD cache if desired.
Conclusion: How to Configure SSD Cache on a Synology NAS
Setting up and configuring SSD cache on a Synology NAS is actually a very straightforward process. The difficult part is determining how you want to set it up (read-only or read-write) and if the benefits of setting it up outweigh the downsides.
SSD cache is a good option for most people, but that doesn’t necessarily mean that it should always be used. Assessing your situation and determining if it will benefit you is the ultimate goal.