Today we are going to take a look at how to self host Bitwarden on a Raspberry Pi.
Before we look at how to set up Bitwarden on a Raspberry Pi, I want to make sure that I highlight that we will be installing Bitwarden RS. (now, Vaultwarden). Vaultwarden is an unofficial version of Bitwarden that’s great for self-hosting.
Overall, if you’re interested in self-hosting the open source password manager Bitwarden, this is what I consider to be the best option. There are two prerequisites that must be installed (Docker/Portainer, Nginx Proxy Manager). I will link to tutorials in the instructions if you haven’t set those up yet.
To have this exposed outside of your local network, you will need a domain name. If you haven’t purchased one, you can use a free DuckDNS domain name which we will configure in later steps.
Following the instructions below to Self Host Bitwarden on a Raspberry Pi will work on any device running Docker and Portainer (not only Raspberry Pi’s running Raspbian OS).
1. Self Host Bitwarden on a Raspberry Pi
1. Ensure that you have Docker and Portainer installed on your Raspberry Pi. Technically, you don’t have to install Portainer, but I find it easier to manage my Docker containers that way, so I’ll be using that to install Bitwarden on a Raspberry Pi.
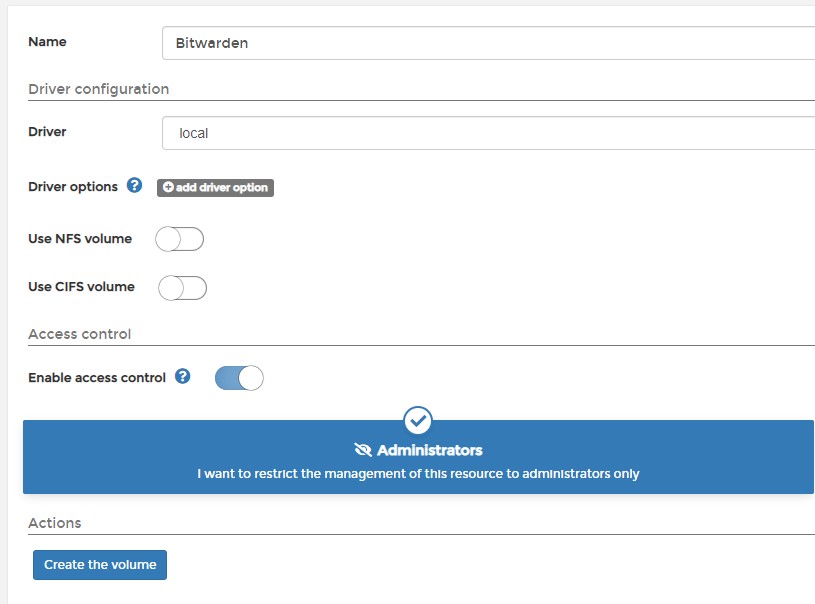
2. Select Volumes then Add Volume.

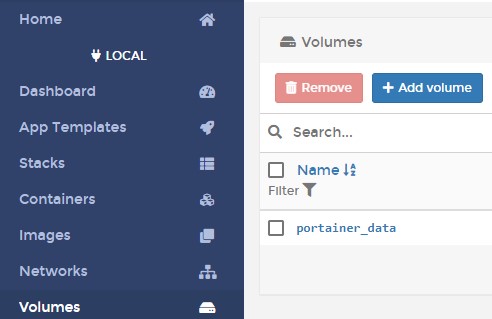
3. Add a Name, then Create the volume. This is where all of your important information will be stored, so back up this folder if you’d like to ensure your data is backed up.

4. Select Containers then Add Container.

5/3/21 Update: The bitwardenrs image has been deprecated and renamed to vaultwarden. For this reason, you will have to use that image name (as opposed to what the screenshot is showing).
5. Give the container a Name, then in the Image section, add vaultwarden/server:latest so docker pulls the latest image. Finally, publish a new network port and map the host port 8080 to the container port 80.

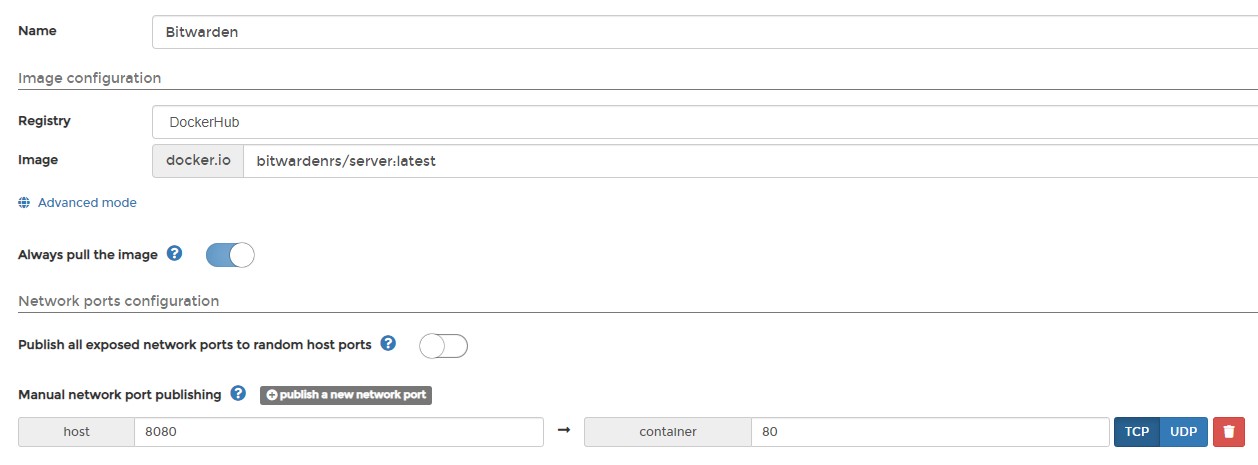
6. Select Volumes, then map the /data container path to the Bitwarden volume we created earlier.

7. Change the Restart Policy to Always, then Deploy the container.

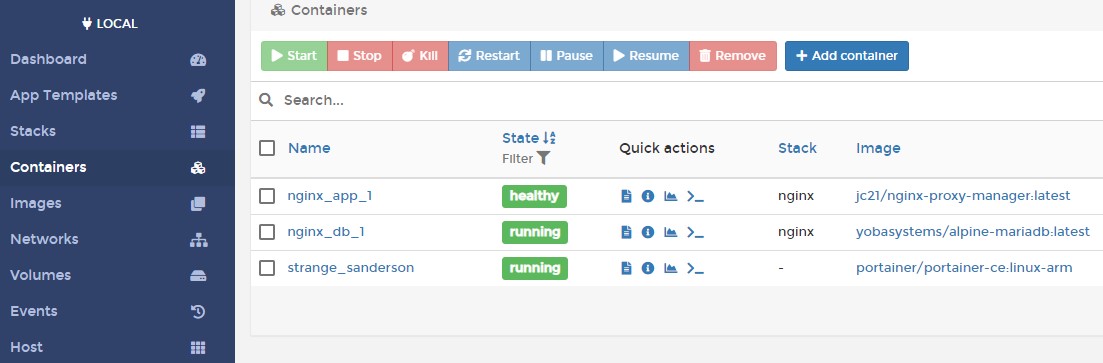
8. Give the container a few minutes, and it should be healthy.

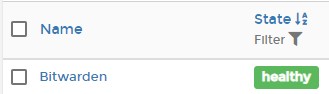
9. Connect to the IP address of your Raspberry Pi and Port 8080 to access the web interface. This is to confirm that everything is loading as expected on the bitwarden server.
http://[RASPBERRY_PI_IP:8080
1.1 Reverse Proxy Setup
The recommended approach for exposing Bitwarden outside of your local network is by using a reverse proxy. In this tutorial, I will be using Nginx Proxy Manager which will be hosted on the same Raspberry Pi.
If you’d like to use Nginx Proxy Manager, you can learn how to set it up here. Alternatively, you do not have to use Nginx Proxy Manager, or a reverse proxy server hosted on your Raspberry Pi. You can use a separate reverse proxy server if you’d like.
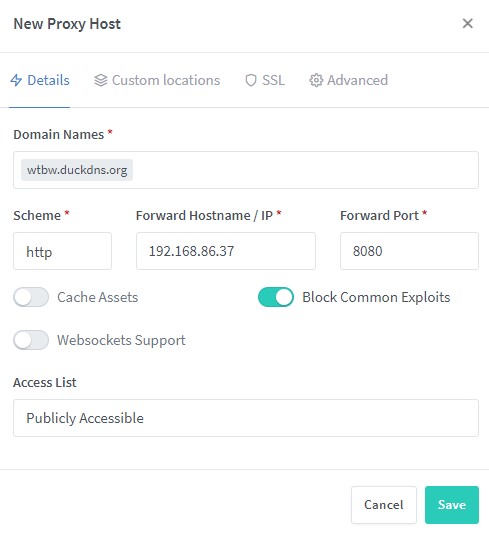
1. Select Proxy Hosts, then Add Proxy Host.

2. Enter in the Domain Name you’d like to use. Leave the scheme as http, enter in the IP address of your Raspberry Pi and port 8080. Select Block Common Exploits and Save.

3. Edit the record we just created, select SSL, then Request a new SSL Certificate. Make sure you enable Force SSL, HTTP/2 Support, and HSTS Enabled. Agree to the terms and Save. The SSL certificate will now be retrieved.

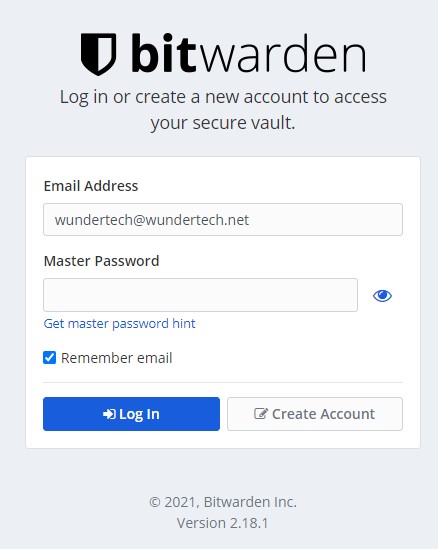
4. When you click the domain name, you will now be brought to the login page for Bitwarden! Create your account so that you can log in.

1.2 Disable Account Creations
After you’ve created your account, you can disable account creation if you’d like. To do so, stop the Bitwarden container.
1. Inside of the container, select Duplicate/Edit.

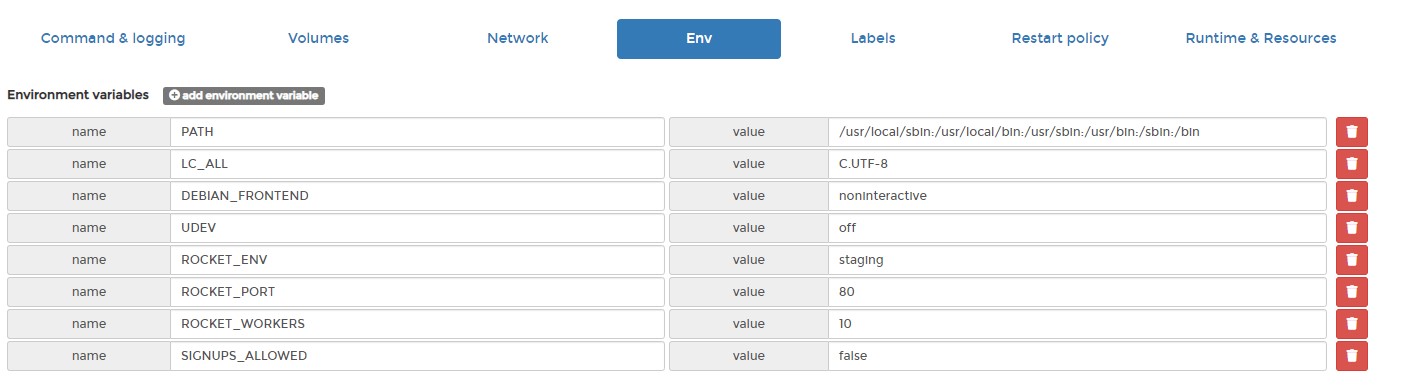
2. Add an environment variable named SIGNUPS_ALLOWED with the value false. Then, Deploy the container. When you get a popup stating that a container already exists under that name, Replace it.

3. If you now try and create a new account, you will no longer be able to. However, the account you already created will still exist!
1.3 Enabling Admin Page
There are various things that you can do with the admin page of Bitwarden RS if you’d like. You can learn about some of those options here. Follow the instructions below to enable the admin page.
1. From the command-line of your Raspberry Pi, enter the command below. In my opinion, it’s easiest to do this from a separate PC so that you can SSH in and copy the string.
openssl rand -base64 48
2. This will create a random string that is 48 characters long. Copy that string and save it.

3. Stop the container. Inside of the container, select Duplicate/Edit.

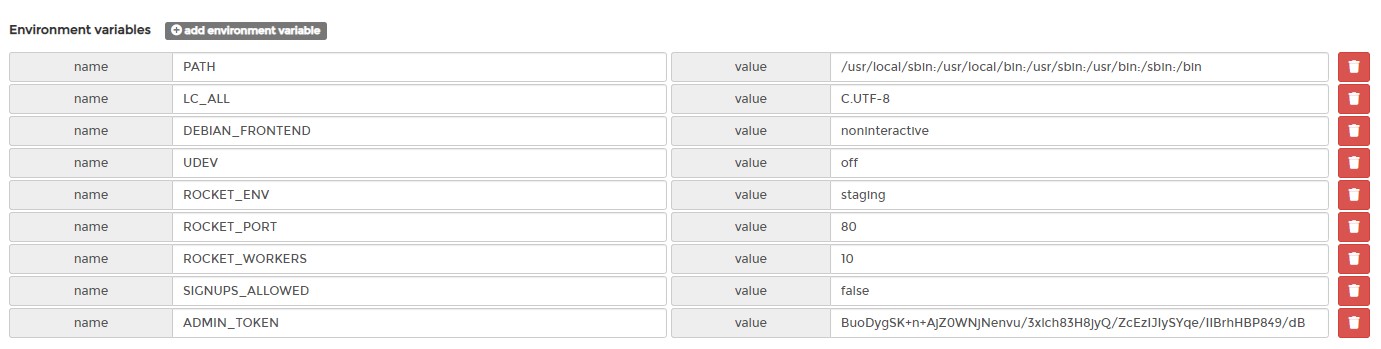
4. Add an environment variable named ADMIN_TOKEN, then add the 48-character string that you created in the last step.
Then, Deploy the container. When you get a popup stating that a container already exists under that name, Replace it. Make sure that you save this 48 character string since you will need it to access the admin page.

5. The admin page will now be accessible by the domain name you’re using and /admin. You can access the admin settings by entering in that 48 character string.
https://[YOUR_DOMAIN_NAME]/admin

2. Conclusion – Self Host Bitwarden on a Raspberry Pi
This tutorial looked at how to self host Bitwarden on a Raspberry Pi! Bitwarden on a Raspberry Pi is awesome, and Bitwarden (VaultWarden) is a great alternative that will allow you to self-host the password manager.
Make sure that you are always using two-factor authentication for your account. This cannot be stated enough.
Thanks a lot for checking out the tutorial on how to self host Bitwarden on a Raspberry Pi. As always, if you have any questions on how to self host Bitwarden on a Raspberry Pi, please leave a comment in the YouTube video above!
Hi,
nice tutorial.
Just one question: is there a reaseon that you do not use portainer for nginx?
Greetings
I’ve found it easier to install using Docker Compose and the CLI, but technically, you can install it using Portainer if you’d like!
Hi, thanks for the fantastic guide, I can’t understand how to program a Bitwarden backup on external USB. Can you explain to me how to do it?
I also satisfy a backup on NAS with rSync protocol
Thank you very much.
I’m glad it helps! There are many ways to back up the Pi/container, but the easiest is to probably rsync the folder where the volume is mounted to a different device. You can then encrypt that and back it up off-site (to fulfill the 3-2-1 backup rule). Like I said, many ways of doing it but that’s one of the easiest!
Hey WunderTech, thank you for this tutorial. It’s easy and just works.
I’m not using the nginx proxy manager but a nginx proxy on another device. One thing to think about is restricting the /admin page access to internal net devices only. Just one step safer 😉
Chris
I will definitely keep this in mind for a future tutorial! Thanks so much for the feedback and for checking out the tutorial!
Can you check the nginx proxy manager? I’m pretty sure that it got some bugs on generating certificates, both in new and renewal.
There are logs inside of Nginx Proxy Manager that you can check. Generally, certificate issues occur when the domain name can’t be validated or 80/443 isn’t opened to the right device.
I can access my bitwarden website from outside my local network but not from inside. If i go to http://[local raspi IP]:8080 Bitwarden comes up. I cannot use the website on my local network because I need .https for bitwarden_rs to run in the browser. I am using duckdns. I followed all instructions in this tutorial and used your other tutorial for nginx
https://www.wundertech.net/nginx-proxy-manager-raspberry-pi-install-instructions/
I have Spectrum and I reserved an IP for my raspberry Pi and port forwarded ports 80 and 443. Canyouseeme says it can see these services. I do not know why bitwarden does not work locally but does work when I use for example a mobile hotspot to access my hosted site. When accessing the site from outside the network .https is enabled and the site works fine. The ssl cert is not working locally.
All docker containers nginx_app_1, Bitwarden, nginx_db_1, and nostalgic_blackwell are healthy and running. If i access the duckdns domain from my pc on the local network it goes to my router login page.
Are you using a local DNS server (or host record) by any chance on your local device? What about a firewall? It almost sounds like it’s rejecting the local IP address and only accepting external IP addresses.
Hi, I’ve just finished to deploy bitwarden on my Pi but I’ve a problem. From the local network I can access, but from outside my network it doesn’t work and I recive “Connection Refused” error. I’ve tried also with the pubblic IP and I’ve checked the 80 and 443 but it doesn’t change. Thanks for your time
Did you configure Nginx Proxy Manager to connect to it? Also, are you using a firewall?
Now that I’m not at home I can use vaultwarden without any problem, it rejects only local ip. If I add a record in Nginx with the local address of the pi I don’t have any problem.
Are you using a firewall or any access controls? If so, did you allow traffic from the local network?
I don’t think, I’ve never activate any access controls.
The “connection refused” error message is normally from a firewall not allowing access, or from the router port not properly being opened. Can you confirm that ports 80/443 are properly opened and accessible from the outside?
Yes, the ports are opened and accessible from outside
That would signal to me that something is messed up with the Proxy Host. If the ports are opened and accessible and you’re using a valid domain name (and that domain name is properly pointed to your network), it should process through.
I’ve checked with my mobile connection and I’ve Intrepid’s same problem. It refuse all local IP connection.
Hi thanks for this tutorial. Is having a paid domain a must?. I am always getting internal error when trying to get letsencrypt certificate. Also i am using a gmail address. is there any problem with that? Your assistance would be much appreciated. Thanks just want to have bitwarden/vaultwarden working.
No problems with the gmail address. You don’t have to use a paid domain, but you do have to use some sort of DDNS hostname (you can check out DuckDNS for a free one if you’d like). As for the internal error, are you able to confirm the ports are properly opened and accessible?
Much appreciate you concise and helpful instructions on the Bitwarden topic. I would not have gotten it working on Synology otherwise.
Thanks so much!
Thanks to you I got Vaultwarden up running first on my Synology and now on my new PI. I want to export my database from Synology to my pi. But I can’t seem to find the folder and database on raspberry os gui. Any tips on how to find it ?
Glad that it helped! As long as you mounted the volume, you should be able to navigate to that path (it’ll be a folder on your NAS) and then copy those files to a folder on your Pi. At that point, you can mount that folder to the “/data” location and it should function as expected.