In this tutorial, we’re going to look at how to set up a TerraMaster NAS.
The goal of this “how to set up a TerraMaster NAS” article is to help guide you through the initial setup process of your new NAS, then configure it with the most important features enabled. Getting a new NAS is sometimes confusing, so this article will ensure that your NAS is set up properly and you understand exactly what is being done and why it’s being done.
This article on how to set up a TerraMaster NAS will work for all NAS devices running the TOS 5.0 operating system, though there may be minor differences between models.
Some links below are Amazon affiliate links which means that I earn a percentage of each sale at no cost to you. Thank you for your support.
How to Set Up a TerraMaster NAS
The steps below will walk you through the process of finding your NAS, then configuring the TOS operating system.
1. Initial TerraMaster NAS Setup
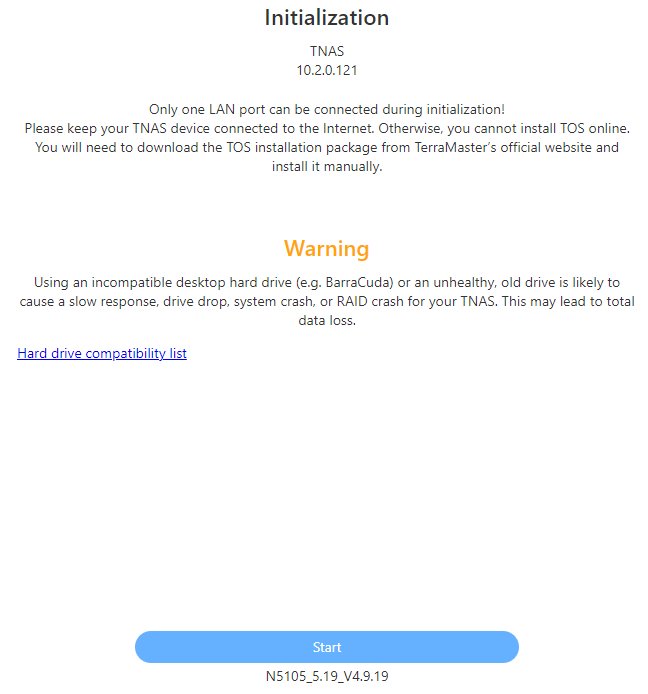
1. After you add the hard drive’s to your TerraMaster NAS, navigate to the http://tnas.local/ URL to access the setup page of your new device. You’ll have to ensure that the device stays connected to the internet during the setup process if you’re not manually installing the OS.
2. You’ll see that an IP address will automatically be assigned (in my case, 10.2.0.121). Select Start.
3. At the next screen, you’ll be able to set up the NAS automatically or by custom settings. There are two options that you can use to set up your NAS, but I’ll be using the custom setup option. I suggest that you use the custom option so that you’re able to select your RAID type and file system.

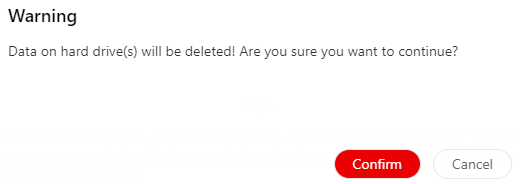
3. You’ll be warned that any data on the hard drive(s) will be deleted. If you’d like to proceed, select Confirm.
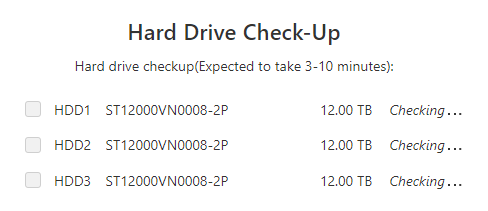
4. The next step will run a check-up on the hard drives. This will take a few minutes to run.
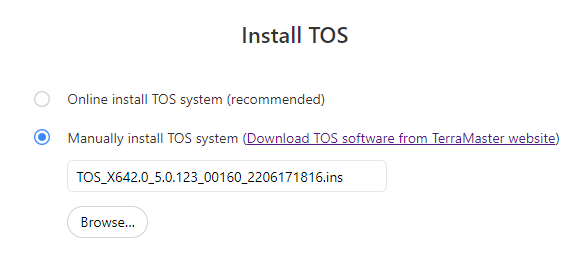
5. When the check is completed, you’ll be asked to install the operating system. If you’d like to install the OS automatically, select online install. However, to install TOS 5.0, I’ll be using the manual option. You can download the TOS 5.0 file here.
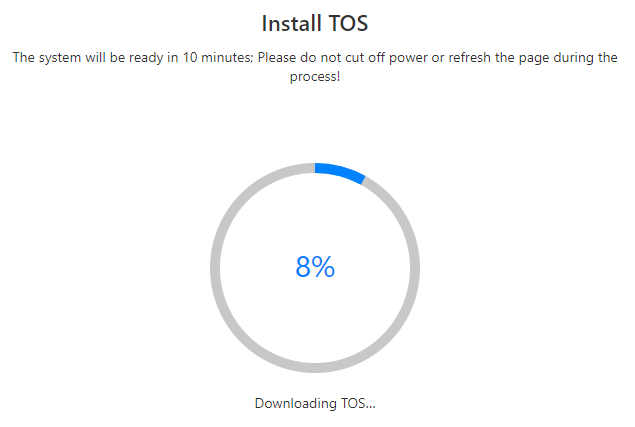
6. TOS will now install!
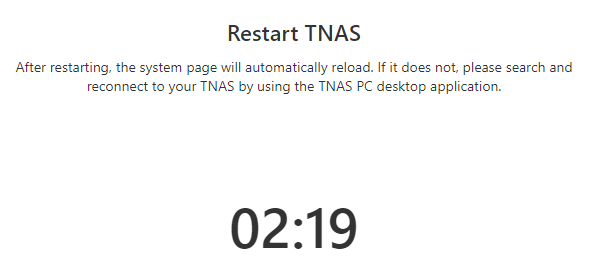
7. When the operating system finishes installing, it will automatically restart.
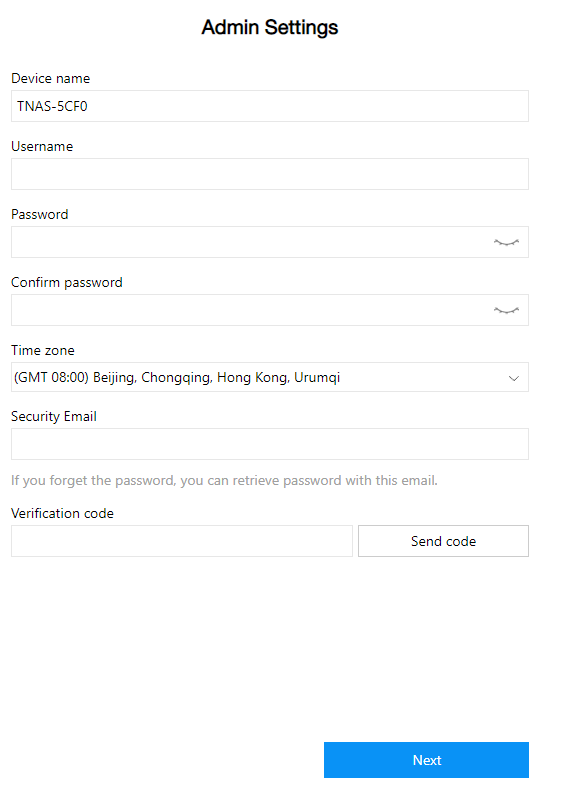
8. After the OS restarts, create your device name and an administrator account.
9. Select the RAID Type that you’d like to use, then select Next.
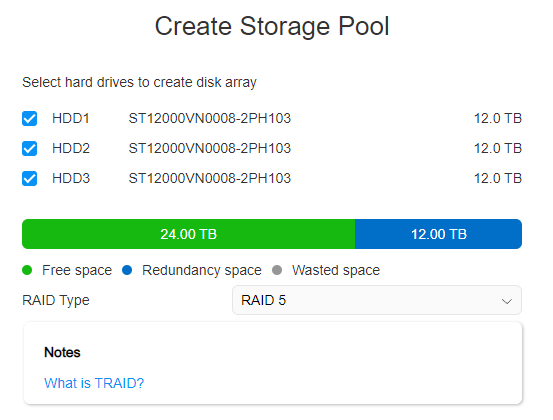
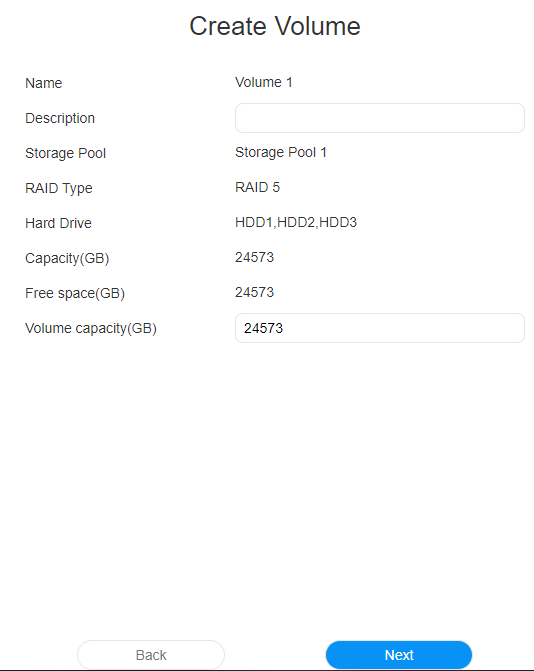
10. Confirm the volume settings, then select next.
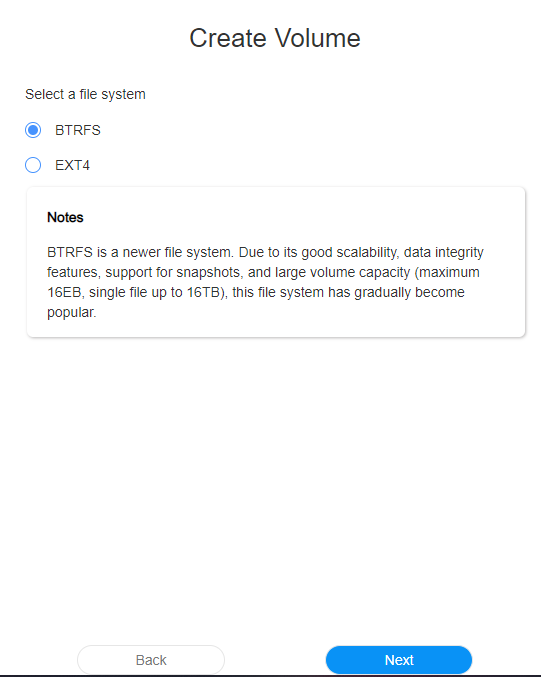
11. Select a file system (BTRFS is recommended if you have that option available), then select next.
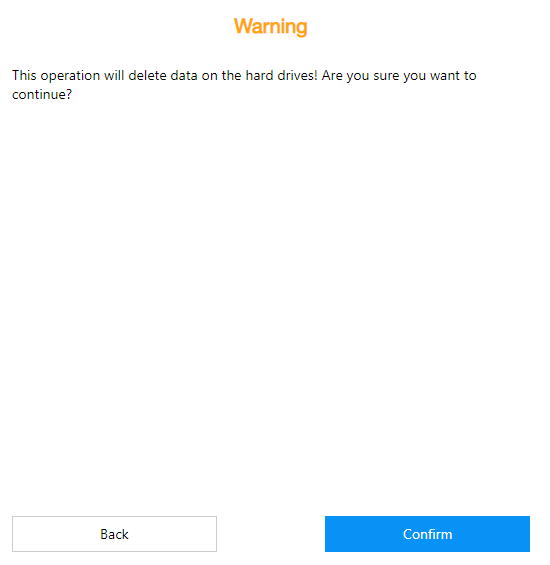
9. Confirm that you want the data deleted on your hard drives, then select Confirm.
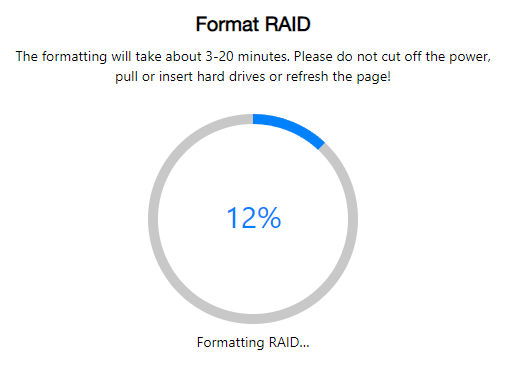
9. The NAS will now format the hard drives.
10. After a few minutes, you’ll be able to access TOS through a web browser!
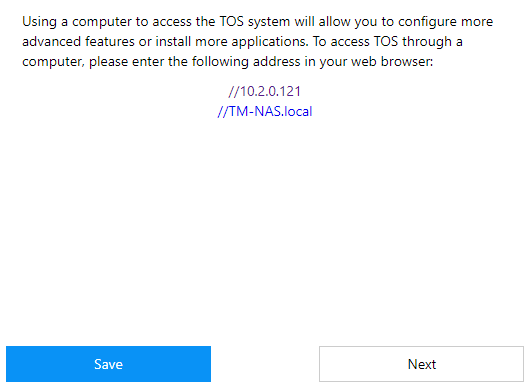
2. TerraMaster TOS 5.0 Configuration – How to Set Up a TerraMaster NAS
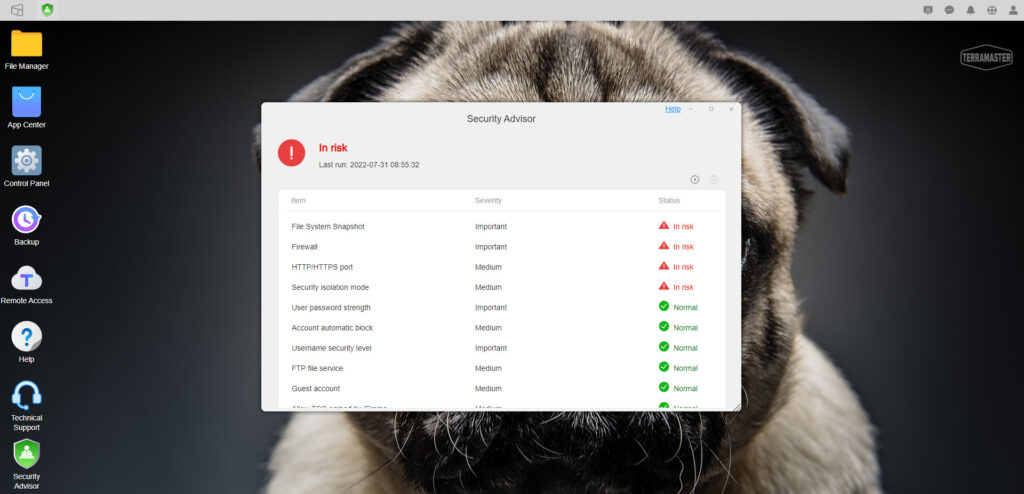
TerraMaster NAS devices run the TOS operating system. When you first launch TOS, a security advisor scan will run. The items that are at risk should be tended to after you finish setting up your NAS, though as you’ll see, you might not have to or want to enable everything.
Even if you alter all of the settings below, you might have a few additional settings that you would like to change based on your specific circumstance. The goal is to ensure that all settings are normal, but that will depend on what you have enabled and how you intend on using your NAS.
The TOS operating system is accessed through a web browser and will allow you to do everything from viewing your storage pool/volume, to creating new shared folders or even implementing one of the many different TerraMaster applications. This will function as the UI for your NAS, and will be the interface you’ll use to change or update settings on your NAS.
2.1 HTTP/HTTPS Port
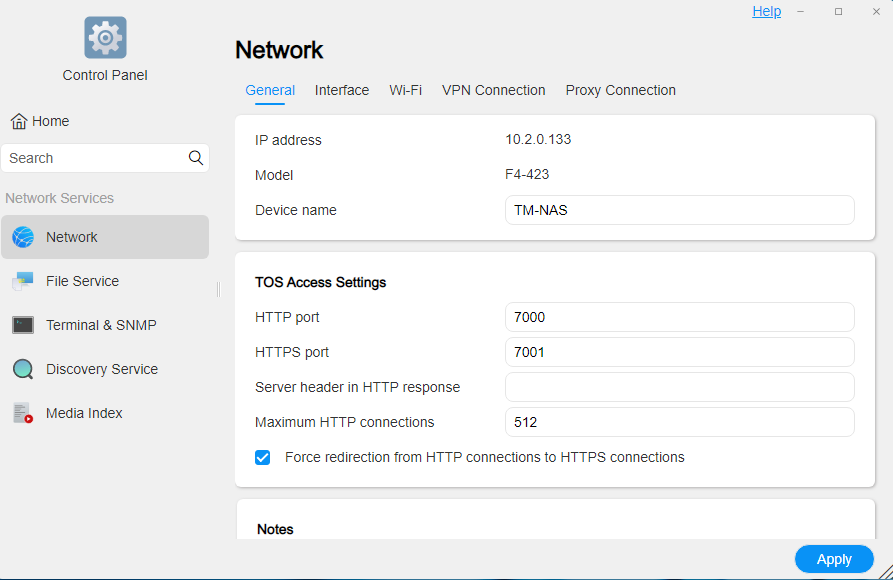
The HTTP and HTTPS ports are how you can access the TOS operating system. The goal of switching these ports is so that they will not be the default value. There are no practical benefits to this change other than TOS being on a port that’s not the default value, but that’s a significant benefit as port scanners won’t be able to target you (if your NAS is exposed to the outside internet).
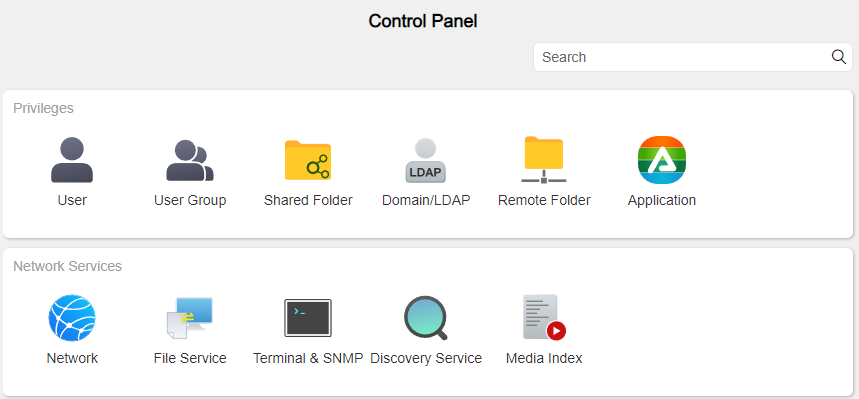
1. Open the Control Panel and select Network. In the HTTP Port and HTTPS Port sections, change the values to whatever you’d like to use (they just have to be ports that are not currently in use). Select force redirection from HTTP connections to HTTPS connections if you want to ensure that HTTPS is always used.
2.2 Static IP Address – How to Set Up a TerraMaster NAS
When you configure your NAS, it’s a good idea to ensure that it always maintains the same IP address. In order to do this, you can configure your router (or DHCP server) to reserve an IP address. This will ensure that the IP address never changes. However, if you aren’t able to do that, the next best option is to configure it on your NAS.
1. Open the Control Panel and select Network.
2. Select Interface and then Edit the LAN interface.
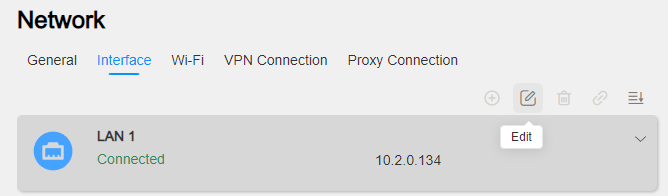
3. Select use the manual configuration noted below and confirm. This will ensure that the IP address specified will not change on this interface.
NOTE: If you have multiple interfaces and want static IP addresses for all of them, you’ll have to modify them individually.

Shared folders are what you’ll use to store data on your TerraMaster NAS. This is the core of the TOS operating system and you’ll end up creating multiple shared folders to store all different types of data. To create a shared folder, follow the instructions below.
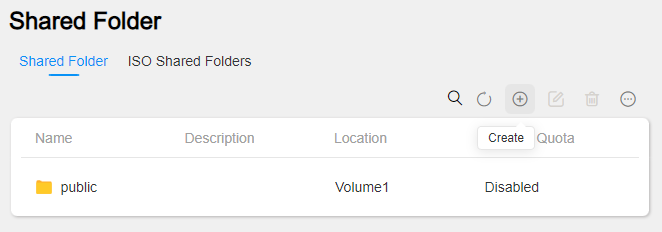
1. Open the Control Panel, then select Shared Folder.
2. Select Create to create a new shared folder.
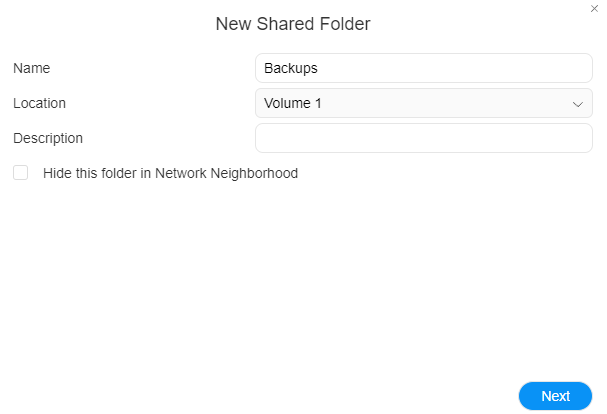
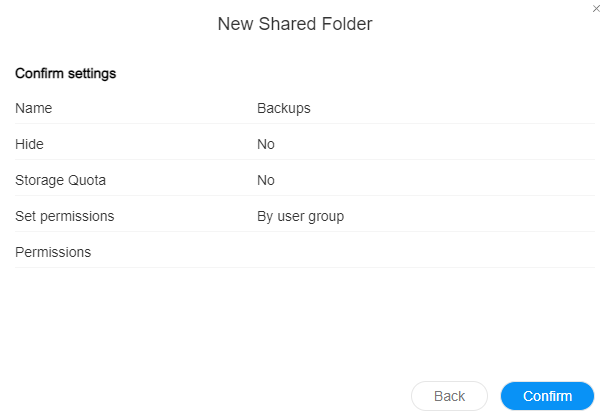
3. Give the folder a name, select the correct volume and determine if you’d like this folder to be hidden when navigating your network. Select Next to proceed.
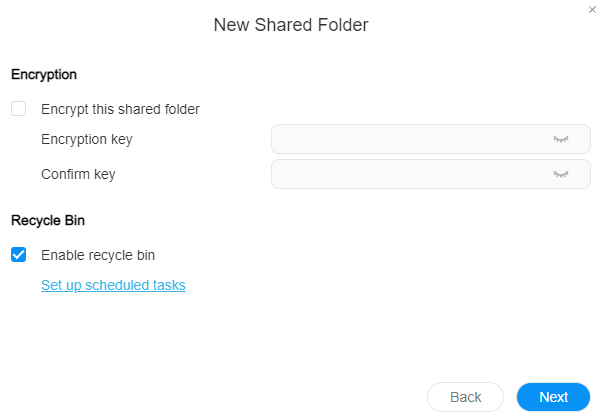
4. If you’d like to encrypt the shared folder, you can enter an encryption key here. Please keep in mind that if you lose this password, you will not be able to access the files on your TerraMaster NAS. Select next to proceed.
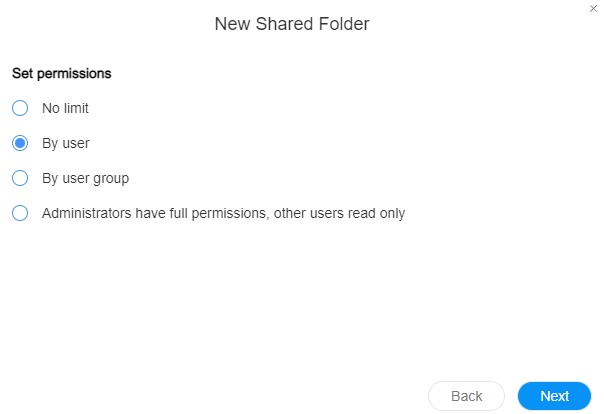
5. Specify how you’d like to manage the user permissions for this shared folder.
NOTE: Generally, it’s a good idea to manage permissions on a group level, as you can add/remove users to groups and give them access to the shared folders they need. However, everyone’s individual needs are different, so if managing permissions on a user level is easier, you can select that option.
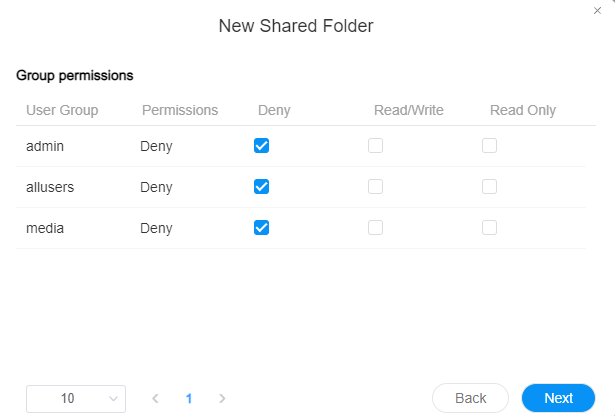
6. This section will be different depending on the option you selected in the last step, but you can modify the permissions for your groups or users at this time.
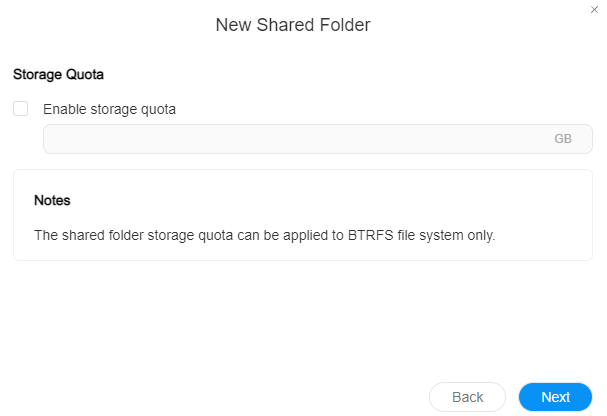
5. Set shared folder quota if desired (most users can skip this step).
6. Finally, confirm the settings and select Create. The shared folder will now be created!
3. Data Protection – How to Set Up a TerraMaster NAS
Now that the storage pool, volume, and shared folders have been created, it’s important to shift towards data protection.
3.1 Snapshots
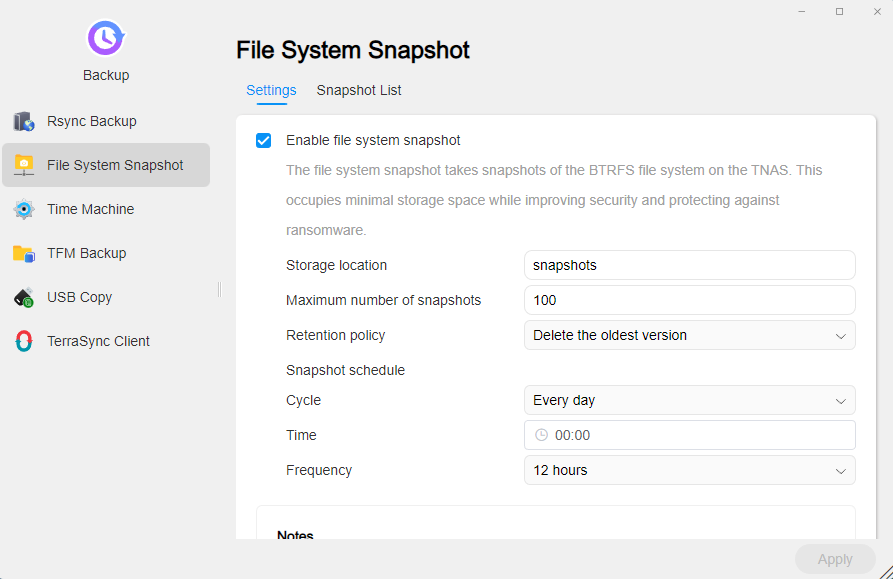
Snapshots allow you to roll back to a point in time. By configuring this, you’ll be able to restore your shared folders to a point in time in case of data loss or even from something like a ransomware attack.
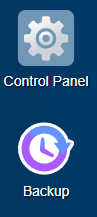
1. Open the Backup application.
2. Select File System Snapshot and enable file system snapshot. After that, enter snapshots as the storage location, modify the maximum number of snapshots, then determine when you’d like this task to run, then apply.
NOTE: Ensure that you set a frequency or the task will not save.
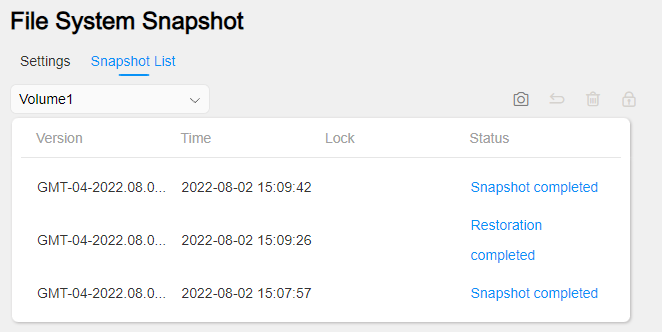
3. After configuring snapshots, they will automatically run based on the schedule specified. In the Snapshot List, you can view your prior snapshots and restore them if needed.
3.2 Data Scrubbing – How to Set Up a TerraMaster NAS
Data scrubbing inspects your data and modifies inconsistencies that it detects. In simple terms, this protects your NAS against bit-rot. There isn’t a specific schedule that’s mandatory, but running it more than monthly is most likely overkill.
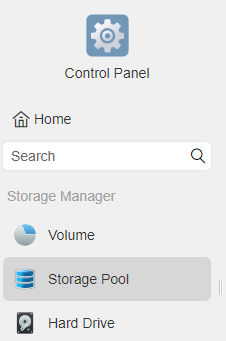
1. Open the Control Panel and select Storage Pool.
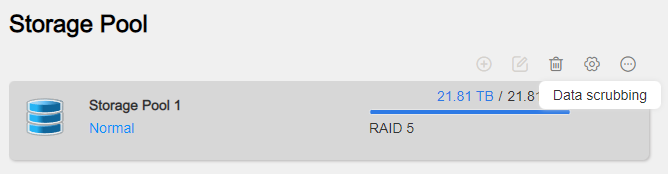
2. Select your storage pool, then select data scrubbing.
3. Select enable scheduled task and then specify the cycle as every month. Modify any other settings you’d like, then confirm.
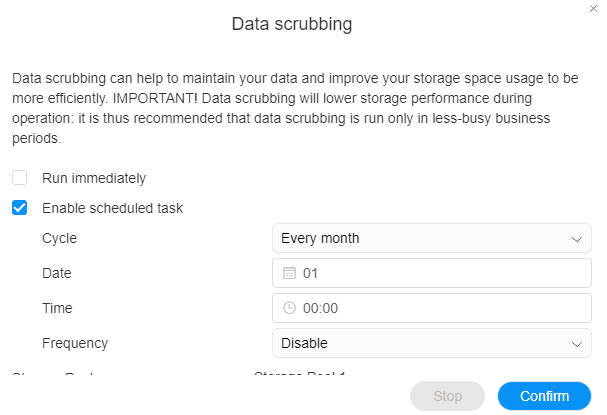
4. Data scrubbing will now run automatically every month!
3.3 Uninterruptible Power Supply (UPS) – How to Set Up a TerraMaster NAS
If the data on your NAS is important to you, a UPS is the cheapest insurance policy you can buy. A UPS ensures that consistent power is delivered to your NAS and in the event of a power outage, your NAS will safely power down. If you don’t have a UPS, it requires an additional purchase, but in my opinion, it’s well worth it.
Here is a link to my favorite UPS. If you’d like to buy a UPS, but spend a little less, here is another great option that has USB data transfer so that it can automatically turn off your NAS!
NOTE: If you’ll only be using a UPS for your TerraMaster NAS, this option is more than capable! Save the money as you don’t need anything more!
1. Open the Control Panel and select Hardware & Power, then select UPS.
2. If you’re using one of the UPS devices recommended above (or you have one with a USB cable that is plugged into the NAS), simply Enable UPS support and specify how long you want the NAS to wait until it enters safe mode.
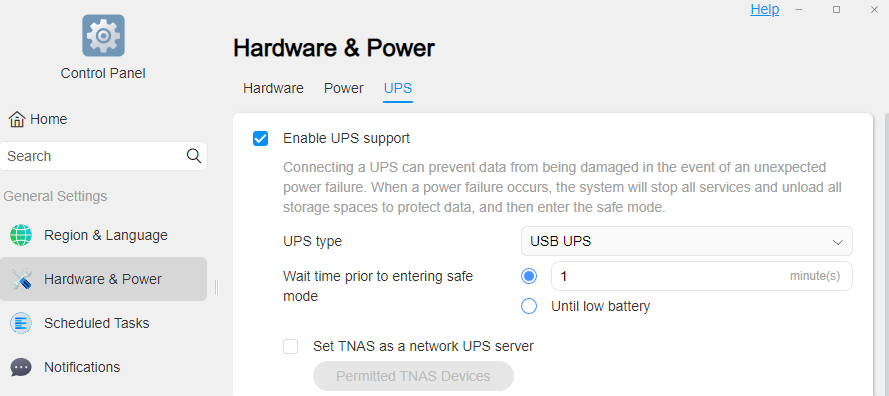
3. With this configured, your NAS will automatically turn off in the event of a power outage and your data will be safe! You can also set up your NAS to function as a network UPS server, meaning that other devices can automatically turn off if the NAS connects to battery power!
4. System Security – How to Set Up a TerraMaster NAS
It’s important to do your best in securing your TerraMaster NAS, which includes following best practices and always ensuring that TOS is up-to-date. However, there are a few settings you can manage that will help mitigate potential risks.
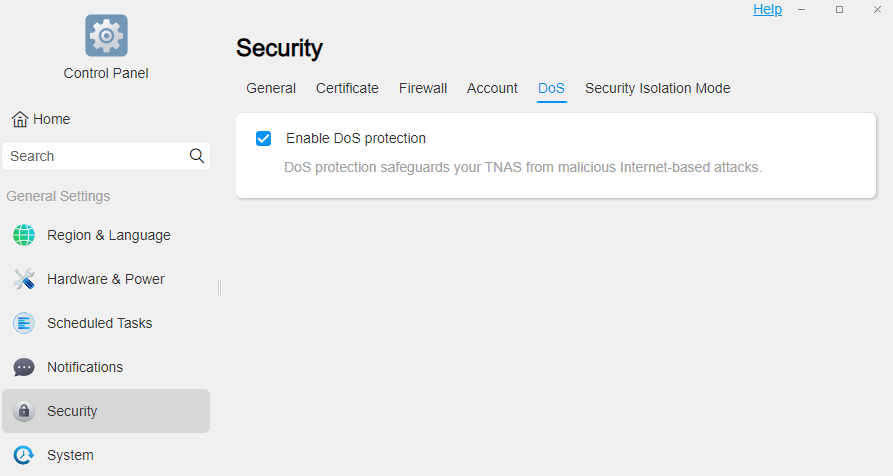
4.1 Denial-of-Service Protection
This setting will help protect your NAS against DoS attacks.
1. Open the Control Panel, select Security, then DoS. Ensure that Enable DoS Protection is enabled.
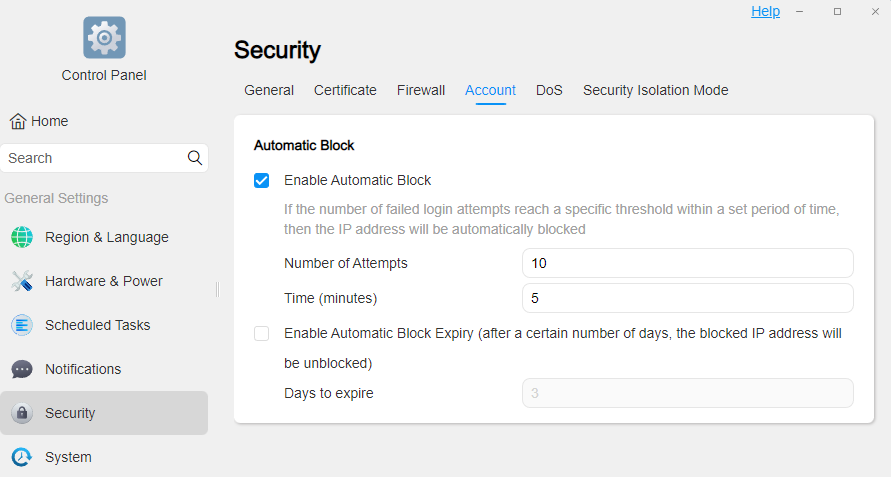
4.2 How to Configure Automatic Block
The automatic block feature will block IP addresses that attempt to log in a certain number of times within a certain number of minutes.
1. Open the Control Panel and select Security. Enable Automatic Block and then change the number of attempts and time to match the settings you’d like, then apply. If you’d like blocked IP addresses to expire (and be unblocked) enable the automatic block expiry option.
5. Storing Files on your NAS – How to Set Up a TerraMaster NAS
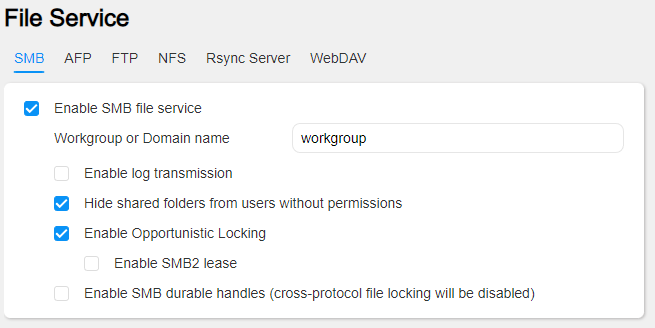
Now that the NAS is configured properly, you’re able to start storing files on your NAS. The easiest way to access your NAS is through SMB. This is enabled by default, but you can confirm it if you’d like by navigating to the Control Panel, selecting File Service, then ensuring that Enable SMB file service is selected.
With SMB enabled, you’re able to enter the IP address into the device that you’re using (or set it up as a network share, which is the same as shown in this tutorial). Any data that is stored in this location will be stored on your NAS!

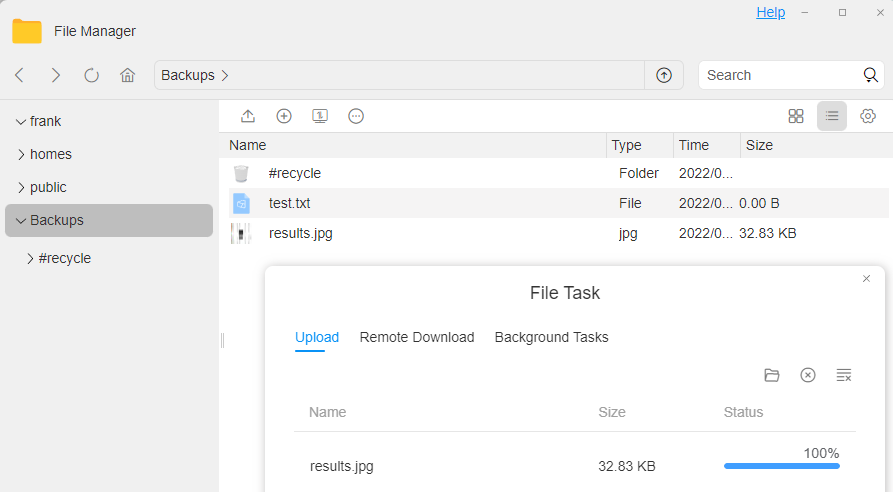
You can also drag and drop files inside of the File Manager application in TOS!
Conclusion – How to Set Up a TerraMaster NAS
This tutorial looked at how to set up a TerraMaster NAS. After using NAS devices for a while, these are some of the settings that I’d recommend all users look into, especially when they are initially setting up their NAS.
This article will be updated as time goes on and especially when TOS is updated. There are also tons of different applications that you can install, which I’ll be exploring in the future.