This tutorial will look at a step-by-step guide on pfSense port forwarding.
When you port forward, you’re allowing access to a device on your local network. It’s important to understand that this allows for people and devices outside of your local network to access a specific device inside your local network.
It’s generally a best practice to utilize a VPN to access devices on your local network as you’re ensuring that an account, as well as a certificate is required to connect. This limits potential security concerns that might arise, however, there are many circumstances where port forwarding is required.
After we look at how to port forward in pfSense, you’ll understand port forwarding and how it’s done. Please keep in mind that this is for a basic pfSense configuration.
What is Port Forwarding?
Before you actually port forward anything in pfSense, it’s important to understand exactly what port forwarding does. Port forwarding exposes a service on your local network to the outside world.
After a port has been forwarded, a user outside of the local network can navigate to a domain name, DDNS hostname, or external IP address, append the port number that was forwarded and access that service.
In general, you want to ensure that you’re safely exposing services as there are certainly risks associated with port forwarding. However, there are also circumstances where port forwarding is necessary. Here are a few examples of ports that are commonly forwarded.
HTTP: Port 80 is the default port for HTTP traffic. While it’s in your best interest to use the HTTPS protocol (port 443) when exposing a web service (shown below), there are circumstances where users will port forward 80.
HTTPS: This is the “default” port that most users open. This can be port forwarded to host a website or used with a reverse proxy server and domain name to expose multiple different web services safely.
VPN: If you’re utilizing something like OpenVPN, you’ll be forced to port forward UDP port 1194 (default). VPN servers are a great way to access services on a local network as users interested in connecting will be required to authenticate with a username, password, and certificate.
You can host an OpenVPN server on your pfSense installation easily, configure WireGuard, or use something like a Raspberry Pi if you’d like an alternative setup.
Now that we have cleared exactly what port forwarding is, follow the instructions below to learn how to port forward in pfSense.
Why is Port Forwarding Necessary?
Port forwarding is an essential networking process that allows remote computers to connect to a specific computer or service within a private local area network (LAN). Here are several reasons why port forwarding is important:
- Remote Access: Port forwarding allows access to servers and devices on your local network from the outside world. This is important for remotely accessing services such as web servers, game servers, mail servers, and file servers.
- NAT Traversal: In a network address translation (NAT) environment, where a public IP address is used to represent multiple devices with private IP addresses, port forwarding is necessary for forwarding incoming requests to the right device.
- Enhanced Gaming and Peer-to-Peer Sharing: For online gaming or peer-to-peer file sharing, port forwarding can enhance the user experience by facilitating a direct connection between users.
- Improving VoIP Quality: Port forwarding can improve the quality of VoIP (Voice over IP) by eliminating the need for traffic to be routed through a relay, reducing latency and jitter.
- Avoiding Connection Issues: Some applications and services require direct communication with specific network devices. If the required ports are not correctly forwarded, these applications may encounter connectivity issues.
Remember that while port forwarding has its benefits, it should be done with caution, as it can expose your network and devices to the internet. It is crucial to secure any services that you make accessible via port forwarding to minimize the risk of unauthorized access.
pfSense Port Forwarding: Step-by-Step Guide
Follow each step below, in order, to port forward in pfSense. Please keep in mind that the ports you use will most likely be different.
Step 1: Accessing the NAT Section of pfSense
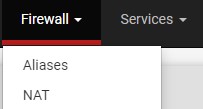
Log in to the pfSense web portal and select Firewall then NAT.
Step 2: Creating a Port Forwarding Rule in pfSense
1. You’ll automatically be brought to the Port Forward section, where you can select Add.
NOTE: There is an up arrow and down arrow next to Add. As time goes on, you’ll potentially have a few different rules, so you’ll be able to add the rule above or below the existing rules.

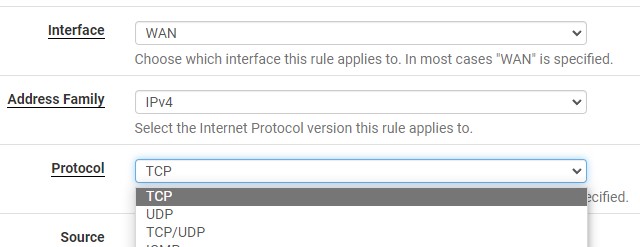
2. Leave the interface as WAN. The Protocol can be left as TCP, changed to UDP or TCP/UDP.
3. Set the Destination as the WAN address, then in the Destination Port Range, you can either select from an existing item using the drop-down menu or enter in a Custom Port.

4. In the Redirect target IP, you can add the local IP address where the port should be mapped. This is the device that will be exposed outside of your local network

5. In the Redirect target port, add the same port number that you selected in step four above (in our example, we are using 5001).

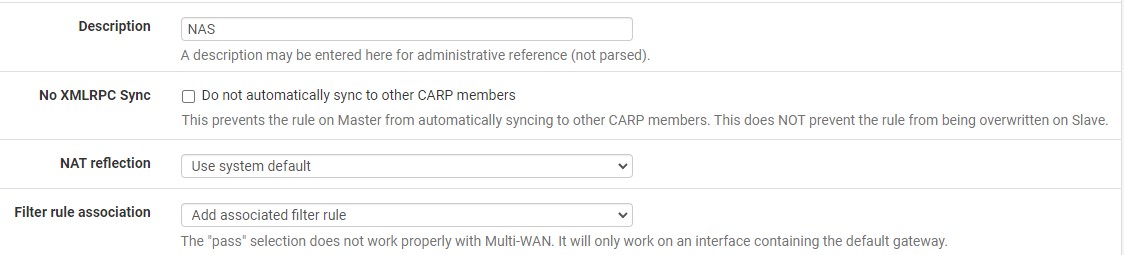
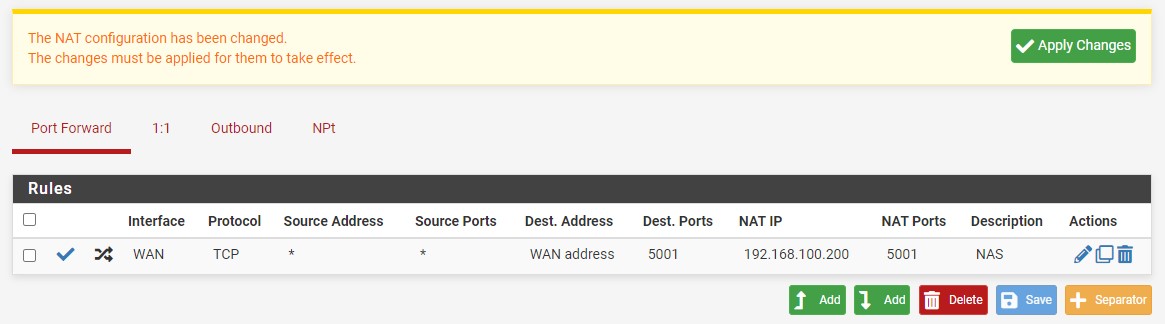
6. At the bottom, give a Description and ensure that the filter rule association is set as add associated filter rule. This will ensure that a firewall rule is automatically created for this port forward. You can then Save the rule.
7. After saving, you will have to Apply Changes. The pfSense port forwarding rule will then be created!
Step 3: Configuring the Necessary Firewall Rules
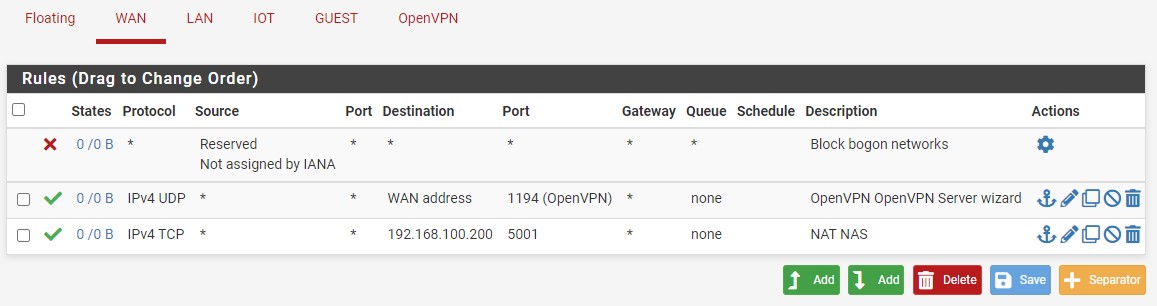
If you select Firewall then Rules, you should see that the firewall rule was automatically created under WAN.
NOTE: the description will have NAT in front of it as the rule was automatically created. The rule will also be linked, meaning that removing the port forwarding rule will delete the firewall rule.
Step 4: Limiting Access
At this point, the rule will be open for everyone meaning that anyone who tries to connect to your external IP address, DDNS hostname or domain name will have access (this doesn’t mean they’ll be able to authenticate, just that they’ll see the service).
1. If you’d like to limit access, edit the port forwarding rule we created in step one, then scroll down until you see Source. Select Display Advanced to view these settings.

2. With Source displayed, you can constrain the source by modifying the Type. One of the best ways to do this is by using Single host or alias and configuring an alias.

This is outlined extremely well in the video below by Tech Me Out. Please consider subscribing to his YouTube channel!
In general, constraining down the locations that will be able to connect to this device is a best practice that should certainly be considered.
NOTE: if you will only be using an individual IP address or subnet, you don’t have to go through the effort of creating an alias and can just enter that information in the source (with single host or alias selected).
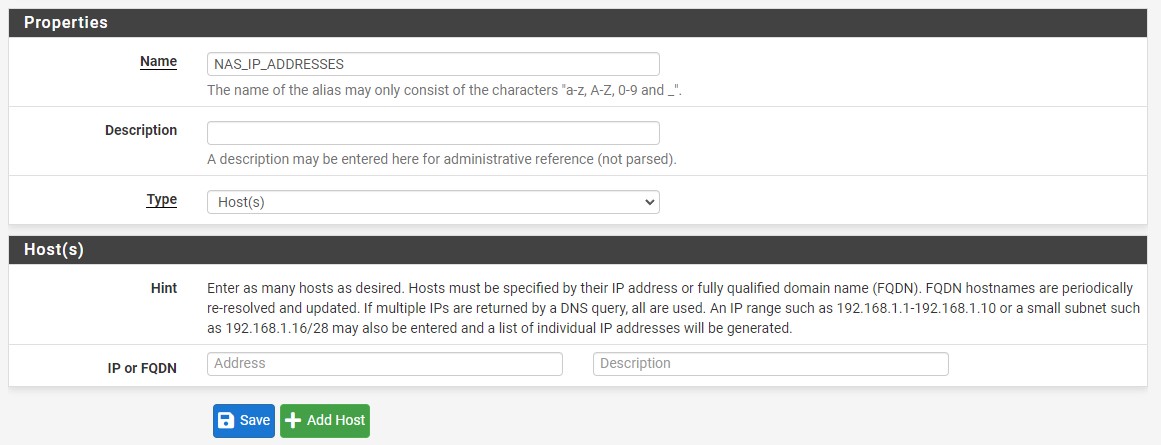
3. To configure an Alias, select Firewall then Aliases.
4. Under IP select Add.

5. You can now specify a Name, then enter in an individual IP address, multiple IP addresses, an IP range, or an IP subnet.
6. You can now head back to the Firewall NAT section, edit the rule previously created, show the advanced settings, then select single host or alias and enter in your alias.

7. The pfSense port forwarding rule will now be constrained to those IP addresses only. This will greatly limit who can access the service and increase security.
Conclusion & Final Thoughts: Port Forwarding in pfSense
This tutorial looked at how to port forward in pfSense. This was created for a basic pfSense setup and can be tailored based on your needs, but the process will be the same for any ports that you’d like to forward. Just understand that you’re exposing these services to the outside world!
Thanks so much for checking out the tutorial on how to port forward in pfSense. If you have any questions on how to port forward in pfSense, feel free to leave them in the YouTube comments section of the video above!