How to Connect a Raspberry Pi to a WireGuard VPN Server!

In this tutorial, we will look at how to connect a Raspberry Pi to a WireGuard VPN Server.

I use Raspberry Pi devices for various different things with some of them being used off-site. Something that runs constantly is the Raspberry Pi I use to backup my Synology NAS off-site. I’ve always used OpenVPN for this, but after setting up and configuring WireGuard, I was interested in using WireGuard as my VPN protocol for my off-site backup.

The thing with WireGuard is it’s almost nothing like OpenVPN. The concept of client devices and server devices isn’t valid which makes accomplishing this task somewhat different than most people are used to. The good news is that it’s very simple to set up and configure. The majority of it is done by running a few commands and adding your config file, but there’s very little information online that will show you exactly how to do this. After you configure the WireGuard server on a Raspberry Pi stored on your local network, the instructions below can be used to configure a Raspberry Pi to automatically connect to that VPN server every time it’s turned on!

Instructions – Connect Raspberry Pi to WireGuard VPN Server

1. Run the commands below, in this specific order. To sum up, we are adding the WireGuard Debian installation source and then ensuring that it’s not used for regular Raspberry Pi OS packages. We’re then installing WireGuard.

echo "deb http://deb.debian.org/debian/ unstable main" | sudo tee --append /etc/apt/sources.list
sudo apt-key adv --keyserver   keyserver.ubuntu.com --recv-keys 04EE7237B7D453EC
sudo apt-key adv --keyserver   keyserver.ubuntu.com --recv-keys 648ACFD622F3D138
sudo sh -c 'printf "Package: *nPin: release a=unstablenPin-Priority: 90n" > /etc/apt/preferences.d/limit-unstable'
sudo apt-get update
sudo apt install wireguard

2. After we’re done installing WireGuard, we need to install the WireGuard tools. This, along with WireGuard, is how we will connect back to our WireGuard VPN Server.

sudo su
apt install raspberrypi-kernel-headers libelf-dev libmnl-dev build-essential git
git clone https://git.zx2c4.com/wireguard-tools
make -C wireguard-tools/src -j$(nproc)
make -C wireguard-tools/src install

3. Since we’re only connecting back to our VPN Server, we need to create a file where we will store our VPN profile information. To be clear, this is generated on the VPN server side. We are only copying the contents of the file so that we can authenticate with our VPN server. Create the file, add the contents, and then save the file.

nano /etc/wireguard/wg0.conf
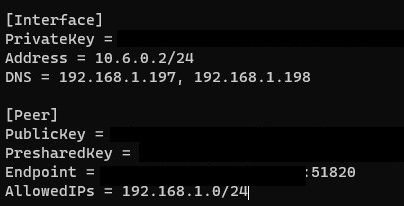
the wg0 configuration file settings for interface and peer

At this time, you have two different options. If you only want to connect to the VPN server, you can run the command below to connect. NOTE: The line below it in purple is what you will use to disconnect from the VPN.

wg-quick up wg0
wg-quick down wg0

If you want to connect to the VPN every time the Raspberry Pi is turned on rather than using the commands above, simply run this command and restart.

sudo systemctl enable wg-quick@wg0

There are a few additional items that you want to ensure that you have configured before restarting.

  • Since this Raspberry Pi will most likely be remote, it’s a good idea to configure a persistent connection so that it doesn’t disconnect from the VPN.
  • This configuration will allow you to connect FROM your external network TO your local network. Your local network will be unable to connect to your external network if you don’t configure a static route. This is a very important step that a lot of people miss!

Conclusion

This tutorial is very basic but it’s super powerful. There are so many different things you can do with Raspberry Pi devices. Having the ability to automatically connect to your home network safely and securely will give you so many options.

Thanks for reading. If you have any questions, please leave them in the comments!

Please share if this helped you!

You are currently viewing How to Connect a Raspberry Pi to a WireGuard VPN Server!

This Post Has 34 Comments

  1. peter

    Thanks Wundertech for your kind reply!
    A. You already helped me a lot with your hint that WireGuard works differently than OpenVPN, will have to do “Trial and Error” anyway as soon I have setup the WG-Server on my local Synology.
    No static adresses here, I have setup the Pi-Hole to have the router provide the DNS Server – the backup routine already works with a DynDNS address via both router’s IpSec protocol. Too slow TBH, that’s why I want to move to WireGuard.
    I definitely come back to provide some feedback for readers planning similar/same setups.
    Thanks much again, keep up your excellent blogging work with your special topics standing out from the crowd.

    1. WunderTech

      Not a problem! Excited to see how this turns out!

  2. Oriol

    Hello Wundertech,
    Thanks for this tutorial. This is the one I was looking for!
    I stilk have some questions:
    As James, I want to use this system to backup my QNAP Nas to another QNAP Nas outside my office.
    As I do not want to open ports on my remote Nas, I want to set up a wireguard vpn connection from my remote location back to my office wireguard server.

    Question 1: do I need to change the DNS on my remote router and set the remote IP local address from my remote RPI as DNS on the remote router? This way, all traffic will be routed thought the RPI (same principle as pihole).

    Question 2: how will I find from my office the remote Qnap Nas?

    Question 3: if from my remote location I force all traffic to go through the RPI (that will be connected as a client to the server), will I be able to see my office network? I have an old mac that no longer supports wireguard. I tried to install wireguard tools but it does not work and would like to access some folders on my office Nas.

    Thanks a lot for your help.
    Best

    1. WunderTech

      It sounds like you’re trying to implement a site-to-site VPN and have resources accessible on both networks, am I right in saying that? If so, you will have to set this up slightly different than the norm. I don’t have a guide on this (though it sounds like it would be great for a future video), but googling “site to site VPN wireguard” or something along those lines should tell you exactly what you’re looking to do.

      I do apologize for not having better information, but I haven’t done this exact scenario so it’s hard to give input. With that said, let me know if I can answer any questions!

  3. Sam

    Hi, when I get to the nano /etc step I cannot save the wg0 file. Could you let me know what I’m doing wrong here? I liked your pivpn tutorial and now instead of using local apps on firesticks etc I want to use my second pi as a VPN gateway for my tv.

    Thanks so much for any help here!

    1. WunderTech

      Can you try running it with sudo in front of it? sudo nano …

  4. sam

    Hi, thanks very much! This got it working, and then playing around with routing tables I have 2 RPs in different countries, and managing to get my TV go through the RP to switch countries. This and your pivpn tutorials are really awsome, so thankyou! Just for indication, what kind of speed is to be expected with a wireguard RP server, ie if I have 10mb upload on the server is say 50% realistic? Anyway, thanks again! I am new to this stuff, but your tutorials really helped.

    1. WunderTech

      Glad that they help, thanks so much! The speeds will be extremely dependent on the upload speeds of the the networks where the WireGuard servers are set up – so in your case, yes, I’d say that anywhere from 50-60% is normal.

Comments are closed.