In this article, we’re going to look at how to configure VLANs in Proxmox.
VLANs are incredibly powerful, and allow you to separate VMs into their own VLAN either individually or in groups. This ensures that the devices on that specific VLAN can communicate with one another (depending on how the VLAN is configured), but can’t communicate with VMs or devices outside of that VLAN.
Please be aware that you must first configure VLANs on your network (here are two tutorials on how to configure VLANs in pfSense and OPNsense). If you don’t have VLANs configured on your network, none of the steps below will work.
Before we configure VLANs in Proxmox, let’s look at exactly what a VLAN is.
What is a VLAN?
A VLAN (Virtual Local Area Network) is a method used to create distinct, isolated networks within a single physical network infrastructure. This allows you to partition a network so that each VLAN operates as its own entity.
The purpose of a VLAN is to improve the performance of a network or to provide segmentation and security. Segmentation, for instance, can prevent a user in one VLAN from gaining access to resources in another.
Here’s how VLANs work:
- Traffic within a VLAN: All devices in the same VLAN communicate with each other like they are in a normal LAN. They share broadcasts and can communicate without the need for a router or Layer 3 Switch.
- Traffic between VLANs: If a device in one VLAN needs to communicate with a device in another VLAN, it must do so through a router or a Layer 3 switch.
VLANs are identified by a unique ID (a VLAN tag), and ports on a Switch can be assigned to a particular VLAN ID. For example, all the ports on a switch that belong to VLAN 1 cannot communicate directly with ports that belong to VLAN 2, despite being part of the same physical switch unless traffic is explicitly allowed.
Default Proxmox Network Configuration
The goal of the information below is to provide you with an understanding of exactly what your default Proxmox configuration will look like by default (though admittedly, yours most likely will differ). After you understand how everything is configured by default, we can move on to the Proxmox VLAN configuration steps.
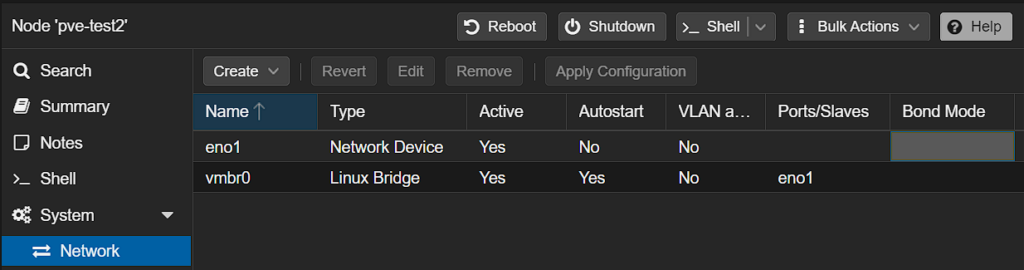
In the screenshot below, we’re looking at the network configuration for the pve-test2 node on my Proxmox Cluster. The Network Device eno1 is the physical network interface (this is the port that I have plugged into my switch).
From there, a Linux Bridge vmbr0 exists to bridge the traffic from your VMs to the physical network interface (shown in the Ports/Slaves section, as vmbr0 is a bridge for the eno1 physical port).
This default configuration is what most Proxmox users will be using. However, you can modify this configuration to allow for VLANs to separate the VMs on your host machine.
How to Configure VLANs in Proxmox
When you configure VLANs in Proxmox, there are really two different approaches you can take:
Using an Individual Bridge for all VLANs
The first option is to allow an individual bridge to access all VLANs by default. With this configuration, you can separate VMs by using the VLAN tag in the VM network configuration, but there are no limitations from a bridge perspective. Use this approach if you simply want to use an individual bridge for all VLANs.
1. To do this, edit the vmbr0 Linux Bridge (yours might be named differently), check off the VLAN aware option, and save.
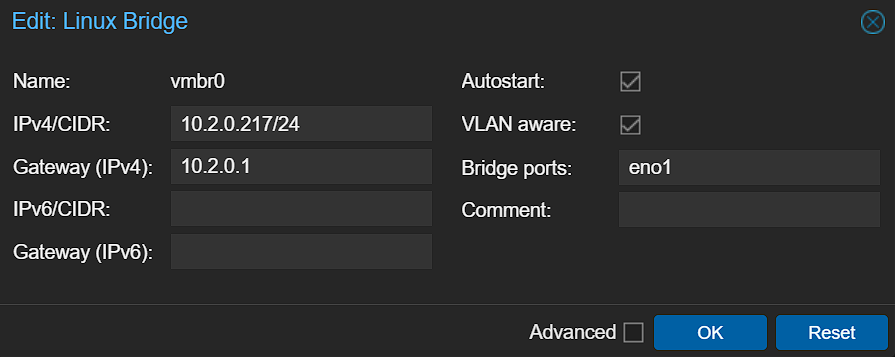
2. After selecting OK, you’ll have to Apply Configuration for the changes to be complete. You can then skip down to the VM Creation section.

Limiting a Bridge to an Individual VLAN
You can also limit a bridge down to an individual VLAN tag. As an example, if you’re planning on creating VMs for IoT devices and want the bridge they’re using to have access to the IoT VLAN only, you’ll have to limit the bridge interface to that VLAN tag.
Please keep in mind that this is generally done on a secondary physical interface so that you’re not using your only bridge network interface in this capacity.
1. To complete this step, create a new bridge interface and make it VLAN-aware. You’ll have to specify a different Bridge Port than the first Bridge Network.
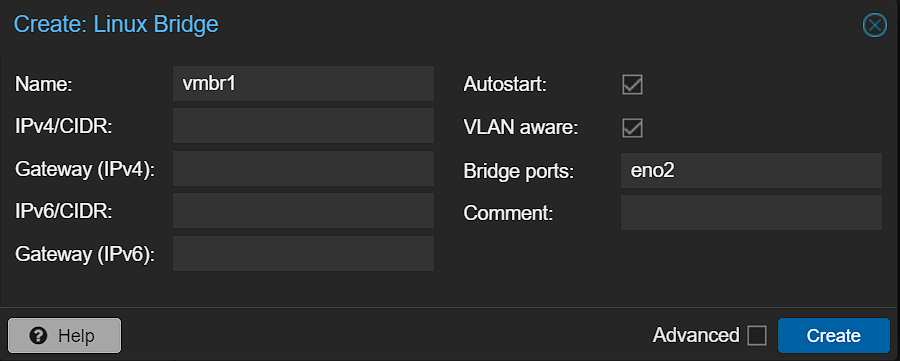
2. After selecting Create, you’ll have to Apply Configuration for the changes to be complete.
3. After the new Linux Bridge has been created, you can run the command below to edit the interfaces file from the Shell.
nano /etc/network/interfaces4. From there, modify the row below, as well as the VLAN tag that you want this bridge network interface limited to (this will display as 2-4094 by default).
bridge-vids [VLAN_TAG_ID]
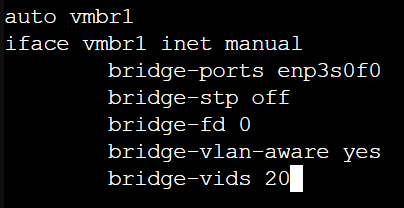
5. Reboot Proxmox and your bridge will be created!
reboot nowCreating a Virtual Machine Using a VLAN in Proxmox
At this point, the Proxmox network configuration is complete for VLANs. From here, the only thing we need to do is create a VM using the correct VLAN tag and Bridge. A few important notes:
- If you aren’t limiting the Linux Bridge to a specific VLAN, you can use any VLAN tag and the VM will use that specific VLAN (assuming it’s configured).
- If you limited the VLAN IDs (as shown above for VLAN tag 20), you can create a VM using a different VLAN tag on that specific Bridge interface, but it will not work. You must use the same VLAN tag that you specified in the configuration.
When creating a VM, access the Network section and select the correct Bridge interface, then add the VLAN tag.
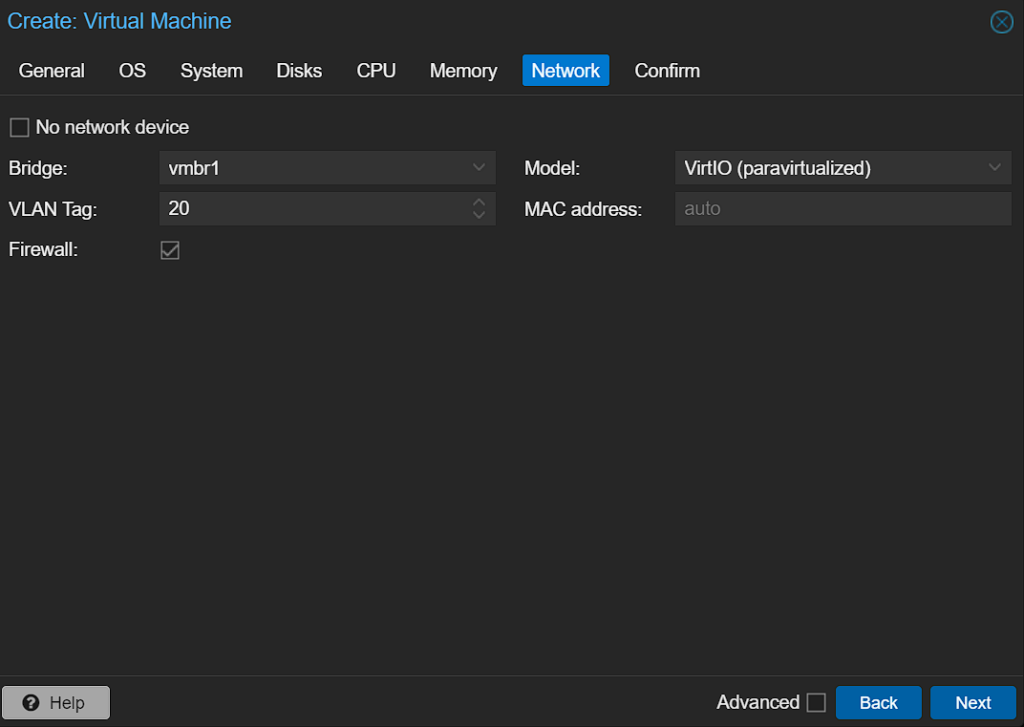
This will ensure that the Virtual Machine is created and will use the correct VLAN. When you boot up the VM, it should have an IP address on that specific VLAN.
Conclusion & Final Thoughts: Proxmox VLANs
This tutorial looked at how to configure VLANs in Proxmox. When you configure VLANs in Proxmox, you’re opening up your Proxmox host to have a ton of power that it didn’t initially have. This is a great way to provide network segmentation and can help from a security perspective. Just keep in mind that VLANs must be configured first, meaning that you can’t do anything in this tutorial if you haven’t configured VLANs on your router or L3 Switch.