This tutorial looks at how to configure an NFS share on a Synology NAS in DSM 7.
There are many reasons why you might want to set up an NFS share, but one of the biggest is that you can give individual IP addresses access to an entire shared folder by default. This means that you can allow individual servers (like Proxmox, which we’ll look at below) to access a shared folder without authenticating with a username and password.
The authentication occurs on the IP address, meaning that the shared folder will be accessible because we are specifying that the IP address of the server can read, or read and write to the shared folder on the Synology NAS. There are many reasons why you might want or need to use an NFS share as opposed to something like an SMB share, and this is a great article explaining the differences.
We will look at how to configure an NFS share on a Synology NAS below!
- Open the Control Panel on Synology DSM and select File Services then NFS.

2. Select Enable NFS service and then Apply.
NOTE: You can leave the Maximum NFS protocol as NFSv3.
3. Edit the shared folder where you’d like your NFS share to be created.
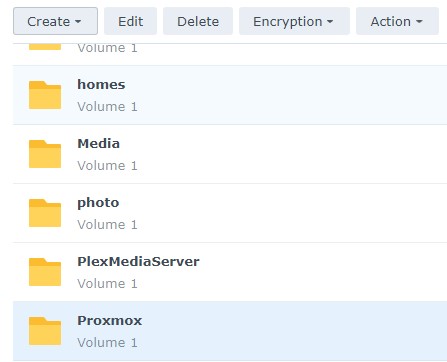
NOTE: If you aren’t sure how to create a Shared Folder, you can click this link to learn how.
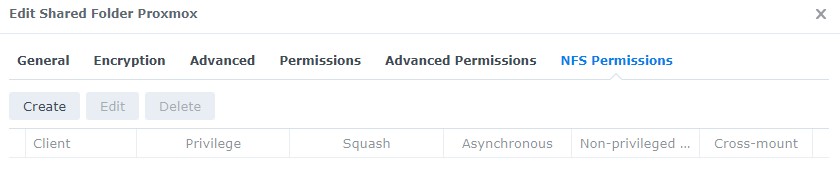
4. Select NFS Permissions then Create.
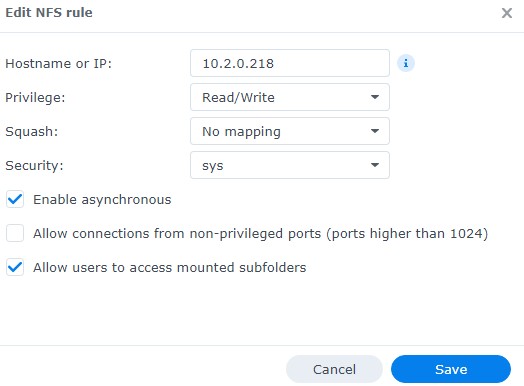
5. In the NFS rule, add the IP Address of the device that you’d like to access this shared folder. Leave the privilege as Read/Write and then select Allow users to access mounted subfolders if you’d like the device to be able to access subfolders.
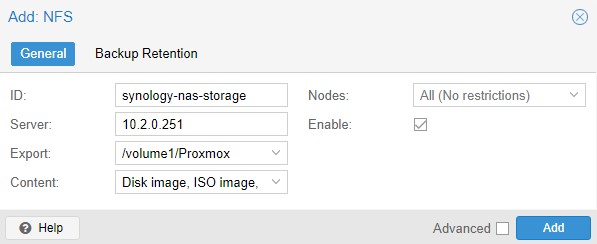
6. Save everything and then log in to the server that you granted permission for above. Since I created the shared folder above for Proxmox, I navigated to Proxmox and added an NFS share. From there, I was able to specify the IP address of my Synology NAS, then access the shared folder (Proxmox) that I created above.
What you can’t see in the screenshot below is that the /volume1/Proxmox location automatically populated since this Proxmox server has access to that shared folder. I can now utilize this shared folder on Proxmox automatically through the NFS share, with authentication happening from the IP address set above!
7. The example above utilizes the Proxmox GUI to add an NFS share, but if you’d like to add it using something like Ubuntu or CentOS, you can. There are also many other devices that you can connect to an NFS share with.
NOTE: The final and most important thing you need to remember is that authentication occurs on the IP address, so you should set up a DHCP reservation on your router if possible, and if not, set up the device to use a static IP address so that it doesn’t change! This ensures that the server won’t ever lose access to the NFS share!
This tutorial looked at how to configure an NFS share on a Synology NAS. NFS shares are extremely versatile and allow you to access shared folders by authenticating with an IP address, which is necessary for certain instances when authenticating with a username and password isn’t possible. The overall process is fairly straightforward on the Synology NAS side, but the client device configuration will be different depending on the type of device that you’re using.