Running Tailscale on Synology NAS hardware gets you into your NAS, and into everything else on your network, without port forwarding and without a static IP. The big change since I first wrote this up is that SSH isn’t required anymore. The Tailscale Synology package ships its own web interface that advertises subnet routes and sets up an exit node from a browser. The command line is optional now.
Tailscale is a zero-configuration VPN built on WireGuard, and a coordination service handles the key exchange and the NAT traversal you’d otherwise do with port forwarding. That’s why it still works behind CGNAT. Synology’s kernel means you can’t run real WireGuard on one, so this is as close as you’ll get. The trade-off is that a third party manages the connection, and if that service is down, your tunnel isn’t coming up. I’ve set this up on a Synology NAS twice for video, most recently in May 2024, and it’s still the first remote access method I’d point anyone at. I’ve compared Tailscale vs. WireGuard separately.
How to Install Tailscale on a Synology NAS
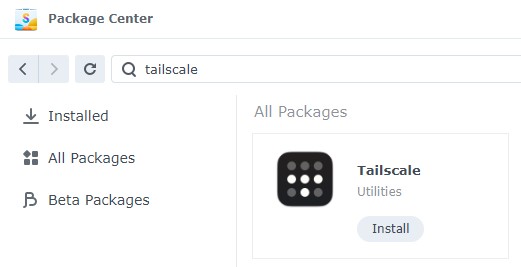
Tailscale for Synology is an official package that Tailscale maintains itself, so you can install Tailscale on Synology NAS hardware straight from Package Center. Most setups need nothing else.
1. Open Package Center, search for Tailscale, and select Install.
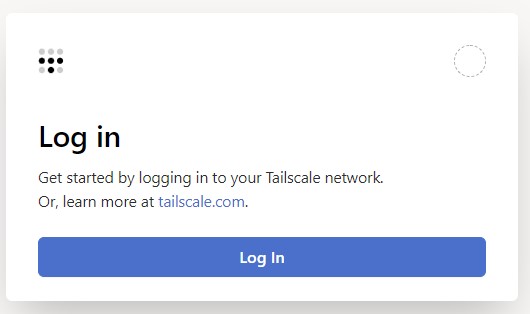
2. Select Open, then Log in, and sign in with your identity provider, which creates a Tailscale account if you don’t have one.
3. Back in DSM, open the Tailscale application, where you’ll see the 100.x address Tailscale assigned your NAS. The screenshot below is from 2022, when the app still had an exit node button.
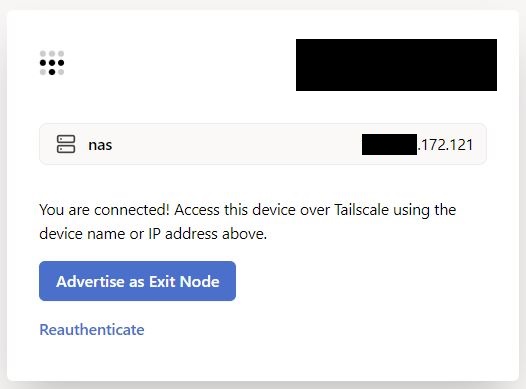
4. Install the Tailscale client on the device you’re connecting from, sign in with the same account, then open the NAS at its Tailscale address and your DSM port, 5000 for HTTP or 5001 for HTTPS unless you changed them.
http://<your NAS's Tailscale IP>:5000Package Center updates Tailscale about once a quarter, and the store’s version may not be the current release. To stay current, create a scheduled task under Control Panel > Task Scheduler > Create > Scheduled Task > User-defined script, set User to root, set the schedule to daily, and put tailscale update --yes in the Task Settings script box. You can also install by hand on a model the store doesn’t cover, or when you want a newer build: Tailscale publishes .spk files for DSM 6 and DSM 7 by architecture, and you install the file yourself in Package Center. 1.102.4 is the current stable client as of September 2026. I’ve also covered installing Tailscale on TrueNAS Scale, renamed TrueNAS Community Edition in 25.04.
Set Up a Subnet Router on Your Synology NAS
A subnet router advertises your LAN to the tailnet, so your Tailscale devices reach the rest of your network by local IP address instead of only reaching the NAS. The example I use is a mapped network drive on a laptop: leave the house, connect to Tailscale, and it keeps working, because the laptop can still reach the local subnet.
Advertise routes from the package’s web interface (no SSH)
Tailscale’s device web interface runs on the package itself, and Synology’s DSM app is how you start it. Open the Tailscale app in DSM once. That starts the device’s web interface, and it’s the step that replaces SSH. Then, from a device that’s on your tailnet and signed in as the same user, browse to http://<your NAS's Tailscale IP>:5252, because check mode won’t authenticate from anywhere else. The view inside DSM is read-only; the page on port 5252, which needs the package at v1.56.0 or later, is the one with the controls.
1. The page loads read-only, so select your profile photo in the upper right, select Sign in, and complete the authentication flow.
2. Go to Settings, open the Subnet router drop-down, enter your own subnet in CIDR form (192.168.1.0/24), and select Advertise routes.
The route is advertised now, but nothing happens until it is approved in the admin console, and forgetting that step is why a setup that installed perfectly can look broken.
3. Open the Tailscale admin console (you need to be the tailnet owner or an admin), find the NAS under Machines, open its menu, and select Edit route settings.
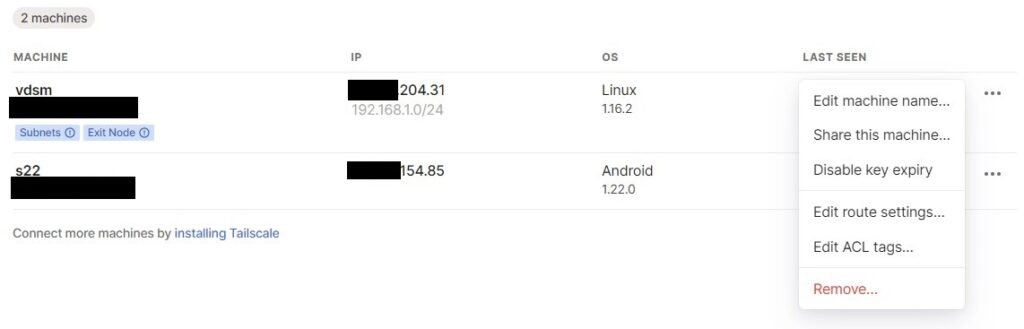
4. Under Subnet routes, turn on the route you advertised, then select Save if the panel asks you to. Your other Tailscale devices can now reach your network by local IP address (on a Linux client at the other end, run sudo tailscale set --accept-routes first). Test it by opening something on your LAN by its local address from the remote device, not by pinging it.
Advertise routes over SSH instead
SSH was the only way to advertise a route when I first set this up in 2022, and it still works fine. SSH into your Synology NAS, run the command below with your own subnet, and approve the route as above.
sudo tailscale set --advertise-routes=192.168.1.0/24The screenshot below is from my original 2022 setup, where I ran the older tailscale up --advertise-routes ... --reset form with the exit node flag on the same line.

Tailscale’s subnet router documentation documents set instead, because flags given to tailscale up aren’t persisted between runs, while set changes only what you name.
Use Your Synology NAS as a Tailscale Exit Node
An exit node sends all of a device’s traffic out through your Synology NAS and your home connection, not just the traffic bound for your network. That’s the difference between a split tunnel vs. full tunnel VPN.
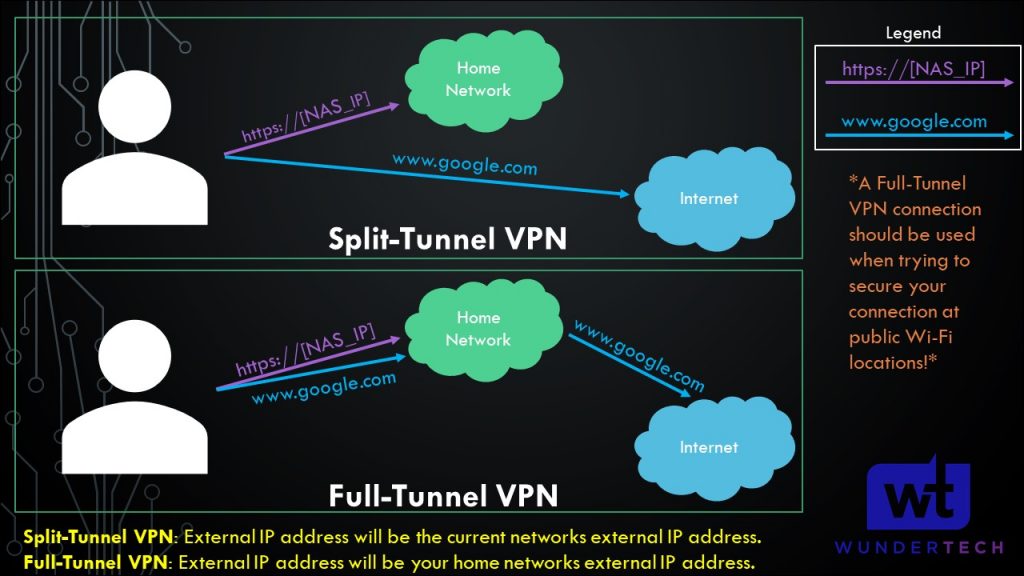
Both ends need Tailscale v1.20 or later, and every stage is opt-in: the device advertises itself as an exit node, and an Owner, Admin or Network admin allows it.
1. In the Synology package’s web interface at http://<your NAS's Tailscale IP>:5252, signed in the way the subnet router section describes, go to This device, open Exit node, and select Run as exit node.
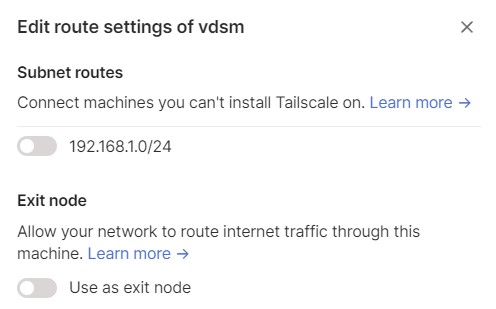
2. In the Tailscale admin console, open the NAS’s menu under Machines, select Edit route settings, and enable Use as exit node.
3. On the client, open the Exit Nodes section and pick your NAS: on Windows that’s the tray icon, then Use exit node, and on macOS it’s Exit Nodes in the menu bar. Turn on Allow Local Network Access too, so you can still reach the network you’re on.
To do that first step over SSH, run this instead, then approve it the same way.
sudo tailscale set --advertise-exit-nodeTo confirm it’s working, search for your IP address before you connect and again afterwards, which is how I checked it when I recorded this in 2024. The label is Allow Local Network Access on desktop and still Allow LAN access in the Android app, and Tailscale’s exit node documentation carries the current labels, because they drift.
Enable Outbound Connections on DSM 7
On DSM 7, the Tailscale package only makes inbound connections to the NAS. Applications on the NAS cannot connect outbound over Tailscale, because the package has no permission to create a TUN device. DSM 6 runs Tailscale as root and needs none of this.
I ran into this on camera in 2024, backing one Synology NAS up to another with Hyper Backup over Tailscale: the new backup task couldn’t reach the second NAS until this script had run. Anything the NAS itself starts is an outbound connection, so a Hyper Backup job to another NAS depends on it. Connections the other way, reaching DSM or a mapped drive from your laptop, work without it. The NAS needs Tailscale v1.22.2 or later.
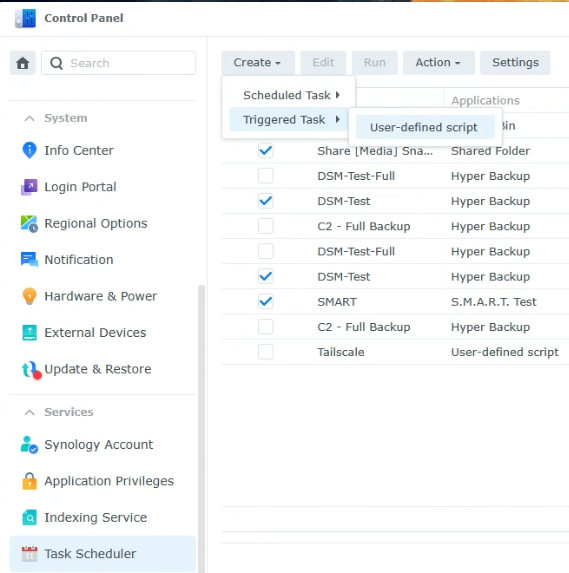
1. Open Control Panel, select Task Scheduler, then Create, then Triggered Task, and finally User-defined script.
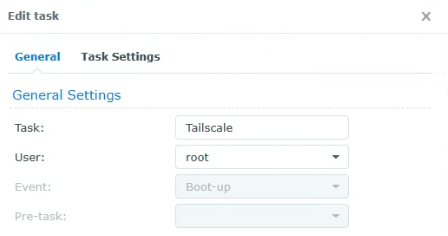
2. In General Settings, name the task, set User to root, set Event to Boot-up, and leave it enabled.
3. In Task Settings, paste the script below into the User-defined script box, select OK, then reboot the NAS, or run the same script as root over SSH to skip the reboot.
/var/packages/Tailscale/target/bin/tailscale configure-host; synosystemctl restart pkgctl-Tailscale.service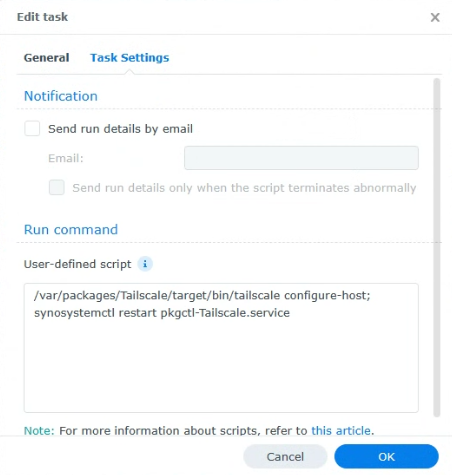
The task runs at boot from then on, so it’s a set-once job. Upgrading the Tailscale package means the script has to run again, by rebooting or running it as root, and that’s an easy one to miss because nothing else about the setup changes. To confirm it took, open the Tailscale app in DSM and check View device details > Debug, where TUN should read Yes.
Enabling TUN also makes Tailscale traffic subject to Synology’s built-in firewall. The firewall is off by default, but if you’ve turned it on, add an allow rule in the default profile under Control Panel > Security > Firewall for source IP subnet 100.64.0.0 with mask 255.192.0.0. I’ve covered setting up the firewall on a Synology NAS if you haven’t.
Get an HTTPS Certificate for DSM with Tailscale
Reaching DSM on a 100.x address gets you a certificate warning every time. Tailscale’s HTTPS certificate documentation covers the way around it, which is a real Let’s Encrypt certificate for the NAS’s tailnet name, installed into DSM itself. No ports are opened to the internet to do it.
On DSM 7, do the outbound-connections step above first: users report the certificate command failing with the package’s TUN setting off.
1. In the Tailscale admin console, switch to the DNS page in the left-hand navigation and enable MagicDNS if it isn’t on already.
2. Under HTTPS Certificates, select Enable HTTPS and acknowledge that your machine names and tailnet DNS name are published to the public Certificate Transparency ledger, so do not enable it if a machine name gives away something private.
3. SSH into the NAS and run the command below as root, which writes the certificate into DSM rather than leaving .pem files for you to import by hand.
sudo tailscale configure synology-cert4. The command prints Tailnet Certificate uploaded with ID "..." when it works. From then on, reach DSM at https://<machine-name>.<tailnet>.ts.net:5001 rather than the 100.x address, because the certificate is issued for that name and the IP still warns.
Let’s Encrypt certificates expire after 90 days, so renewal goes in a weekly Task Scheduler job as root running that same command. Renewal is the rough edge here, and I’d rather say that than promise it works. As of September 2026 an open Tailscale issue has the command succeeding by hand and failing on a schedule. One person on that thread traced their failure to the package’s TUN setting having reverted to No (Tailscale app > View device details > Debug), and got renewals back by running the previous section’s boot-up script before each renewal. Users on that issue report renewal working by hand when they pass the machine’s full name, sudo tailscale configure synology-cert --domain=<machine-name>.<tailnet>.ts.net, though the flag is ignored when the device has only one certificate domain.
Fix Common Tailscale Problems on a Synology NAS
Most of what goes wrong is on the list below, and Tailscale’s Synology documentation covers the rest.
- It installed and nothing works. A subnet route and an exit node are both inert until they’re approved in the admin console.
- Ping fails but the service works. Tailscale uses hybrid networking mode on Synology, so shared subnets answer TCP and UDP but not necessarily
ping. Test the port you use. - Outbound connections stopped after an update. Check View device details > Debug in the Tailscale app: if TUN reads No, the boot-up script has to run again, which a reboot or running it as root does.
- Devices behind another subnet router cannot reach the NAS. Tailscale on Synology does
--advertise-routesbut not--accept-routes, so that direction isn’t available. - Tailscale SSH doesn’t run. It is not supported on Synology. Use DSM’s own SSH server instead.
- You need to reauthenticate after reinstalling the package. SSH in, run
sudo tailscale up, then open the login URL it prints. - Moving from DSM 6 to DSM 7. Uninstall and reinstall the Tailscale package after the upgrade, and do not run the upgrade over Tailscale, because you may lose the connection.
This was all checked against DSM 7 and the current package as of September 2026. Security changes, defaults change, and nothing in a guide like this is a guarantee, so open the admin console’s Machines page every so often and remove any device you don’t recognise.
When I first set this up in 2022, a working split tunnel and full tunnel took me under ten minutes, and it has only gotten simpler since. If port forwarding is what has kept you from remote access, this is the one to do.