Today we are going to look at how you can setup a static IP address for OpenVPN on a Synology NAS.
When you setup a VPN server on your Synology device, the IP addresses are dynamic when a user connects. What this means is that every user will have a different IP address when they connect and the order in which they connect determines what the address will be. In other words, it’s totally random. There are many cases where using a static IP address is necessary, and today we are going to go through the process of configuring this.
If you have not configured your VPN Server, you must do it before proceeding. I have instructions on how to do it here.
Setup a Static IP Address for OpenVPN on a Synology NAS – Instructions
- First off, you need to be able to SSH into your Synology device. If you aren’t sure how to do that, you can watch this quick 90 second video that shows you how.
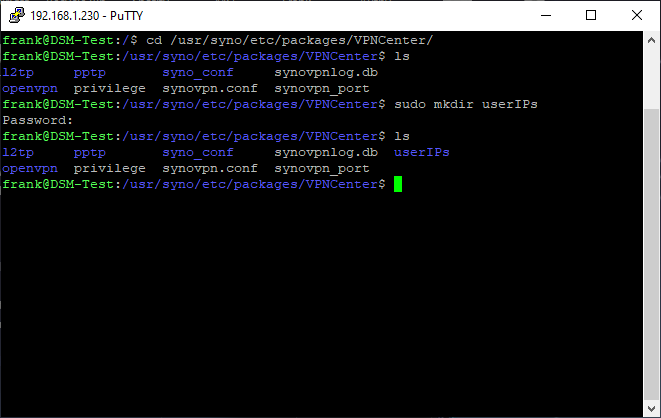
- SSH into your Synology NAS and navigate to the VPNCenter folder by running this command:
cd /
cd /usr/syno/etc/packages/VPNCenter/
3. At this point, we need to create a directory which is where we will store our users and their predetermined IP addresses. Run this command to create a folder.
sudo mkdir userIPs
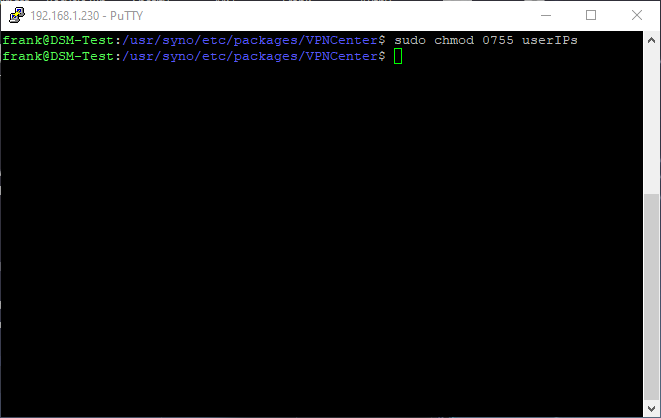
4. Now that this directory is created, we need to give users the rights to execute items in this folder by running the command below. If you’d like to read more about what permissions this command grants, you can do so here.
sudo chmod 0755 userIPs
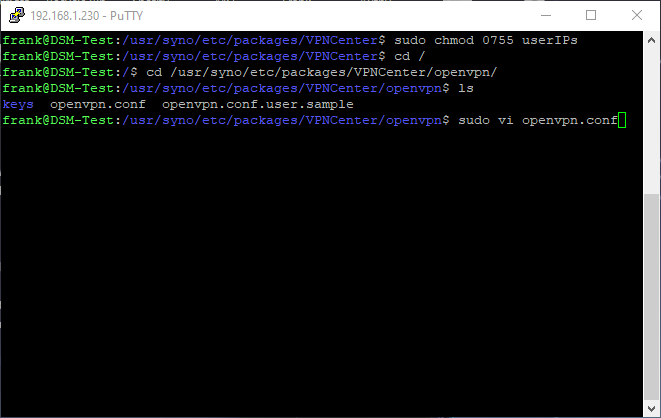
5. The next step involves reconfiguring the OpenVPN configuration file to check our newly added folder for files. Run these commands to navigate to the folder and edit the configuration file.
cd /
cd /usr/syno/etc/packages/VPNCenter/openvpn/
6. When you have the configuration file open, add the line below inside of the file. NOTE: you will need to use vi to edit this file. If you aren’t sure how to use the vi editor, check out this tutorial. In its simplest form, press “i” to insert and when the line is entered/changed, press “Escape” to stop editing, then type “:wq” to quit.
sudo vi openvpn.conf
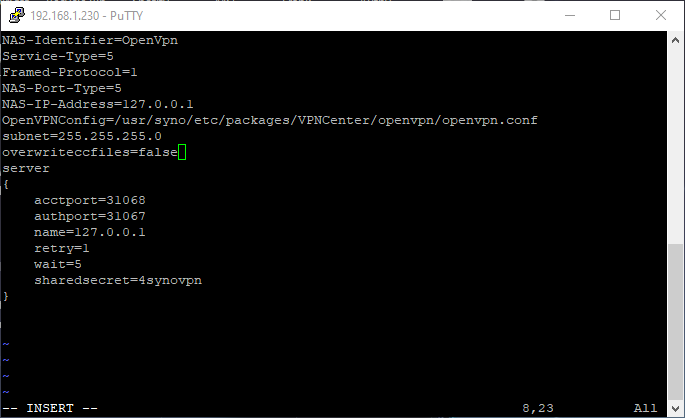
client-config-dir /usr/syno/etc/packages/VPNCenter/userIPs/

7. After the file has been saved, navigate to the radiusplugin.cnf folder by typing this command:
cd /
cd /volume1/@appstore/VPNCenter/etc/openvpn/
8. Edit the radiusplugin.cnf file by typing this command. See instructions above on how to use the vi editor.
sudo vi radiusplugin.cnf

9. Change the “true” flag to “false” for “overwriteccfiles”.
overwriteccfiles=false
10. The server configuration is now complete. The final step is to determine which VPN users should have static IP’s and create a file letting the system know what IP address should be assigned to that user account. The file name must be the EXACT username that will be connecting to the VPN (in my case, vpnUser1 and vpnUser2). Another important note is that when you configured your VPN server, you defined a dynamic IP address that is the IP address that will be given to clients that are connecting. In my example, VPN connections are given an IP address of 10.5.0.X.

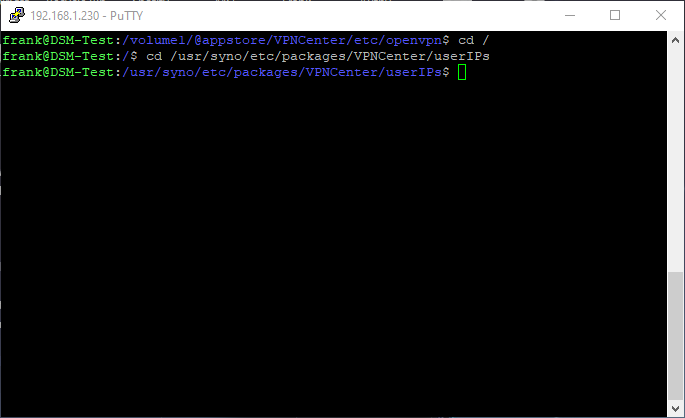
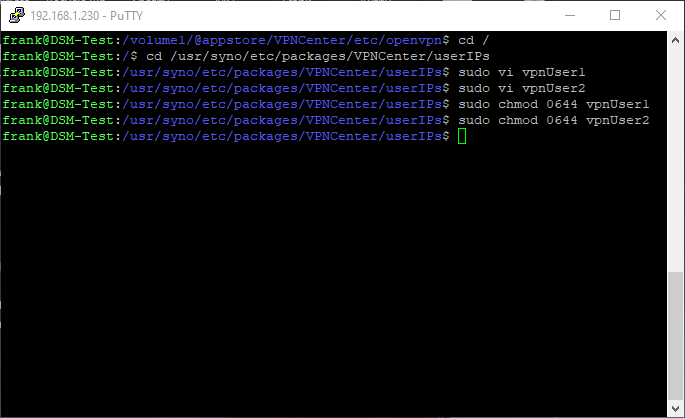
11. Navigate back to the userIPs directory
cd /
cd /usr/syno/etc/packages/VPNCenter/userIPs
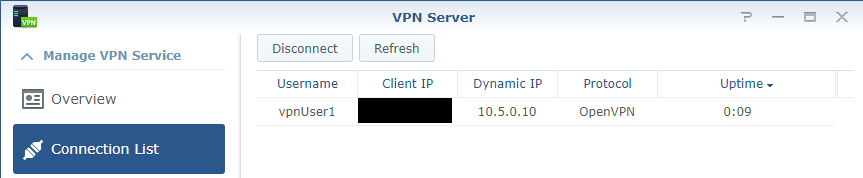
12. To show how the configuration is setup, I have created two user accounts (vpnUser1, vpnUser2). When they connect, I want vpnUser1 to connect to the 10.5.0.10 IP address and vpnUser2 to connect to the 10.5.0.14 IP address. By default, the first IP address given is 10.5.0.6. For this reason, I don’t recommend using the .6 IP address, so it’s best to start at .10 and increase that number by four for every additional user. Follow the instructions below to configure this.
13. Create a file with the username where you would like to setup the static IP (in my case, vpnUser1 and vpnUser2).
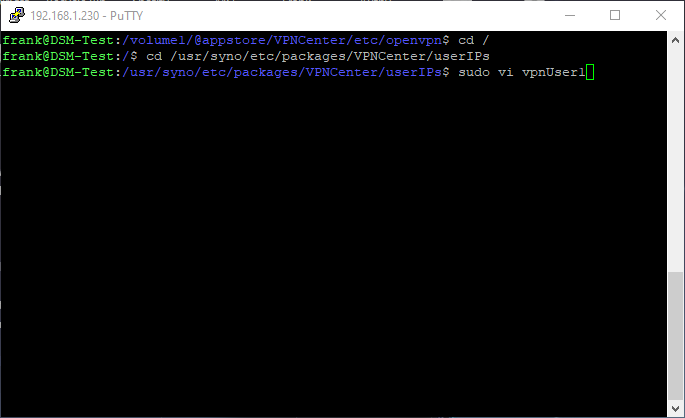
sudo vi vpnUser1
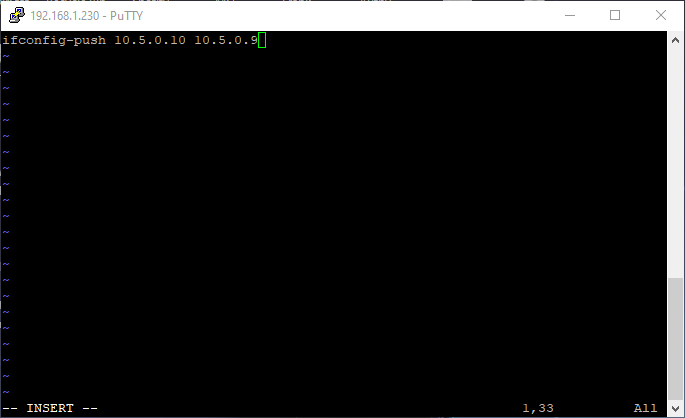
14. Enter the line below in the newly created file. NOTE: the IP address should always increment by 4 and the second IP address in the string should always be one less than the first.
ifconfig-push 10.5.0.10 10.5.0.9
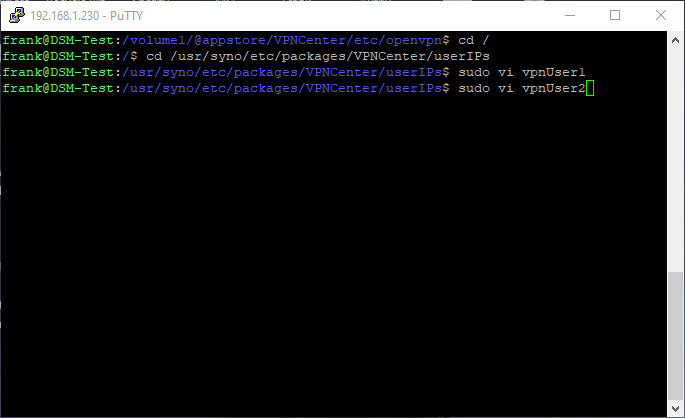
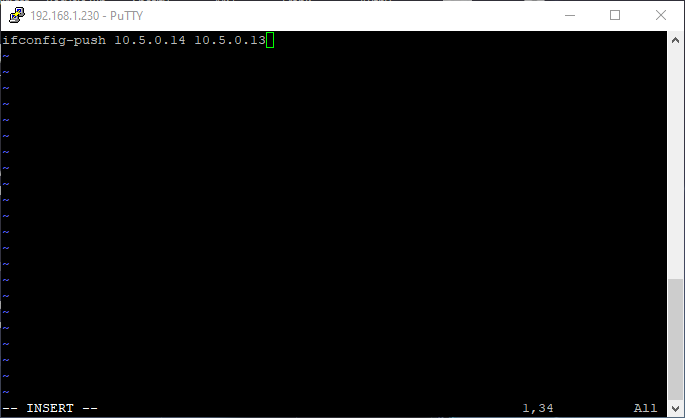
15. I will do the same for vpnUser2.
sudo vi vpnUser2
ifconfig-push 10.5.0.14 10.5.0.13
16. We now need to change the permissions on these files. To do that, run the commands below. If you’re interested in seeing what these permissions are, you can view the information here.
sudo chmod 0644 vpnUser1
sudo chmod 0644 vpnUser2
17. Reboot your Synology device and try and connect to your VPN. I suggest using your mobile phone and mobile network (as you cannot be on the same network). You should see that each VPN user that connects has the IP address that we configured above.

Conclusion
In general, dynamic IP addresses are fine and the majority of people won’t need to know what IP address is assigned to each device. However, in very specific situations, there may be a requirement where an administrator needs to know that a specific device will be assigned to a specific IP address. This easy tutorial gives you the exact steps that you need to conduct to accomplish that. After setting this up, you can take this one step further and backup your Synology NAS to a Raspberry Pi off-site using Hyper Backup!