
The way you update Pi-hole depends on how it was installed. If you used the official install script (on a Raspberry Pi, Ubuntu, Debian, or a Proxmox LXC), it’s one command, sudo pihole -up. If Pi-hole runs in Docker, that command is disabled inside the container, so you pull the new image and recreate the container instead.
Everything below is for Pi-hole v6 (released in February 2025), checked against Pi-hole’s documentation in October 2026. DNS drops while Pi-hole restarts, so a second DNS server (a public one, or better, a second Pi-hole you aren’t updating at the same time) means nobody notices.
Should you Upgrade Pi-hole to the Latest Version?
For most people, yes, but read the release notes first.
Why You Might Want to Update Pi-hole
- Security fixes: a Pi-hole update can patch vulnerabilities found since your version shipped (security changes constantly, so no version is guaranteed safe forever).
- Bug fixes and features: releases fix earlier problems and add features.
Why You Might Not Want to Update Pi-hole
- Stability: a new release can bring new bugs, especially a major one.
- Downtime: without a second DNS server, nothing resolves during the restart.
Pi-hole’s update documentation splits the release notes across Core, FTL and Web interface (plus docker-pi-hole for the container). That matters most on a major upgrade like v5 to v6, where Pi-hole recommended a configuration backup first because there was no going back.
If you have more than one Pi-hole, I’d suggest updating one and confirming everything works before you update the others. Waiting a few weeks after a release so any issues surface in the community is reasonable too.
How to Check if a Pi-hole Update Is Available
The easiest check is the footer of the Pi-hole web interface. In v6 it lists your Core, FTL and Web interface versions (plus a Docker Tag on a container install), and any component with a newer release is marked Update available! (on Docker, only the Docker Tag is). The hint below it reads “To install updates, run pihole -up.” On Docker, it tells you to replace the container with a fresh upgraded image instead.
There’s no update button in the web interface, so you can’t update Pi-hole from the GUI or your phone. The footer’s check runs once a day and at reboot, so it can lag a fresh release by up to a day.
From the command line, pihole -v shows each component as “Version is vX (Latest: vY)”. pihole -up --check-only reports whether Core, Web interface and FTL have an update, then exits without installing anything:
pihole -v
sudo pihole -up --check-only
If the footer says the versions file is incomplete, run the command it asks for and reload the page:
sudo pihole updatecheckerHow to Update Pi-hole with pihole -up
The pihole update command is pihole -up. It needs root, so run it with sudo unless you’re logged in as root. This is the method for any install from the official script (curl -sSL https://install.pi-hole.net | bash). I’ve used that script to install Pi-hole on a Raspberry Pi, Ubuntu, and Proxmox, and my guide to installing Pi-hole covers all three.
On a Raspberry Pi you’ll probably have to SSH into it first.
1. Back up your configuration by going to Settings > Teleporter in the web interface and selecting Export (or, on Proxmox, backing up the LXC, covered below).
2. Update the operating system’s packages. pihole -up only touches Pi-hole’s own components, so OS packages update with apt:
sudo apt update && sudo apt upgrade3. Run the Pi-hole update command. It updates whichever of Core, Web interface and FTL has a newer release, and prints Everything is up to date! if none do.
sudo pihole -up4. When it finishes, run pihole -v again or reload the web interface, and the footer should show the new versions.
pihole -g is a different thing: it updates gravity (your blocklists), not the software, and Pi-hole already runs it weekly. If DNS doesn’t come back after a Pi-hole update, sudo pihole -t tails the log and sudo pihole -r repairs the install. There’s no downgrade command, and Teleporter restores settings, not the old version, so rolling back takes a system backup like the LXC one.
How to Update Pi-hole in Docker
The Pi-hole update command is disabled inside the container (it returns “Function not supported in Docker images”), so you replace the container with one built from a newer image. Your settings only survive that if /etc/pihole is mapped to a volume. If your compose file uses pihole/pihole:latest, a pull gets the newest release. If it pins a date-based tag (like 2026.09.0), change the tag first. On a Synology NAS, edit it in the Container Manager project from my Pi-hole on Synology guide, then Stop, Build and Start the project.
Updating with Docker Compose
Open a terminal in the folder that holds your compose file and run the three commands from Pi-hole’s docs:
docker compose pull
docker compose down
docker compose up -d
If you used docker run instead, pull the image, remove the old container, then run your original docker run command again:
docker pull pihole/pihole:latest
docker stop pihole
docker rm pihole
docker run ...   # your original command, with the same volumes
Then check the footer’s Docker Tag, or run docker exec pihole pihole -v.
Updating Pi-hole Using Portainer
In Portainer 2.45.1 (September 2026), the Recreate button replaces the container, except on Swarm, AutoRemove or Podman containers. My guide on updating a Docker container using Portainer covers it in more detail.
1. Select your environment (usually local), then Containers and the pihole container. You can stop it first, as in the screenshot below, but Recreate stops and removes the old container either way.

2. On the container’s page, select Recreate, turn on Re-pull image, then select Recreate again. Portainer warns that non-persisted data will be lost (the volume mapping again).
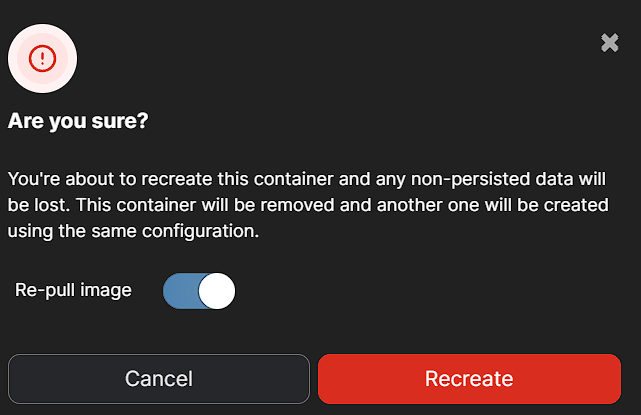
3. When it finishes, Portainer starts the new container from the newest image, so it should show running.
Updating from Pi-hole v5 to v6 in Docker
If your container is still on v5, the jump to v6 needs more than a pull, and Pi-hole’s v5 to v6 Docker page has the full list. Back up your volume folders before the first v6 start, because that upgrade is one-way.
Most environment variables moved to FTLCONF_ names (WEBPASSWORD is now FTLCONF_webserver_api_password), some were removed with no replacement, and lighttpd is gone, so FTL serves the web interface itself on ports 80 and 443. v6 also stops reading /etc/dnsmasq.d/ by default. If you used it, keep it mapped for the first v6 start so the migration picks it up, and set FTLCONF_misc_etc_dnsmasq_d: 'true' if you still need it afterwards. Then make those changes in your compose file, swap a pinned v5 tag (2024.07.0 or older) for latest, and run the three commands above.
How to Update Pi-hole on Proxmox
On Proxmox, Pi-hole usually runs in an LXC (sometimes a VM), and either way it’s a native install inside the guest. Updating the Proxmox host does not touch the container, so the update is pihole -up from the container’s console plus the guest’s own apt packages.
When I set up my Pi-hole LXCs in early 2025, I used three Ubuntu containers across a two-node cluster and the official install script, not a helper script and not Docker. Later in 2025 I recommended an LXC over Docker, because the setup script makes it a lot easier and because of Proxmox backups. If you don’t think backups like that can be handy, talk to a few people who upgraded from Pi-hole v5 to v6 and they’ll convince you otherwise.
1. In Proxmox, back up the LXC or VM first: select the container, open its Backup tab, select Backup now, then Backup. Or use Snapshots (Take Snapshot) if your storage supports them.
2. Open the container’s Console and update its packages (as root, you can leave off sudo):
apt update && apt upgrade3. Run the update:
pihole -up4. Check the web interface footer, then confirm it resolves DNS with nslookup wundertech.net <its IP> from another machine. If you run more than one Pi-hole container (my 2025 build had three, two of them sharing a virtual IP through Keepalived), finish this one before you move to the next, so DNS stays up the whole time.
My redundant Pi-hole guide covers the full build.
If You Used the Proxmox Helper Script
If your Pi-hole LXC came from the community-scripts helper (ct/pihole.sh), open the LXC’s own Console (not the Proxmox host shell, where this command creates a new container) and type update, or run the same command again. Pick YES in the menu, and it runs apt update, apt upgrade -y, then pihole -up, so it’s the same update:
bash -c "$(curl -fsSL https://raw.githubusercontent.com/community-scripts/ProxmoxVE/main/ct/pihole.sh)"As I said when I ran the official script in 2025, you should never just run scripts you find online without confirming what they do, and that goes for this one too.
Should You Automatically Update Pi-hole?
You can, but Pi-hole doesn’t recommend it. There’s no auto-update on a bare-metal install by design, and Pi-hole’s Docker tips say not to auto-update the container either (so no Watchtower). In their words, “Pi-hole is an integral part of your network, don’t let it fall over because of an unattended update in the middle of the night.”
If you’d like to do it anyway, add a line like this to root’s crontab (sudo crontab -e) to run the update every day at 7:00:
0 7 * * * PATH="$PATH:/usr/sbin:/usr/local/bin" pihole -upDon’t put it in /etc/cron.d/pihole, since Pi-hole rewrites that file when it updates or repairs itself.
For most people, the right cadence is to update when the footer notice shows up and you’ve read the release notes.