Proxmox VE forces you to set a static IP during installation — no DHCP option. That’s fine until you need to move it to a different subnet or clean up your address scheme. The catch is that the IP lives in two separate files, and if you only update one, the management UI won’t come back up after the reboot.
I’m running Proxmox VE 9.1.2, and the process below is how I handle it on a standalone node. One important caveat before you start: if you’re running a Proxmox cluster, do not follow this process. Changing the management IP on a clustered node will break cluster communication, and you’ll have a bad time recovering from it. This is for single-node setups only.
Before You Start
Make sure you can either SSH into the server or access the shell directly through the web UI. You won’t be able to use the web UI once the IP change is applied — not until the server reboots with the new address.
Also, power off or shut down your VMs and containers before rebooting at the end. It’s not strictly required, but it’s cleaner.
Edit the interfaces File
1. Navigate to the network configuration folder.
cd /etc/network
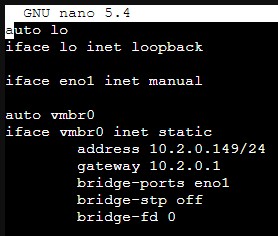
2. Open the interfaces file in nano.
nano interfaces
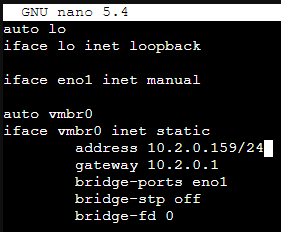
3. Find the line with your current IP address and update it.
In my case, the management UI was using 10.2.0.149. I changed it to 10.2.0.159. This is the address Proxmox binds to for the web UI — https://[IP]:8006.
If you’re moving to a different subnet, update the gateway line too. I was staying on the same subnet, so my gateway stayed at 10.2.0.1.
4. Save and exit.
Press CTRL + O to write the file, then CTRL + X to exit.
Update the hosts File
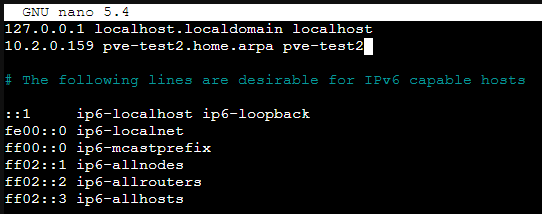
The /etc/hosts file also stores the node’s IP address and needs to match. If you skip this step, you’ll likely see hostname resolution errors after the reboot.
5. Open the hosts file.
nano /etc/hosts
6. Update the IP address to match what you set in the interfaces file.
Mine showed 10.2.0.149 here as well — I updated it to 10.2.0.159 to match. Save with CTRL + O, then exit with CTRL + X.
Reboot and Reconnect
7. Reboot the server.
reboot now
8. Once it comes back up, access the UI at the new address.
https://[NEW_IP]:8006That’s it. Both files updated, server rebooted, and the management interface should load cleanly on the new IP. If you’re planning to configure VLANs or set up Proxmox Backup Server after this, make sure any NFS mounts or backup jobs that reference the old IP get updated too — those won’t automatically follow the change.
If You’re Running a Cluster
This is worth repeating: don’t use this method on a clustered node. The cluster layer maintains its own corosync configuration with hardcoded IP addresses, and changing the network interface underneath it will break quorum.
If you need to change the IP of a node in a cluster, the process is significantly more involved — you’ll need to update the corosync config and potentially remove and re-add the node. If you’re not in a cluster yet but are considering it, take a look at how to set up a 2-node cluster in Proxmox — it’s worth planning your IP scheme before you get there rather than after.
If you’re just getting started with Proxmox and haven’t locked in your network layout yet, it’s worth reading through how to install Proxmox VE and thinking about your addressing before standing up a bunch of VMs — moving things later is doable, but it’s extra work.