In this tutorial, we will look at how to set up Blue Iris motion notifications in Home Assistant, though I recommend you use Ntfy with the new method I’ve been using.
I have been playing around with my Blue Iris notifications in Home Assistant for about a week and I am finally happy with how they are configured. I can confidently say after having sporadic issues with various different solutions, the example below has been 100% accurate for me ever since I implemented it. With that said, there are a few points that I want to make before starting:
- This solution is not mine and I do not take any credit for it. All I did was take various bits of information from extremely helpful users in this Home Assistant thread to implement the solution below.
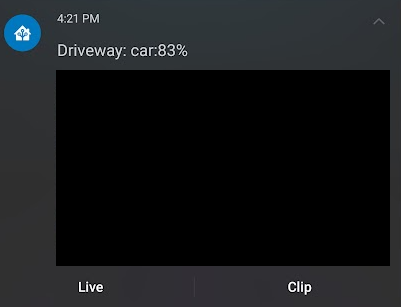
- The example below works on iPhone and Android and provides actionable notifications with an image of the motion event, meaning that one button will provide a live view of the camera and the other will display the clip from the motion event (both in the BI web server).
A few additional points that I want to make before we get started. These points are based on Blue Iris configuration settings:
1. Your trigger/alert settings in Blue Iris must be configured properly.
2. You must have an active MQTT broker configured as we will utilize MQTT to send data from an alert to Home Assistant. You can run an MQTT broker directly in Home Assistant if you’d like.
3. The notification can be modified if you’d like, but the example below will use the camera’s name as the title of the notification along with the AI information acquired (person, car, truck, etc.). If you aren’t using any AI information in Blue Iris, you can remove this information.
4. I am going to be utilizing Node-RED because I love the visual GUI that it provides, though the information below can be modified to use the built-in functionality of Home Assistant if desired.
Blue Iris Motion Notifications in Home Assistant
We will look at how to set up Blue Iris motion notifications in Home Assistant below.
1. As mentioned above, ensure that you have an MQTT broker configured.
2. Edit a camera in Blue Iris and navigate to the Alerts tab, then select the On Alert action at the bottom.
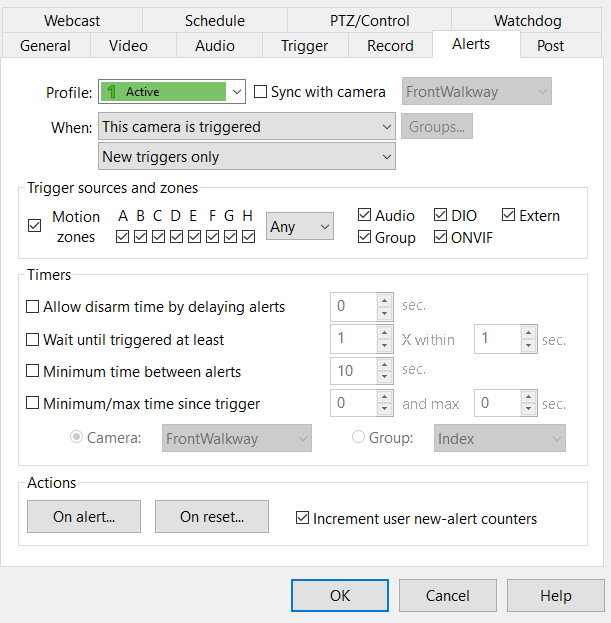
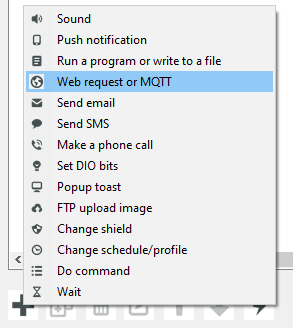
3. Select the + icon in the bottom left, then select Web request or MQTT.
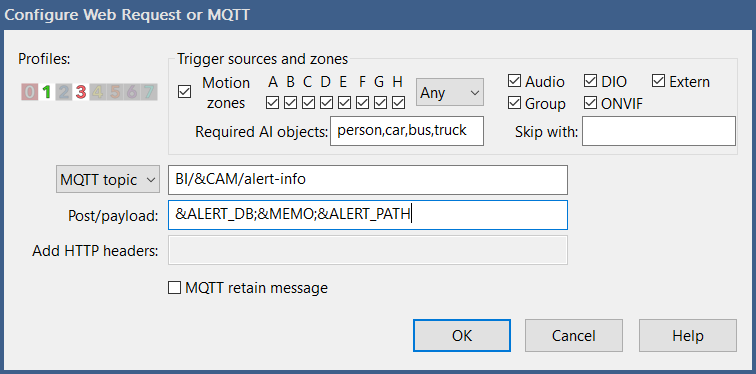
4. Set the profiles, motion zones, and required AI objects to be whatever you’d like. Select MQTT Topic, then enter it as the data below:
BI/&CAM/alert-infoThis will send the alert with the camera information to the MQTT broker. Next, set the Post/Payload as the information below:
&ALERT_DB;&MEMO;&ALERT_PATHThe &ALERT_DB parameter will send the database ID for the clip. The &MEMO parameter will send the AI information (person: 75%, car, 68%, etc.), and the &ALERT_PATH parameter will send the ID needed to access and display the image in the Home Assistant notification.
5. Save the settings and move on to the Home Assistant section!
Home Assistant Configuration – Blue Iris Motion Notifications in Home Assistant
Before proceeding to the Node-RED configuration, make sure you have MQTT set up so you can configure the workflow!
The workflow we will be creating is rather simple but will utilize the parameters we sent from Blue Iris to construct an actionable notification with an image of the motion event.
I will paste the information for this notification below, but here is the entire workflow:

The first step listens for any MQTT messages in the BI/+/alert-info format. The + symbol is a wildcard, which will contain the name of your camera in Blue Iris (sent from the &CAM parameter in Blue Iris).

The second step takes the string that was sent and splits it into three parts by the semi-colon we entered. The parameters match the information below:
- msg.db: &ALERT_DB
- msg.memo: &MEMO
- msg.path: &ALERT_PATH
The data can be accessed by using db.db, memo.memo, or path.path (as shown in the notification below).
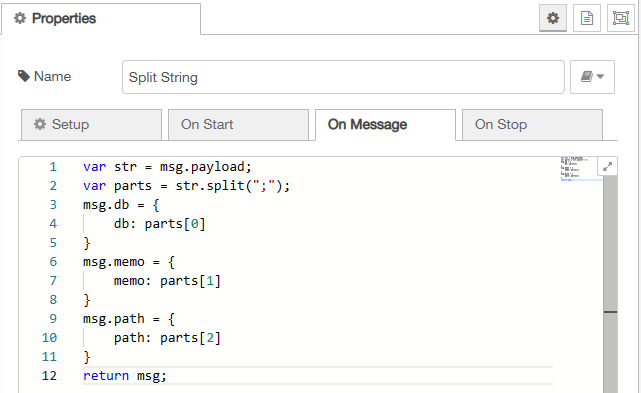
var str = msg.payload;
var parts = str.split(";");
msg.db = {
    db: parts[0]
}
msg.memo = {
    memo: parts[1]
}
msg.path = {
    path: parts[2]
}
return msg;
The final step notifies all devices (this can be modified if desired) with the image, clip, and a link to a live view of the camera if desired.
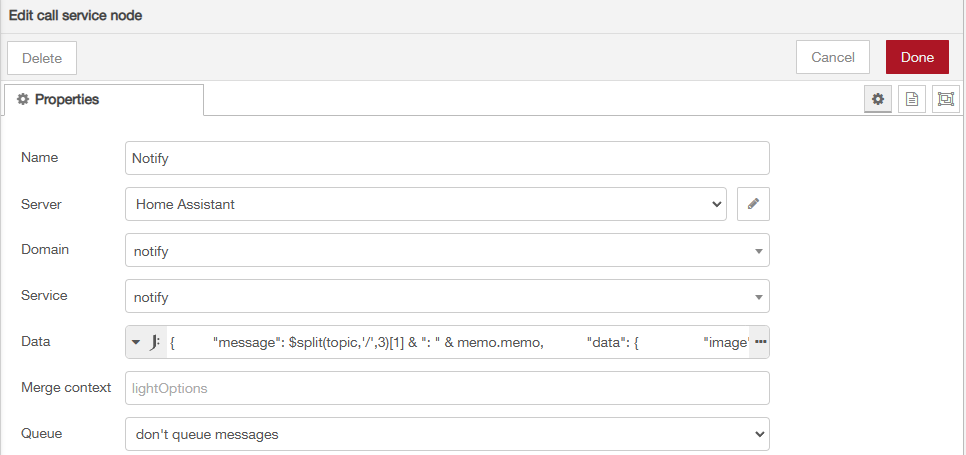
{
   "message": $split(topic,'/',3)[1] & ": " & memo.memo,
   "data": {
         "image": "http://[BLUE_IRIS_IP]:81/alerts/" & path.path,
         "actions": [
               {
                  "action": "URI",
                  "title": "Live",
                  "uri": "http://[BLUE_IRIS_IP]:81/ui3.htm?maximize=1&cam=" & $split(topic,'/',3)[1]
               },
               {
                   "action": "URI",
                   "title": "Clip",
                   "uri": "http://[BLUE_IRIS_IP]:81/ui3.htm?maximize=1&tab=alerts&cam=" & $split($lowercase(topic),'/',3)[1] & "&rec=" & db.db
               }
         ]
   }
}
Entire Node-RED Workflow
[{"id":"90bd251f226c084a","type":"tab","label":"BI Images/Videos","disabled":false,"info":"","env":[]},{"id":"8bc1f507afbd14ad","type":"mqtt in","z":"90bd251f226c084a","name":"BI/+/alert-info","topic":"BI/+/alert-info","qos":"2","datatype":"utf8","broker":"a3a154c72e3a9230","nl":false,"rap":true,"rh":0,"inputs":0,"x":130,"y":140,"wires":[["069342c2726613ef"]]},{"id":"0975bbae61bb30fe","type":"api-call-service","z":"90bd251f226c084a","name":"Notify Devices","server":"f11c46a6.207018","version":5,"debugenabled":false,"domain":"notify","service":"notify","areaId":[],"deviceId":[],"entityId":[],"data":"{\t \"message\": $split(topic,'/',3)[1] & \": \" & memo.memo,\t \"data\": {\t \"image\": \"http://[BLUE_IRIS_IP]:81/alerts/\" & path.path,\t \"actions\": [\t {\t \"action\": \"URI\",\t \"title\": \"Live\",\t \"uri\": \"http://[BLUE_IRIS_IP]:81/ui3.htm?maximize=1&cam=\" & $split(topic,'/',3)[1]\t },\t {\t \"action\": \"URI\",\t \"title\": \"Clip\",\t \"uri\": \"http://[BLUE_IRIS_IP]:81/ui3.htm?maximize=1&tab=alerts&cam=\" & $split($lowercase(topic),'/',3)[1] & \"&rec=\" & db.db\t }\t ]\t }\t\t}","dataType":"jsonata","mergeContext":"","mustacheAltTags":false,"outputProperties":[],"queue":"none","x":500,"y":140,"wires":[[]]},{"id":"069342c2726613ef","type":"function","z":"90bd251f226c084a","name":"Split String","func":"var str = msg.payload;\nvar parts = str.split(\";\");\nmsg.db = {\n db: parts[0]\n}\nmsg.memo = {\n memo: parts[1]\n}\nmsg.path = {\n path: parts[2]\n}\nreturn msg;","outputs":1,"noerr":0,"initialize":"","finalize":"","libs":[],"x":310,"y":140,"wires":[["0975bbae61bb30fe"]]},{"id":"a3a154c72e3a9230","type":"mqtt-broker","name":"","broker":"localhost","port":"1883","clientid":"","autoConnect":true,"usetls":false,"protocolVersion":"4","keepalive":"60","cleansession":true,"birthTopic":"","birthQos":"0","birthPayload":"","birthMsg":{},"closeTopic":"","closeQos":"0","closePayload":"","closeMsg":{},"willTopic":"","willQos":"0","willPayload":"","willMsg":{},"userProps":"","sessionExpiry":""},{"id":"f11c46a6.207018","type":"server","name":"Home Assistant","version":5,"addon":true,"rejectUnauthorizedCerts":true,"ha_boolean":"y|yes|true|on|home|open","connectionDelay":true,"cacheJson":true,"heartbeat":false,"heartbeatInterval":30,"areaSelector":"friendlyName","deviceSelector":"friendlyName","entitySelector":"friendlyName","statusSeparator":"at: ","statusYear":"hidden","statusMonth":"short","statusDay":"numeric","statusHourCycle":"h23","statusTimeFormat":"h:m","enableGlobalContextStore":true}]That’s it! You can now test it and as long as the MQTT settings are correct, you should get an actionable notification with the camera name, the AI information (if being used), and an image of the motion event.
Selecting live will bring you to the live view of the camera and selecting clip will bring you to a clip of the motion event.
Conclusion & Final Thoughts on Motion Notifications in BI
This tutorial looked at Blue Iris motion notifications in Home Assistant. As mentioned above, I did not create this solution and simply took portions of it from a great thread and tried to combine it all.
With that said, the process above (after fully configuring it) has been 100% accurate for me. With prior attempts, I had issues with images displaying properly but this solved it all. The notifications are actionable on Android and iOS (which wasn’t working for me previously) and overall, it works well. One other point to mention is that the motion events can be converted using a tool like Handbrake to shrink the size of the video file.