In this tutorial, we will look at how to install HandBrake in Docker. If you’re ever interested in minimizing the size of your media files, HandBrake is a great way to do it!
What is HandBrake?
HandBrake is an awesome tool that allows you to convert video files manually or by monitoring a folder. After you install HandBrake in Docker, you’ll be able to access a webpage that has all of the HandBrake settings (functions the same as the client application does).
The Docker container we’ll be using is the jlesage/handbrake container and I’ll be using Portainer to manage the installation, though Portainer is not required.
How to Install HandBrake in Docker
As mentioned above, we will look at how to install HandBrake in Docker using Portainer, however, you can use Docker Compose or a Docker Run command if you’d prefer. If you don’t have Portainer installed, you can learn how to install Portainer here on various devices.
1. Open Portainer and select Add Container.

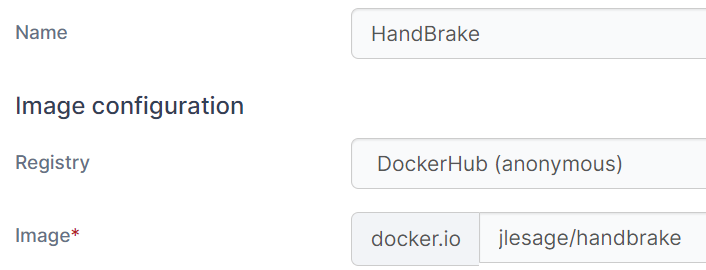
2. Give the container a Name, then add the jlesage/handbrake image.
3. Select publish a new network port in the manual network port publishing section and set the host as 5800 and the container as 5800.

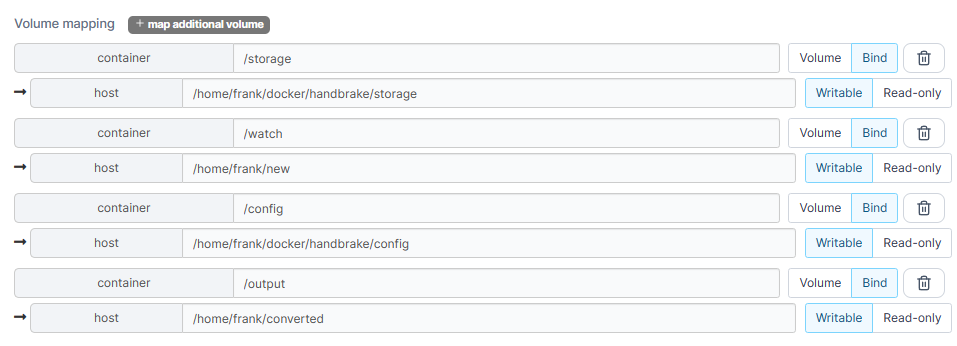
4. Scroll down to the Volumes section. There are four total volumes that can be created here, though two of them are only required if you’d like automatic video processing.
- Mount the /config path in the container section to a location on the host.
- Mount the /storage path in the container section to a location on the host.
- If you’d like to watch a folder and automatically convert files in it, map the /watch container section to a location on your host that will have videos added.
- If you will be mapping a /watch location, map a /output container folder to a location on your host that will house the converted files.
5. We will create a few environment variables, but there are a bunch of them that you can add if you’d like. Select Env in Portainer, then Add an Environment Variable. You will have to perform these steps as many times as necessary for the total number of environment variables you would like to use.
- TZ: Timezone
- SECURE_CONNECTION: 1
- VNC_PASSWORD: Password you’ll use to access the web browser version of HandBrake.
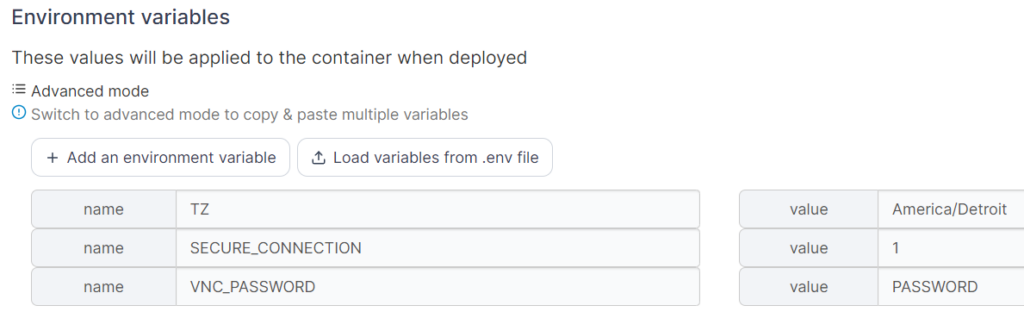
A fourth environment variable may be needed if you’re using the automated video conversion process so that you can select the correct preset to use. There are also countless other environment variables that do various things (one of my favorites is to delete the source file after it’s been converted). View the options here.
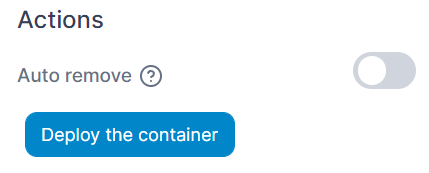
6. In the Restart Policy section, set the value to Always so the container automatically restarts.

7. Select Deploy the Container to deploy the container and access it by the IP address of your Docker host and port 5800!
https://[DOCKER_IP]:5800
8. After navigating to the IP address above, you’ll have to enter the password selected in the VNC_PASSWORD environment variable. After you do, you’ll have a fully functional version of HandBrake in a browser, running on Docker!
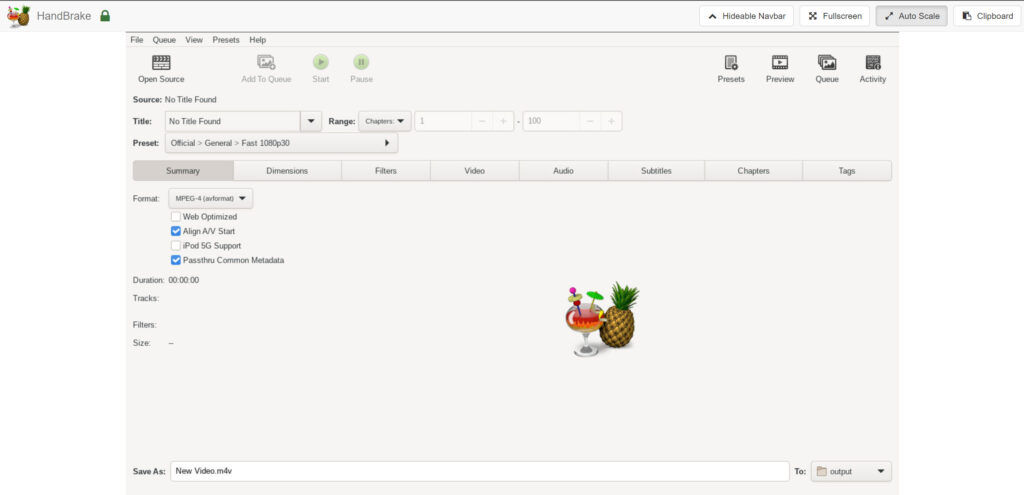
9. You can now use HandBrake or modify any of the presets! Please keep in mind that if you want the automatic conversion to use a specific preset, you must modify it in the environment variables in Portainer.
Conclusion: How to Install HandBrake in Docker
This tutorial looked at how to install HandBrake in Docker. Running HandBrake in Docker is my favorite way to run it – mainly because I can automate the process of converting videos by simply monitoring a folder and ensuring that anything inside of it gets converted. It’s a great tool for archiving video files and storing them in a drastically smaller data size. There are also specific settings that can be set which will keep almost all (if not all) of the quality of the video at a drastically smaller file size.