WG-Easy is the absolute easiest way that you can configure, manage, and maintain a WireGuard VPN server. In this article, we’ll look at why you should use it and how to configure it, so that you can set up your own VPN server in just a few minutes!
What is WG-Easy and Why Should You Use It?
In summary, WG-Easy removes all of the difficult parts of WireGuard (mainly managing the keys) and gives you a basic user interface to configure the VPN server and manage your clients.
WG-Easy can be installed on various different types of operating systems, and for the most part, works on any device that supports Docker. To install and configure it, you simply have to create a Docker container.
It is important to highlight that the kernel of the device must support WireGuard, so technically speaking, the support is broad, but it can be limiting for certain devices. With that said, the WireGuard-Easy application can be installed on TrueNAS, Unraid, or even on a device like a ZimaBoard (example shown in the video below).
How to Install and Run WG-Easy using Docker
We’ll look at the steps on how to install and run WG-Easy using Docker below, but before we do, let’s ensure the device that you’re running supports WireGuard.
Step 1: Prerequisites for Installing and Running WG-Easy
Before you can install WG-Easy, you need to ensure that you have a few things configured:
- The device you’re using must have Docker installed.
- The Linux kernel you’re using must support WireGuard. To do this, you can run the command
uname -rto confirm that the Linux Kernel is higher than 3.10. If it’s not, WireGuard will not work.

Using the screenshot above as an example, I’m running the 5.4.0-153 Linux Kernel, so WireGuard will run properly. Assuming your system fulfills both requirements above, you can move on to installing WG-Easy.
Step 2: Installing WG-Easy
The easiest way to install WG-Easy is to access the terminal of the device you’re using, and run the Docker command below, taken from the official GitHub page for WG-Easy.
NOTE: Make sure that you update the YOUR_SERVER_IP and YOUR_ADMIN_PASSWORD variables below, as well as the volume (~/.wg-easy) if you’d like to use a different location.
- YOUR_SERVER_IP: This is the External IP Address of your network or DDNS Hostname (either will work).
- YOUR_ADMIN_PASSWORD: The password you’d like to access the admin interface with. This must be hashed and added to the docker run command.
- ~/.wg-easy: This is the location on your device where the WireGuard volume will be mounted. If you’d ever like to move WG-Easy to a separate device, this folder will hold all configurations. In its simplest terms, this is an entire backup of the WireGuard VPN Server.
First, run this Docker Container and add your password.
sudo docker run --rm httpd:2.4 htpasswd -nbB admin YOUR_ADMIN_PASSWORD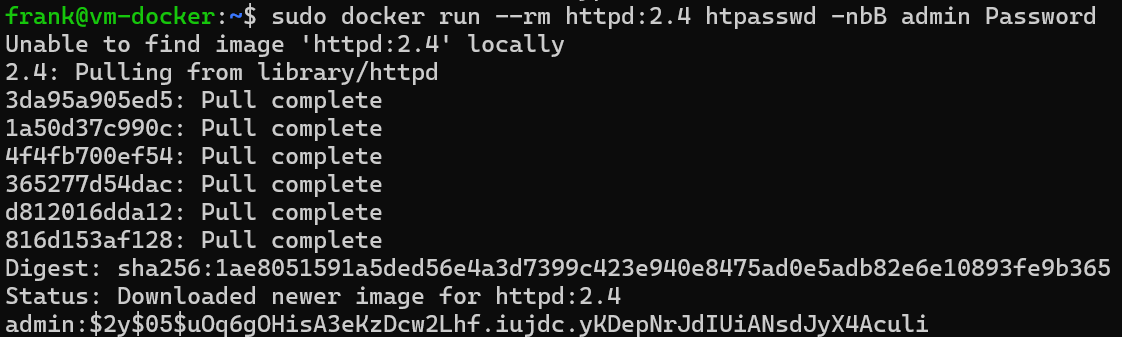
Copy everything after “admin:” and add it to the PASSWORD_HASH below.
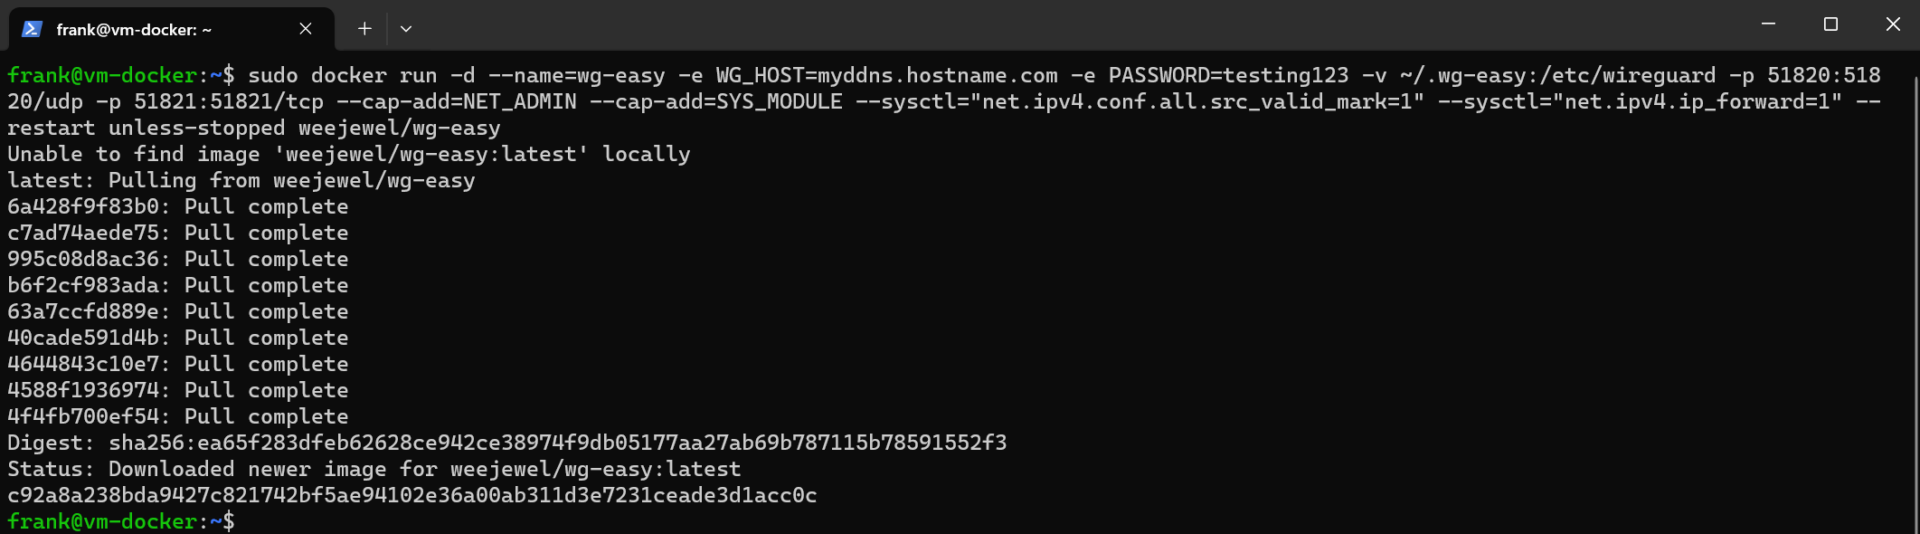
sudo docker run -d --name=wg-easy -e WG_HOST=YOUR_SERVER_IP -e PASSWORD_HASH='YOUR_ADMIN_PASSWORD_HASH' -v ~/.wg-easy:/etc/wireguard -p 51820:51820/udp -p 51821:51821/tcp --cap-add=NET_ADMIN --cap-add=SYS_MODULE --sysctl="net.ipv4.conf.all.src_valid_mark=1" --sysctl="net.ipv4.ip_forward=1" --restart unless-stopped ghcr.io/wg-easy/wg-easy:latestNOTE: The only other important section above to be aware of is the ports. By default, the WireGuard VPN server will use UDP port 51820, and the WG-Easy web interface will use TCP port 51821. If you want to change either of these, you can.
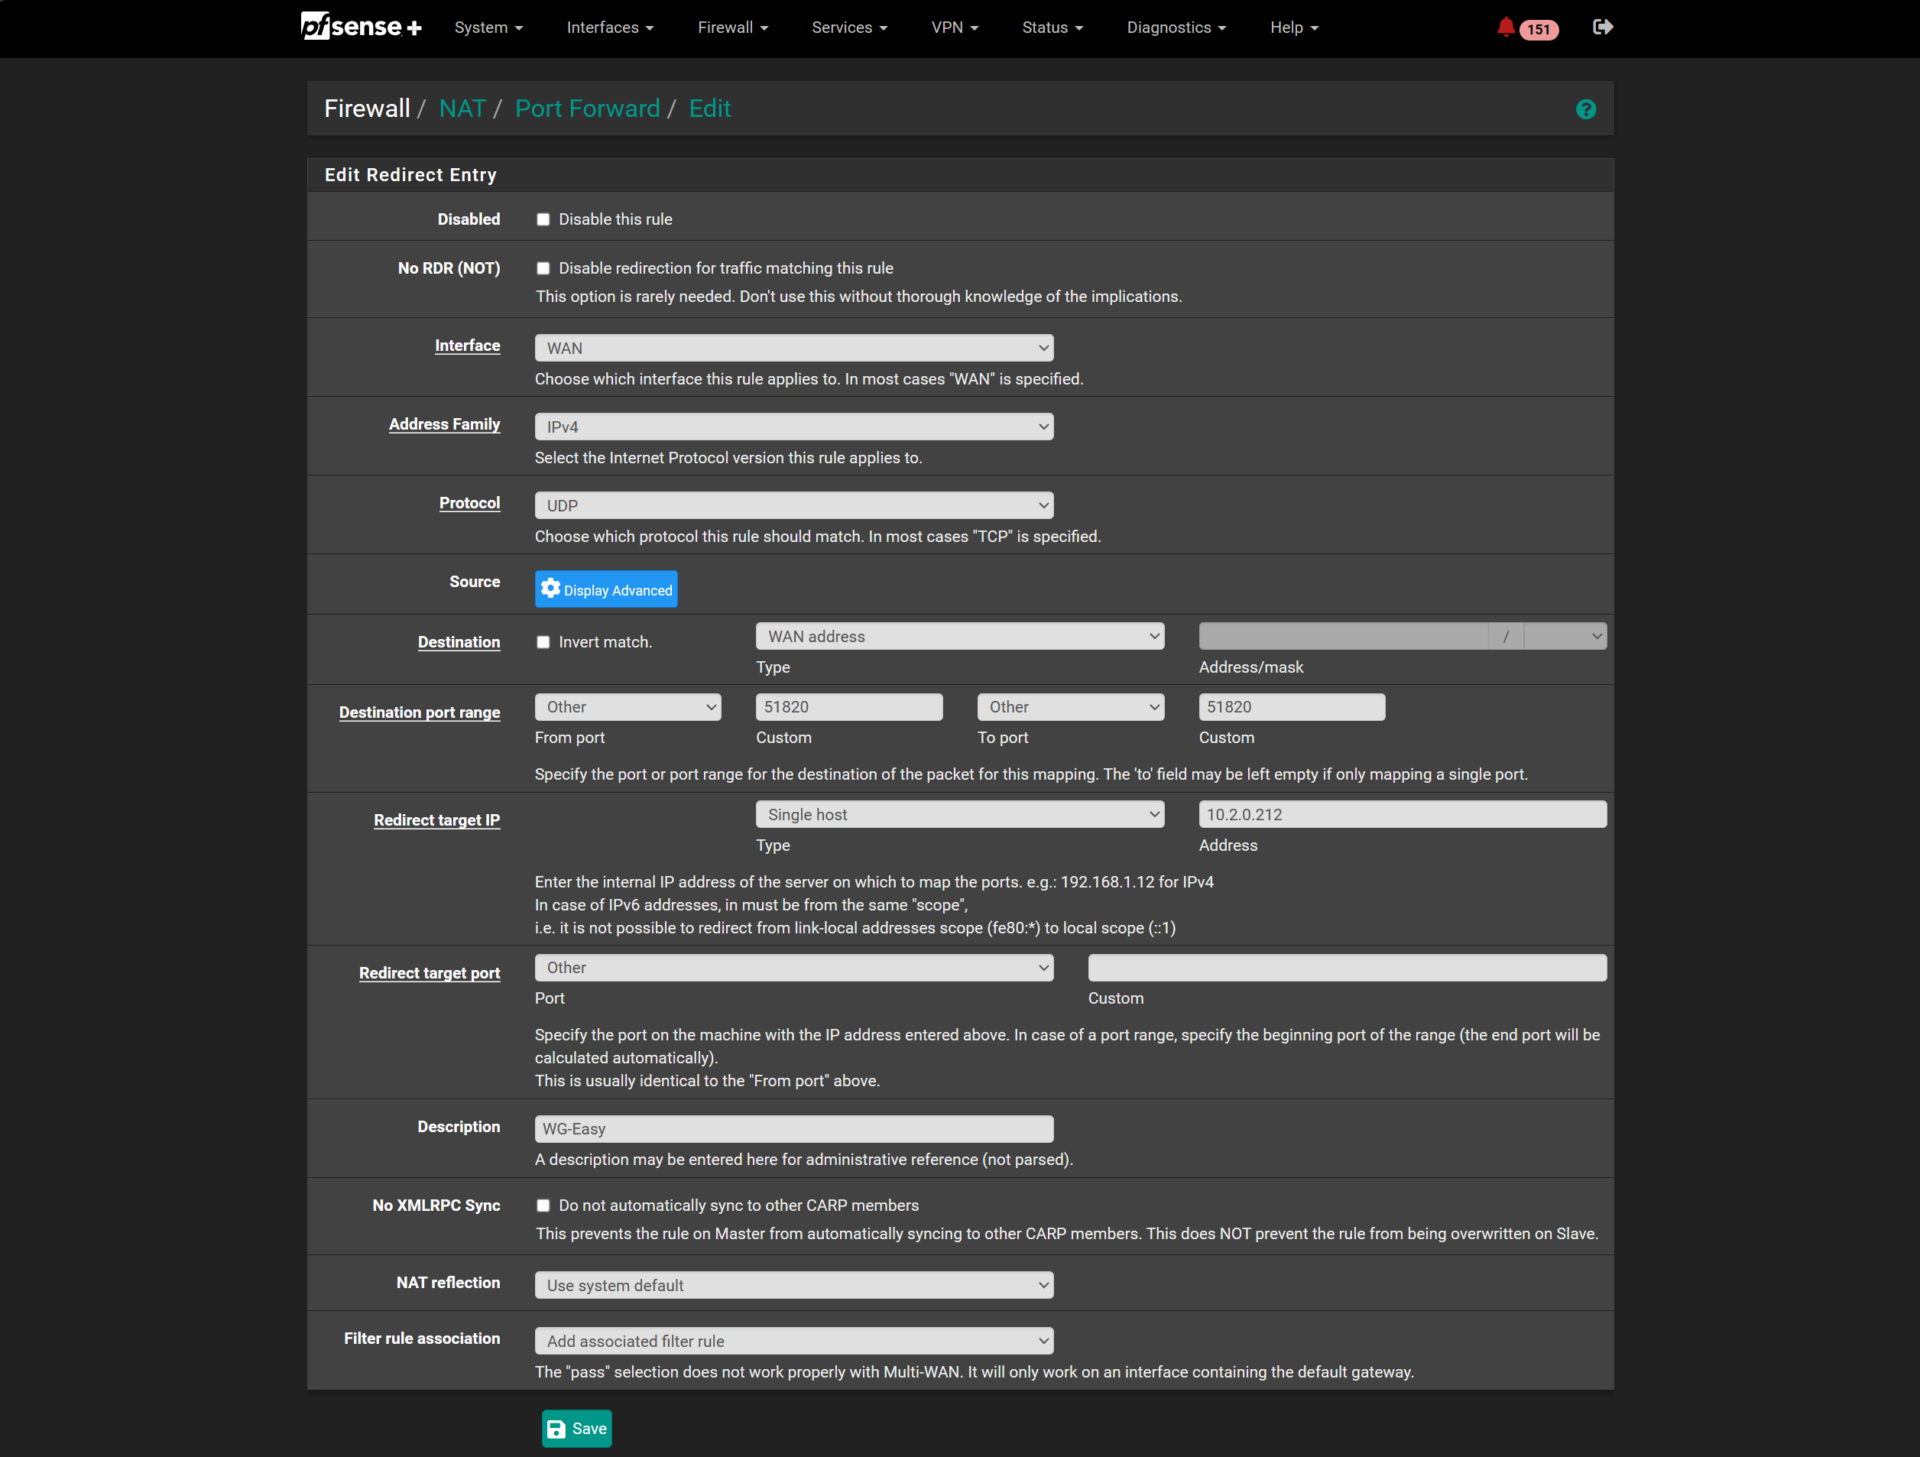
Step 3: Port Forwarding
Now that WG-Easy has been installed, the next step is to ensure that the port forwarding has been completed. This will be different on each router, but login to your router and port forward UDP Port 51820 to the IP address of your server running WG-Easy.
In this example (using pfSense), you can see that I forwarded UDP port 51820 to the IP address of my vm-docker server. After the port forwarding has been completed, you can access the web interface.
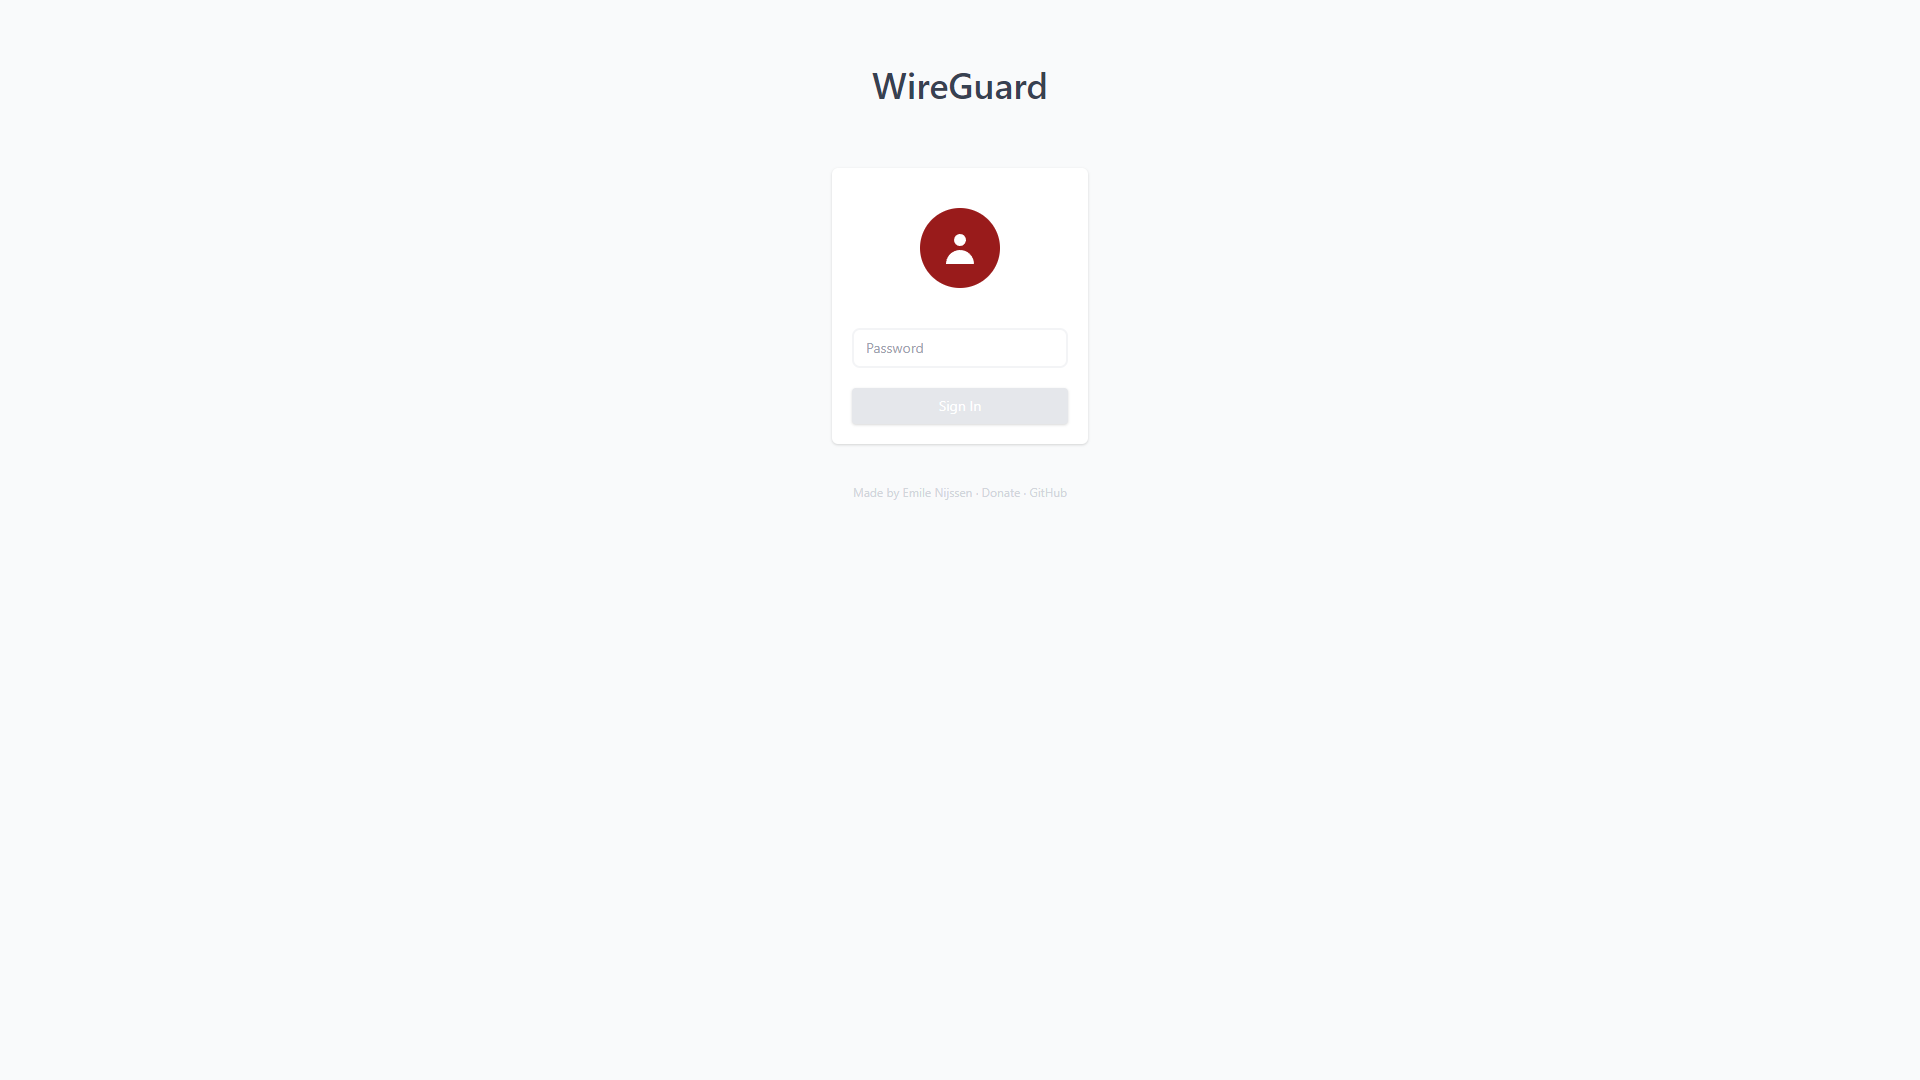
Step 4: Accessing the Web Interface for WG-Easy
At this point, you can access the WG-Easy web interface by navigating to the IP address of the Docker host and port 51821.
http://Docker_IP:51821
After you get to the login page, log in with the password specified in the Docker Run command above.
Step 5: Creating a VPN Client User
As soon as you access the web interface, select New Client to create a new VPN Client, then give the user a name.
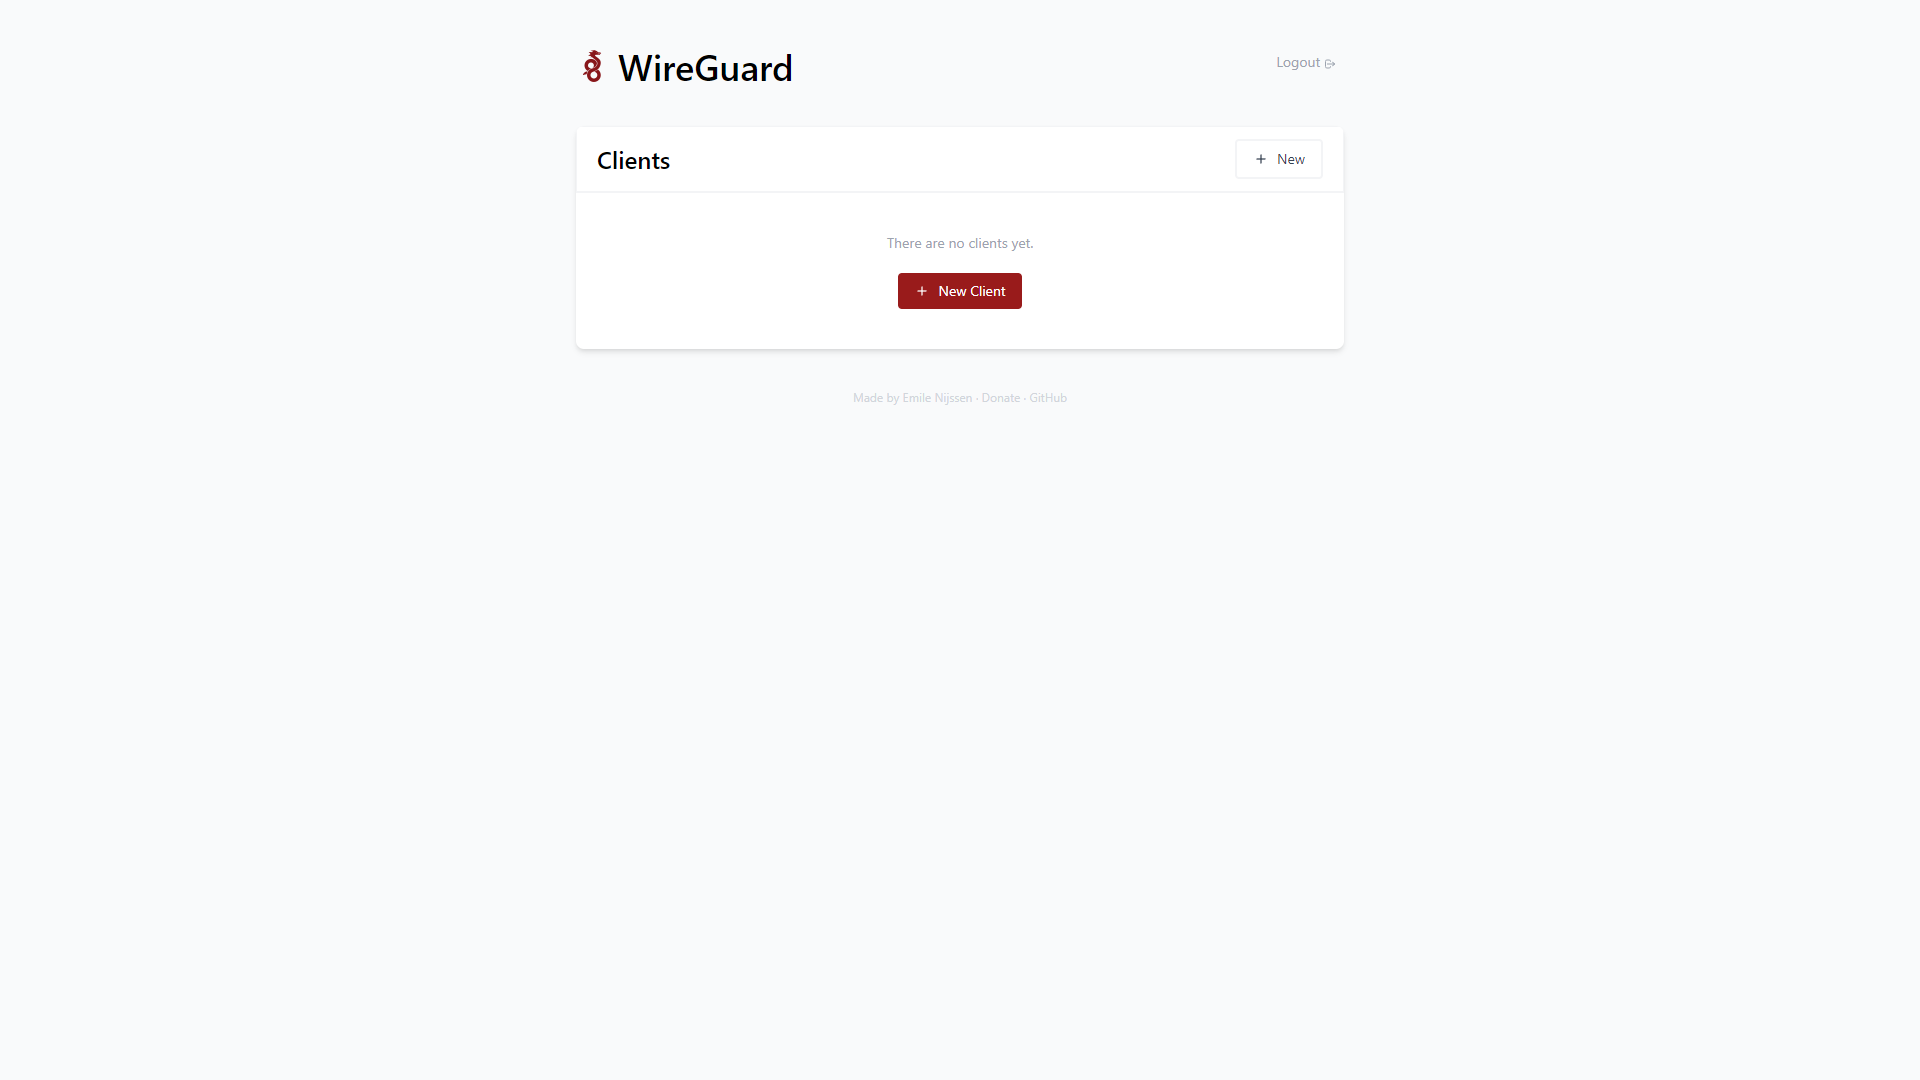
This will create the user, and you’ll be able to export the VPN configuration file by selecting the download icon, or even importing it into a mobile phone using the QR code.

Step 6: Connecting with a VPN Client
The final step is to connect and validate that WireGuard is working as expected. Using a WireGuard VPN client (mobile phone, laptop, etc) and an external network, try and connect to the VPN server.
If you’re using a mobile phone, you can import the VPN client configuration via the QR code from the WG-Easy web interface.
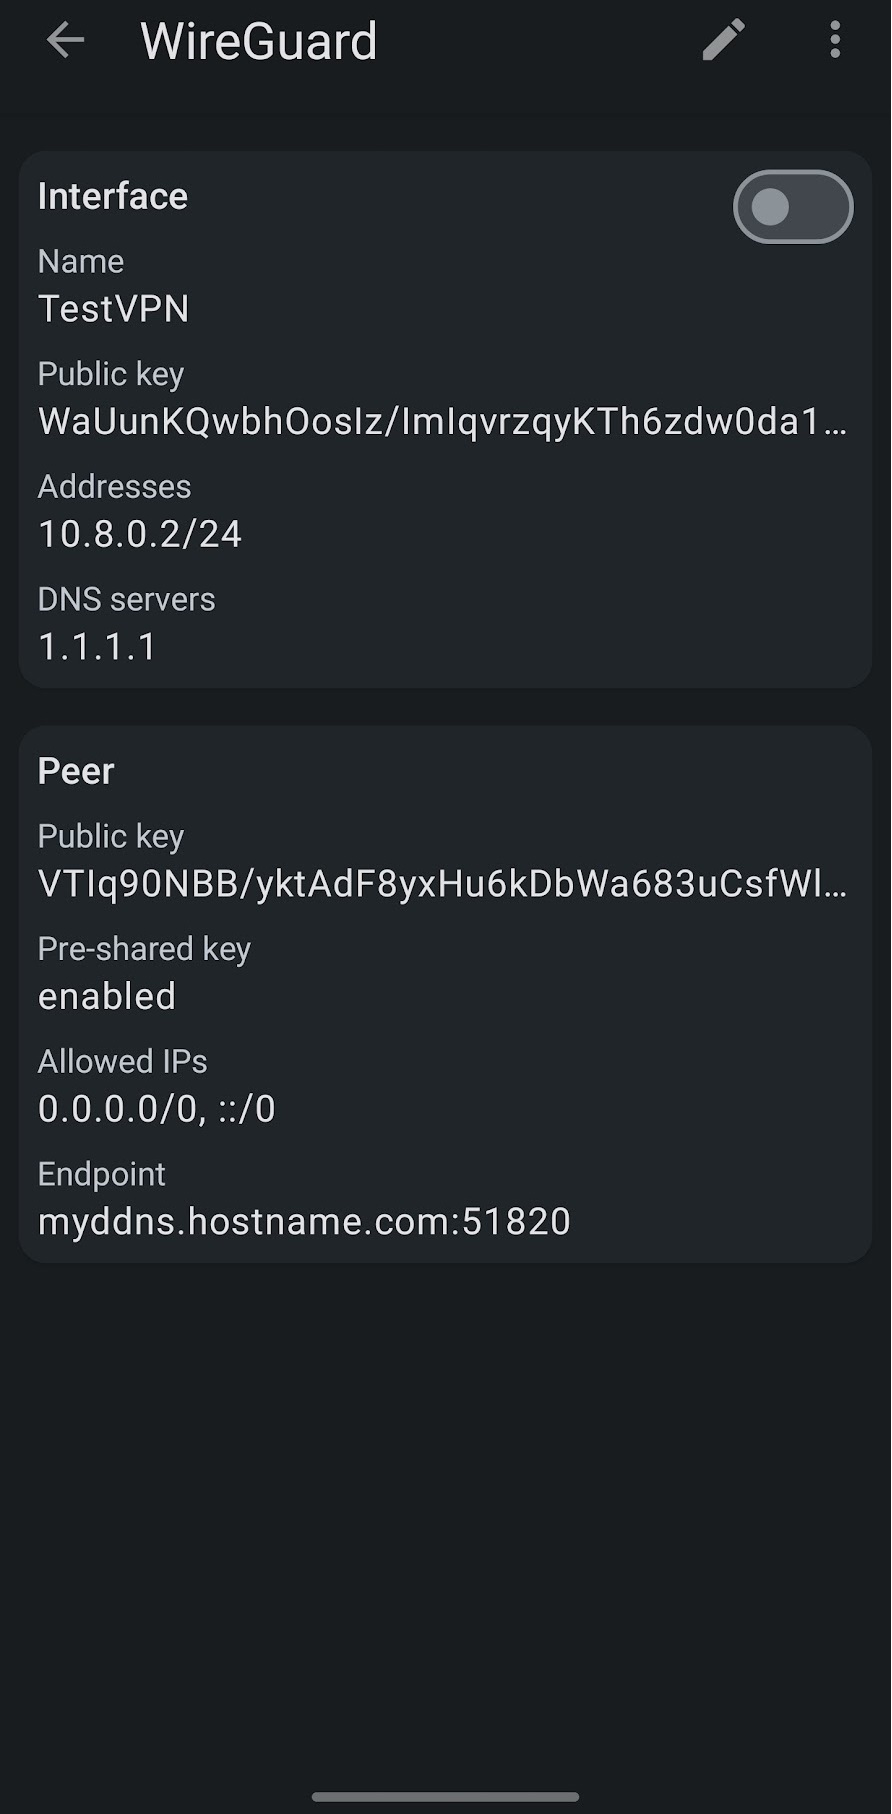
Assuming that the port forwarding was done properly and the endpoint is correct, you should be able to connect to the VPN server!
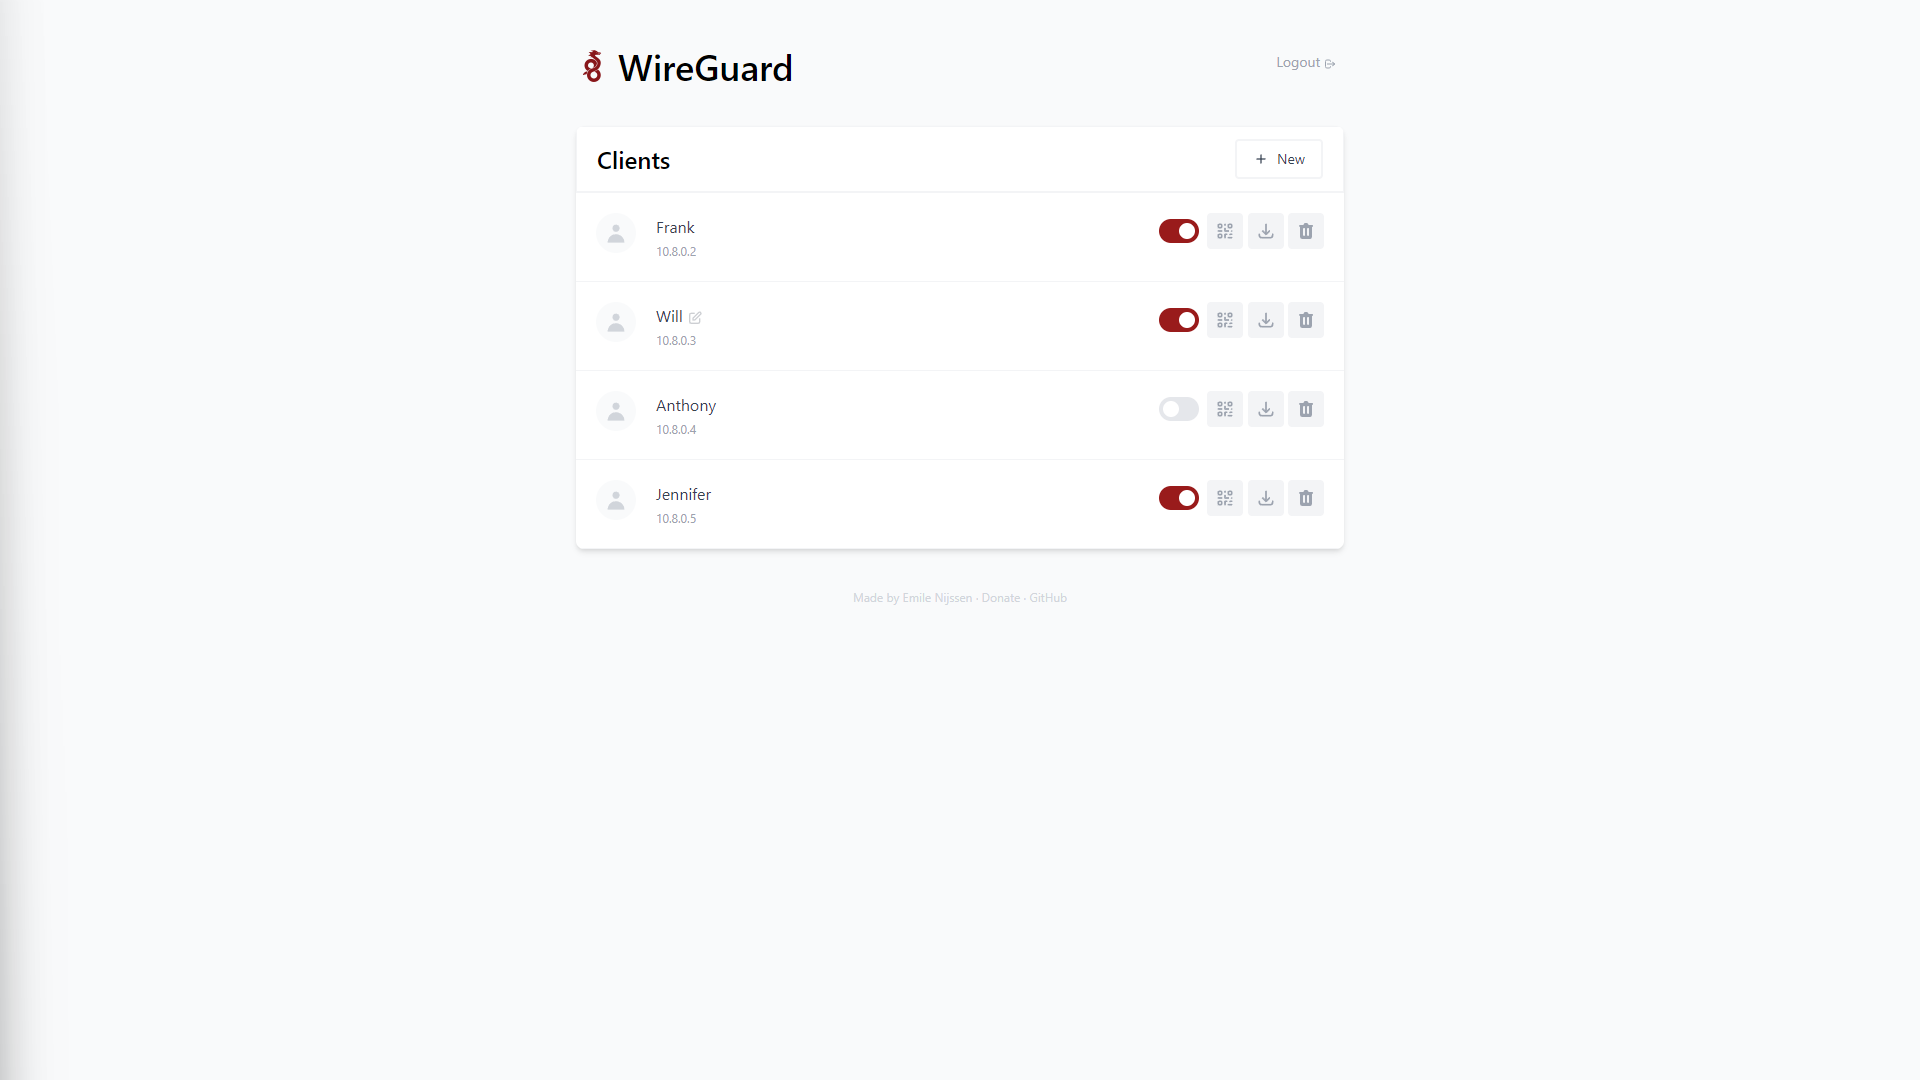
Managing VPN Clients
Managing clients in WG-Easy is super simple. If you’d like to disable clients, you can simply uncheck them and the account will be disabled.
If you’d like to take it a step further and delete the user entirely, select the trash icon next to their name and it will be deleted. You can even rename clients if you’d like by selecting the edit icon next to a name.
Troubleshooting Steps for WireGuard Easy
While the process above seems fairly straightforward, it’s important to remember that we’re configuring a full-fledged VPN server. For that reason, you might run into specific issues that need troubleshooting. Here are a few common issues that might occur:
- The most common issue is that the port forwarding wasn’t done properly. Ensure that UDP Port 51820 is properly forwarded to the internal IP address of your Docker host.
- Ensure that you’re using the correct endpoint and that it’s resolving to the correct external IP address. Since most people are going to be using a DDNS hostname, it’s important to ensure the DDNS hostname is resolving to the correct external IP address.
- Ensure that the VPN client is using the correct information.
Final Thoughts on WG-Easy
Every time I configure WireGuard-Easy, it reminds me of how simple it is. If you would like to see it for yourself, compare this with configuring WireGuard on pfSense. This can be accomplished in about 10% of the time, and the overall troubleshooting steps will be significantly easier as well if you run into any problems.
WireGuard is my favorite VPN server, and WG-Easy makes it possible for almost anyone to run and manage a VPN server.