In this tutorial, we will look at how to configure the Raspberry Pi firewall with UFW.
UFW (Uncomplicated Firewall) is an extremely easy way to set up and configure a firewall on a Raspberry Pi. Before proceeding, please be aware that you can do a lot of harm with UFW, meaning that configuring it improperly can lock you out of specific services or even the Raspberry Pi itself. For that reason, it’s in your best interest to fully understand how UFW works and apply the correct firewall rules for your specific situation.
Please keep in mind that in a worst-case scenario, you can always hook up your Raspberry Pi to a monitor and disable the firewall to gain access (if you normally run it headless).
How to Configure the Raspberry Pi Firewall with UFW
Before we get started, there are a few things that are important to understand.
- Rules are created for TCP and UDP using IPv4 and IPv6. You should only create TCP or UDP rules based on the protocol that the service is using.
- Every person will have different firewall rules depending on what you’re using your Raspberry Pi for.
- UFW is disabled by default (after installing). It must be enabled after configuration to use it.
- A deny-all rule is created by default, meaning that if an allow rule isn’t created, traffic will be denied by default. Create UFW “allow” rules for all services you’re using on your Raspberry Pi.
- If you’re using SSH to access your Raspberry Pi, the first firewall rule you create should be for the SSH port (22).
Step 1: Installing UFW
Before you’re able to use UFW, it must be installed. Run the command below on your Raspberry Pi to install UFW.
sudo apt install ufw
After UFW is installed, you can start to configure it.
Step 2: Creating UFW Rules
Now that UFW is created, we will create a few allow rules below. The rules must be created for each port and specific parameters can be included/excluded to change the rule.
A basic firewall rule to allow traffic on an individual port can be created by running the command below:
sudo ufw allow [PORT]![sudo ufw allow [PORT]](https://www.wundertech.net/wp-content/uploads/2023/01/image-83.png)
As you’ll note above, TCP and UDP rules were created automatically for IPv4 (no label) and IPv6. If you’d like to create a firewall rule for TCP or UDP only, you can modify the command:
sudo ufw allow [PORT]/[UDP/TCP]![sudo ufw allow [PORT]/[UDP/TCP]](https://www.wundertech.net/wp-content/uploads/2023/01/image-84.png)
Limiting Traffic to an IP Address or IP Subnet
If you create any of the rules above, you’ll be creating allow rules for all IP addresses by default. However, this can be limited to a specific internal or external IP address, as well as an IP subnet if desired.
sudo ufw allow from [IP OR SUBNET] to [RASPBERRY PI IP] port [PORT]This can also be limited to TCP or UDP only as shown above using a protocol argument.
sudo ufw allow from [IP OR SUBNET] proto [UDP/TCP] to [RASPBERRY PI IP] port [PORT]In the example below, 10.2.0.0/24 is the local subnet and 10.2.0.182 is the IP address of the Raspberry Pi.
![sudo ufw allow from [IP OR SUBNET] proto [UDP/TCP] to [RASPBERRY PI IP] port [PORT]](https://www.wundertech.net/wp-content/uploads/2023/01/image-85-1024x143.png)
While we are looking at allow rules above, if you’d like to deny traffic from an IP address or subnet, you can run the exact same commands as above, replacing allow with deny.
sudo ufw deny from [IP OR SUBNET] to [RASPBERRY PI IP] port [PORT]Once again, this can also be limited to TCP or UDP only as shown above using a protocol argument.
sudo ufw deny from [IP OR SUBNET] proto [UDP/TCP] to [RASPBERRY PI IP] port [PORT]![sudo ufw deny from [IP OR SUBNET] proto [UDP/TCP] to [RASPBERRY PI IP] port [PORT]](https://www.wundertech.net/wp-content/uploads/2023/01/image-86-1024x143.png)
As mentioned above, these examples are using a subnet, but you can use an individual IP address as well!
Step 3: Configuring Port Range Rules
There are situations where you might have to allow access to a range of ports (8080 through 8082 for example). You can create individual rules for each port if you’d like, but you can also create an individual rule for all ports in the range using the command below.
sudo ufw allow [PORT START]:[PORT END]/[TCP or UDP]Please note that the firewall rule must be limited to a specific protocol.
![sudo ufw allow [PORT START]:[PORT END]/[TCP or UDP]](https://www.wundertech.net/wp-content/uploads/2023/01/image-87.png)
Step 4: Creating Firewall Rule Limits
If you’ve created the firewall rules above and would like to limit the total number of connections to six within 30 seconds, you can run the command below.
This will protect against things like brute-force attacks and ensure that an individual IP address can only attempt to connect six times within 30 seconds. This is great if you’re using SSH on your Raspberry Pi.
sudo ufw limit [PORT]![sudo ufw limit [PORT]](https://www.wundertech.net/wp-content/uploads/2023/01/image-88.png)
Step 5: Enabling the UFW Raspberry Pi Firewall
We will enable the UFW firewall by running the command below, but please keep in mind that if you are using SSH and do not have an SSH allow rule, you will lock yourself out.
As mentioned above, the firewall is disabled by default. If you create rules but don’t enable the firewall, it will function as if you don’t have a firewall. If you’ve created the firewall rules needed (you can always add more later), run the command below to enable the firewall.
sudo ufw enable
Step 6: Disabling the UFW Raspberry Pi Firewall
If you’re interested in disabling the UFW firewall, you can disable it by running the command below. At times, this is necessary if you enabled it and have determined that specific services are no longer working.
sudo ufw disable
Step 7: Listing and Deleting UFW Rules
If you’d ever like to see the existing rules or delete any, you can run the command below to get a listing of all firewall rules.
sudo ufw status numbered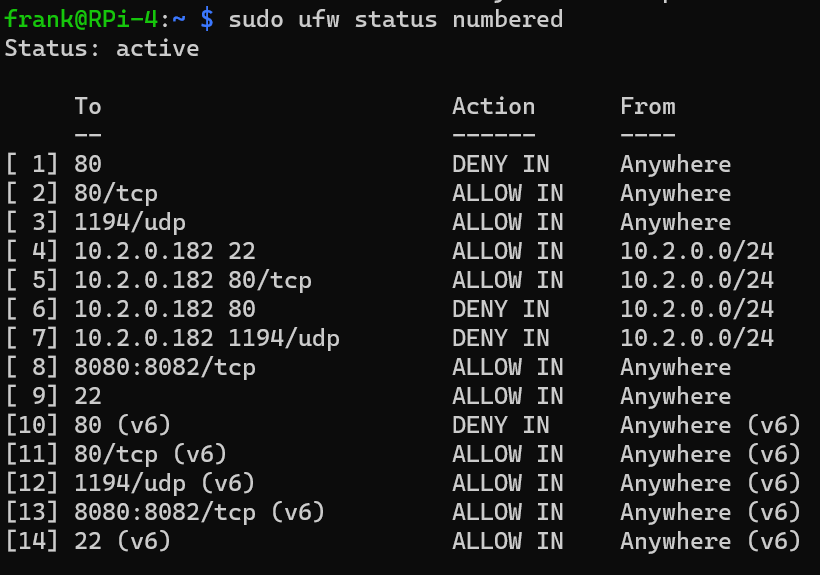
As you can see above, this is a listing of all firewall rules, the action, and where the traffic is allowed/denied from. If you’d like to delete a specific rule by using the number in the list, you can run the command below to delete a specific rule. Confirmation will be required based on the rule you’re deleting.
sudo ufw delete [NUMBER]![sudo ufw delete [NUMBER]](https://www.wundertech.net/wp-content/uploads/2023/01/image-92.png)
Conclusion on UFW Firewall Rules
This tutorial looked at how to configure the Raspberry Pi firewall with UFW. As mentioned above, this process will be entirely different for each person as most users are running different services on their Raspberry Pi. It’s in your best interest to take your time, look up the services you’re using and the ports that they’re accessed by, then create firewall rules from them. These are only a few of the most common commands as well.
It’s also in your best interest to limit the scope of the firewall rule as much as you can, meaning that allowing traffic from all IP addresses may not be the best decision based on the service you’re exposing.