Jellyfin transcoding might just be what you need to improve the overall performance of your Jellyfin server. With hardware transcoding, a GPU (generally, an iGPU) is used to convert the video on the fly to the resolution required for the individual device trying to stream it. It’s important to understand exactly what hardware transcoding does, so we’ll break it down before looking at it in terms of Jellyfin.
What is Hardware Transcoding?
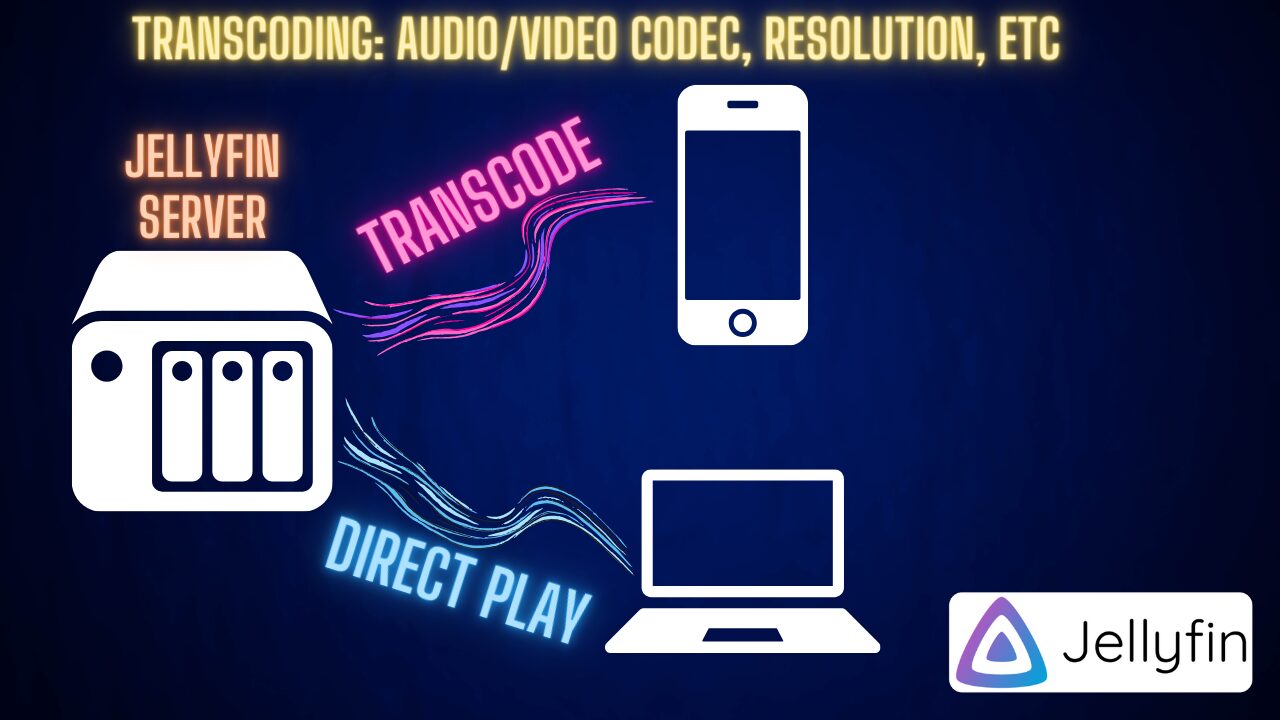
When a device attempts to play a video from a Jellyfin server, it’s attempting to play it in a specific format that it supports. Some of the common requirements could be video codecs or a specific resolution, but the important point is that the format is different than what is currently on the Jellyfin server.
In the event that the format is the same (meaning the client device supports everything the video file has on the Jellyfin server), the client can directly play the video on the server. In this scenario, no hardware transcoding is done. This does not put a strain on your server and generally, the playback will be fine on the client device.
Transcoding can also increase the performance of the total number of client devices currently being used. For example, if you’re having trouble with four total streams running concurrently, configuring hardware transcoding could be helpful in improving performance. Overall, there are multiple different types of transcoding, but generally, transcoding video is the most taxing on a server. That’s where utilizing hardware acceleration can be helpful.
Transcoding is Somewhat Confusing…
We live in a digital age where everything is streamed. When you stream a video from your favorite YouTuber, lowering the resolution generally improves the performance for a given stream. This is because the bandwidth required to stream the video is generally higher than what’s available.
Transcoding is not like that. When you stream a 4K video, it might actually stream better than a 720P video if you can direct-play it off of your server as opposed to transcoding it. This can be confusing because your ultimate goal is to stream the video at a resolution and codec capable of being played on your client’s device. If you can’t, that’s when transcoding comes in.
Jellyfin Transcoding Should Be Configured (If Applicable)
The final point to make is that you don’t need to configure hardware transcoding, but you should. Transcoding will happen whether you do or do not configure it, meaning that if a video file needs to be transcoded, it will be done automatically.
However, it will utilize the CPU as opposed to the GPU. CPUs are far less efficient in this area than GPUs and you’ll have significant improvements to overall system performance by utilizing the GPU.
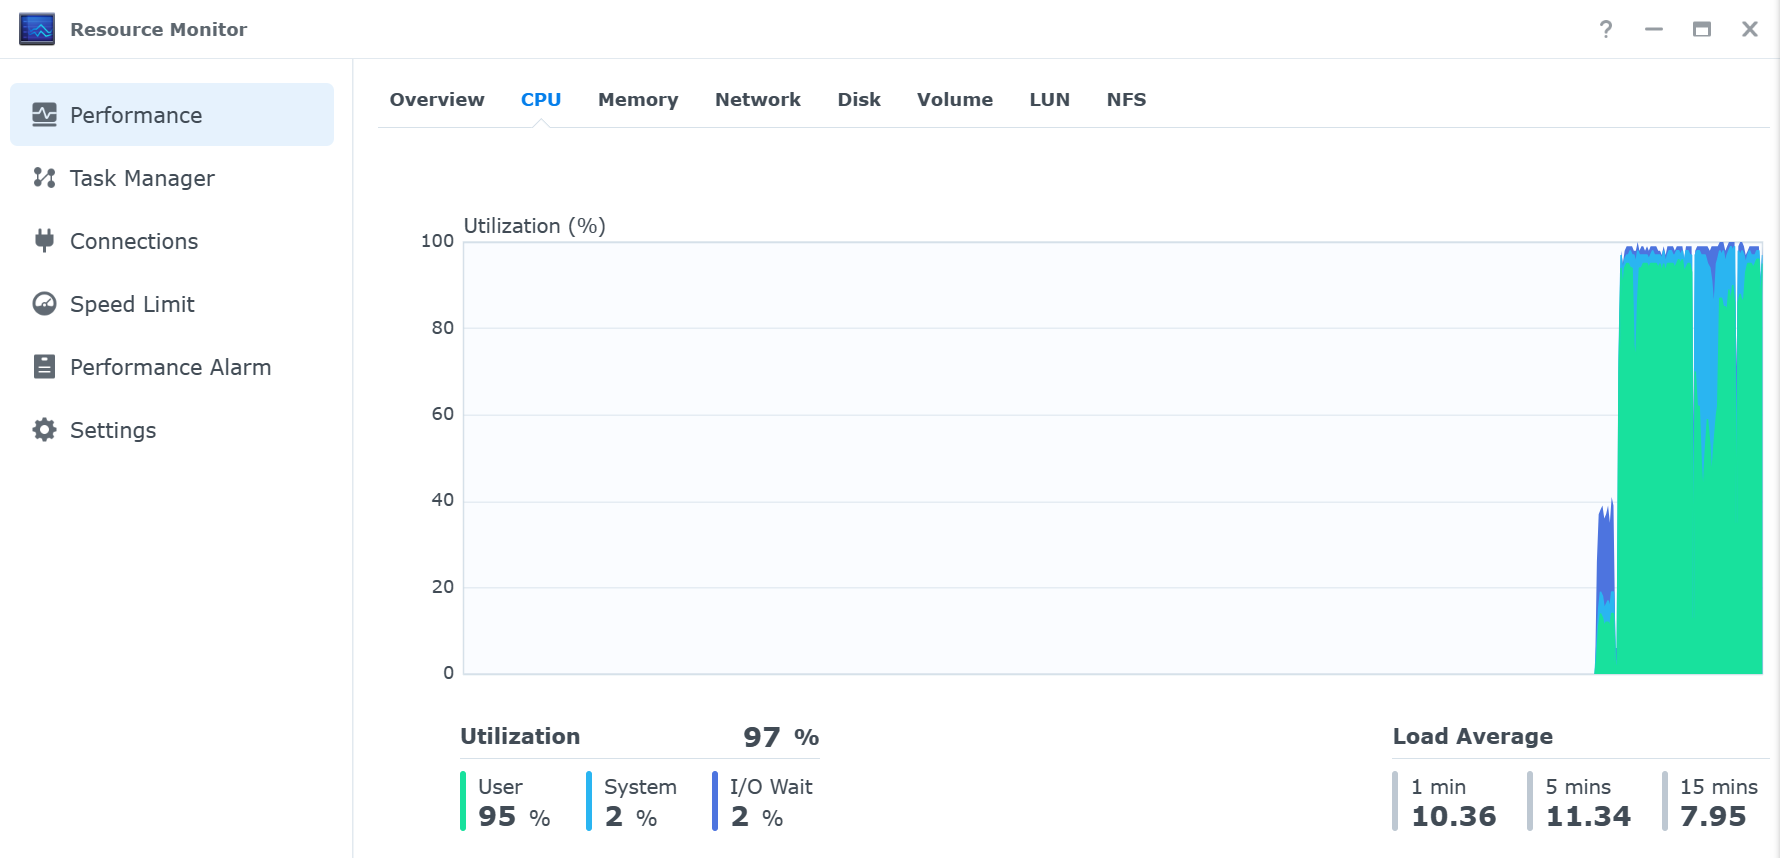
As an example, here is a screenshot of a Synology NAS attempting to transcode a video file using the CPU. You can probably see exactly when the video started transcoding…
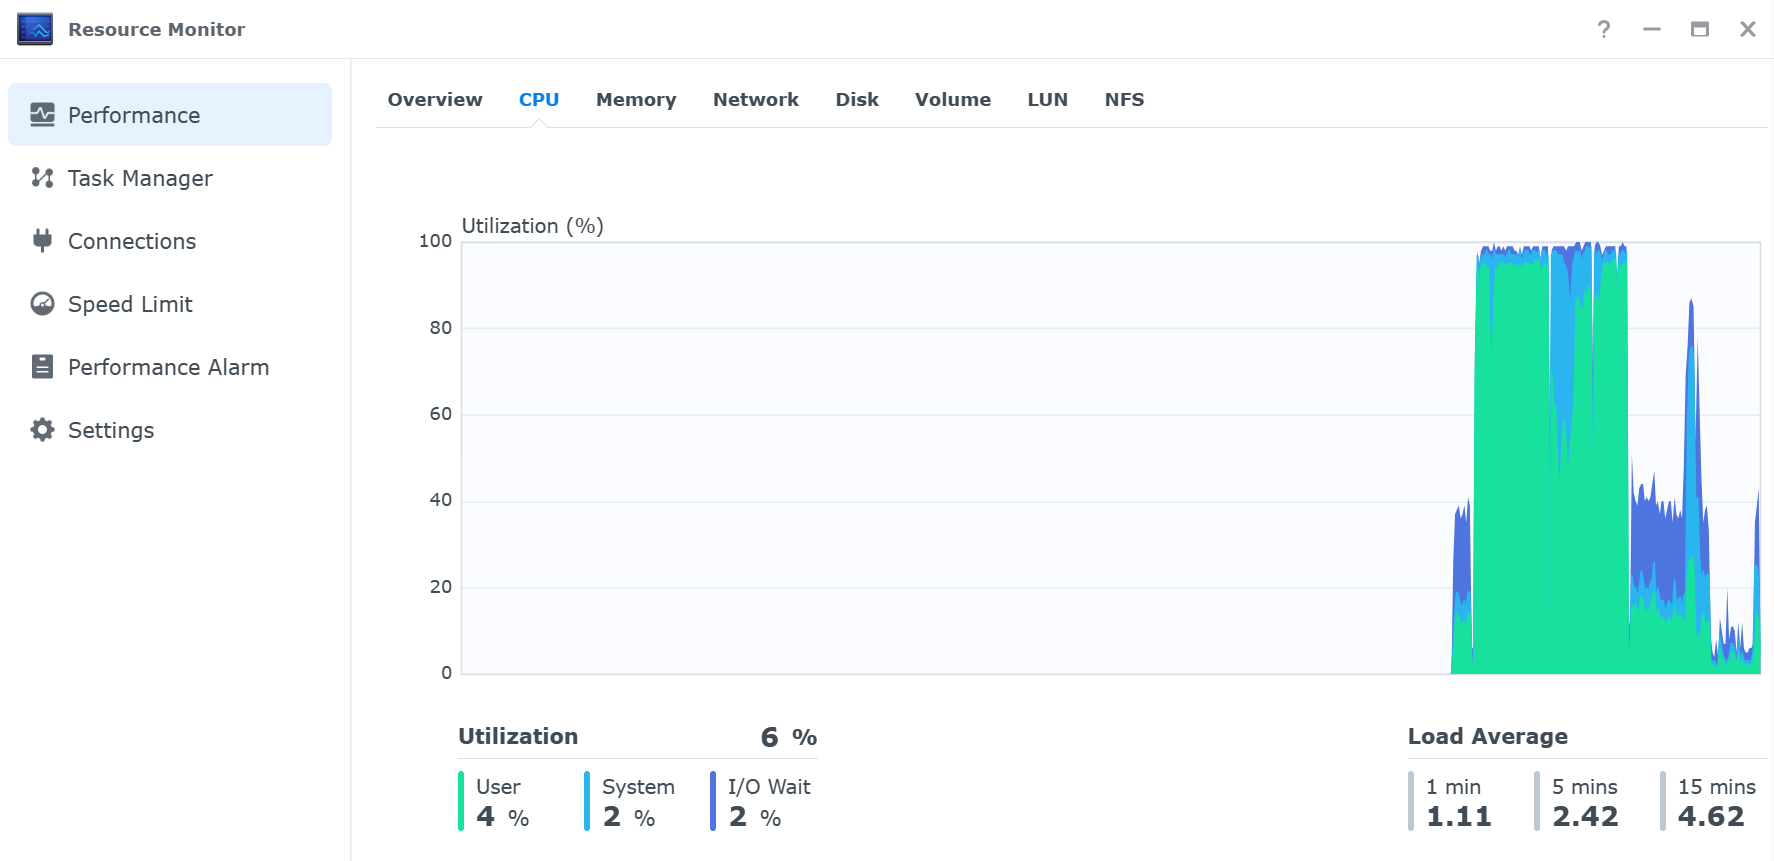
After enabling hardware transcoding, the CPU dropped back to its “normal” utilization (normal on this device is higher due to its age).
Configuring Hardware Transcoding on Jellyfin
The process for configuring hardware transcoding on Jellyfin will be different depending on the operating system available. For example, if you’re using Docker, you’ll have to pass the iGPU directly to the container. Using Jellyfin on a Synology NAS as an example, the two device lines below are what pass the iGPU to Jellyfin.
version: '3.5'
services:
  jellyfin:
    image: jellyfin/jellyfin
    container_name: jellyfin
    network_mode: 'host'
    volumes:
      - /config:/config
      - /cache:/cache
      - /Media:/Media
    restart: 'unless-stopped'
    environment:
      - TZ='America/Detroit'
    devices:
      - /dev/dri/renderD128:/dev/dri/renderD128
      - /dev/dri/card0:/dev/dri/card0
From there, configuring Jellyfin transcoding is very straightforward. Open Jellyfin, access the Settings, then select Dashboard, and finally, Playback. Under Hardware Acceleration, you’ll have to select the correct option (which will be dependent on the type of hardware you’re using, but many will be using an Intel Processor with QuickSync).
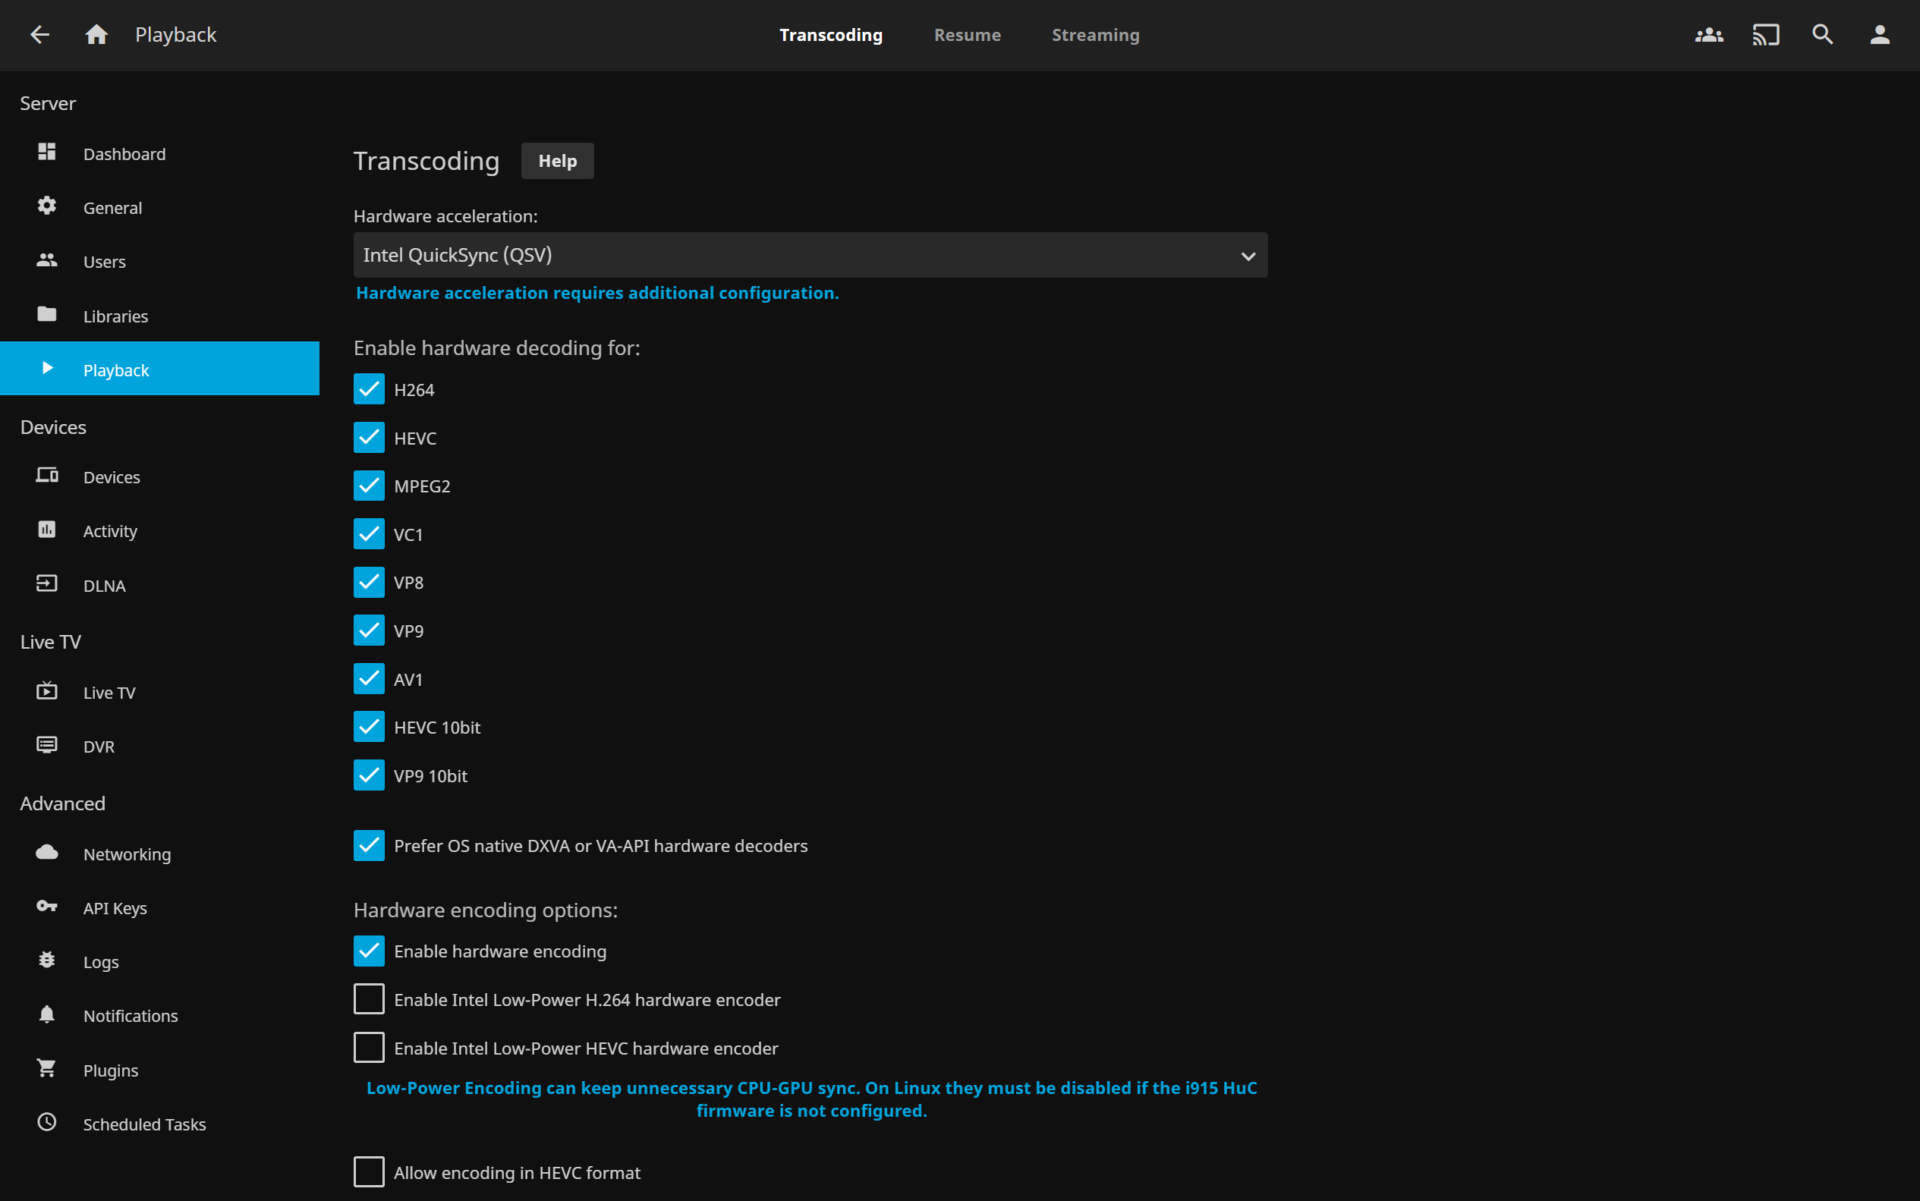
All other settings on this list can be modified based on the configuration that you’d like, but ensuring that hardware acceleration is enabled as well as the codecs that transcoding should be used on is the first step.
Testing Hardware Transcoding on Jellyfin
To test if hardware acceleration is working, select the gear in the bottom right (of a video playing), and select Playback Info. In the playback info, if you see a transcoding option, the video is being transcoded. From there, you’ll have to check the server to ensure that the GPU is being used properly.

Final Thoughts and Conclusion on Jellyfin Transcoding
Transcoding on Jellyfin is something that you should configure if you can. Simply put, it won’t do anything bad, but can actually improve the overall performance of your server. By utilizing the iGPU, your CPU will be more efficient, and video playback will be better. It’s a win-win overall and something that everyone should consider if their device is capable. It’s a quick and easy way to ensure that if transcoding is ever needed, the most efficient option will be used.