In this tutorial, we will look at how to set up iSCSI storage on Proxmox.
There are many storage locations you can connect to with Proxmox, but iSCSI is one of the fastest protocols you can use. The main reason is that iSCSI shares storage at the block level, whereas other protocols (SMB, NFS, etc.) share at the file level. For specific virtual machine processes, this is a huge difference and can result in significantly faster transfer speeds (in favor of iSCSI). We will look at how to set up iSCSI storage on Proxmox below.
How to Set Up iSCSI Storage on Proxmox
In the example below, I’ll be connecting directly to iSCSI storage on a Synology NAS. I’ll be connecting with a Proxmox Cluster, but the process will be the same if you only have an individual node.
How to Set Up iSCSI Storage on Proxmox Without CHAP Authentication
If your target is using CHAP authentication, skip down to the next section as this will only work if you’re not using CHAP authentication.
1. Select Storage under Data Center, then select Add and iSCSI.
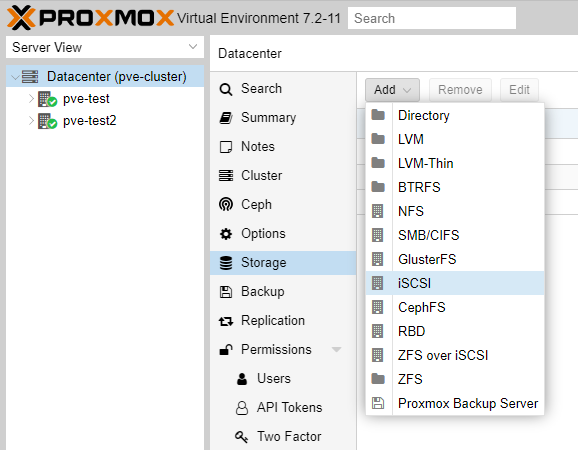
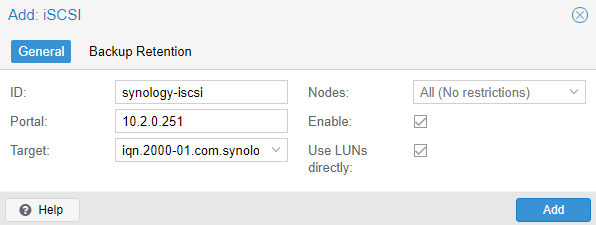
2. Enter the settings below to configure iSCSI storage on Proxmox:
- ID: Name of the storage location
- Portal: IP Address of the iSCSI Target
- Target: iSCSI Target
You can also change the Nodes section if you’d like to modify which Nodes this applies to. When you’re done making these changes, select Add.
3. After a minute or so, the iSCSI storage location will be added and you’ll be able to use it in Proxmox! If the iSCSI target isn’t using CHAP authentication and you’re still having trouble connecting, ensure the permissions are properly configured on the iSCSI target.
How to Set Up iSCSI Storage on Proxmox With CHAP Authentication
If the target you’re attempting to connect from is using CHAP authentication, you first have to configure the iSCSI config file.
1. Connect to your Proxmox shell and run the command below to edit the config file.
nano /etc/iscsi/iscsid.conf
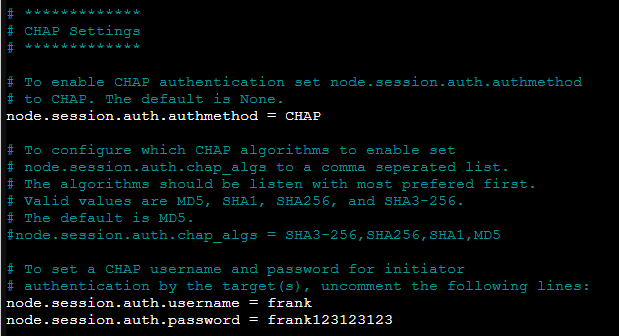
2. There are a few lines that we have to uncomment to set the CHAP configuration (remove the # symbol):
- node.session.auth.authmethod = CHAP
- node.session.auth.username = [USERNAME]
- node.session.auth.password = [PASSWORD]
When you’re done modifying these settings, select CTRL + O to save the file, the CTRL + X to exit the file.
NOTE: This assumes that the target has CHAP authentication enabled, but isn’t expecting the initiator (Proxmox) to use CHAP authentication. If you want to use it on both sides, there will be additional changes you must make in this config file.
3. Select Storage under Data Center, then select Add and iSCSI.
4. Enter the settings below to configure iSCSI storage on Proxmox:
- ID: Name of the storage location
- Portal: IP Address of the iSCSI Target
- Target: iSCSI Target
You can also change the Nodes section if you’d like to modify which Nodes this applies to. When you’re done making these changes, select Add.
5. After a minute or so, the iSCSI storage location will be added and you’ll be able to use it in Proxmox! If you’re still having trouble connecting, ensure the permissions are properly configured on the iSCSI target and the configuration file for CHAP authentication is modified properly.
Conclusion: How to Set Up iSCSI Storage on Proxmox
This tutorial looked at how to set up iSCSI storage on Proxmox. Setting up iSCSI storage is extremely easy if you’re not using CHAP authentication, but slightly more complex if you are. The configuration file that you need to modify for CHAP authentication is pretty clear but ensure that you know exactly what you’re changing or you might run into further issues.
Thanks for checking out the tutorial on how to set up iSCSI storage on Proxmox. If you have any questions on how to set up iSCSI storage on Proxmox, please leave them in the comments!