
WireGuard is one of the easiest VPN options to set up on a UniFi Cloud Gateway, and it is the VPN server I would start with for most UniFi users. It is fast, simple to manage, and built directly into the UniFi Network application, so you do not need to run WireGuard on a separate Raspberry Pi, Linux server, or firewall.
I’ve used WireGuard on several platforms over the years, including pfSense, Raspberry Pi, UniFi, and other Linux-based systems. For my own UniFi setup, I moved WireGuard to my UniFi Dream Machine Pro Max, and it has been extremely stable. The biggest benefit is that everything is managed from the same place as the rest of the network.
That said, UniFi WireGuard is not the most customizable WireGuard implementation. If you want maximum control over routing, firewall rules, peer management, or advanced VPN design, pfSense or OPNsense still gives you more flexibility. But if you already use a UniFi Cloud Gateway and want an easy remote-access VPN, this is the setup I would use first.
WireGuard is supported on UniFi Cloud Gateway devices, and in this guide, we’ll look at how to create the WireGuard VPN server, add clients, adjust the configuration file, and choose between a split tunnel and full tunnel VPN.
Disclosure: Some links below are UniFi affiliate links, which means that I earn a percentage of each sale at no cost to you. Thank you for your support.
When I Would Use WireGuard on UniFi
I would use WireGuard on UniFi if your UniFi Cloud Gateway is already your main router/firewall and you want secure remote access back into your network.
This setup makes sense if you want to:
- Access your NAS, Proxmox server, Home Assistant, Blue Iris server, UniFi controller, or internal web interfaces remotely.
- Avoid exposing internal services directly with port forwarding.
- Create separate VPN profiles for phones, laptops, tablets, or remote devices.
- Manage the VPN from the same UniFi Network interface as the rest of your network.
- Use either split tunnel or full tunnel VPN access.
I would not use this as my first choice if you need very advanced routing, complex firewall policy, or extremely granular WireGuard control. For that, I would still look at pfSense or OPNsense. But for most UniFi users, this is the cleanest remote-access VPN option.
Split Tunnel vs Full Tunnel on UniFi WireGuard
Before you create clients, it is worth deciding how you want the VPN to behave.
- Split tunnel VPN: only traffic for your selected internal networks goes through the VPN.
- Full tunnel VPN: all traffic from the client goes through the VPN.
For most home lab and remote-access use cases, I would start with a split tunnel VPN. That lets you access internal devices without forcing all web browsing, streaming, and normal internet traffic through your home connection.
A full tunnel VPN makes more sense when you are on public Wi-Fi or an untrusted network and want everything routed through your home or business network.
UniFi handles this through the client configuration. If you do not enable Remote Client Networks, the VPN will act more like a full tunnel configuration. If you define Remote Client Networks, you can control which internal networks are reachable over the VPN.
For a deeper explanation, you can read my split tunnel vs full tunnel VPN guide.
Create the WireGuard VPN Server in UniFi
To create the WireGuard VPN server, open the UniFi Network application, then go to Settings > VPN > VPN Server.
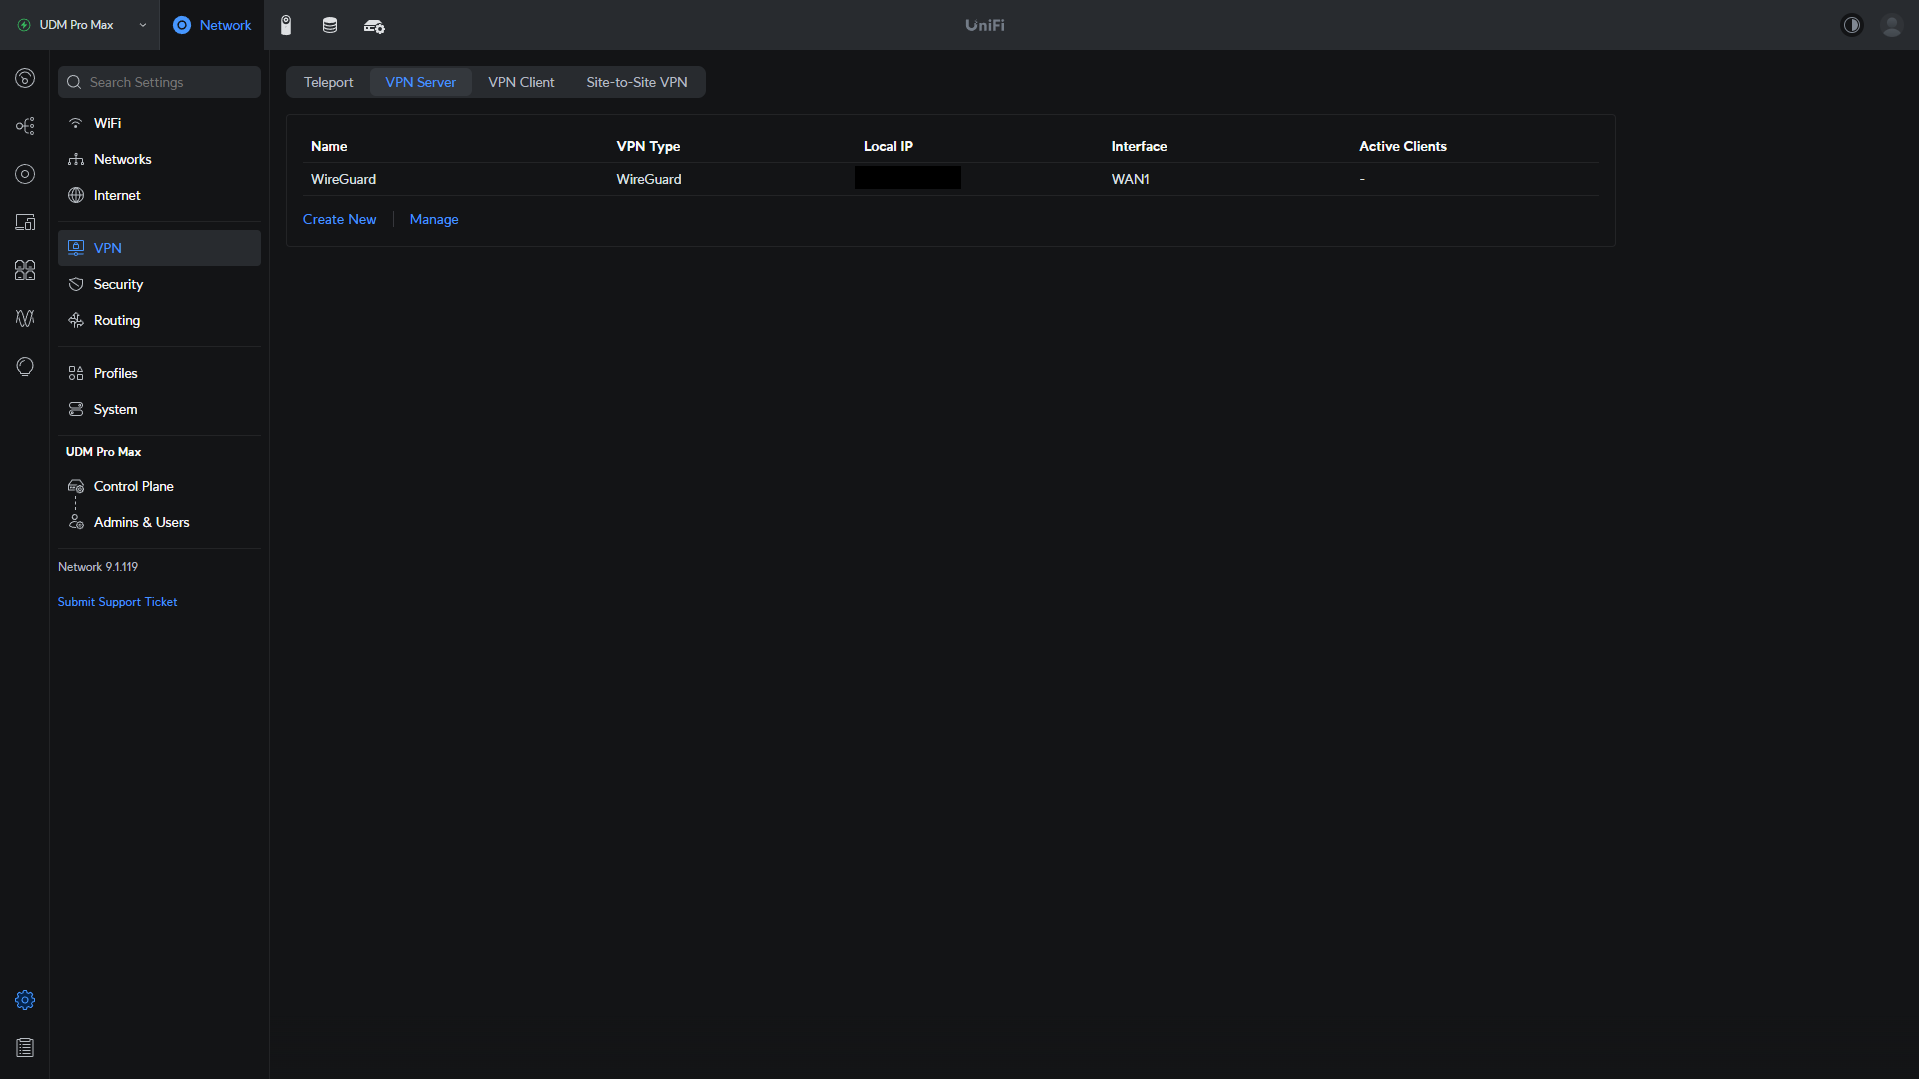
Select Create New, then choose WireGuard as the VPN type. Give the VPN server a name that makes sense, such as WireGuard or Remote Access VPN.
In most cases, I would keep the default WireGuard port:
51820This is a UDP port. You can change it if you have a reason to, but I normally keep the default unless there is a conflict or a specific network requirement.
You can also manually change the WireGuard gateway/subnet if you want. This is the subnet used by WireGuard clients when they connect. The main thing is to make sure it does not overlap with any existing LAN, VLAN, guest, camera, IoT, or VPN subnet.
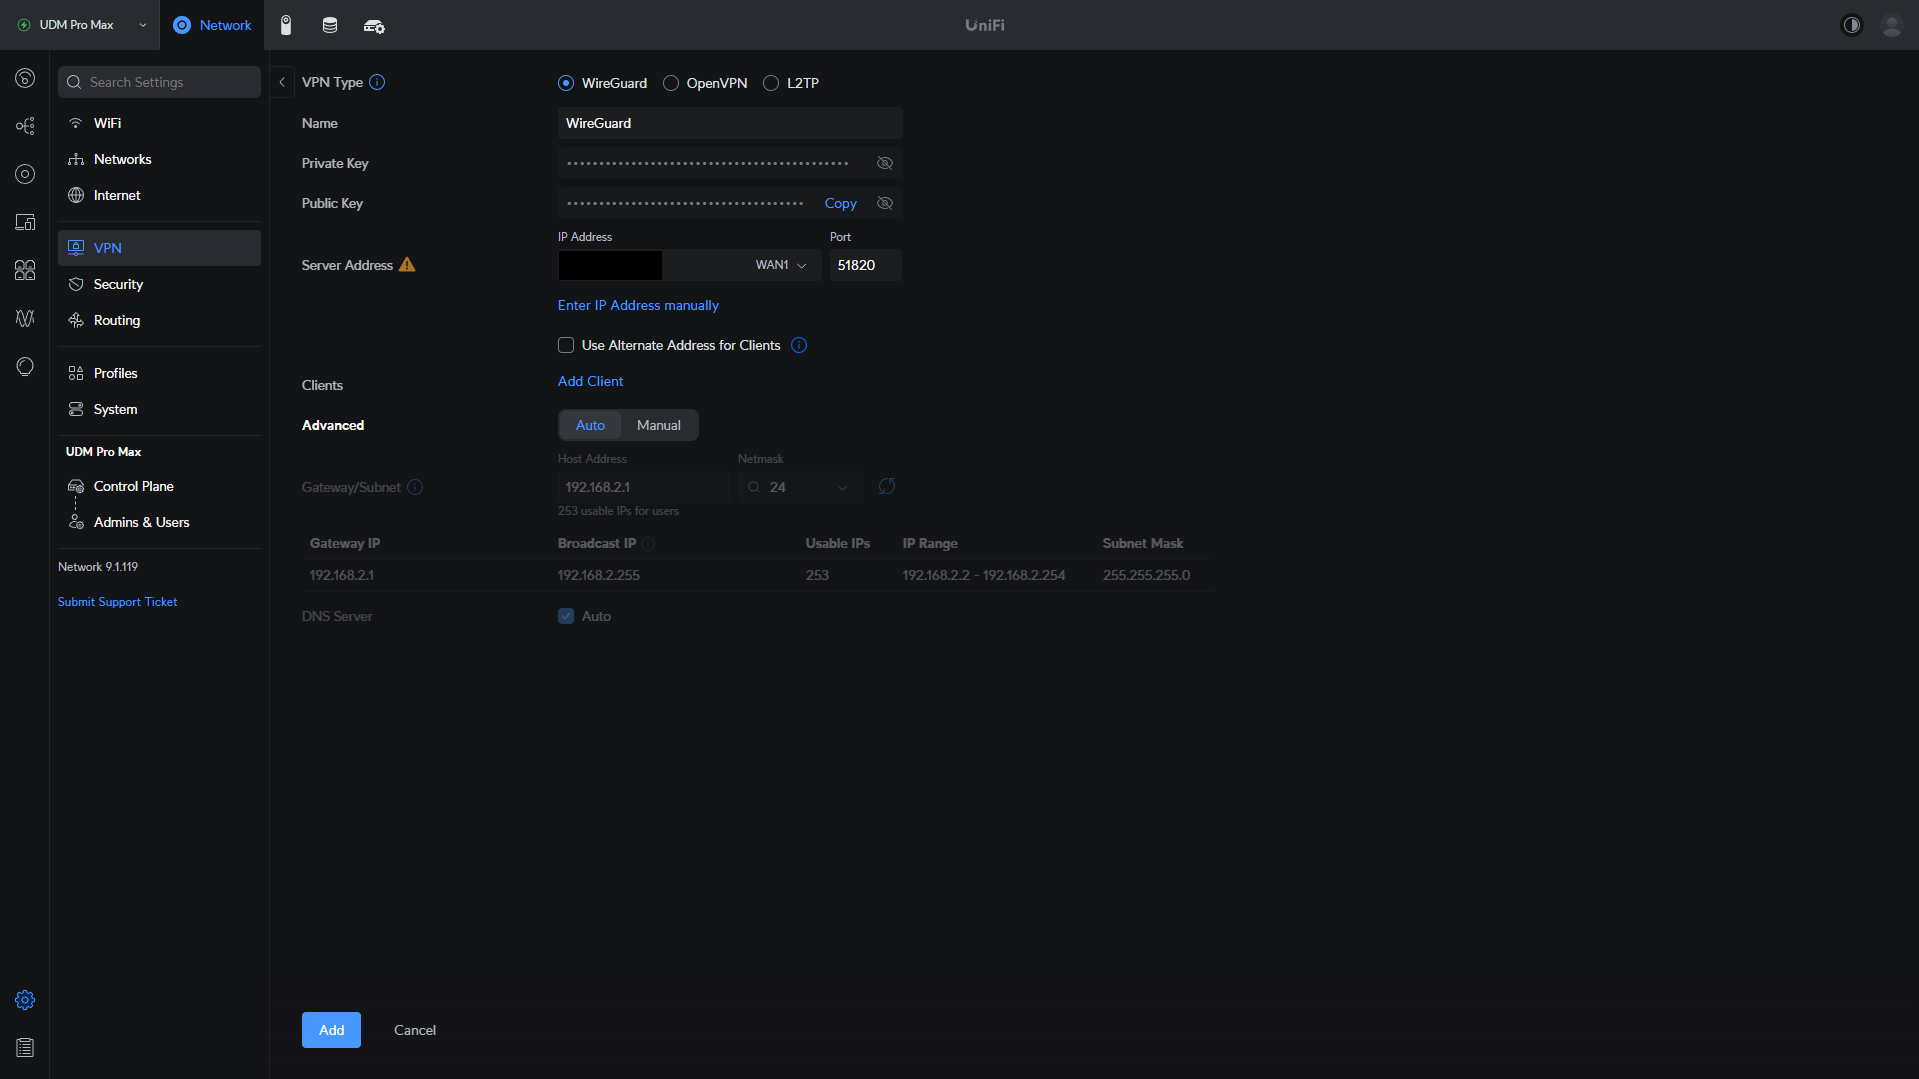
When everything looks good, select Add to create the VPN server. One of the nice things about doing this directly on a UniFi Cloud Gateway is that UniFi automatically handles the basic firewall access needed for the VPN server. You do not have to port forward WireGuard to another internal device like you would with a Raspberry Pi or separate Linux server.
Add a WireGuard Client
After the WireGuard server is created, you need to create a client for each device that will connect to the VPN.
I strongly recommend creating one client per device. Do not reuse the same WireGuard configuration on your phone, laptop, tablet, and another computer. Separate clients make it much easier to remove or rotate access later without affecting everything else.
To add a client, open the WireGuard VPN server settings, then select Add Client.
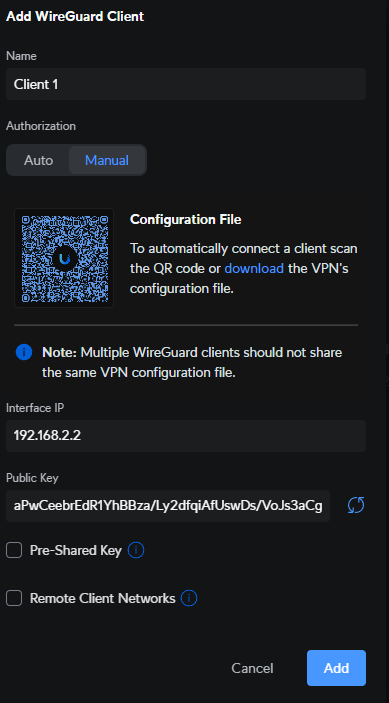
Enter a name that identifies the device clearly, such as:
Frank-iPhone
Frank-Laptop
Travel-Laptop
Work-iPad
You can either let UniFi automatically configure the client, or you can customize settings like the client IP address, pre-shared key, and remote client networks.
I generally like using a pre-shared key. WireGuard already uses public/private keys, but the pre-shared key adds another layer to the connection. It is not something I would skip unless I had a specific reason.
Remote Client Networks
The Remote Client Networks setting is one of the most important parts of the UniFi WireGuard setup because it controls what the VPN client can access.
If you want a split tunnel VPN, enable Remote Client Networks and select the internal networks the client should be able to reach. For example, you might allow access to your main LAN and server VLAN, but not your IoT or camera VLAN.
This is usually how I would configure it. Give the VPN client access to what it actually needs, not the entire network by default.
If you do not enable Remote Client Networks, the configuration may behave more like a full tunnel VPN, where all client traffic is routed through the VPN.
The main thing is to be intentional. If the goal is remote access to a NAS or server VLAN, split tunnel is usually cleaner. If the goal is securing all traffic on public Wi-Fi, full tunnel can make sense.
Download the WireGuard Configuration
After the client settings are configured, download the WireGuard configuration file. You can import this file into the WireGuard app on Windows, macOS, Linux, iOS, or Android.
If you open the configuration file in a text editor, it will look similar to this:
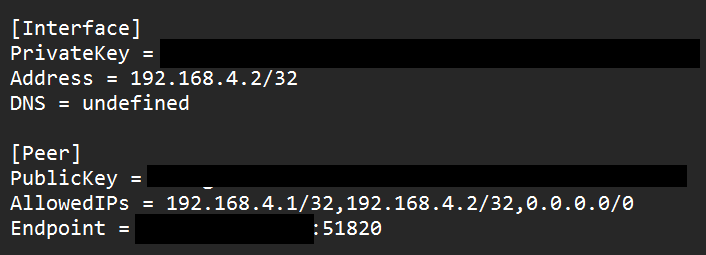
There are a few fields I would check before importing it:
- DNS: By default, this may use your UniFi Cloud Gateway. You can change it to another internal DNS server or a public DNS server if needed.
- Endpoint: This is the public IP or hostname the client connects to.
- AllowedIPs: This determines whether the client is using split tunnel or full tunnel routing.
If your ISP gives you a dynamic public IP address, I would use a DDNS hostname instead of the raw public IP address. That way, if your ISP changes your IP, the VPN profile does not break. If you need help setting that up, you can follow my Dynamic DNS on UniFi Cloud Gateways guide.
AllowedIPs: Split Tunnel or Full Tunnel
The AllowedIPs value in the WireGuard client configuration controls how traffic is routed through the VPN.
For a full tunnel VPN, AllowedIPs usually looks like this:
AllowedIPs = 0.0.0.0/0This sends all IPv4 traffic through the VPN. If IPv6 is being used, you may also see:
AllowedIPs = 0.0.0.0/0, ::/0For a split tunnel VPN, AllowedIPs should include only the networks you want to reach through the VPN. For example:
AllowedIPs = 192.168.1.0/24, 192.168.20.0/24You may also include the WireGuard VPN subnet if needed. The exact values depend on your network.
For most UniFi home lab setups, I would start with split tunnel and only include the LAN/VLANs the remote device actually needs to access. If you later decide you want full tunnel for travel, create a separate full tunnel client profile instead of trying to make one profile do everything.
Import the WireGuard Profile
Install the WireGuard app on the client device, then import the configuration file you downloaded from UniFi.
You can download WireGuard here:
After importing the profile, connect to the VPN from an external network. Do not only test from inside your own Wi-Fi network and assume it works. Use cellular data or another external network.
Test the UniFi WireGuard VPN
After connecting, test a few things:
- Can you access your UniFi Cloud Gateway or internal gateway IP?
- Can you access your NAS, Proxmox server, Home Assistant, Blue Iris server, or other internal services?
- If you configured split tunnel, does normal internet browsing still use the local network?
- If you configured full tunnel, does your public IP change to your home/business IP?
- Can you resolve internal hostnames if you use local DNS?
If the VPN connects but you cannot access internal devices, I would check Remote Client Networks, AllowedIPs, DNS, and firewall rules first.
If the VPN does not connect at all, check the endpoint, public IP/DDNS hostname, WireGuard port, and whether the UniFi Cloud Gateway is actually reachable from the internet.
What I Would Avoid
There are a few things I would avoid when setting up WireGuard on UniFi:
- Do not reuse one client profile on multiple devices. Create one client per device so you can revoke access cleanly later.
- Do not assume full tunnel is always better. For normal remote access, split tunnel is usually cleaner and faster.
- Do not forget DDNS if your public IP changes. A dynamic IP can break your VPN profile later.
- Do not give VPN clients access to every VLAN unless they need it. Limit access to the networks the client actually needs.
- Do not test only from inside your own LAN. Test from cellular or another external network.
- Do not expose internal services with port forwarding if WireGuard solves the problem. VPN access is usually cleaner and safer.
- Do not forget to remove old clients. If a device is lost, replaced, or no longer used, remove the old WireGuard client.
The best UniFi WireGuard setups are usually simple: one client per device, split tunnel for normal remote access, full tunnel only when needed, DDNS if your IP changes, and access limited to the networks the client actually needs.
Final Thoughts
WireGuard on UniFi Cloud Gateways is one of the easiest VPN setups I’ve used. It does not give you the same level of control as pfSense or OPNsense, but for most UniFi users, that is not necessarily a problem. The setup is simple, the performance is good, and everything is managed from the UniFi Network application.
For most people, I would start with a split tunnel WireGuard profile that gives access only to the internal networks you need. If you travel often or use public Wi-Fi, create a separate full tunnel profile as well.
The biggest things are to create separate clients for each device, use DDNS if your public IP changes, test from an external network, and be intentional about which networks the VPN client can access. Once that is configured, UniFi WireGuard is a clean and reliable way to access your network remotely without exposing individual services to the internet.