In this tutorial, we will look at how to use Rsync to restore backed up files from a Synology NAS to a Linux PC.
Now…technically, you can substitute the source in this tutorial (Synology NAS) and replace it with any location you’d like, but following the trend of our last two tutorials, we will be restoring the files from a Synology NAS.
Before we get started, I want to highlight exactly what Rsync is. Rsync is a utility that transfers files from one file location to another. Initial backups are long as every individual file is backed up, but future backups are incremental and significantly quicker. If there’s one thing you need to know, it’s that Rsync is NOT something you should or can use for bare-metal restores. Rsync is a great utility for backing up your home folder and personal files but will be a poor option for certain scenarios. This does not mean it’s impossible to back up other folders/files (as you can backup the entire root directory and should in many cases). It just means that restoring the entire root directory is not an option as you risk major file/folder permission issues. However, restoring individual files/folders is a valid use-case.
If you missed the first two parts of this tutorial, please check them out below.
PART 1: How to Backup a Linux PC to a Synology NAS using Rsync!
PART 2: Use SSH Keys to Automatically Backup a Linux PC to a Synology NAS!
Use Rsync to Restore Backed up Files from a Synology NAS – Instructions
1. We are not going to go through the process of using Rsync to back up our Linux PC (link above), but for your reference, this is the command that I used to back up my home folder.
rsync -ax ~ [USERNAME]@[IP ADDRESS]:/[VOLUME]/Backups/[PC NAME]

NOTE: It’s important to know the format of the command above, so let’s break it down:
- Rsync -ax : This is the Rsync utility and command line parameters.
- ~ : This is the SOURCE directory. Meaning the directory that you will be backing up. If you’d like to see what exists here, you can “cd” into it (cd ~), and then “ls” to see the folders/files.
- [USERNAME]@[IP ADDRESS]:/[VOLUME]/Backups/[PC NAME] : This is the location of the Synology NAS’s folder that we are backing our files up to.
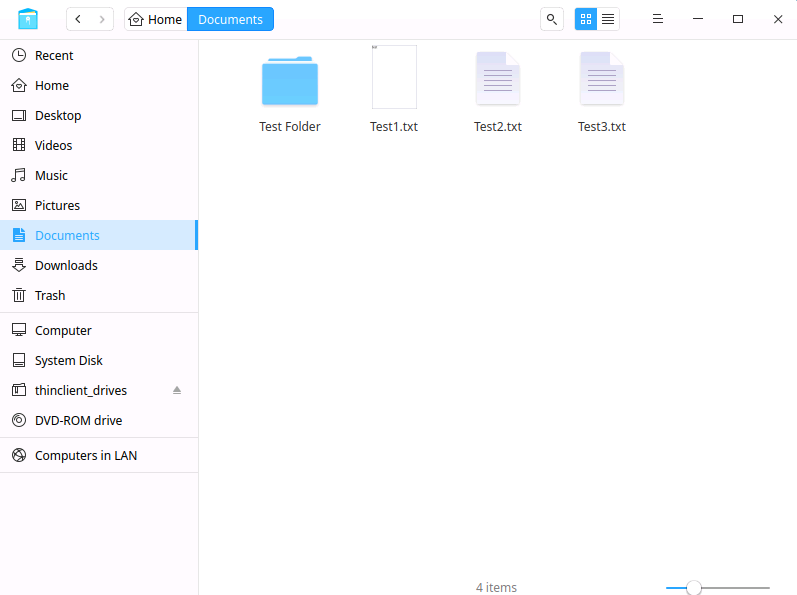
2. After the Rsync command finishes and all files have been backed up, view the folder location on your Synology NAS (or wherever you’re storing it). You’ll note that Rsync added the home folder of my user account (which is where all my files are stored). This is important to note when we create our “restore” Rsync command.

3. At this point, you need to determine what you’d like to restore. If you lost a folder/file, you most likely won’t restore an entire home folder, but in this tutorial, I am going to restore the entire home folder. Run the command below to restore the entire home folder.
rsync -avnx [USERNAME]@[IP ADDRESS]:/[VOLUME]/Backups/[PC NAME]/[USERNAME]/ ~

NOTE: The last “/” IS VERY IMPORTANT! Without it, you will restore a folder to your home directory that is your username with all of your files inside of it. Adding the “/” to the end will overwrite the existing home directory files/folders.
4. If the test appears correct and the files/folders will be restored properly, remove the “n” parameter, and execute the command.
rsync -avx [USERNAME]@[IP ADDRESS]:/[VOLUME]/Backups/[PC NAME]/[USERNAME]/ ~

5. Your files in your home directory should now be restored!
Conclusion
Rsync is a great tool that gives you a ton of flexibility. I use Rsync to backup my entire root directory which ensures that I have everything backed up properly. Then, I will run multiple Rsync commands to move files/folders from my Synology NAS to my newly installed Linux operating system. Sadly, running a basic command to overwrite the entire root directory on a fresh install doesn’t work as your entire permission hierarchy will be destroyed, but having the data is the important part.
In my next tutorial, I am going to go over how to install Veeam for Linux, configure it, and do a bare-metal restore! This is a better option for people who want or need to do bare-metal restores.