Today we are going to look at how to use Docker on a Synology NAS.
The majority of the explanation on how to use Docker on a Synology NAS will be done through the video above, but it’s important to have certain points documented. The Docker implementation on a Synology NAS is very powerful when you understand it, but it’s slightly confusing when you initially get started.
While I create specific tutorials that will guide you through the implementation of specific containers, my goal is to give you the knowledge needed to implement whatever container you’d like.
DOCKER HAS BEEN UPDATED TO A NEW USER INTERFACE AND IS NOW CALLED CONTAINER MANAGER! The settings are the exact same, though they’re in different locations. Please use this article on Container Manager moving forward!
How to use Docker on a Synology NAS
We will look at how to use Docker on a Synology NAS below by exploring almost all of the options that Docker provides.
1. Volume Mapping
When creating a Docker container, the important data must be mapped to a local folder. This is completed in the Volume section, where a local folder is mapped to a container folder. This is arguably the most confusing part when looking at how to use Docker on a Synology NAS.
When the container runs, the container’s folder location in the Mount Path below is written to the File/Folder entered on your Synology NAS. Any data that is modified on the local Synology NAS folder will write to the containers folder.
It’s important to highlight that you can’t mount any folders that you’d like. When you download an image from the registry, a little icon (shown below) will bring you to the documentation for that container. You can search that documentation to see what folders can be mounted.

After you navigate to the documentation, you will have to search the page to see what volumes can be mounted. Unfortunately, all documentation is different, so you will have to search through it to find the volume information. Using Pi-Hole as an example, an example Docker Compose file is provided. Under the volumes section, you can find the two volumes that can be mounted.
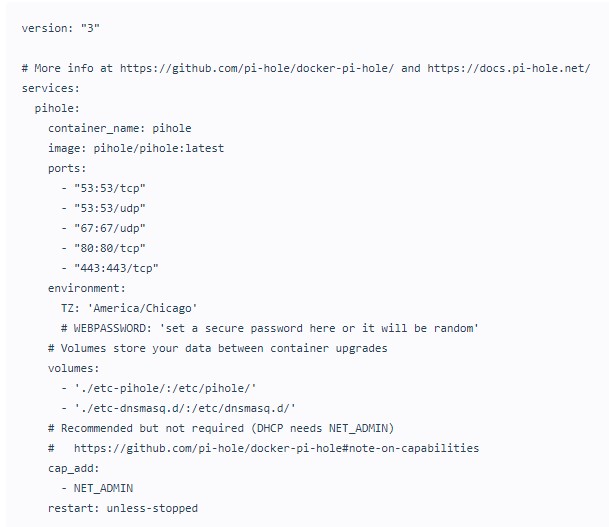
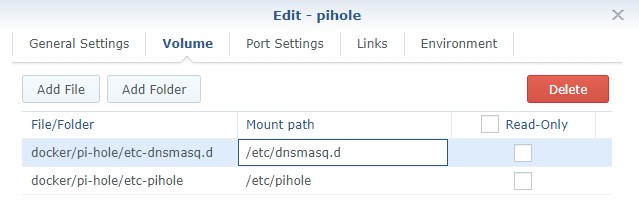
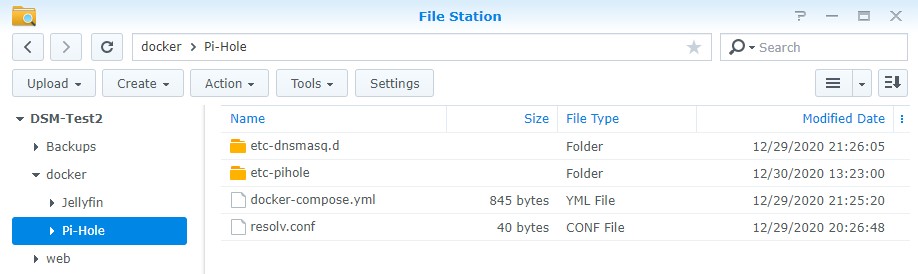
Using ./etc-pihole/:/etc/pihole/ as an example, etc-pihole is the local folder and /etc/pihole is the container’s folder. You can easily translate this to a Synology NAS by creating subfolders in the docker folder and mounting that folder location to the container’s folder. Using the screenshot below, I created a folder named pi-hole and a sub-folder name etc-pihole.
Those folders are inside of the docker folder and are mounted to the container’s /etc/pihole folder. When the container is started, the contents of the container’s /etc/pihole folder will be written to my Synology NAS’s etc-pihole folder.
If you are interested in backing up a container, the folders you mount for each container hold all of your personal data. These are the important folders that must be backed up. The rest is simply configuration that can be created on a separate NAS or Docker installation.
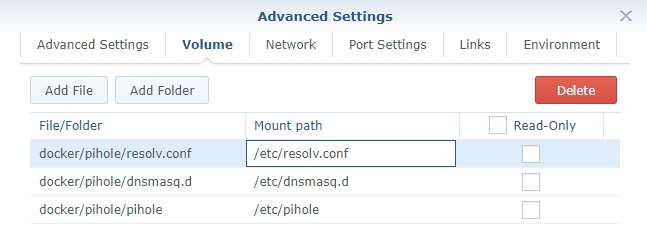
This next part is a little tricky – you can overwrite a specific file on the container by creating a local version of that file and selecting the exact path where that file exists on the container. An example of that is the resolv.conf file in the screenshot below.
When the container runs, the resolv.conf file on the container will be replaced with the contents of the resolv.conf file on the Synology NAS. To reiterate, if you want to update a file on the container, create a local file on your Synology NAS and map that file to the container’s internal file.
2. Macvlan & Bridge Networks
There are situations where a docker container will use certain ports (80/443 for example) and the host network interface already uses those ports for something else. When this occurs, a port conflict will stop the container from functioning properly. In situations like this, you have two main ways of fixing the problem:
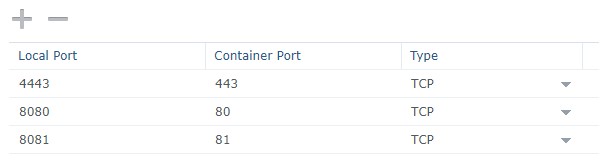
- Change the local port so that you’re using something different. For example, if the Docker container wants to use port 80, change the Local Port to be something different, like 8080 as shown below. To access the Docker container, you’d then use your Synology NAS’s IP address and the local port (http://[SYNOLOGY_NAS_IP]:8080).
2. Create a macvlan network interface and a bridge network. A macvlan network interface will avoid all port conflicts as you’re specifying a unique IP address that the container you’re creating will use.
This means that you’ll access that container using a completely different IP address than your Synology NAS. By default, your host (Synology NAS) will be unable to communicate with your container.
For this reason, a bridge network is required so that the host (Synology NAS) and the container can communicate. To be clear, if the Synology NAS needs to communicate with the container, you will use the bridge network IP address and NOT the macvlan IP address.
2.1 How to Create Macvlan & Bridge Network Interfaces
We will look at how to use Docker on a Synology NAS using a Macvlan/Bridge Network interface below.
1. SSH into your Synology NAS using your favorite SSH tool.
2. First, we need to determine what network interfaces currently exist (on your Synology NAS) and note down the adapter name. To do this, run the command below and note down the network interface name that has your Synology NAS’s IP address (in this example, mine is eth0).
ifconfig

3. Next, you need to run the command below while substituting the correct subnet (most are 192.168.1.0/24 by default). You also need to pick an IP address that you’d like to use that’s not currently in use. I will be using 192.168.1.198.
NOTE: ph_network will be the name of the network (you can substitute this as you’d like).
sudo docker network create -d macvlan -o parent=eth0 --subnet=192.168.1.0/24 --gateway=192.168.1.1 --ip-range=192.168.1.198/32 ph_network

Our network is now created. We can then exit our SSH session and disable it in DSM (if you won’t be using it). If you are disabling it and created a firewall rule for it, you should inactivate the firewall rule as well.
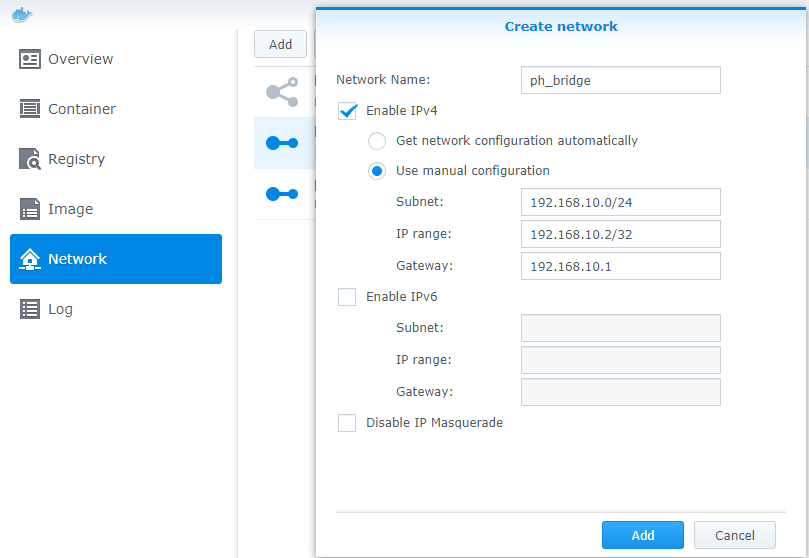
4. Next, we need to create a bridge network. This is what will allow our host (NAS) to communicate with our container. Open Docker and navigate to the Network section. Select Add and enter a subnet that’s not currently in use. The IP address of the bridge I am creating will be 192.168.10.2.
NOTE: ph_bridge will be the name of the network – you can substitute this to be the name you’d like.
7. Our new networks are now created. We can then exit our SSH session and disable it in DSM (if you won’t be using it). If you are disabling it and created a firewall rule for it, you should inactivate the firewall rule as well.
8. When you’re creating your container, remove the bridge network and add the two networks (ph_network and ph_bridge, but yours might be named differently) to the container.
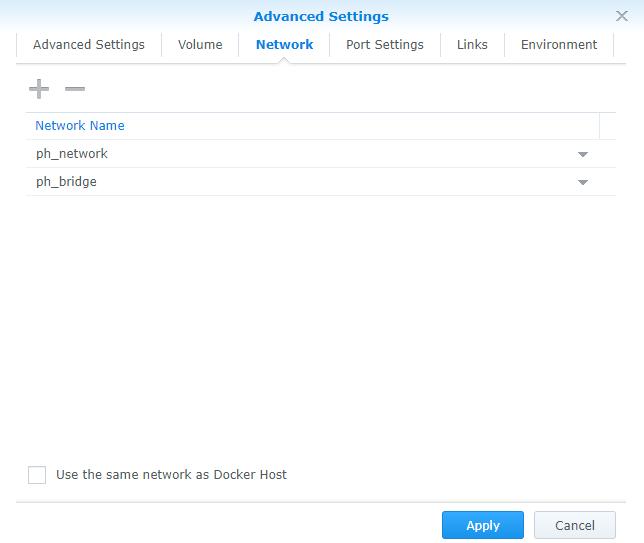
The container will now use the correct networks! You will avoid any port conflicts that would have occured, have a unique IP address for the container, and be able to communicate between the host (Synology NAS) and the container using the bridge network!
3. Environment Variables
By default, many Docker containers have environment variables that you can modify to change the settings of the container. There aren’t standard environment variables across containers and while some share variable names, it’s always suggested to view the documentation and determine which environment variables you’d like to use.
The container will come standard with certain variables, but you have the option of changing them or adding new ones before the container is created.
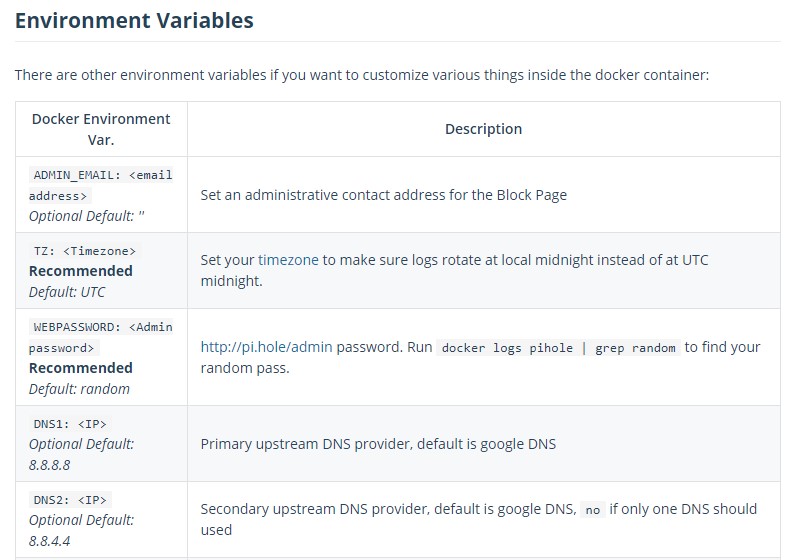
This is an example of the Pi-Hole environment variable details listed in the documentation.
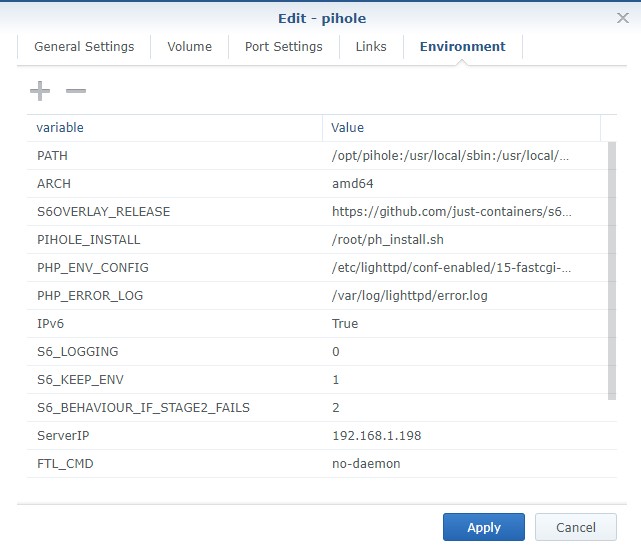
In the Docker container on your Synology NAS, the Environment section is where you can add, remove, or change environment variables.
4. How to Access a Container via Command-Line Interface (CLI)
There are certain situations where you will need or want to access the container’s files. Whether you need to modify something (by mounting a file volume) or view the structure, there’s a way to do it on a Synology NAS, but it must be done through SSH.
1. Start your container! If the container is not started, you will not be able to access the container!
2. Ensure you can SSH into your Synology NAS. Open Control Panel, select Terminal & SNMP, and Enable SSH service. If you are using Synology’s Firewall, ensure that you allow port 22 traffic. I created a video on how to SSH into your Synology NAS if you have any problems.
3. Run the command below to list the running containers. Copy the Container ID.
sudo docker container ls

4. Run the command below and substitute the container ID found above.
sudo docker exec -it CONTAINER_ID bash

5. You will now be connected as the root user for the container!

5. Docker Compose
It might come as a surprise to some, but you can use Docker Compose as soon as Docker is installed on a Synology NAS. For anyone that doesn’t know, Docker Compose allows you to create containers off a YAML configuration file with a single command.
Everything is executed through the command-line interface (CLI) and some users find it easier. If you’re going to use this, you might want to update Docker Compose as it’s a slightly outdated version.
A few benefits of Docker Compose on a Synology NAS:
- Everything is managed through the command-line interface (CLI). If you’re comfortable in the CLI, you will most likely find it much easier than manually configuring containers in Synology’s GUI.
- Docker Compose is system agnostic, meaning that the configuration file and data folders can be transferred to any other system running Docker Compose and it will function as expected. This is a stark difference from Synology’s Docker GUI, as you can back up the important container data, but you can’t port it over to a different operating system easily.
A few downsides of Docker Compose on a Synology NAS:
- Everything is done through the command-line interface (CLI). If you’re not comfortable in the CLI, it’s probably easier for you to manage everything in the GUI.
- Since the Docker Compose file holds all of the configuration, you need to ensure that this file is setup perfectly or you will be deleting/recreating the containers regularly to test and ensure everything works as expected.
5.1 How to Create a Container using Docker Compose
1. Move the docker-compose.yaml file that you created to the folder of the container that you’ll be creating.
2. Ensure you can SSH into your Synology NAS. Open Control Panel, select Terminal & SNMP, and Enable SSH service. If you are using Synology’s Firewall, ensure that you allow port 22 traffic. I created a video on how to SSH into your Synology NAS if you have any problems.
3. Navigate to the docker folder location on your Synology NAS and the subfolder for the container that you’ll be creating. For most people, the folder will be stored on volume1, but if you’re using multiple volumes, it could be something different.
cd /volume1/docker/[conatiner_folder]
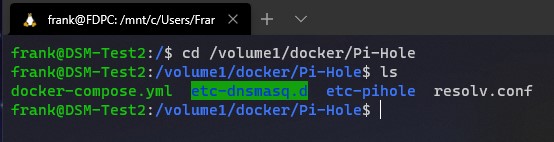
4. After confirming that the docker-compose.yaml file is located in the current folder, run the command below to create the container. The container will now start!
sudo docker-compose up --detach

Conclusion & Final Thoughts
This article looked at how to use Docker on a Synology NAS. There are a ton of different Docker containers that you can create (Heimdall and Grafana being two lesser-known options) on a Synology NAS. I’m hoping that the video provided explained everything in an easily understood way, but it’s important to highlight how the Docker GUI works so that you can install any container you’d like.
The process on how to use Docker on a Synology NAS will be the same for all containers and hopefully, show you how to use Docker on a Synology NAS!
Thanks for checking out the tutorial on How to use Docker on a Synology NAS. If you have any questions, please leave them in the comments!


Hello thanks for the clear explanation
i have a beginner question
i am trying to install openhab
I tried it twice but always the same error
5 volume mountings and one give s an error : /etc/localtime:ro
Create container openhab-openhab1 failed: {“message”:”invalid volume specification: ‘/volume2/docker/Openhab/etc-timezone:/etc/timezone:ro:rw'”}.
volumes:
– “/etc/localtime:/etc/localtime:ro”
– “/etc/timezone:/etc/timezone:ro”
– “./openhab_addons:/openhab/addons”
– “./openhab_conf:/openhab/conf”
– “./openhab_userdata:/openhab/userdata”
can you help me please ?
Erk
I haven’t used OpenHAB so it’s hard to say what could go wrong. Do you maybe need to add a period in front of the “/etc”?
Hi!
Could you make a tutorial about wireguard in docker? It would be awesome!
There is a docker registry (https://registry.hub.docker.com/r/linuxserver/wireguard/), and there is a ui (https://hub.docker.com/r/ngoduykhanh/wireguard-ui) too.
I’m noob, and I got stucked.
I will take a look at this! Thanks!
You also need to open port (e.g. 8080), if you are using firewall on the nas.
Hi, in part 5.1 of your text you write: “Move the docker-compose.yaml file that you created to the folder of the container that you’ll be creating”. But I don’t find a part where you actually discuss creation of that file. Do I miss something?
I am struggling with using mongodb from docker on my Synology DS718+. I have a problem with giving Docker the right access rights to create it’s internal data volume. I hope to solve this by using Docker-Compose as it appears to me that I have more freedom to move around with that compared to the Synology Docker UI. Also It connects me to the community articles that address the issue without using the Synology UI.
The docker-compose.yaml file will be created based on the container you’re using. So you would create a folder for whatever container you’d like to, and then create the docker-compose.yaml file inside of that. The contents of the file will contain the information that is provided in the container’s documentation. Unfortunately, there is some leg work to try and figure out exactly what needs to be put into that file, but if you google the container’s name and “docker compose”, you can generally find examples.
There’s a good chance that your issue is PGID/GID related. Basically, those values have to be passed as environment variables to certain containers in order to get them to see your local shares. I could be totally wrong in saying that, but that’s what it sounds like.
Great description. However, as someone who has never used docker, I don’t know what the end user experience of using Docker even looks like. How would I log onto a docker partition as a user?
Can you describe the experience of using docker first?
The process will look completely different depending on whatever container you’re running. Generally, they are web interfaces that you’ll connect to. I have a bunch of Docker tutorials on this site that will show you exactly what the front-end interface will look like if you’re interested!
Hi, thanks for the great explanation of how to accomplish this. the macvlan seems to allow only 1 IP address. is there a way to create it and allow other containers to obtain a separate IP address of their own as well?
You can use a different IP range, but the issue is that /32 makes it a static IP, so it will never change. If you’re using something other than /32, you cannot be positive that the IP address will always be what you think it is. For certain containers, this isn’t a problem, but for things like a DNS server, you NEED to make sure it doesn’t change. So I guess the answer is yes, but you might cause yourself other issues depending on the container.
Hi. Thanks for your guide.
How to use domain name instead of port address?
Do you want to access it outside of your local network? If so, a reverse proxy would be the best option. Internally, I’m not sure it’s worth it.
Thanks so much for your guide. This is the first Docker app I have setup and I think I get the concepts involved. I think I have got Pihole working, using the macvlan method above. I can login to Pihole, can ping it on its own IP address. But when I put its IP address into my router then nothing seems to be able to resolve, and on the PiHole page I cannot see any requests. I know this isn’t a Pihole tutorial article, but I am at a bit of a loss as to what to try next or even how to search for the problem. Any help would be appreciated.
Do you have any upstream servers set on the Pi-hole admin page? Also, are you able to access any local servers (local DNS entries) to test if local functionality is working? I would try and limit it to see if you can get local OR external to work, which will hopefully isolate the issue.
Great article, it helped me a lot as it describes things in a simple manner!
However in chapter 2.1 step 8: as soon as I plug in the ph_bridge network to the container, I cannot reach the application’s web page under 192.168.1.198 (ph_network) anymore. Unplugging ph_bridge reveals it. I also tried to reach the container via 192.168.10.2 (opened also firewall rules) – bummer.
In general I do not understand, what you mean by “able to communicate between the host (Synology NAS) and the container”. On my NAS I can use the Docker client in the usual way
That’s definitely a weird scenario. You aren’t removing the ph_network when you add the ph_bridge, right? By default, the host (NAS) cannot communicate with containers when they’re using a macvlan network interface. When I say communicate, I mean that it can’t ping/access the resource on that IP address. The bridge network is there so that the host (NAS) can access the container. For example, if you wanted to set the NAS’s DNS server to be Pi-hole, you would have to use the bridge network IP address as opposed to the macvlan.
Yes you got it right. All I did was adding the macvlan driver (note: I’m using a DS1517+ with 4 physical network ports, also the Open vSwitch as a Virtual Machine Manager is present, therefore the interface is named ovs_eth3):
docker network create -d macvlan -o parent=ovs_eth3 –subnet=192.168.48.0/24 –gateway=192.168.48.1 –ip-range=192.168.48.192/28 oh_network
After this command, I can ping (and use) containers running over the macvlan driver (in my case this is openHAB (192.168.48.192) or a alpine instance (192.168.48.193)). Of course any firewall settings on Syno must allow that communication.
As soon as I plug in the oh_bride on 192.168.10.2 as suggested (go to the Docker NW settings on DSM and add to the OH container to the oh_bride network), the OH container on 192.168.48.192 cannot be reached on its webpage anymore and does also no longer respond to pings.
I’ve also tried the same setup with a single IP on mavlan 192.168.48.192/32 – same result.
To be honest: in my configuration I do not have a connectivity issue, I’m just puzzled why to attach a bridge network to the container. So what is the need behind this or am I missing something?
You definitely aren’t missing anything and it looks like you did everything correctly. Without troubleshooting, it’s hard to say why the website would become unresponsive, but it shouldn’t. To confirm, you aren’t accessing the website by a hostname, right? You are trying to access it by IP?
Now it works, don’t know what went wrong. I was always using IP addresses to call the website of the container and for pinging.
However now I also understand what you mean with the connectivity from a shell on the DSM (here 192.168.48.192 is the macvlan address of the container, 192.168.49.2 the bridge to DSM):
maurice@DiskStation2:~$ sudo ping 192.168.49.2
PING 192.168.49.2 (192.168.49.2) 56(84) bytes of data.
64 bytes from 192.168.49.2: icmp_seq=1 ttl=64 time=0.065 ms
64 bytes from 192.168.49.2: icmp_seq=2 ttl=64 time=0.057 ms
64 bytes from 192.168.49.2: icmp_seq=3 ttl=64 time=0.060 ms
^C
maurice@DiskStation2:~$ sudo ping 192.168.48.192
PING 192.168.48.192 (192.168.48.192) 56(84) bytes of data.
From 192.168.48.2 icmp_seq=1 Destination Host Unreachable
From 192.168.48.2 icmp_seq=2 Destination Host Unreachable
From 192.168.48.2 icmp_seq=3 Destination Host Unreachable
^C
Glad you got it working!
Can you have more then one macvlan network? I created one using this guide and it’s up and running but I needed another one for another different application but I keep getting errors (the gateway address .5 is the firewall gateway device for my network).
Error response from daemon: failed to allocate gateway (10.0.0.5): Address already in use
Do you have multiple network interfaces by any chance? If you do, then yes. If you don’t, then you can use a different subnet mask to generate more IP addresses, but then won’t know exactly what IP address is handed to which container.