Today we are going to look at how to set up Bitwarden on a Synology NAS! Bitwarden is a password manager that can be self-hosted if desired. The benefit of self-hosting is that you are in control of your data and don’t need to rely on a third party to manage it.
This doesn’t necessarily mean that there is an inherent security risk with using Bitwarden’s hosting. We are just looking at an alternate option on how to set up Bitwarden on a Synology NAS!
Please keep in mind that this utilizes Vaultwarden, a low-resourced, Docker container version of Bitwarden. You can learn more about Vaultwarden vs. Bitwarden here.
1. How to Set Up Bitwarden on a Synology NAS
The instructions below will show how to set up Bitwarden on a Synology NAS. This tutorial utilizes the latest version of DSM (v7.2) and Container Manager.
1. Download and install Container Manager from the Synology Package Center.
2. Before we get started, we need a directory where Bitwarden can add all of its files. Open File Station, navigate to the docker folder, and create a subfolder named bitwarden.

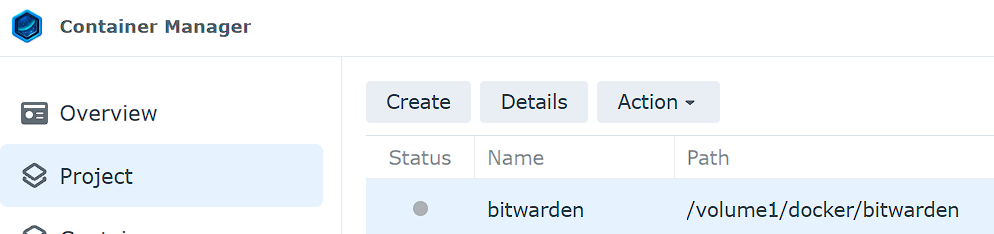
3. Open Container Manager and select Project, then Create.
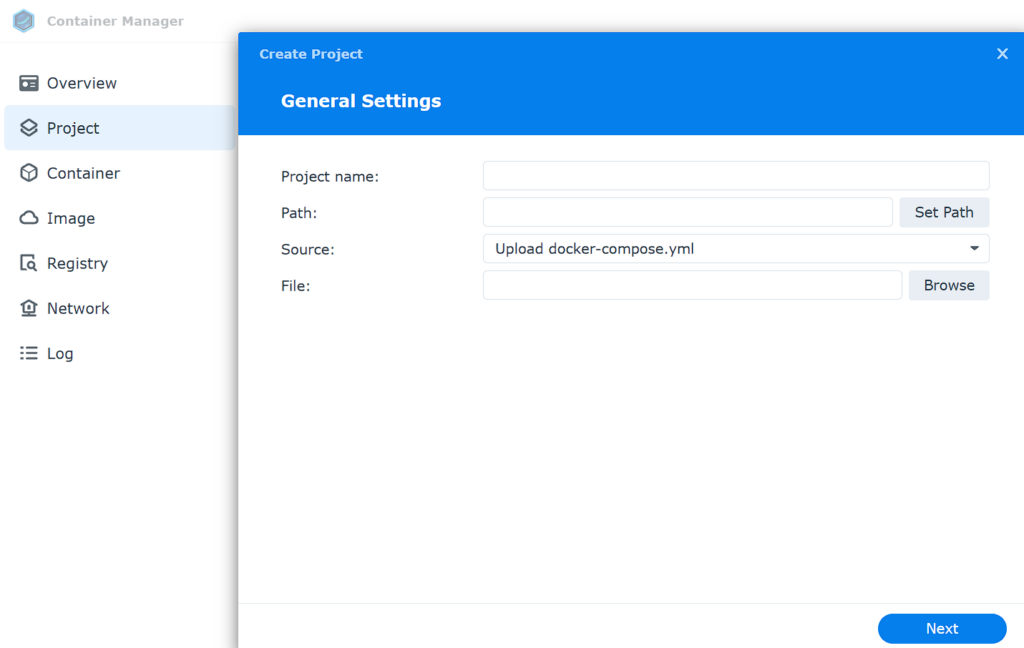
4. Enter the Name, then select the bitwarden path, and then select Create docker-compose.yml. From there, paste in the Docker Compose file listed below. You can then continue to create the container!
NOTE: This will use the host port 5555 (if you’d like to alter it, you can here). You can also change the timezone and volume number if you’re using something other than Volume 1.
version: "3"

# Instructions: https://www.wundertech.net/how-to-self-host-the-password-manager-bitwarden-on-a-synology-nas/

services:
  bitwarden:
    container_name: bitwarden
    image: vaultwarden/server:latest
    ports:
      - "5555:80/tcp"
    network_mode: bridg
    environment:
      TZ: 'America/Chicago'
    volumes:
      - '/volume1/docker/bitwarden:/data'
    restart: unless-stopped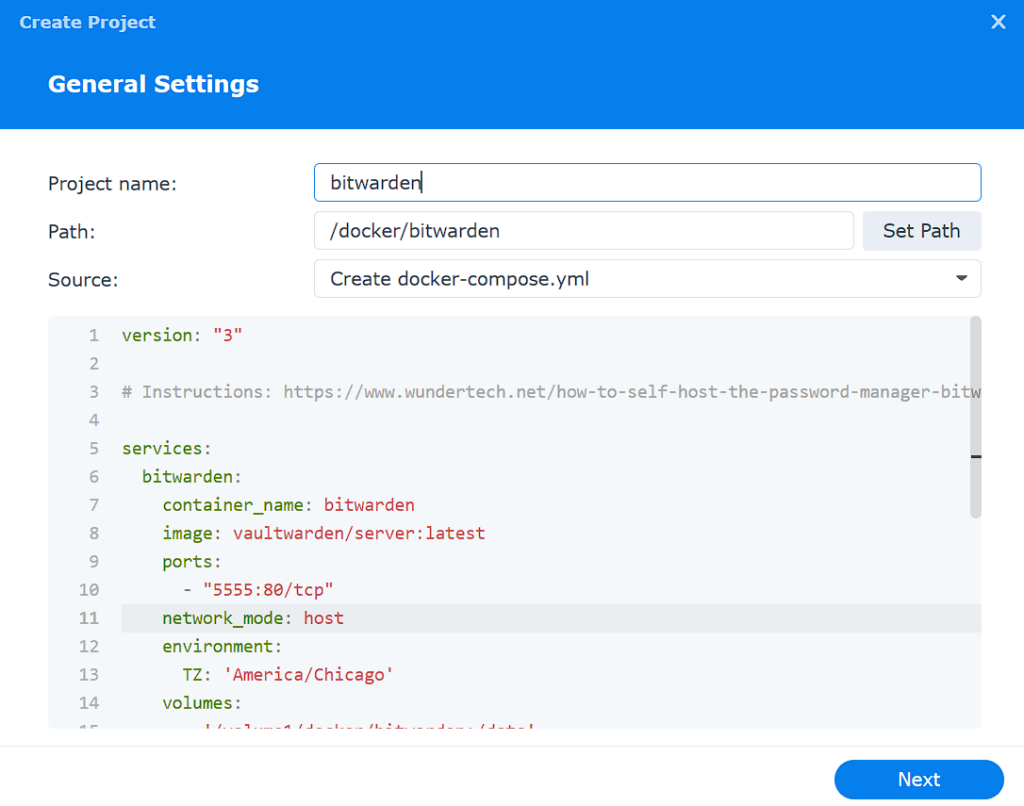
5. Proceed through the steps and create the project!
1.1 Reverse Proxy Setup
At this stage, you need to determine if you will be using a domain name. I will not be using a purchased domain name, but I will be using a free DuckDNS DDNS hostname. If you’d like to configure this, please check out our tutorial on how to configure this.
1. After you have your domain name configured, open the Synology “Control Panel”, select “Application Portal” and then “Reverse Proxy”.
2. Select “Create” to create a reverse proxy. At this stage, we will need to configure a few settings:
- Description: bitwarden
- Source:
- Protocol: HTTPS
- Hostname: This is where you will enter your domain name or DDNS hostname
- Port: The default port is 443 and if you’re using your NAS as a reverse proxy server, you can use that port. I have an article on the reverse proxy function if you’re interested in learning more about it. If you are using that port, you will have to use something that’s not currently in use.
- Check off “Enable HSTS”
- Check off “Enable HTTP/2”
- Destination:
- Protocol: HTTP
- Hostname: IP Address of your Synology NAS (or localhost if it’s the local device)
- Port: 5555 (this is the port that we configured in step 8 of the bitwarden setup instructions).
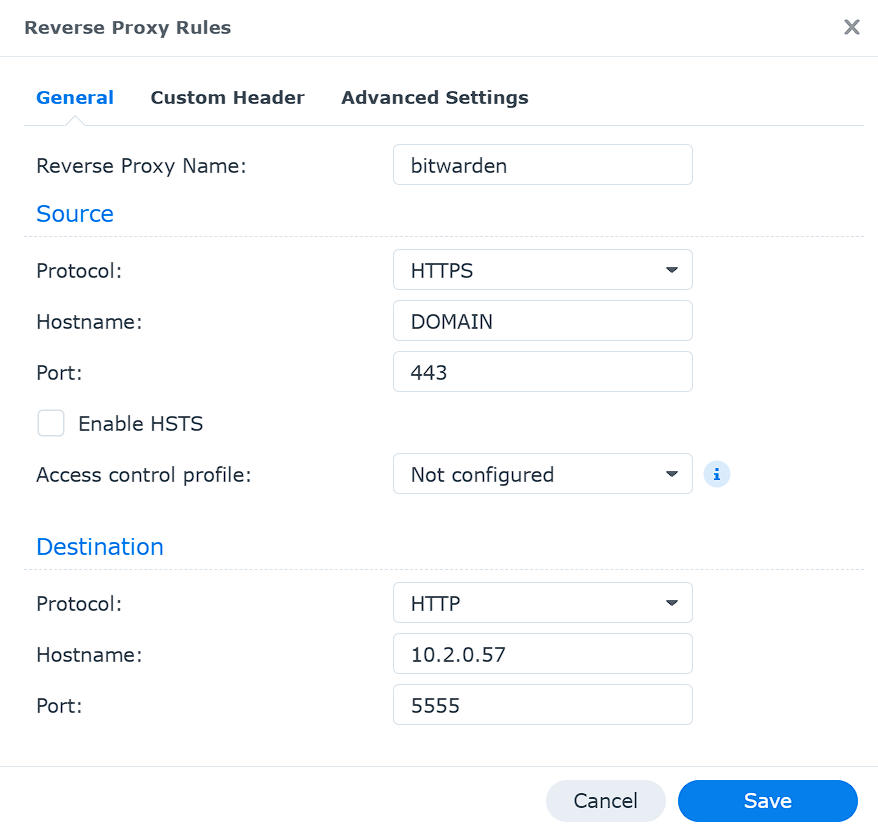
The reverse proxy has now been configured. When you navigate to the hostname and port configured in the “Source” section of the reverse proxy, your NAS will forward the request to the “Destination”.
The settings below are from DSM 6, but the settings are the exact same.
1.2 Let’s Encrypt Setup
Now that the reverse proxy is set up and Bitwarden is configured, we will need to create an SSL certificate using Let’s Encrypt. NOTE: If you are having trouble creating this certificate, create a port forwarding rule in your router settings to open port 80 traffic on your NAS. You can remove this when complete.
1. Navigate to the “Control Panel”, then “Security”, then “Certificate”. Select “Add”.
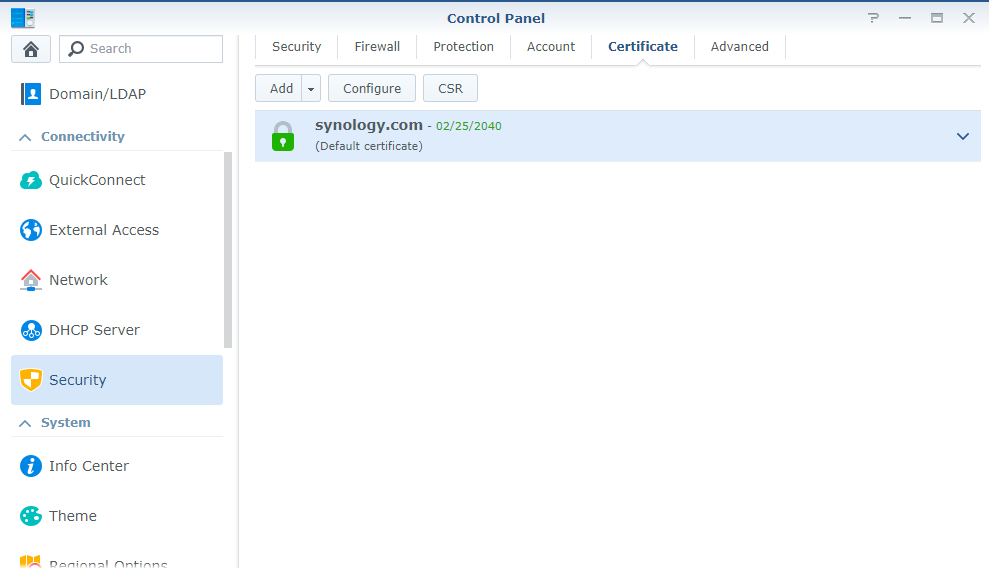
2. Select “Add a new certificate” and select “Next”.
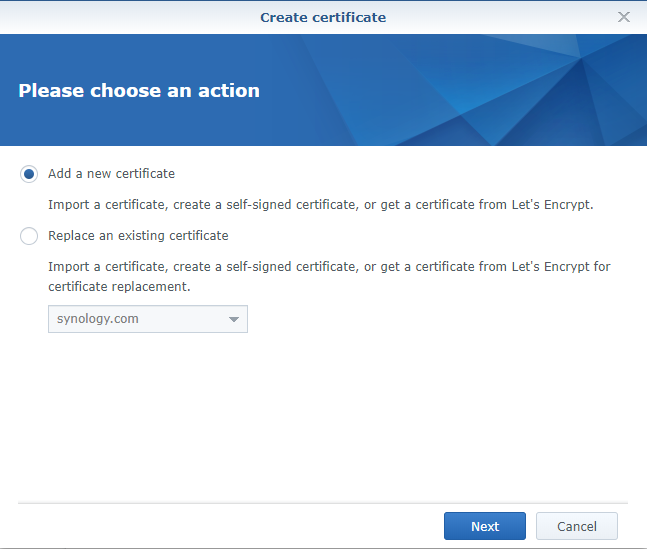
3. Select “Get a certificate from Let’s Encrypt” and select “Next”.
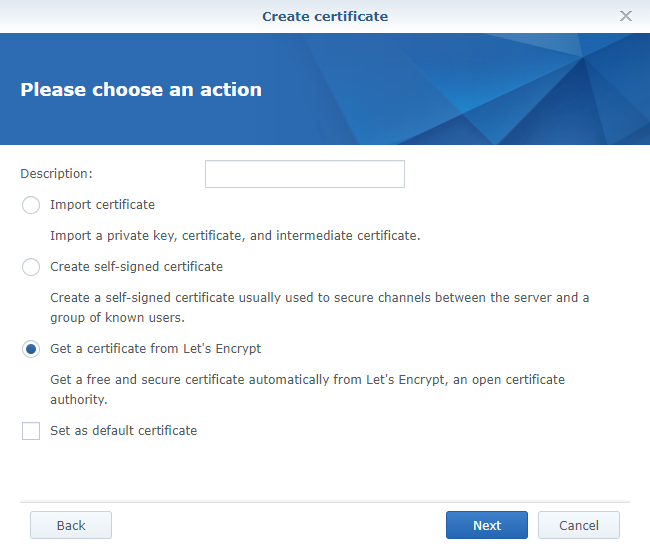
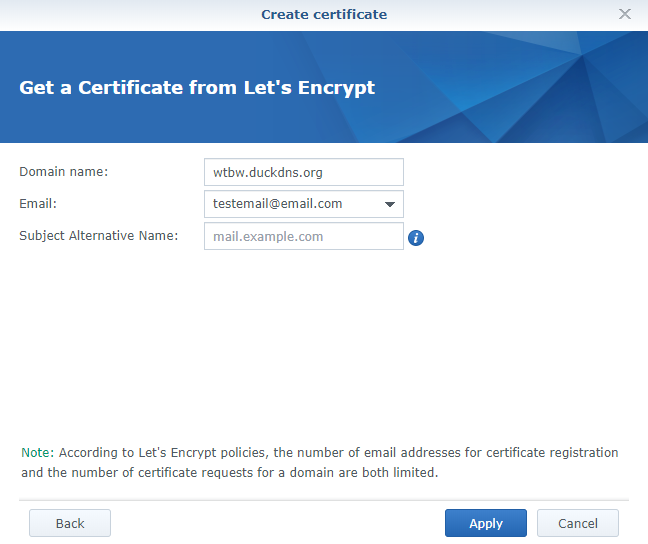
4. Under the domain name, enter the hostname you used in the “Source” section of the reverse proxy setup. Enter your email and select “Apply” to create the certificate.
5. After the certificate has been created, select “Configure”. Ensure that the “hostname:[port]” is listed with the certificate that you just created.
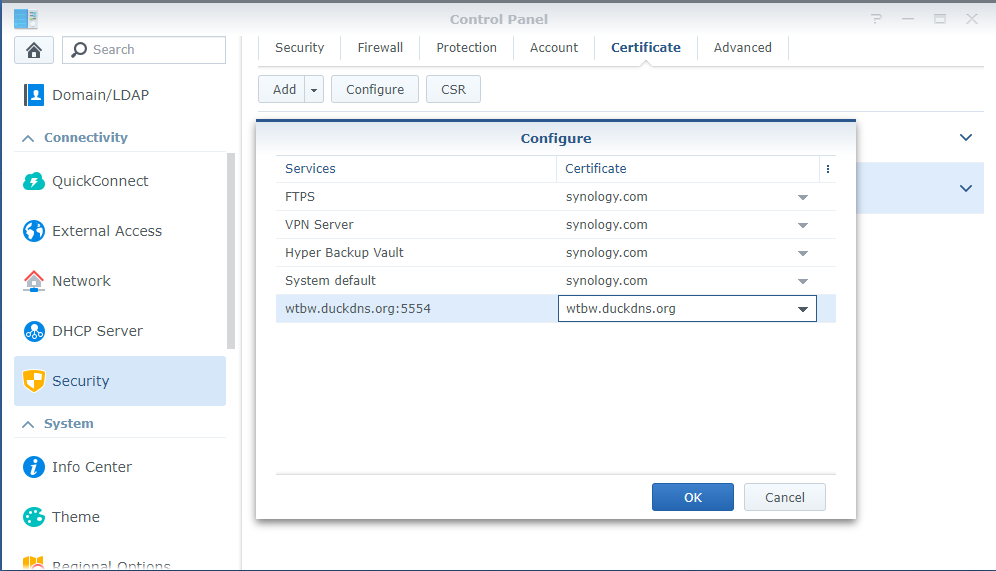
The certificate has now been created and will auto-renew moving forward!
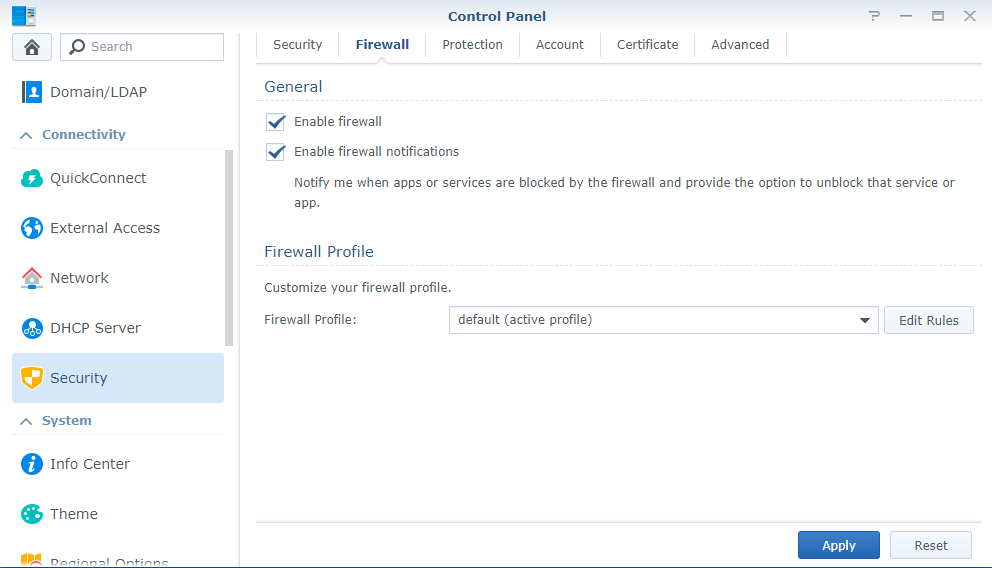
1.2 Firewall Setup Instructions
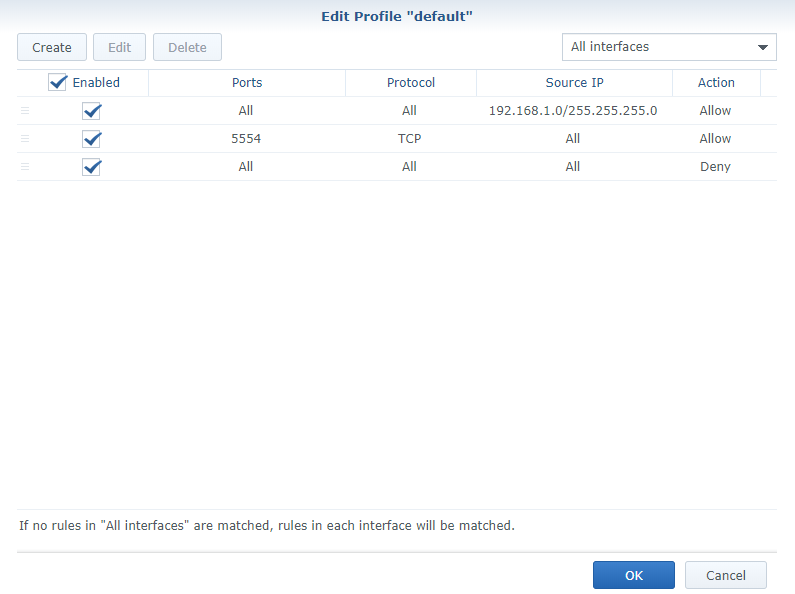
It’s very important to configure your Synology Firewall, especially if you intend on exposing your Bitwarden instance to the internet. The way that I manage my Synology firewall is that I allow all LAN traffic (192.168.1.0/24) access to my NAS, but all other traffic gets blocked. I then allow all traffic on port 5554. This ensures that I can access my NAS using my DDNS hostname + port.
1. Navigate to the “Control Panel”, “Security” and then “Firewall”. Enable the firewall if it isn’t currently enabled, and then select “Edit Rules”.
2. You will need to tweak the settings based on the applications running on your NAS and the ports selected, but the screenshot below has my settings.
NOTE: It is important to note that firewall rules are processed from top to bottom, so you want to have all “Allow” rules at the top with the “deny all” rule at the bottom. Ensure that you set this up right before proceeding, as incorrect configuration can lock you out of your NAS.
3. The final step is to configure a port forwarding rule on your router. You will need to forward port 443 (if you are using the same ports as I am) to your reverse proxy server so that you can access it from outside of your network.
You will now be able to access Bitwarden with a properly installed SSL certificate! You can now create an account.
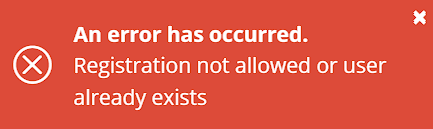
1.3 Deny Account Creations
After you’ve successfully created your account, it’s a good idea to deny future registrations. This will stop anyone from creating a new account moving forward.
1. Open Container Manager and stop the Project. Then select Details on the Project.
2. Edit the YAML Configuration File and add an environment variable. The name should be “SIGNUPS_ALLOWED” and the value should be “false”.
SIGNUPS_ALLOWED: false
3. Save the Project and recreate the container. You won’t be able to create new accounts now!
2. Conclusion & Final Thoughts
This tutorial looked at how to set up Bitwarden on a Synology NAS. Self-hosting your Bitwarden instance on a Synology NAS ensures that you control your data. Keep in mind that this utilizes Vaultwarden, which is a great, lightweight option for setting up Bitwarden on a Synology NAS.
There are many reasons why someone would want to self-host Bitwarden on a Synology NAS, and the tutorial above shows you exactly how!
Thanks for checking out the tutorial on how to set up Bitwarden on a Synology NAS! If you have any questions, please leave them in the comments!


Hello, your youtube tutorial to setup bitwarden self hosted is perfect! However, I am trying to setup the TOTP feature bitwarden offers to automatically provide/fill-in the the TOTP code, so far unsuccessfully. I get an error that I believe, (I am not very experienced in IT/technology matters), reads that the server time is not syncing with the bitwarden client’s time. My question to you is this: could you provide information how to fix this problem or even a quick youtube tutorial about it?
Thanks for your help
Martin Pineyro
Thanks a lot for reading the tutorial!
When you say that you get an error syncing the time, is it on the server or the client? I have TOTP working properly on mine, so I know that it can work, there just might be a timezone issue.
You might have to create an environment variable to set your timezone. I’m not sure if this is impacting anything, but it can’t hurt to try. Stop the bitwarden docker container then edit it. In the environment section, add a new variable called “TZ” and the value as “Country/City” (fill in your country/city). This will set the timezone of the docker container. I’m not sure if this will help, but it’s worth a try. The issue is almost certainly related around system time (in some way, either the docker container or Synology’s DSM).
Let me know how it goes!
hi again!
I tried your suggestion above with no luck so far. Anyway, I am open to try any other changes/suggestions if you think of any. I can send you a screenshot of the container if you’d like to take a look at it.
thanks for your help!!
Martin
I am sorry to hear that it didn’t work.
I tried looking through Google to see if I could find anyone with similar issues, but I think I need a little more information on the error.
Can you please tell me where the error is occurring? Is it in Docker, Bitwarden, or in the TOTP section? If possible, can you paste in the error message that you are receiving? Hopefully that can point us in the right direction!
It also wouldn’t hurt to recreate the docker container (if you’re comfortable doing that) just to see if that works.
Hopefully we can clear this up!
-Frank
Hi Frank,
Thanks for the great and simple Bitwarden tutorial. I read a few of your Synology tutorials using docker to self-host an app and was wondering about data backup.
Do I have to backup anything else than the as volume mounted ‘data’ folder of each container?
Thanks again,
Simon
Hi Simon,
Thanks for following the tutorial! Docker containers are different, in the sense that you generally mount the data to a local folder that is unique to you. So using Bitwarden as an example, we mounted a container folder named “data” to our local “bitwarden” folder. That local “bitwarden” folder now has all of your data and is what should be backed up. If you were to create a new Bitwarden container on a separate NAS, but imported and mounted that “bitwarden” folder properly, all of your data would exist in that new container.
So in summary, when you create a Docker container and mount the specific container folders to local folders, make sure you back up those local folders. This is what contains the data that is specific to you.
I hope this helps, but if you have further questions, let me know!
Thank you,
-Frank
Great info… I have a couple quick questions:
1. When setting up port forwarding on router, I presume the correct protocol to use is TCP and UDP (not just TCP), correct ?
2. I presume the root “docker” folder that is automatically created after installing bitwarden (and also contains the “bitwarden” folder and all data) is encrypted, correct? Or, do we need to manually encrypt this folder via Control Panel >Shared Folders>docker>Edit>Encryption…?
3. I downloaded and setup the Bitwarden mobile app for iOS (iPad and iPhone) and setup to access my NAS. I presume all syncing is done solely between mobile device and local NAS. Meaning, Bitwarden servers are NOT part of syncing activity, correct?
Thanks in advance!
Thank you for reading!
1. TCP only is good in this specific case. Some VPN protocols use UDP, but in this case, we only use TCP.
2. The folder “docker” is created automatically when you install Docker on your NAS. This folder should not be encrypted. The Bitwarden files that you use are stored inside of the “data” folder that we created and are encrypted by default.
3. Bitwarden servers are NOT part of the syncing. As long as you’re connecting directly to your NAS, there will only be traffic between your mobile device and NAS. Keep in mind, when self-hosting, security is on you, so always ensure you’re using the latest DSM version, application updates are regularly run and your SSL certificate (renews every three months) is up to date!
If I can help at all, let me know!
Thank you so much for the reply and info.
On the topic of security…I happened to run across this article today re: the auto-update feature on the Desktop app (https://www.techradar.com/amp/news/popular-password-manager-could-have-a-critical-vulnerability). By no means am I a security expert, but curious if it’s best to manage passwords via the web application vs using the Desktop application…?
Lastly, re: updating bw to the latest release…I presume one would need to download and install a new bw image file in Docker, or is the process much simpler?
Thanks again!
No problem! Hope the info helped!
It’s hard for me to say that one is better than the other, but that’s definitely an interesting article and I appreciate you sharing. I never downloaded the local application but if this is a valid security concern, I would suspect that the Bitwarden devs will reply at some point. They’ve really been great and incredibly transparent, so hopefully we get an update of some sort!
As for updating, you are correct! Download the latest image (not sure how often the Docker bitwarden_rs image is updated), mount the existing “data” path and all of your data should be there with the new updates!
If you ever run into any issues or have any questions, please let me know! Thanks for checking out the tutorial!
Thanks! Is there a way to check the “current” build of the bitwarden image within docker and somehow cross-reference this against the current build on Docker’s hub website (https://registry.hub.docker.com/r/bitwardenrs/server/), or some other site where the current build is listed? Or perhaps a way to enter a command line in the terminal window of docker to check current version? Just trying to determine if I have to manually install a new image file “every so often” in hopes of getting an updated file, or if there’s a way to check the version up-front.
Thanks again.
I have been trying to get you an answer on this for a few days and I can’t. For some reason, the github for bitwarden_rs uses a version number that is different than the one used on Synology devices (at the bitwarden login page).
This is the github page: https://github.com/dani-garcia/bitwarden_rs
I’m very sorry, but outside of downloading the image and recreating a new container to see what the version number is, I’m not sure that you can find out when there are updates. When I get some time this weekend, I am going to continue looking into this and if I can find anything, I will let you know.
Thanks for looking into this!
On the topic of updating to the current bitwarden installation…
1. I started by downloading the latest bitwarden image from the Registry (bitwardenrs/server)
2. Next, I went to setup a NEW container (i.e. bitwardenrs-server2) using the same specs as the initial/current container (i.e. bitwardenrs-server1). This includes mounting /data.
When I got to the final step to Apply settings, it stated the “Local port conflicts with other ports used by other services” (i.e. I used the same port number for server2 as serve1). I figured I’d get some sort of error since server1 is still running/active. So do I first “Stop” server1 from running, or do I have to delete server1 in order to install the newest/latest version?
In summary, does the update process entail setting up a NEW Container each time and removing the previous container, or do I simply update the image file and keep the current Container (bitwardenrs-server1) and it will “point to/read from” the latest Image file?
Thanks!
No problem!
You are correct in stating that you need to first “stop” the container and then recreate the new one. In general, if I want to update a container, I stop the old one, download the latest image and recreate the new container, and then leave the old one for a few weeks. There are actually a decent amount of issues that some of these new containers have (at one point, Pi-hole completely stopped working for me), so it’s easier for me to roll back this way. Technically, you can always delete it after you ensure it works properly and then download an older version if you run into any problems, but I just find it easier to roll back this way.
To be clear, you DO need to recreate a new container. Simply downloading the newest image will not actually update the existing container. There have been people online who have different approaches for updating Synology Docker containers, but I haven’t had luck with any of them. While it’s somewhat painful, recreating the container is always the easiest way of doing it for me. I am trying to validate if duplicating the settings of a current container (with the new image downloaded) will “update” the container, but I need a little more time for that. I will keep you updated with my progress!
If you have any other questions, please let me know!
PS. Does the image file (bitwarden/setup) ease the process of updating? Its description reads…”The Bitwarden helper image used for installing and updating bitwarden”. Or is this image file not applicable for Synology deployment?
I believe that is for the “official” bitwarden deployment. Bitwardenrs is a fork of the “official” bitwarden docker container that drastically reduces system resources and has a lot of the “paid” features of bitwarden for free (at least how I understand it). While you can implement the official bitwarden on a Synology NAS, it’s much more resource intensive and the setup process is drastically different and a lot more complex.
I prefer bitwardenrs for home deployments, but I understand why people want to use the “official” bitwarden image. If you have any other questions, please let me know!
Hi WunderTech, if I already have a certificate created through LetsEncrypt for a Synology domain I created for OpenVPN use (hope that makes sense), can I/should I use this one, or should I create a new certificate/domain specifically for Bitwarden?
As long as you’re using the same domain name to access Bitwarden, that one’s fine! As to if you should or shouldn’t create a new one, it’s kind of personal preference. I normally create new ones and prefix my service (bitwarden.wundertech.net, plex.wundertech.net, etc), but it’s totally personal preference. If you do use a different domain prefix, you will need a new certificate.
Hope this makes sense, but if you have any further questions, let me know! Thank you for reading!
One problem I’ve just found with this is that it stops my disks going into hibernation (they normally do after 20 minutes of inactivity). I don’t know if it’s Docker or the Bitwarden container specifically, do you know if there’s a way to get the disks to back into hibernation whilst using this?
I have a feeling the answer is going to be “no” ;).
I unfortunately think that your initial guess is correct 🙁
As far as I know, there is no way to control a lot of the settings in Docker on Synology’s. Do you have a spare PC that you can throw Ubuntu on and run Docker there? I prefer Docker on Linux devices as it’s way easier to work with but use my NAS for certain containers since I know it’s always running. Bitwarden is a great Synology container, but I don’t hibernate my disks so I never ran into that issue.
Sorry, I know that’s not the best answer, but let me know if I can answer anything else!
Can you post steps on installing Bitwarden on a Ubuntu PC running docker? I know there are some tutorials out there but I run into the problem of using a duckdns subdomain with Bitwarden on Ubuntu docker*
Do you mean creating a tutorial for self-hosting Bitwarden in an Ubuntu Docker instance or connecting to a Bitwarden server FROM an Ubuntu machine?
No problem, I’ve turned off hibernation of my disks for the moment to see if my other half notices the sound of the fan being on all the time. I assumed hibernating disks was a good thing, but I’ve read posts on various sites saying that it’s actually better to leave them running. I know that’s a completely different topic though. Cheers for your help once again 🙂
No problem! That is definitely a highly debated topic. I understand the whole “always spinning is better than constantly stopping and starting” but I think most of it is opinion based. Anyways, hope it works out for you!
This was all working for me, apart from I noticed the icons for my password entries weren’t being downloaded. I had to add an extra Allow rule to my Firewall to cover this:-
Ports: All (I haven’t narrowed this down to the specific port required)
Protocol: All
Source IP (Specific IP): Subnet: IP address: 172.17.0.0 Subnet mask: 255.255.0.0
I’d deleted all the entries in the icon_cache folder, and as soon as I had entered this rule in my NAS firewall the icons started to download. Hope this is of help to somebody else.
That’s really helpful! I think I had that rule already created (for something else) and it was working for me so I never noticed it was required. Thanks so much for the info!
Thanks for the tutorial! My only issue is that https://myhostname.duckdns.org:5554 is very slow when I’m on LAN. When I’m connecting from the internet it works as it should.
Do you have any guess what can cause this issue?
It’s definitely a little strange that it’s slow on your LAN only. If you’re comparing it against using the IP address and navigating to the server directly, that makes sense. An option would be to create a DNS record so that you go straight to the internal server IP address rather than through the external network, but that’s assuming that the reason is because you’re comparing navigating locally versus navigating through the external network.
Let me know and hopefully I can provide some help! Thanks for checking out the tutorial!
Will Bitwarden work if the option “Execute container using high privilege” is unchecked, or is it option required?
When I tested (and created this tutorial), it didn’t work without that setting turned on. I always try and keep that disabled if I can, but with that said, I would try to see if it works for you without it turned on. I created this tutorial a while ago and with container updates, you never know if there will be slight differences. Can’t hurt to try it and if it doesn’t work, check it off and you should be good!
I just want to set up a reverse proxy, but I get the message “This domain name is already in use” when I enter (slightly modified here): string.spdns.org.
Currently I am still running Pi-Hole in a Docker container, which is accessed via string.spdns.org:8181/admin.
Do you guys have any suggestions on what I can do?
Are you using that domain for anything else? Have you tried using a subdomain? Generally, you want to try and use subdomains for your services (bitwarden.yourdomain.com, etc). Let me know and I will try and help further!
Can you elaborate on this? I’m installing on a DS216+
I have an instance of ownCloud using port 443, so I followed your instructions for the reverse proxy & when I try to access via the secure https & the port # I’m unable to connect. However, if I access via http & the port # I can connect but it reports unsecure, and I can’t create a user because it’s not over a secure connection.
I have a certificate configured for this, I’m using the same one for my ownCloud instance. Do I need a separate certificate?
When you set up the reverse proxy, I’m assuming that you set it up to use ports 80/443? If so, you would set up the reverse proxy using the port on the INTERNAL configuration, and use the domain to access it EXTERNALLY.
So basically, the domain subdomain.yourdomain.com will point to an internal IP address and port number for the service you’re exposing. The internal port number will no longer be used (when accessing externally). You would only use the domain name, as it’s configured to use ports 80/443.
You will need a certificate for each subdomain you create (if you don’t have a wildcard certificate, which you most likely do not). Not sure if this helps, but please let me know if I can clarify anything!
Thank you for the tutorial! I’ve have the same issue as above, although I used the same port as you did for the reverse proxy.
So I get an error (Unable to connect) when trying to use https, while http works perfectly fine.
What am I missing?
I basically just picked a random, obscure port (that people wouldn’t know without port scanning), so feel free to use whatever you’d like. Since we’re using a reverse proxy, it makes perfect sense to use port 443 if you’d prefer. However, you need to ensure that the port you select is properly port forwarded otherwise you might not be able to connect to it.
Do you know if you setup the reverse proxy properly?
Hi, after I followed your tutorial, I’m able to reach my self-hosted-bitwarden outside my network but my browser tells me that the website is still insecure (chrome & safari). I set up the SSL certificates the same as in your tutorial and I’m using duckdns as well. Any idea what is going wrong?
On the Synology, did you assign the SSL certificate to the reverse proxy entry?
All is working after following your instructions, I have noticed my data folder is empty – is this right? am I missing something? I also can’t find the admin token to log into the admin page?
Your “data” folder should definitely be populated. Do you have the mount path properly entered as “/data”?
I believe that the admin token will be in the “.env” file, but you might have to SSH into the container to do that. I have a tutorial on how you can access a container via CLI which should help.
Hi Dean and WunderTec,
I am also searching for access to the admin page and to set the smtp mail server settings.
According to the bitwarden help article(s)
https://bitwarden.com/help/article/admin-portal/ and
https://bitwarden.com/help/article/environment-variables/
you should configure these settings by editing the environment file, located at ./bwdata/env/global.override.env.
However on my Synology the folder /volume1/docker/bwdata doesn’t exist.
I also logged on (as root@bitwardenrs-server1) with ssh into the docker container.
However I am unable to locate the global.override.env file anywhere.
Did you find a solution?
Kind regards,
Marco
The admin portal can be enabled by adding an environment variable inside of the Docker containers settings. I didn’t include it in this tutorial, but I have an example of how it’s done on this page (using a Raspberry Pi) – https://www.wundertech.net/how-to-self-host-bitwarden-on-a-raspberry-pi/#admin-page. Basically, you will need to generate a 48 character string and add an environment variable with the string to get this to work.
As for the SMTP mail server, that link is pointing directly to the Bitwarden self-hosting instructions. This tutorial focuses on Bitwarden_rs (easier to implement, less resource intensive build). Check out these instructions to help with the SMTP server: https://github.com/dani-garcia/bitwarden_rs/wiki/SMTP-configuration
I’m on step 3-4 and when I click Apply to get the Let’s Encrypt certificate, I get the error message: “Failed to connect to Let’s Encrypt. Please make sure the domain name is valid.” – Any suggestions at to what I’m doing wrong? I copied the domain name directly from my duck DNS site so I know it’s not a spelling mistake. Any change there is some kind of port I’m blocking that’s not letting me actually access Let’s Encrypt?
Have you created the reverse proxy yet? If you haven’t, create that, ensure ports 80/443 are opened, then retry. That could be the issue. Let me know how it goes!
Thank you for the excellent tutorial. I have read the comments and have 3 questions:
1 – what is the recommended way to update Bitwarden? Do I turn off the current BW docker and start again with same settings?
2 – how should I backup the BW data? what folder/file to backup?
3 – can I follow these instructions for docker on ubuntu?
Thanks.
Hello!
1. I have a tutorial up for this which will hopefully clarify the update process – https://www.wundertech.net/how-to-update-docker-containers-on-a-synology-nas/
2. You will backup the entire “bitwarden” folder that you created. You can use any tool you’d like, but an encrypted Hyper Backup file would probably be best.
3. You will have to alter them slightly, but the overall theme will be the same. With that said, you might be able to find some Ubuntu instructions, but I will put this on my list for a future tutorial!
Hello ,
Thank you for this awesome easy -to -understand tutorial about how to self-host Bitwarden.
I was wondering if you could also please explain to me/us how do we update the container? looks like there are newer versions but i still have the older one, is there the posibility to run an update ? if yes, how is it ?
Thanks in advance!!!, Best regards,
Nico
Hello! Glad to hear that it helped. You can find out how to update the container here: https://www.wundertech.net/how-to-update-docker-containers-on-a-synology-nas/
Thanksss <3!
Has anyone had issues with bitwarden becoming non-responsive? I have this installed on DS1019+ and it seems to work at first and then I get spinning icon and it seems to freeze. I wait for 10+ minutes and then have to restart the docker image. Same things – freezes. Thanks.
I haven’t personally experienced this. Are you running into any NAS hardware issues? Meaning high CPU/Memory usage?
No – no hardware issues. I make minor changes such as making new folder and I get spinning wheel. It does not happen every time but enough that it makes me hesitant to rely on it for all my passwords. I’m on a DS1019 with 8GB ram. CPU and RAM usage 4% and 12 % respectively.
That usage wouldn’t cause any issues then. Have you tried to recreate the container to see if it’s any better? Are any of your other containers having issues?
I recreated the container and so far I have not experienced any significant issues. I do not have any other containers.
Thank you. Appreciate all your help.
Not a problem, glad to hear it’s working better!
hello, Thanks for the great tutorial! Since I already use pFsense & HAProxy I skiped the reverse proxy setup. I am able to using Bitwarden using the ipaddress:5555 but when I try to use my bitwarden.domain.com I get a “503 Service unavailable error” If I use bitwarden.domain.com:5051 I get my nas login so I know the domain name is resolving. Can you help?
What port are you using for your reverse proxy? Is it 80/443? Do you have the firewall rules configured properly?
Sorry for the generic questions, the reverse proxy setup is fairly straight forward (especially if it’s working by IP_ADDRESS:5555), so it has to be something between the reverse proxy server and the Synology NAS.
First of all – thanks for the tutorial. I’ve gotten it to work with a self-signed cert, but I’m having some minor issues that I want to address.
I can access the bw web panel with HTTPS and it works correctly at https://bw.domain.tld, but when I access this domain with HTTP, it goes to my DSM login – is it possible to autodirect anyone going to the HTTP page to HTTPS? I already have this autodirect set for regular DSM (http://nasip -> https://nasip) – the behavior here seems to reflect that when I want it to do http://bw.domain.tld -> https://bw.domain.tld instead.
Secondly, I’m unsure how to get the reverse proxy to work with a port that’s not 443. I’m only able to access the bw web panel when the reverse proxy port is 443. I’d like to use a different port.
I followed your setup above except that I’m using a self-signed cert (for bw.domain.tld through DSM) and my DNS server is AdGuard Home (Pi) with the domain bw.domain.tld -> nasip (I feel this part is the culprit, but I’m not sure).
A few questions before we continue:
1. Do you intend on exposing Bitwarden outside of your local network? If you do, you probably want to use a Let’s Encrypt certificate rather than a self-signed one. If you use a self-signed certificate, you will be responsible for adding the certificate to each device whereas Let’s Encrypt will handle it on its own. Plus, Let’s Encrypt is designed for external traffic.
2. The reverse proxy on a Synology NAS will use any port that you want. In the “Port” section under the “Source”, you will be able to add any port you’d like. You just need to make sure that port is opened on your router to your Synology NAS.
I would be careful and double check your entire setup. Right now, it appears like your NAS (DSM) might be exposed outside of your local network. You shouldn’t have your NAS’s ports (default 5000/5001) open on your router.
I will not be using Bitwarden outside my local network (I’ll connect through OpenVPN externally) and the NAS is not connected to the outside otherwise. I opted for the self-signed certs so I can use a custom domain set via my DNS server. I only have a few clients so importing the certs to each is something I’m fine with.
The setup is generally fine as is in that BW works on on the desktop. It’s just annoying that when I go to the RP hostname with http (http://bw.domain.tld) -> I’m sent to the DSM login. Once I get this fixed, I’ll be pretty happy.
Another issue I’m having is that Android and iOS clients using the BW app with the RP hostname set as the custom server won’t connect – something to do with SSL I think, but I’m pretty sure this is a wider bitwardenrs issue.
Got it, sorry for the confusion!
For your first issue, it sounds like you’re trying to access it without the port. Domain names can’t include port mappings, so you will have to append the port (:5555) to the end of the domain name. Hopefully I understood the problem properly, but that is most likely what’s causing it.
For your second issue, my assumption is that since you’re trying to use an SSL certificate, you’re trying to connect using HTTPS. HTTPS is unfortunately not configured by default (it’s designed to use a reverse proxy), but you technically can enable HTTPS on it if you’d like following these instructions: https://github.com/dani-garcia/bitwarden_rs/wiki/Enabling-HTTPS
Let me know how I can further assist.
Hey Frank – I can’t reply to your newer comment for some reason so replying with updates here.
Long story short (and with a bunch of trial and error), I ended up resolving most of my issues using a custom reverse proxy (.conf file instead of the built-in Synology solution). I came to this conclusion while taking the steps to enable the LiveSync feature which require the custom .conf configuration (followed Rusty’s steps here https://www.synoforum.com/resources/bitwarden-self-hosted-password-manager-using-bitwardenrs-server-image.3/updates#resource-update-29).
Once I got this setup, any requests for http://bw.domain.tld automatically go to https.
The other annoyances I have are 1) the vault web timeout not respecting any option I choose (vault locks any time I refresh the page for example) and 2) Android app doesn’t log in. I’ll deal with these later, but welcome your thoughts. I’m pretty sure #2 is due to me using a self-signed cert whereas I’m not quite sure about #1. Thanks again!
Sorry about that – most likely has something to do with Cloudflare (cache resets every hour).
I’m glad to hear you got everything working! For your first issue, that might just be a bug in the version you installed. I can’t say I’ve experienced it (but I’m definitely running an older version at this point), so maybe update in a month or so to see if it fixes the issue.
For the second issue, are you selecting the gear in the top left (or right, not sure where) to put in your custom domain information?
So it turns out my first issue (web vault timeout) isn’t really an issue at all. The web vault locking upon refresh is normal and that’s how the official BW one acts too. I was confusing that with actual timing out.
As for my second issue, it turns out I mistakenly imported the wrong certificates onto my iOS and Android devices. Once the correct ones were installed, their respective apps work without issue.
FYI – I’m a different Mike (not Mike Keys) – so sorry for the confusion there. I just realized I responded to his post instead of creating a new comment. Anyway, thanks again for the tutorial!
I think I misunderstood the initial question, because now that I see what you’re saying, you’re absolutely right! The vault locks when you refresh the page. It will lock after a certain duration as well, but I’m pretty sure that’s configurable in the settings.
I’m glad to hear that you were able to get everything working though. Thanks for checking out the tutorial!
I was using the wrong port with my haproxy setting. Should have been using 5554 instead of 5555. Made the correction and now everything works!! Thanks again
Glad to hear you got it working!
Thanks a lot for this tutorial, I’ve set it up with no issues at all!
Not directly related to the tutorial, but one thing I’ve just found out is that the “users” group has read permission to the docker shared folder by default, even if no permission checkboxes are checked in the group permissions.
That means that any user, even guest (if you have it enabled) can read all files in the docker folder!
I guess this is a Synology thing more than a docker thing, but its a big NO-NO for me, as sensitive information (like a bitwarden database?) could be just downloaded by anyone with access.
The only way I’ve managed to remove access is to check “No access” for “users” in group permissions, but this makes the folder invisible to anyone, even administrators which is not ideal. Checking No access for each individual user except for the admin works, but then I would have to remember to do it for any new user created, so not a solution…
Great input and thanks a lot for sharing!
This is important for everyone to know, but I do want to point out that simply having the database does NOT expose your passwords. A threat would have to restore the database and then try and decrypt it with your master password. If your password is weak (and they have endless time), this is possible. If you’re using a strong password, while it’s something you certainly want to make sure doesn’t happen, the data IS encrypted.
This isn’t to detract from your concern because it’s perfectly valid! Just wanted to highlight this point as well.
I totally agree that with strong passwords it’s not a big deal that someone gets the database (today.. and if you are not a high value target).
However, my point about the database was only an example to the underlying risk, because in the docker folder there may be volumes for other containers which have sensitive information. I don’t have a nginx-proxy-manager container but does it not store ssl certificates in the mounted volume? (It’s a guess, I honestly don’t know). Other containers may include “.secrets” types of files with passwords, or store private keys… etc.
And if I may suggest a topic for one of your videos, have you considered doing one for a fail2ban container to complement the bitwarden one? I’ve set this up because I was afraid of someone brute-forcing through bitwarden (even though I’ve set 2FA and have tasks in the task scheduler to stop the bitwarden container during the night).
Again, many thanks for your tutorials because I’ve learned a lot that would have otherwise taken me much more time and energy!
Absolutely! I didn’t mean to imply that it wasn’t an important point, because it certainly was.
I will keep this in mind for future tutorials! I haven’t used that myself, but it seems like an awesome tool to implement! Thanks so much for the feedback and for checking out the tutorials!
I have the exact same problem as Tes reported, everything works fine for a few minutes then I just see spinning wheels in the vault and the settings pages. My mobile app won’t sync and the chrome extension won’t login. I’ve tried recreating the container, but it hasn’t worked for me. Can anyone help?
The problem appears to be related to the csv import from LastPass. Clearly there is something it doesn’t like in the csv file. I am going to go through them and see if I can figure it out. Does anyone know of any issues that may cause this?
Is it only happening when you import or is it happening randomly? If you try and create a new entry, does it succeed?
Dean Collins, I have that exact same problem and did the LastPass import too… Annoying bug.
I had to open another subnet in my NAS firewall rules to enable Bitwarden to work after these instructions.
I ALLOWED:
172.17.0.0/255.255.0.0
My problems were that after connecting locally (on my subnet) once the container would hang. The android app wouldn’t connect ever. Icons would not download properly.
Glad you got it working and thank you for sharing. I didn’t have to do that on mine, but it’s good that other people are aware!
Hi, searching for a few items in the net I landed on your videos…and found it to be the probably best guides which indeed work out.
I installed Bitwarden on a Synology NAS in the docker, all good and working. However, there are following challenges:
1. Your step “5. Deny Account Creations”: I did as recommended but still have the mask and button available to create new accounts. I also added as variable disableUserRegistration with value true, but still the same result. Or is the input mask visible but finally the accounts are not submitted? Where could I check which accounts exist and potentially delete?
2. I installed the extensions (desktop Mac, browser extensions for safari, opera, edge. Entering login data for hotmail, gmail nothing happens, Bitwarden does not ask to save anything, even if I manually add the data to Bitwarden vault, clicking on the symbol next to the url entry, Bitwarden says that there is no login data available to this site. anything I did wrong? or how can I convince Bitwarden to recognize the login data for eg. these email accounts? Also when a site asks for more input fields like an account number, how can the extension work?
Thanks for checking out the tutorial!
1. The option will still be there, unfortunately. However, if you try and create an account, you should receive an error and it shouldn’t allow you to. Is that how it’s working?
2. When you say that it doesn’t save, do you mean to the vault, or the vault isn’t properly writing the information to the login page when you select it?
Hi. Many thanks for your tutorial. I tried to follow it and managed to get access to the bitwarden server on my NAS. But somehow https is not working properly. If I open “bw.xxxx.synology.me:5554” I only get a http connection and the browser tells me “not secure”.
If I connect to DSM (xxxx.synology.me:70xx) I get a https connection.
I don’t know where I’ve messed it up. Do you have an idea?
Did you properly get a certificate for bw.xxxx.synology.me and apply it to the domain? Also, are you testing this internally or externally (of your network)?
I can see the certificate for bw.xxxx.synology.me in DSM. It shows a green lock. For me it seems to be properly installed. I have choosen this certificate in “Configuration” for the service “bw.xxxx.synology.me:5554”.
I tested both. From outside of my network and internally. It’s the same for both.
Hi. You can ignore my question. The problem was that I didn’t forward the port in my router correctly…Now it works. Thank you for your tutorial.
Glad you got it working!
@WunderTech thanks for the tutorial really appreciate it.
I followed your tutorial to the dot. The docker container port it is default to 80 and the local port is 5555. I have used the default DDNS service and set up mxxxx.synology.me which is working for me. Under router configuration I have custom port local port 5554 and router port 5554 setup. Tested the connection and it’s working. Under firewall I have allowed port 5554,5555 all connection from my country to allow. Deny all is right at the bottom. SSL certificate done and it was working fine before the tutorial so I just check that under the configuration tab services mxxxx.synology.me:5554 and certificate is selected. In my router port settings:
ID Service Type External Port Internal IP Internal Port Protocol Status Modify
1 Bitwarden 5554 192.168.0.128 5554 TCP
The problem is when I navigate the browser to https://mxxxx.synology.me:5554/ I receive:
Sorry, the page you are looking for is not found.
What am I doing wrong?
I have also setup reverse proxy setting. Source Hostname https://mxxxx.synology.me port 5554 and Destination hostname localhost 5555.
When you say that you allowed traffic on your firewall, did you port forward it on your router as well? Can you check the port using this website to see if it’s opened? https://www.yougetsignal.com/tools/open-ports/
@WunderTech, thanks for your reply. I fixed the problem. I had to restart the router and Set Up the Router one more time to get it up and running. Thanks for the tutorial and reply.
I ran into another issue. After I have registered an account under my Self Hosted Bitwarden site. I think I screwed up the sign up process and now I am unable to login into Bitwarden with the master password. I received “Unexpected Error” message. Is there a way for me to uninstall all Bitwarden Docker instances and reinstall it to get a clean self host Bitwarden without any user accounts?
Yes, you will have to delete the contents inside of the “bitwarden” Docker folder on your Synology NAS. Once those are deleted, you can recreate the container. You might want to just move them to a different folder until you confirm everything is working, though.
Thanks for your very useful guide I’m jumping from lastpass like a million other people!
I’ve got the bitwardennrs server set up in docker on my nas as per your instructions with container ports set, the reverse proxy source and destination settings set. My Let’s encrypt cert is set up and showing the same port as the reverse proxy “source”
and the firewall rules set up as per the instructions. The problem I had was it took me ages to get into the bitwarden server login and account creation page. Attempts to point a browser at https://insertsillynamehere.duckdns.org:reverseproxysourceport from behind my home router just timed out all the time. I tried to connect using my mobile phone data connection and it worked immediately and I was able to set up an account and import my .csv . I found to make the desktop/laptop browser plugins work behind my home router I had to use http://synologynaslocal_IP:reverseproxydestinationport for the self hosted environment server field. It all works nicely but anyone have any idea why I can’t use/see the https duckdns url from inside my home network? I wondered if it might be some DNS cache lag, or rubbish router from my ISP. Thought my problem and workaround might help others. Thanks again Sam
It sounds like you set everything up properly. Are you using a local DNS server, by any chance? Any firewall rules (limiting traffic to your local country, for example)?
Thank you for the very detailed setup instructions. I have setup the server and everything works well. I am able to access my endpoint from inside the home network( using pihole), from the internet, and on the app.
The only problem is on my ios app, I don’t see recently added entries in the vault. I have to refresh manually to see the new vault items. Is this expected behavior? any solution that can automate the refresh on mobile app?
When you say that you have to refresh manually, do you mean that you need to “sync” manually? If you completely close out the app and reopen it, does it sync on its own?
I tried killing ios app, and reopening. Right after login I searched for the newly added item I could not find it.
I changed settings on app, Settings>sync>Enable sync on refresh = yes.
Now when I pull down in the vault it triggers refresh and sync, after sync happens I can find the newly added item.
That sounds like it might be an app issue. If everything is working as expected when you sync manually, the connection to the server is working properly. While it’s not ideal, I would wait for the app to be updated to see if there are any bugs that are resolved.
I see why it’s not working .. it’s missing a feature on bitwarden_rs unofficial server.
https://github.com/dani-garcia/bitwarden_rs/wiki
I don’t think that Live Sync is what’s causing your issue. Your issue sounds like it’s not syncing at all unless you manually do it. It’s supposed to sync when you open the app. It could be an app issue – at least that’s what it sounds like to me.
I tried killing the ios app, and reopening doesn’t sync. I have enabled option sync on refresh, so when I do pull-down action on the vault it does sync. But I have to do that manually if I want to see any updates on my ios client app.
Question on this Docker container. You’re using the bitwardenrs/server container. How does this differ from the official bitwarden/setup container on DockerHub? Has this container been vetted as backdoor free? I’ve looked at the github page, https://github.com/dani-garcia/bitwarden_rs and I don’t see anything nasty, but I’m no expert.
Would you consider doing another tutorial using the official container?
Thanks!
You can technically set up the official Bitwarden instance, but it requires higher resources and is significantly more complex from what I remember. I can’t speak to the tests that bitwardenrs has been through, but I know it’s the most widely used Bitwarden container (not to say that makes it to be secure). I would say that you should go with your gut, and if you’re concerned, the official Bitwarden instance hosted in the cloud has been thoroughly tested and can be trusted, in my opinion.
I will look into the official image for a future tutorial!
Hi Wundertech, thanks. I can confirm I have bitwarden up and running in a Docker container on my Synology NAS with reverse proxy and Let’s Encrypt certificates. Question: how can I use the bitwarden mobile app or Windows desktop client to access my local instance? It seems I need an organization ID. How does that work?
When you launch the application, you will see a “gear” icon in the top left. Click that and then you should be able to enter in the custom information. Let me know if you have any trouble!
Hi, Wundertech. Thank you so much for putting together such helpful video. I have followed it and successfully set up mine on my Synology NAS. It is working as expected on my Android Bitwarden app and my wife’s iPhone as well as a browser extension. The only thing I found not working is the Bitwarden Windows desktop app. When trying to connect to my self-hosted Bitwarden, I got ‘Failed to fetch’ error. Do you have any idea how to make the desktop app work?
Glad to hear you got it partially working! As far as the windows application, do you have a firewall on or anything like that (on the NAS)? If so, it could be blocking the connection. Let me know and we can continue troubleshooting!
Hi WunderTech, based on your description the installation was seamless and perfect, thank you! I have realized that the developer changed the name of the container (as you highlighted). I would like to update the container. Should I install the new, renamed container on the same way than before and point to the same file/folder (data/bitwarden) to have all of the passwords? I don’t want to lose the data. Thanks to your suggestions.
That would be my recommendation! I believe that there are other ways of doing it, but since it’s so easy to create the container, it doesn’t hurt to just set it up again.
Worked like a charm, thank you! 🙂
Hello, seems that at this time bitwardenrs has been deprecated ( https://registry.hub.docker.com/r/bitwardenrs/server/) and there a new version https://registry.hub.docker.com/r/vaultwarden/server/ Any comment?
That is correct! I added a note when it first happened in May (in written instructions), but haven’t had a chance to update the screenshots. It is the same application, just a new name.
Hi
I have succesfully managed to have a running bW server following your instructions…farewell lastpass!!!
I have a problem with the ios app…it doesn’t want to connect….connection timeout after about a minute of waiting on the connecting prompt….any ideas as to what could be going wrong?
All other methods of accessing the vault work perfectly….
Thanks
When you try and access the application, are you inside or outside of your local network? Any specific situation where it’s working and then it stops working, or is it only on the iOS app? Also, did you configure the iOS app to use your local server?
Hi
Is there a way to backup all the data in the vault (perhaps as a vault export) to say Google Drive/iCloud/Dropbox or something. Make it perhaps a monthly task.
This is just in case something happens to my NAS.
You can, but it’s probably easier to do on the Synology side with something like Hyper Backup. You’ll have to back up the “bitwarden” folder and can back it up to any provider you’d like. Just keep in mind that you’ll need a docker instance to “restore” it.
Hi,
Thank you again for all your videos!
After I followed all the steps when I type xxxxx.domain.com it doesn’t redirect to me to bitwarden/vaultwarden (thanks to reverse proxy) and It opens Synology Login Portal. What can be the issue?
However, if I enter xxxxx.domain.com:5554 it worked. But is the main point of the reverse proxy to not type the ports ?
Another issue that I have is when I open port 443 on my router (Ubiquiti UDM) I can’t longer login to the router locally.
I really appreciate any help you can provide
Cheers,
Nicolas
Change the port to 443 rather than 5554 (if you don’t want to type it in), then ensure 443 is open on your router and it should work the way you’re expecting it to!
Hi!
Thanks for the great work!
I guess everything works just fine. But i cannot login into mobile Apps or Browser-extensions. I click at the “setting” gear-symbol and enter the DDNS-Name with Port like https://xxxxx.myddns.me:5554. Then i enter the registration name and password, but nothing happens, sometimes i get strange errors.
Do you have any advice?
Greetings
Thanks! Are you on an external network at that point? If you try and access the bitwarden URL from a webpage instead, does it work?
Hi there,
Thank you very much for the extensive guide on how to set up the server.
I as many others I also recently migrated from LastPass to bitwarden.
At the moment I had not seen this article on how to host the locker on my own NAS so I have just been using bitwardens vault.
This means that I created an account at bitwarden already that I am using in my browser extensions and mobile apps.
I have not yet created my bitwarden account on my own nas.
I am very fond of using these extensions and apps however, now that I have set up my own bitlocker vault, how do I configure these extentions and apps to point to my own bitwarden server?
Sorry found it already:
https://bitwarden.com/help/article/change-client-environment/
Glad you figured it out!
Following your guide – thank you -I have successfully installed bitwarden in a docker container.
Where are the data files stored locally?
I mounted the /data directory in the docker/bitwarden directory – however I am unable to find the data folder i using File Manager.
When you start the container and access the “bitwarden” folder on your NAS, do you see any of the files? It should all be stored inside of the “bitwarden” folder (you will see a bunch of files there if it works properly).
Thank you for your prompt reply.
Thanks to your tutorial, everything appears to be working well with my installation.
Here are the files on my NAS in the docker/bitwarden directory.
rsa_key.pub.pem
rsa_key.pem
db.sqlite3-wal
db.sqlite3-shm
db.sqlite3
Plus the folder…
icon_cache
Which of these files contain my data files?
Glad you got it working! The short answer is all of them. Those files collectively make up the config of Bitwarden. If you want to restore this on a different device, you will need to use all of those when creating the new container.
Thanks – for your prompt responses and valued support.
Regarding future updates to Bitwarden – will I receive a docker notification? Or do I have to check for Bitwarden updates manually.
Glad to try and help! Unfortunately, you’ll have to check the versions manually. You generally don’t have to update on every version (meaning you don’t have to check all the time), but once a month should be enough.
Thanks for this tutorial. Might I request a follow up to this with possible backups that can be done?
I will add this to my list!
Hi, I Installed Bitwarden and it is working. However I can only access Bitwarden Login with http and not https. Message is Secure Connection Failed. xxxxx.PR_END_OF_FILE_EROOR.
Is my certificate not valid ?
Are you using Nginx Proxy Manager and can you access the webpage outside of your local network?