Today we are going to take a look at how to self host Bitwarden on a Raspberry Pi.
Before we look at how to set up Bitwarden on a Raspberry Pi, I want to make sure that I highlight that we will be installing Bitwarden RS. (now, Vaultwarden). Vaultwarden is an unofficial version of Bitwarden that’s great for self-hosting.
Overall, if you’re interested in self-hosting the open source password manager Bitwarden, this is what I consider to be the best option. There are two prerequisites that must be installed (Docker/Portainer, Nginx Proxy Manager). I will link to tutorials in the instructions if you haven’t set those up yet.
To have this exposed outside of your local network, you will need a domain name. If you haven’t purchased one, you can use a free DuckDNS domain name which we will configure in later steps.
Following the instructions below to Self Host Bitwarden on a Raspberry Pi will work on any device running Docker and Portainer (not only Raspberry Pi’s running Raspbian OS).
1. Self Host Bitwarden on a Raspberry Pi
1. Ensure that you have Docker and Portainer installed on your Raspberry Pi. Technically, you don’t have to install Portainer, but I find it easier to manage my Docker containers that way, so I’ll be using that to install Bitwarden on a Raspberry Pi.
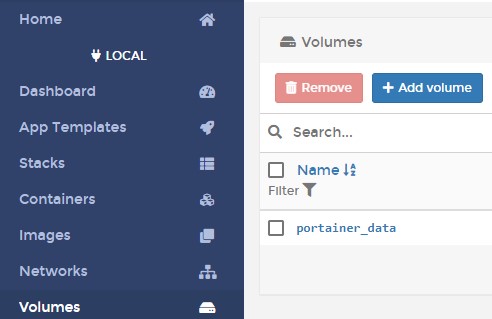
2. Select Volumes then Add Volume.
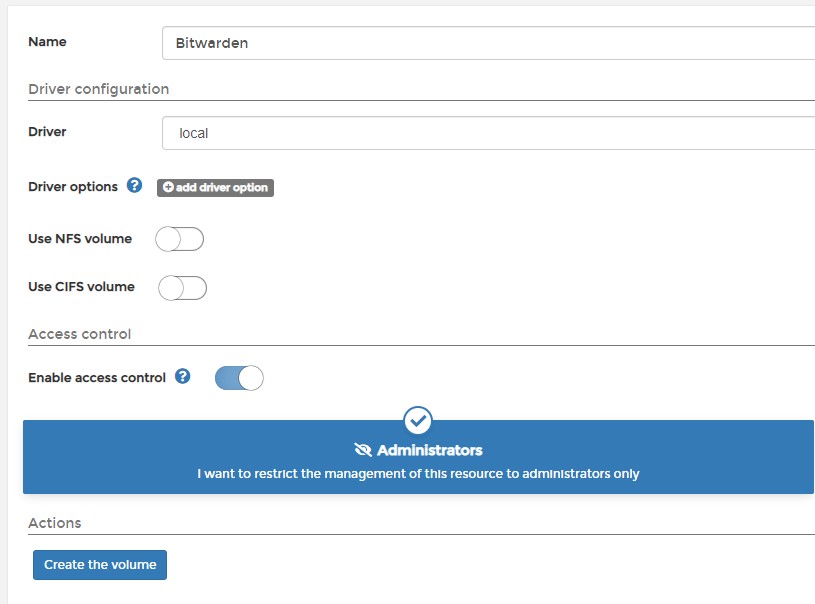
3. Add a Name, then Create the volume. This is where all of your important information will be stored, so back up this folder if you’d like to ensure your data is backed up.
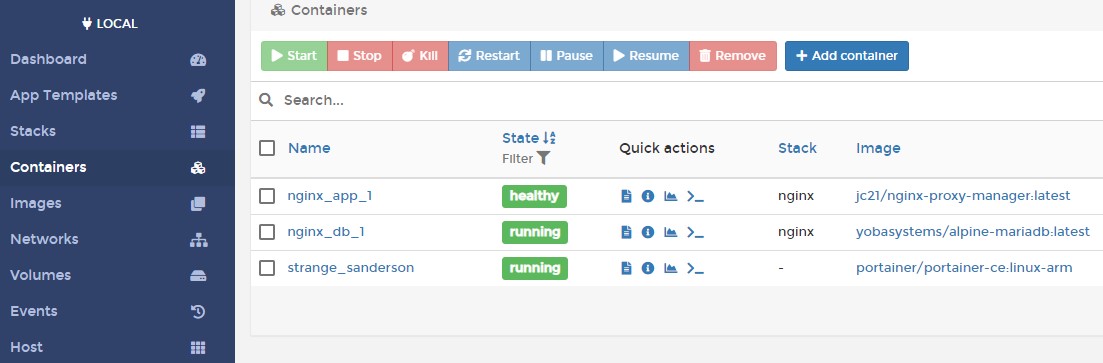
4. Select Containers then Add Container.
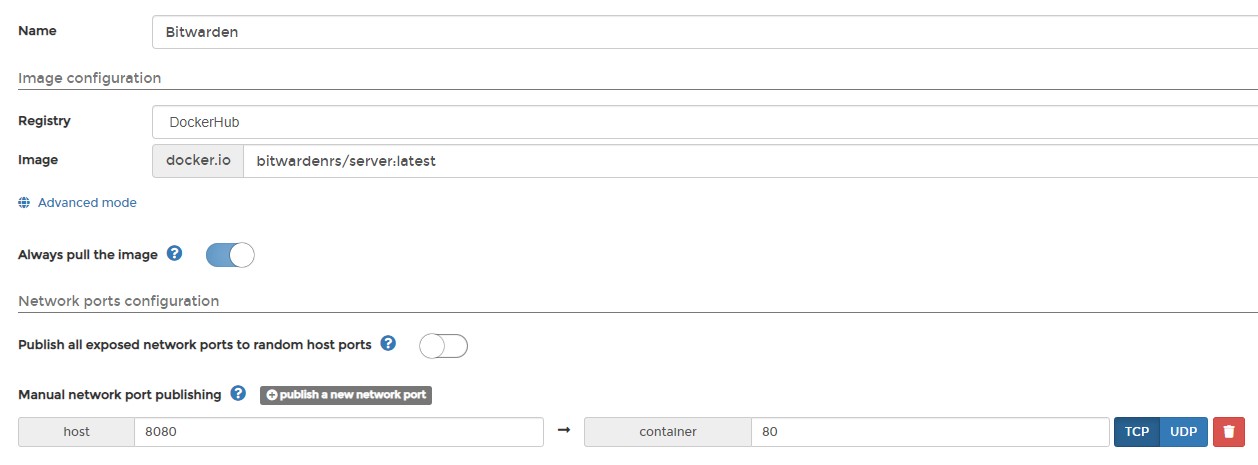
5/3/21 Update: The bitwardenrs image has been deprecated and renamed to vaultwarden. For this reason, you will have to use that image name (as opposed to what the screenshot is showing).
5. Give the container a Name, then in the Image section, add vaultwarden/server:latest so docker pulls the latest image. Finally, publish a new network port and map the host port 8080 to the container port 80.
6. Select Volumes, then map the /data container path to the Bitwarden volume we created earlier.

7. Change the Restart Policy to Always, then Deploy the container.

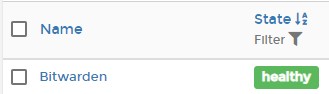
8. Give the container a few minutes, and it should be healthy.
9. Connect to the IP address of your Raspberry Pi and Port 8080 to access the web interface. This is to confirm that everything is loading as expected on the bitwarden server.
http://[RASPBERRY_PI_IP:8080
1.1 Reverse Proxy Setup
The recommended approach for exposing Bitwarden outside of your local network is by using a reverse proxy. In this tutorial, I will be using Nginx Proxy Manager which will be hosted on the same Raspberry Pi.
If you’d like to use Nginx Proxy Manager, you can learn how to set it up here. Alternatively, you do not have to use Nginx Proxy Manager, or a reverse proxy server hosted on your Raspberry Pi. You can use a separate reverse proxy server if you’d like.
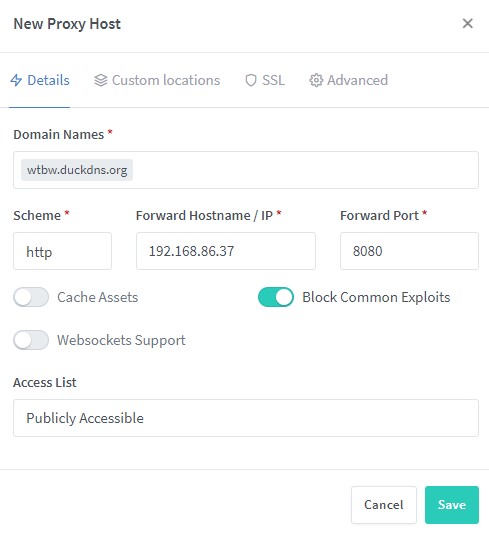
1. Select Proxy Hosts, then Add Proxy Host.

2. Enter in the Domain Name you’d like to use. Leave the scheme as http, enter in the IP address of your Raspberry Pi and port 8080. Select Block Common Exploits and Save.
3. Edit the record we just created, select SSL, then Request a new SSL Certificate. Make sure you enable Force SSL, HTTP/2 Support, and HSTS Enabled. Agree to the terms and Save. The SSL certificate will now be retrieved.

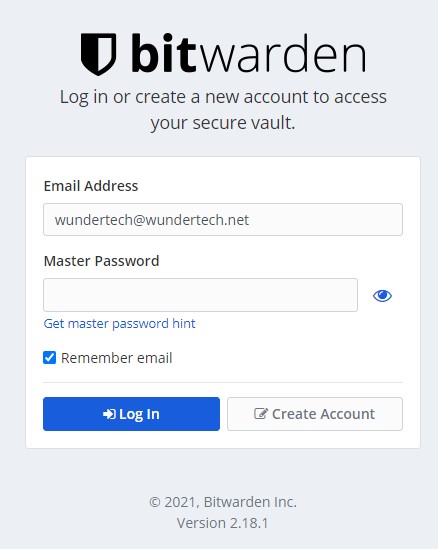
4. When you click the domain name, you will now be brought to the login page for Bitwarden! Create your account so that you can log in.
1.2 Disable Account Creations
After you’ve created your account, you can disable account creation if you’d like. To do so, stop the Bitwarden container.
1. Inside of the container, select Duplicate/Edit.

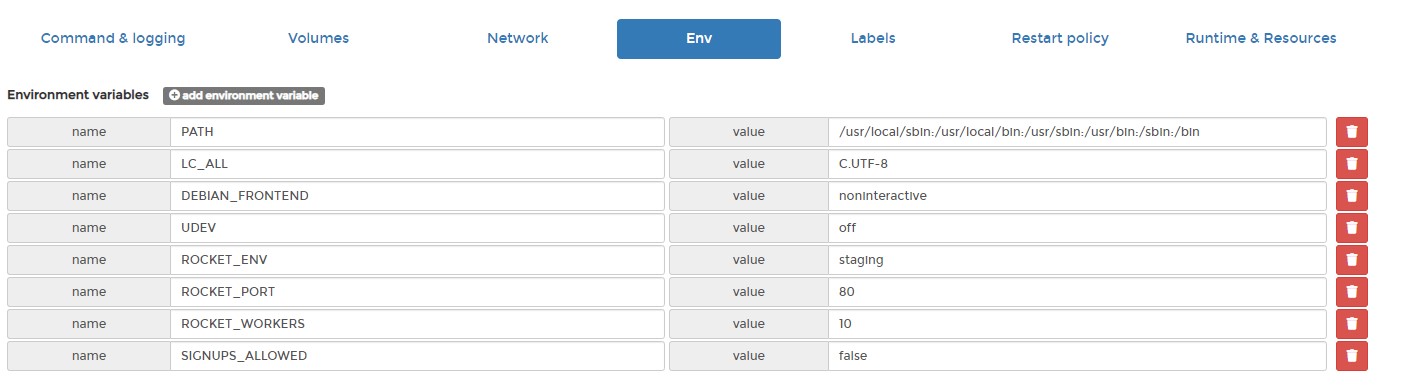
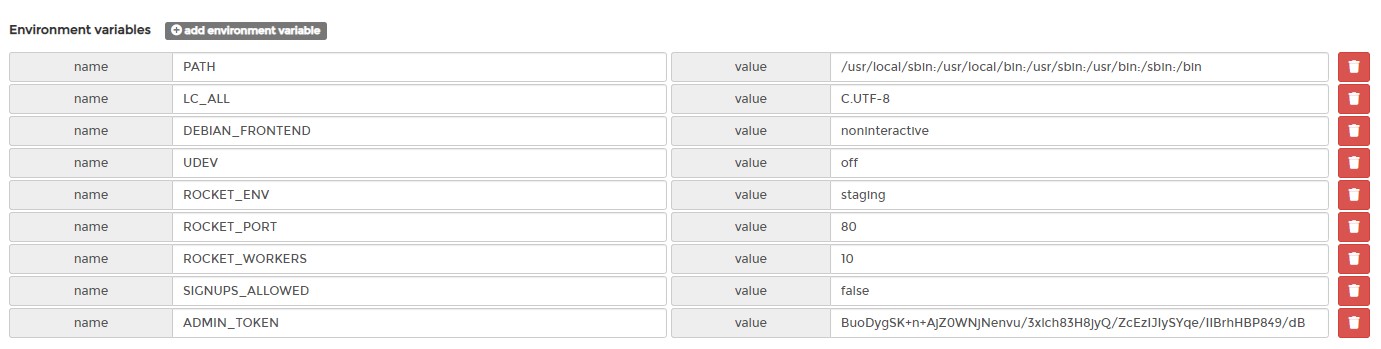
2. Add an environment variable named SIGNUPS_ALLOWED with the value false. Then, Deploy the container. When you get a popup stating that a container already exists under that name, Replace it.
3. If you now try and create a new account, you will no longer be able to. However, the account you already created will still exist!
1.3 Enabling Admin Page
There are various things that you can do with the admin page of Bitwarden RS if you’d like. You can learn about some of those options here. Follow the instructions below to enable the admin page.
1. From the command-line of your Raspberry Pi, enter the command below. In my opinion, it’s easiest to do this from a separate PC so that you can SSH in and copy the string.
openssl rand -base64 48
2. This will create a random string that is 48 characters long. Copy that string and save it.

3. Stop the container. Inside of the container, select Duplicate/Edit.
4. Add an environment variable named ADMIN_TOKEN, then add the 48-character string that you created in the last step.
Then, Deploy the container. When you get a popup stating that a container already exists under that name, Replace it. Make sure that you save this 48 character string since you will need it to access the admin page.
5. The admin page will now be accessible by the domain name you’re using and /admin. You can access the admin settings by entering in that 48 character string.
https://[YOUR_DOMAIN_NAME]/admin

2. Conclusion – Self Host Bitwarden on a Raspberry Pi
This tutorial looked at how to self host Bitwarden on a Raspberry Pi! Bitwarden on a Raspberry Pi is awesome, and Bitwarden (VaultWarden) is a great alternative that will allow you to self-host the password manager.
Make sure that you are always using two-factor authentication for your account. This cannot be stated enough.
Thanks a lot for checking out the tutorial on how to self host Bitwarden on a Raspberry Pi. As always, if you have any questions on how to self host Bitwarden on a Raspberry Pi, please leave a comment in the YouTube video above!


Hi. Is the following setup possible?
I want a combination of the following on a raspberry pi 4. It must act like a server or something and than use openvpn , atc as a NAS AND bitwarden.
You shouldn’t have a problem implementing everything, but you might run into some performance issues. Especially when clients are connected to OpenVPN. Do you have a more powerful device running 24/7 that you can offload some of this to?
Thanks for the article! You picked a great time to post. I am having an issue when I get to requesting the SSL Certificate. After clicking save I get “internal error” with no other details. Do you have any suggestions on how to troubleshoot?
Please disregard. I had bad port forwarding rules on my firewall. Make sure to forward both 80 and 443 to the Raspberry Pi hosting everything! Thanks again.
That error generally occurs because the Let’s Encrypt certificate failed in some capacity. If you have the time (and desire), you can search through the Nginx Proxy Manager logs (through terminal) to find the exact reason the certificate failed, but it generally has something to do with one of the items below:
1. Did you properly create an A/CNAME record for the domain name, pointing to your external IP address?
2. Is ports 80/443 port forwarded to your Raspberry Pi?
3. If you have a firewall, are ports 80/443 allowed?
4. If you’re using Cloudflare, do you have the DNS record as “DNS Only”?
I have this same problem. I’m using duckdns I forwarded both 80 and 443 to 8080 and I am still getting the internal error.
The internal error means that the certificate can’t be retrieved. I’m not sure how comfortable you are in the terminal, but if you check the logs for the Nginx Proxy Manager container, the reason why the certificate will not retrieve will be there.
I am having the same internal error. I am using duckdns and have forwarded ports 80 and 443 to 8080. I don’t see anyway to create an A/CNAME with duckdns. Do you have any other ideas?
Hey, thanks a lot for the great tutorial! By far the best and the only one that worked for me.
I would like to ask, if I have PiVPN setup that is tested and running, can I use that to access my vault instead of Reverse Proxy? I don’t want the Bitwarden server exposed to the internet since it isn’t that necessary.
The big question is, can I do your setup + a Wiregurard PiVPN on the same Raspbery Pi Zero?
Thanks so much, I’m glad it helped! You CAN do it, but you will most likely have some performance issues. Unfortunately, the Raspberry Pi Zero is not that powerful, plus it does not have gigabit ethernet (which is very important for WireGuard as far as speed goes). So in summary, yes, you can do it, but you might run into some performance issues.
If you do decide to do this, I would also suggest enabling HTTPS: https://github.com/dani-garcia/bitwarden_rs/wiki/Enabling-HTTPS
Let me know if I can answer anything else!
Hey, thanks for getting back to me! I tried WG on my Pi Zero and Pi 3 B and it’s bottlenecked by my very modest ADSL connection (1Mbps upload speed) running on a 150Mbps router, so Ethernet wouldn’t make it any better I guess!
I asked a question on your other post about nginx which I was also having a problem with, basically the nginx app staying “unhealthy” and generating an error in the log. I’d appreciate if you take a look at that too!
Thanks again for your time!
Glad you got your answer! I actually just responded to that, just not sure how much help it will provide. Hopefully with some feedback we will be able to get it working!
Thanks for your help! Do you think it would be something in the sequence of installing/running things? I installed Docker, then Bitwarden Server, then Nginx.
Btw, is that actually Bitwarden_rs and named Bitwarden/server in Docker? Sorry I’m fairly new to this.
Thanks again!
I believe that bitwarden/server is different. The image that I use in the tutorial is bitwardenrs/server. Are you using that one or bitwarden/server?
It’s certainly possible that it’s the order, but I can’t confirm that. Have you tried starting from scratch with a fresh version of Raspberry Pi OS and installing NPM first?
Hi again! So I had the time to test this on a Pi3 B and it worked out of the box! Turns out the Pi Zero W had an unsupported armv6 architecture – I actually used to see a message like this when deploying in the terminal but didn’t know it would be such a huge problem – since things still worked anyway!
Now, after everything is set, when I use my DDNS address inside the network it throws an error with ERR_CONNECTION_REFUSED, and from outside it throws ERR_CONNECTION_RESET. I used Np-IP with the DUC on the Pi, and made the SSL certificate and port forwards all according to the tutorial.
Also, the local-addres:8080 opens the Bitwarden interface just fine without the HTTPS, once I add that in front it throws an error with ERR_CONNECTION_CLOSED.
What would possibly be the reason for that?
Thanks again for your collaboration and your great posts! You’re truly a great human being!
The internal HTTPS issue makes sense, since bitwarden_rs only listens on HTTP. For the reverse proxy, that doesn’t make sense. Are you using a firewall on your Raspberry Pi? Can you confirm using an online port checker that the port is properly opened?
Hello again! I just want to once again admire this tutorial for it was the only one that got me successful results!
And following up today after applying it with updated notes (and using a Pi4) I have full success with everything.
One of the mistakes I did was forwarding port 433 instead of 443 (a stupid typo that cost me days of running around in circles). Also the note about Nginx version helped a lot with the “unhealthy” status.
Thanks again and thanks for your help throughout my journey!
Glad you got it working and thanks for the kind words!
Hi Wundertech. This was the best tutorial I found so far on the internet! Thanks a lot for this, It helped me fix this in one evening on my raspi 2B :)!
I was wondering, do you also have a tutorial to add nextcloud as a docker container on the pi?
Thank you very much!
I don’t have a tutorial for that, but I will keep it in mind for future a tutorial!
Thanks for these straightforward instructions. I was reading the bitwarden_rs wiki page on updating and saw a number of different methods. Based on your installation methodology, how would you suggest updating bitwarden_rs?
This is my preferred way of updating Docker containers: https://www.wundertech.net/how-to-update-a-docker-container-using-portainer/
Make sure you take backups of your volumes first!
Thanks for your quick reply.
Hello,
i exactly used your instructions and everything works fine.
except the thing, that i cannot acces my bitwarden domain in my local network. when i use vpn or just another extern network i can access the domain.
do i need to configure the host file on my raspi?
Are you using a DNS server by any chance? You should be able to access it internally if it’s not being blocked by a firewall or routed to a different server by a local DNS server.
Hello,
Yes i am using Pi-Hole on an dietpi Image (this is a lightweight image for the raspberry)
Do i need to configure the Host File on the Raspi like this:
my.domain.com 192.168.0.2:123
Or do i need to change something at the Pi-hole?
If you’re exposing it outside of your local network, you shouldn’t have to change anything on Pi-hole. If you’re only planning on using it internally, yes, creating a local DNS record for the IP address (not the port) will be correct.
Yeah i want to use it internally and externally. I made a Port Forwarding on my Router 80 to 80 and 443 to 443.
Nginx gets a valid SSL Certificate as well, but i only can access the domain from an outside network like VPN.
When i use my local Network i get forwarded to mydomain.com:8443 and i do not know why this is happening.
Have you tried to create a local DNS record for that domain and point it to your Raspberry Pi?
Thank you!
Now it works like a charm.
Hello and thanks for this instructions!
I have the problem, that i only can access my domain via VPN, not when i am in my local network. Then the forwarding goes to Port 8443 i dont know why..
Could you help me?
Best Regards
Are you using a firewall that’s blocking access? Also, when you say the forwarding port is 8443, what exactly do you mean?
No on the Router is no Firewall and on the Raspi also not..
This means: When i click on the link to mydomain.net i get redirected to “MyWANIP:8443” – This happens when i am at my local Network.
When i use a VPN Client or the mobile network of my phone and i click then to mydomain.net i get the Bitwarden Homepage with full SSL Certificate.
And thats why i cannot use Bitwarden in my local Network, only when i use VPN.
Do i need to redirect it internly?
So you didn’t open the port on your router? If you didn’t (and 8443 is opened), that could be why it’s trying to forward you there. It’s honestly hard to say what could be doing it since it depends on your local configuration, but you will have to try and trace the route that’s being taken to determine where the forwarding is occurring, then undo it.
Would just like to confirm that this works on Diet Pi (Armv8 version)! This way, the system is even more lightweight and runs perfectly fine on my Pi 3. However, I did have to change some stuff up first as the installation scripts didn’t work too well.
I installed docker, docker-compose, and portainer using the ‘dietpi-software’ application.
Portainer defaults to port 9002 for some reason (use dietpi_IP_address:9002 to access), but that’s not a big deal.
Then, I installed bitwarden using the above guide. For some reason, the first (and second) time I did this I had errors showing up ALL OVER THE PLACE with my nginx reverse proxy. So I did a full clean install and installed everything I could using dietpi-software instead of install scripts and it worked flawlessly.
Is there any kind of backup solution you recommend? I’ve made a full disk image copy of the rpi’s sd card and am thinking of just backing up the bitwarden and portainer volume data regularly – but I’m sure there’s a better solution.
Either way, this is a great Last Pass alternative, thanks!
Thanks so much for sharing!
I’m not sure whether my question should reference your Nginx Proxy Manager tutorial rather than this one, but here goes. I see that I can manually renew Let’s Encrypt certificates through the NPM web service. I would like to be able to automatically renew the certificates through NPM as appropriate, but I suspect that it doesn’t do that by default. I also see that certbot is installed in nginx_app_1, but is there a capability in NPM (or bitwarden_rs) for automatic renewal or do I have to set up my own CRON job?
NPM should automatically renew the certificate, but you might get an error if you try and do it too early. I know that NPM will limit you to X number of days before expiration (you can find that in the log if you try and get an error), but no, you shouldn’t need to set up a CRON job. NPM should renew it, or you can manually renew it a few days before if you’d prefer, just to be safe.
Hi WunderTech,
Ive followed your instruction and anything works fine. I just checked the ssl configuration with ssl labs and found out that there are some weak cipher in use. I already was looking for disabling cipher suites for the nginx reverse proxy, but every google search brings me to a nginx.conf file which does not exist. Do you know where the settings stored?
regards
pLeX
That could be inside of the container, though I haven’t tried to do it myself. If you mount a volume (instructions in this post https://github.com/jc21/nginx-proxy-manager/issues/564), you should be able to edit that file.
Hi,
nice tutorial.
Just one question: is there a reaseon that you do not use portainer for nginx?
Greetings
I’ve found it easier to install using Docker Compose and the CLI, but technically, you can install it using Portainer if you’d like!
Hi, thanks for the fantastic guide, I can’t understand how to program a Bitwarden backup on external USB. Can you explain to me how to do it?
I also satisfy a backup on NAS with rSync protocol
Thank you very much.
I’m glad it helps! There are many ways to back up the Pi/container, but the easiest is to probably rsync the folder where the volume is mounted to a different device. You can then encrypt that and back it up off-site (to fulfill the 3-2-1 backup rule). Like I said, many ways of doing it but that’s one of the easiest!
Hey WunderTech, thank you for this tutorial. It’s easy and just works.
I’m not using the nginx proxy manager but a nginx proxy on another device. One thing to think about is restricting the /admin page access to internal net devices only. Just one step safer 😉
Chris
I will definitely keep this in mind for a future tutorial! Thanks so much for the feedback and for checking out the tutorial!
Can you check the nginx proxy manager? I’m pretty sure that it got some bugs on generating certificates, both in new and renewal.
There are logs inside of Nginx Proxy Manager that you can check. Generally, certificate issues occur when the domain name can’t be validated or 80/443 isn’t opened to the right device.
I can access my bitwarden website from outside my local network but not from inside. If i go to http://[local raspi IP]:8080 Bitwarden comes up. I cannot use the website on my local network because I need .https for bitwarden_rs to run in the browser. I am using duckdns. I followed all instructions in this tutorial and used your other tutorial for nginx
https://www.wundertech.net/nginx-proxy-manager-raspberry-pi-install-instructions/
I have Spectrum and I reserved an IP for my raspberry Pi and port forwarded ports 80 and 443. Canyouseeme says it can see these services. I do not know why bitwarden does not work locally but does work when I use for example a mobile hotspot to access my hosted site. When accessing the site from outside the network .https is enabled and the site works fine. The ssl cert is not working locally.
All docker containers nginx_app_1, Bitwarden, nginx_db_1, and nostalgic_blackwell are healthy and running. If i access the duckdns domain from my pc on the local network it goes to my router login page.
Are you using a local DNS server (or host record) by any chance on your local device? What about a firewall? It almost sounds like it’s rejecting the local IP address and only accepting external IP addresses.
Hi, I’ve just finished to deploy bitwarden on my Pi but I’ve a problem. From the local network I can access, but from outside my network it doesn’t work and I recive “Connection Refused” error. I’ve tried also with the pubblic IP and I’ve checked the 80 and 443 but it doesn’t change. Thanks for your time
Did you configure Nginx Proxy Manager to connect to it? Also, are you using a firewall?
Now that I’m not at home I can use vaultwarden without any problem, it rejects only local ip. If I add a record in Nginx with the local address of the pi I don’t have any problem.
Are you using a firewall or any access controls? If so, did you allow traffic from the local network?
I don’t think, I’ve never activate any access controls.
The “connection refused” error message is normally from a firewall not allowing access, or from the router port not properly being opened. Can you confirm that ports 80/443 are properly opened and accessible from the outside?
Yes, the ports are opened and accessible from outside
That would signal to me that something is messed up with the Proxy Host. If the ports are opened and accessible and you’re using a valid domain name (and that domain name is properly pointed to your network), it should process through.
I’ve checked with my mobile connection and I’ve Intrepid’s same problem. It refuse all local IP connection.
Hi thanks for this tutorial. Is having a paid domain a must?. I am always getting internal error when trying to get letsencrypt certificate. Also i am using a gmail address. is there any problem with that? Your assistance would be much appreciated. Thanks just want to have bitwarden/vaultwarden working.
No problems with the gmail address. You don’t have to use a paid domain, but you do have to use some sort of DDNS hostname (you can check out DuckDNS for a free one if you’d like). As for the internal error, are you able to confirm the ports are properly opened and accessible?
Much appreciate you concise and helpful instructions on the Bitwarden topic. I would not have gotten it working on Synology otherwise.
Thanks so much!
Thanks to you I got Vaultwarden up running first on my Synology and now on my new PI. I want to export my database from Synology to my pi. But I can’t seem to find the folder and database on raspberry os gui. Any tips on how to find it ?
Glad that it helped! As long as you mounted the volume, you should be able to navigate to that path (it’ll be a folder on your NAS) and then copy those files to a folder on your Pi. At that point, you can mount that folder to the “/data” location and it should function as expected.